How to do nail extensions at home. gel nail extension
There is hardly a girl who would not want to have well-groomed and beautiful nails. If not their own, then at least extensions. Now this is very easy to do, just go to the nearest nail salon, and during the day you will grow nails for every taste.
There is nothing special about this, and almost every girl at least once in her life has grown her nails in the salon. However, now it is possible to become the owner of stylish extended nails without salons. Therefore, many are interested in how to grow nails at home.
It is important to understand that for certain health problems, this procedure is contraindicated. These can be problems with the endocrine system, cardiovascular diseases, hormonal and circulatory disorders, Graves' disease, viral diseases such as herpes, chemotherapy.
The use of antibiotics is also a contraindication, as false nails simply will not hold.
A separate issue with pregnant women. There are no restrictions here, but some requirements must be met. Namely:
- extension should take place in a well-ventilated room;
- only safe materials should be used;
- after completing the procedure, you need to drink mineral water, which will clear the airways of dust and possible allergens.
Not worth the procedure yet. at:
- injured nails, the presence of bruises under the nails;
- the presence of fungal and viral infections.
Before the procedure, it is worth getting to know with three rules to avoid possible mistakes.
- Before the procedure, the cuticle on the nail plate must be removed.
- It is desirable that the nails be cut short, but do not cut them at the root, there should be an extra 1-2 mm.
- On the day of the procedure, it is worth giving up baths, visiting the pool, baths or saunas.
In addition, remember that some products for the skin of the hands may not affect the new nails in the most favorable way, but rather, exfoliate them.
 If the nail began to exfoliate, do not pick it up. It won't lead to anything good. You need to make a correction.
After the procedure, it is necessary to regularly care for the skin around the new nails. Moisturize it in the morning and evening nourishing cream. Every 14-28 days it is necessary to carry out a correction. For the first extension, make the length of the nail short.
This remark is especially true for our women. False nails are not a corkscrew, a screwdriver or a knife. Their main purpose is beauty.
All routine household work, such as washing clothes and washing dishes, should be done with gloves. When using graters and other kitchen utensils, be careful not to break or cut the nail.
It must be remembered that exposure to open flame can cause the nails to burn. The area under the nails is not cleaned with sharp objects. In such cases, a soapy toothbrush is used.
Now let's start the procedure. We note right away that nail extension at home without gel and acrylic is unrealistic. These are the main materials used when working with nails.
 Their difference is small, lies in the time and process of solidification. Acrylic hardens with monomer and powder. The gel, consisting of the same components, has a liquid form, hardens with the help of ultraviolet rays.
For those who do such a procedure for the first time, it can be recommended to build up nails with gel for the first time, due to the greater ease of use.
Although experts prefer acrylic, only with it is it possible to achieve clear line and forms. With gel, unfortunately, this is unrealistic.
Minus acrylic - a specific smell, volatile and toxic, quickly spreads in any room. The gel, on the contrary, does not have a strong odor.
Nails are extended on forms and tips. Forms are used much less often. With tips, building up is faster, but grace cannot be achieved with them. The execution technology is completely dependent on the material.
What is necessary?
The first is an ultraviolet lamp. It is needed for any extension and preferably more powerful. You will also need a cuticle remover, nail files, molds, tips, glue, brushes, tweezers, disinfectants, dehydrator, primer, bonder (for gel), acrylic powder, building gel, monomer, finish, adhesive remover.
When everything is ready, choose the shape for the nails. There are two types of them: classic (oval, almond, square, soft square) and modernity (edge, stiletto, bridge, pipe).
This is the simplest type. With careful work, everything can turn out right away.
 The main thing to do is to disinfect the instruments. Next, we prepare the tips, lay them out and select them for each nail in size and shape. Then we give them a shape. For example, an oval. Next, prepare the surface of your nail. We push back the cuticle, remove the top shiny layer, trim the length. We do everything without haste.
We process the nails with cutasept, dry them with a dehydrator. Then the tips are glued on. Glue is applied in uniform doses. We apply tips to our nails, check their position, press and hold.
The next step is to apply the bonder and prime (with the gel version). Do not overdry the Bonder, otherwise a positive result will not work. Therefore, we dry only 2 minutes.
The main stage is working with acrylic on the prepared nail. Here it is necessary to accurately form the nail, it depends on it. further fate. Glue is applied evenly over the entire nail, from the center to the edges.
When using the gel, polymerization with ultraviolet light is necessary. This is done for each finger, then the sticky layer is removed, a finishing gel is applied to the nails. The last stage is drying under an ultraviolet lamp for 2 minutes. Now everything is ready.
Forms
The preparation process is almost the same as in tips, only now, instead of them, forms are being prepared, which are patterns, through which it is created ideal model nail.
The form is folded in half, placed under the nail and fixed with a sticky edge. material is also distributed. When using tweezers, the nail can be made more elegant and thinner. You just need to crush the frozen material on the sides.
How to care?
Care is very simple. It is necessary to regularly rub nourishing oil into the cuticle, and the nails themselves should be periodically lubricated with varnish. This is quite enough to have well-groomed hands and a fresh manicure.
Besides, follow the rules below:
- do not use acetone to remove varnish;
- forget about scissors, which only harm the nails;
- a sharp temperature drop is detrimental to false nails;
- when covering nails with varnish, only acrylic or gel products should be used;
- remember about regular correction, after all natural nail grows and it weakens the artificial;
- do not often paint your nails, let them breathe.
One of the modern ways to get a reliable manicure is gel nail extension on forms. By following the instructions step by step, you can carry out nail extension at home. The gel allows you to model the shape and length of nails, while maintaining the aesthetics of manicure for two to three weeks.
Mandatory set of tools:
Mandatory set of materials:
- Antiseptic agent for pre-treatment of the nail and adjacent skin.
- Cuticle softener.
- Composition for disinfection, degreasing, dehydration. You can use separate formulations, but it is better to purchase a specialized spray or 3 in 1 liquid preparation that performs all three functions.
- Primer (or other adhesive compound) - to provide adhesion nail plate with gel.
- Degreaser that removes the sticky layer.
- Base gel coat. The gel can be one-, two- or three-phase.
- Colored gel coats.
- Gel finish for a glossy finish.
Types of gel for nail extension
For successful nail extension, it is necessary to ensure a strong adhesion of the polymer to the nail plate, correct the shape of the nail and give it shine and smoothness. According to the technology of the process, gels are divided into one-, two- and three-phase - depending on the number of technological stages and compositions required for work.
Present on the market a large number of gels from different manufacturers.
Experienced craftsmen advise choosing products from the following brands:

There are other brands on the market as well.
What is the difference between single-phase and three-phase gel
The sequence of step-by-step actions for gel nail extension on forms differs depending on which technology is used: single-phase, two-phase or three-phase.
Differences:
- The gel composition used for single-phase extension, performs all the necessary functions: guarantees adhesion to the nail base, allows you to model the required shape of the nail, provides smoothness and shine of the coating. This technology is very convenient for beginners, because. the most easy to use: only one type of gel is required, which is applied in one step and fixed in one session of irradiation with an ultraviolet lamp.
- Two-Phase Technology requires the use of two types of gel. One of them provides connection and modeling, and the second is protective, ensuring the smoothness and strength of the nail. Accordingly, the application of two layers and two curing sessions under a UV lamp are required.
- Work on three-phase technology most time consuming. Three compositions are used: for adhesion, for modeling, for protection. Each layer is applied and irradiated with a lamp separately. This method requires the master to have experience and qualifications. Professionals prefer this technology because of the high quality of modeling.
Nail preparation
Before building a nail, it needs high-quality preliminary preparation:

Nail platinum is ready for extension.
How to fit the shape to the nail
A form is a template with markings made of metal, Teflon and other materials. Durable reusable molds require thorough disinfection after use, so are often used disposable forms from paper, thin plastic, foil. The form can be fixed on top or bottom of the nail.
Setting and fitting the shape is a very important stage, on which the quality of the extended nail depends.
When using solid forms, it is necessary to choose the size of the pattern so that it fits perfectly to the nail plate. The form is bent with a slight pressure and put on the nail through the provided hole. After the shape coincides with the “smile line”, it is securely fixed on the finger.
Disposable soft forms require additional adjustment. They make it possible to fit the stencil to the shape of a particular nail plate. This is especially convenient when processing nails of non-standard outlines. If the forms are too soft, then experienced craftsmen advise gluing two pieces together. 
The disposable template is removed from the substrate, the perforated oval is squeezed out and glued to the back of the mold, providing additional rigidity. The bottom edges are torn along the perforated line, the shape is slightly bent and put on the finger. For orientation on the form there is an axial line.
Before the final fixation on the finger, the form is given the desired slope - it must continue the line of the nail, without deviating up or down. If at the same time gaps are formed between the surface of the nail and the form, the cutout of the form is corrected with nail scissors. The shape match with the root arch must be perfect, otherwise the gel will leak into the resulting gaps.
After fitting, the “ears” are carefully glued together, fixing the shape on the nail. The lower edges of the form are glued to the finger. Fitting the shape is carried out individually for each nail.
Stages of nail extension with single-phase gel on forms
Single-phase gel due to its ease of use is optimal for those who are just learning the art of nail extension. Beginning masters should build up each finger separately.
After developing practical skills, it is important to follow the order of extension: first 4 nails (except thumb) of one hand, then 4 nails of the other, lastly the nails are processed on thumbs- otherwise the gel will drain from them due to the angle. 
Building step by step gel on the forms:
- Nail prep:
- antiseptic treatment;
- hygienic manicure;
- filing the edge of the nail and the nail surface;
- cleaning from nail dust;
- applying dehydrator and primer.
- Fitting and molding.
- Applying the first gel layer. The layer is made thin, distributing the gel with a brush over the entire area of \u200b\u200bthe nail. On the first third of the nail at the base - the cuticle zone - the gel is placed in a thin layer. On the stress zone (the rest of the nail area, the line connecting the nail and the form, a third of the form), the layer thickens a little, because. this is where the bulk of the load comes from. To the edge of the modeled nail, the layer becomes thinner again. The layer is polymerized - under a UV lamp for 2 minutes, under an LED lamp - 1 minute.
- Application of the second gel layer. A drop of gel is applied to the middle with a brush and gently distributed over the surface. Then you need to hold your fingers horizontally for half a minute so that the gel is evenly distributed over the surface of the first layer. The polymerization conditions are the same as for the first layer.
- Removing the sticky layer- produced with a lint-free napkin.
- Removing the stencil.
- Surface grinding and adjusting the edge of the created nail.
- If necessary - applying a decorative coating.
How to work with a three-phase gel - step by step instructions
Building step by step with a three-phase gel on the forms requires the master to have certain experience and qualifications.
Sequencing:

Extension lesson: jacket on forms - step by step with a photo
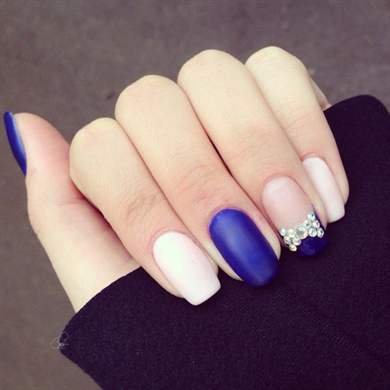
Classical French manicure(French) is a monochromatic discreet background (flesh or pinkish tint) and a clearly traced white “smile line” along the edge of the nail. The appearance of extended nails led to a new round of popularity of the jacket, which looks especially impressive on the nails of the correct geometric shape.
When creating a jacket using forms, it is laid out with a gel of the selected color.
 Extension step by step gel on the forms is performed for any shape of the nail.
 Stages of French execution on forms:
- Pre-preparation of nails.
- Fitting and molding. The edge of the form is placed under the nail, the other edge is fixed on the finger.
- Applying a layer of base gel. To make it matte, you can blot it with a napkin.
- The gel of the selected shade (pinkish, flesh-colored) forms a nail - to the border of the future "smile". The “smile line” is laid out very carefully. The surface must be perfectly flat.
- gel white color with the help of a brush, a contour-smile is formed, the gel is superimposed close to the main color. The layer is polymerized - under a UV lamp - 2 minutes, under a LED - 1 minute.
- Removing the form.
- Grinding the surface and adjusting the edge of the created nail, removing sawn particles.
- Application of a transparent layer for protection and shine.
You can create a French manicure without using white gel. Then a “smile” is drawn on the formed nail with white acrylic paint, and the nail is covered with a protective layer of a transparent gel, which polymerizes according to the technology.
gel-jelly extension
Gel jelly is one of the latest developments in the field of nail design. The dense jelly-like consistency makes it a very convenient material to work with. Working with gel-jelly takes noticeably less time than with conventional gels. It is easy to form, it is convenient for them to correct mistakes made during the build-up, and it is convenient for repairing nails.
Setting time - only 5 seconds, polymerization takes 2 minutes. Manufacturers offer natural shades of gel-jelly: flesh, beige, pink.
How to work with top forms
When using the upper forms, a template with an already formed nail is superimposed on the nail plate. 
Step-by-step sequence of gel extensions on the upper forms:
- Preliminary preparation of nails is carried out.
- A nail is modeled on the inside of the stencil from a sculptural gel and the layer is partially polymerized in a UV lamp (20 sec) or LED (10 sec).
- A layer of base gel is applied to the nail plate, providing adhesion to the artificial nail.
- The stencil form is pressed tightly in the desired position (without distortions) to the nail plate, fixed for 15-20 seconds.
- With the help of a pusher, excess gel mass is removed.
- The nail is placed under the lamp for final polymerization.
- The shape is carefully removed, the edge is corrected with a nail file. The surface of the nail does not need correction, because. With this method, it turns out perfectly smooth.
- A protective layer is applied.
This method is quite laborious, but it is indispensable for repairing broken nails and correcting cracks and other serious defects.
Modern techniques and materials make it possible to create durable and beautiful manicure. One of these technologies is gel nail extension on forms. Subject to step by step instructions you can achieve an aesthetic and wearable manicure.
Video: step-by-step gel extension on forms
How gel extension is performed on forms, see the video clip:
How to build gel nails, find out in the video clip:
In recent decades, nail extensions have become a very popular procedure. Of course, in such a delicate matter it is better to trust a specialist, but often, there are still doubts about the sterility of the tools used by the master. Therefore, the topic of nail extension at home is becoming more and more relevant. In this article, we will understand in detail how to perform the procedure correctly.
Contraindications to consider when performing an extension procedure
Modern girls and women strive to look perfect. But sometimes even a perfectly matched dress and new color hair is not able to give the fair sex full confidence in their appearance.
It often happens that the unrestrained rhythm of life is simply unsettling, and you do not have time to put your nails in order. In addition, many girls suffer from brittleness of the nail plate, and therefore cannot grow the desired length of nails. In such situations, the fair sex decides on a nail extension procedure.
However, before you begin the extension process, you should carefully read contraindications:
- viral diseases such as herpes
- disruption of the hormonal system
- undergoing chemotherapy
- violation of the circulatory process
- allergic reactions to individual components that you intend to use during the extension procedure
- diabetes
- severe thyroid disorders
- diseases of the cardiovascular system
Moreover, if you are in this moment take antibacterial substances, then you are also recommended to temporarily abandon the extension procedure. Artificial nails simply can not hold well.

During pregnancy, you can also build up nails, because this excellent condition is not a contraindication.
At the same time, during the procedure itself, it is important to observe the following rules:
- In the process of building, use only new and high-quality tools;
- During the procedure, ventilate the room well;
- As a result of the extension, it is worth rinsing the nose mineral water. This will remove substances that can be inhaled during work, which in turn can cause an allergic reaction.
Among other things, you can harm your own nail surface in such cases:
- you hurt your nail, and therefore there is a bruise under the nail
- in case the nails are damaged
- if you have a virus or fungal infection

If you have not found contraindications in yourself, then you can proceed with the extension procedure. True, before this, you should familiarize yourself with the basic rules, which should also not be violated in the process:
- refrain from taking a bath, going to the bathhouse and swimming pool directly on the day of building
- pre-do a hygienic manicure and remove the cuticle
- do not remove the nail under the root (the nail plate should protrude at least a few millimeters)
Step-by-step instructions for building nails yourself
To carry out the extension procedure, you should stock up on a set of tools and solutions that will be needed in the process.
The most important is the presence lamps with ultraviolet light. It is useful for any method of building.
If you have decided to make an acrylic build-up, then the usual, not the most powerful lamp will suit you. In case you decide to make an extension using a colored gel, then you will already need a 37 watt lamp.
In addition, for the procedure you will also need the following tools:
- nail files: for gel - with a grit density of 100 grit, and for acrylic - 80 grit;
- in many manicure sets there is a spatula with which you will remove excess cuticle;
- tips;
- glue;
- flat brush (if using gel) and drop-shaped (for acrylic). Moreover, the first must be used synthetic, and the second only natural;
- if you will be using molds you will also need tweezers
You can purchase the declared tools and substances in stores specializing in the sale of manicure and hairdressing products. As a rule, the price in online stores is lower than in regular points of sale.

In addition, the market offers specialized kits for the extension procedure at home. The sales assistant will help you in the selection process.
After you have purchased all the necessary accessories, proceed to the selection of the desired shape of the nails. You can choose classic or more modern and sophisticated options.
The former include oval, square, soft square or almond-shaped nails. to more unusual and original versions include: bridges, stilettos, edges and pipes. Next, we will consider options for building using various materials.
Extension of artificial nails with gel at home
One of the most popular methods of nail extension is gel extension. This is a more complex procedure compared to acrylic extensions, however, this type of extension is not particularly difficult.
For it you will need the following tools:
- Disinfectants, this can be "Kutasept" for treating the surface of the hands, as well as "Bacilol" for treating tools
- Solution for degreasing and cleansing the nail - dehydrator
- Material for fixing artificial materials with nail area - primer
- Bonder, also used to fasten the nail plate with synthetic material, the first layer of the gel
- Modeling gel
- Tack remover and topcoat

To begin with, you should do a regular hygienic manicure and leave a few millimeters of regrown nails, as well as remove the cuticle. After that, use the following algorithm of actions:
- Sand the nail. Then you need to put on the finger form for extension, linking the edges of the form under the nail itself.
- Next, apply the gel base first on the natural nail, and then extend the gel area in the form of the length you need. Dry the nail in an ultraviolet lamp.
- After drying, apply the next layer of gel. At the same time, leave an area of approximately 2 mm from the cuticle untouched. Dry your nails again under the lamp.
- When the gel has completely set, carefully, without damaging the gel part, remove the molds and trim the resulting nails. Sand your extended nails.

At the end, cover the artificial nails with colored varnish and decorate to your taste.
Artificial nails extension with acrylic at home
For this method, you will need the following materials:
- Disinfectant materials
- Dehydrator
- primer
- Acrylic Powder
- Monomer
- Tack remover and top coat
You can build artificial nails with acrylic using both tips and forms.
Acrylic extension technique based on tips
- disinfect the surface of the hands;
- remove the cuticle;
- treat natural nails using an antiseptic;
- apply primer to the top of the nail;
- choose the necessary tips based on the size of individual nails, three types of tips are usually used: for the little finger, thumb and other remaining nails;
- apply acrylic to the mold (the amount of acrylic material depends on the desired length of the nails), wait until the acrylic is completely dry;
- remove the form;
- give the necessary shape to the edge of the nail plate;
- at the end, you can cover the finished artificial nails with ordinary varnish.

This method of building artificial nails has several important advantages:
- if you are good at this technique, you can easily carry out the procedure at home
- ideal for ladies who have increased sensitivity in the cuticle area
- you will not spend much time on this procedure, it is carried out much faster than the classic extension
Acrylic based extension method on bottom mold
- First you need to treat your hands using a disinfectant. After that, remove the upper part of the nail plate with a coarse-grained file. Remove any remaining dust from the surface of the nail.
- Take a fine-grained nail file and push back the cuticle area. Using a brush, apply the primer to the nail area, while avoiding contact with the skin area around the nail.
- Attach the form to the surface of the finger so that it fits evenly on the nail. The form should be located at an angle of the nail plate itself. Otherwise, your nail will eventually crack. Firmly press the shape to the plane of the nail plate. Then connect the ends of the forms. Make sure that the tips of the forms are not closed. This is needed for beautiful shape artificial nail.
- Apply primer again. Place a drop of acrylic inside the mold and spread it evenly over the plane of the nail. Wet the brush with liquid liquid and make a line in the shape of a smile.
- Place a pink drop of acrylic material on the natural part of the nail. Apply in such a way that both the white and pink base intersect. Spread the next drop of acrylic on the cuticle area. Both the side of the nail and its overall area should be uniform (the nail area should be somewhat moist). Wait until the acrylic base is dry.

- When the acrylic thinner is dry, remove the mold and smooth the surface of the nail. With a coarse-grained file, sharpen the side part and smooth the ends of the nails, holding the file at an angle. Sand the nail surface (with a fine-grained nail file from top to bottom, moving from the cuticle to the side of the nail).
- Apply oil to the base of the cuticle, spread it over the surface of the nail. Now sand the surface of the nail so that the nail reflects the light. Finally, apply a colorless varnish.
When choosing an extension technique, pay attention to such properties of acrylic as rather strong bad smell. It can cause allergies. If you, your relatives or neighbors have allergic reactions to acrylic fumes, then opt for gel extensions.
Care of artificial nails
After you have grown your nails, it is important to remember that now your nails need special care.
- The first thing to note to all owners of artificial nails: now that the nails are extended, refuse to steam in hot water. If you want to remove the cuticle, then it is better to use a special liquid that softens it and facilitates removal.
- In some women, the cuticle grows quite quickly, creams that slow down growth will help to cope with this problem. In addition, use oils with vitamin complexes, special creams, as well as gels to nourish the cuticle. In addition, these products help your nails grow strong and strong.
- To remove varnish from the surface of the nail, use products that do not contain acetone. In addition, it is necessary to paint nails with varnishes without acetone, and before applying colored varnish, cover the plate with a transparent base.

- Also, artificial nails need timely correction. Otherwise, you risk damaging both the extended and natural nail. The average frequency for correction is a period of 3 or 4 weeks. If the nail is damaged, it must be removed with a special solution that stays on the nails for an hour. In such a case, it is better to contact the master.
- You can grow nails within two years. After this period, you need to take a break of three months. During this period, the nail will be completely renewed, after which you can re-build. During such a "time out" treatment procedures for the health of the nails should be carried out using various oils.
Thus, if you wish, you can learn how to do nail extensions at home by following the instructions above. At the same time, it is important to pay attention to contraindications, as well as recommendations that should be followed before the crime before the procedure, as well as at its end. If necessary, always contact a professional, he will help you correct the nails, as well as give helpful tips for the care of artificial nails.
Video: Nail extension at home
Unfortunately, not all women have endowed nature with strong and durable nails. This issue is easily solved, one has only to visit a beauty salon and use the nail extension service. This process can also be done by hand. We will consider two types of gel extensions: on tips and forms. We will also briefly talk about the types of extensions in the French style with visual photos. And, if you have no desire to visit the salons, then our article will tell you about gel nail extension step by step.
What to choose: forms or tips?
Nail extension can be carried out using forms or tips. When there is a nail base on the finger, tips must be used. In order not to be mistaken right choice, you need to take into account the width of the nail surface, what kind of bend you want to get at the end of the work and do not forget about the height of the nail hole. When we talk about using gel extension molds, we mean recreating from scratch the length, shape that you or your client prefers, not forgetting to take into account the structure of the nails and the size of the fingertips. When the type of work that suits your client has been chosen, you need to know that there are five types of nail structure:
- slightly convex;
- snub;
- flat;
- cat's nail;
- wavy.
The most common are cat's nail and snub-nosed nail growth.
"Cat's Nail"
Cat nail extension should not be carried out on tips, since with the growth of the nail, its free edge will bend down. This will create a space between the tip and your nail, making it possible for dust and water to get in. In this case, you need to use the form for nail extension.

"Snub" nails
If you work with snub-nosed nails and decide to build on the forms, do not be surprised that in the future the nails will lose their correct structure. And in this case it is better to use tips.
The final result of gel extension also depends on the chosen type, one of which is used most often is a three-phase gel extension:
- Base gel
- Construction gel
- Finishing - gel polish

Nail extension at home
In order for your work at home to be harmonious and complete, you need to stock up on these tools, they can be purchased at ruNail:
- UV lamp;
- antiseptic;
- modeling agent - adhesive;
- the basis;
- degreaser - dehydrator;
- tips;
- forms;
- sculptor;
- clinser;
- flat brush;
- file 220/280 grit;
- file 240 grit;
- finishing gel;
- glue for tips;
- lint-free wipes;
- orange sticks;
- dust brush
- cuticle oil.

Step by step instructions for beginners
Gel nail extension on tips:
- We prepare the nail surface with an orange stick: peel off the cuticle, create the desired shape for the freed edge, and polish the nail area with a file rectangular shape 220/280 grit, it prepares nails for polishing, smoothes and eliminates scratches.
- Apply a degreaser
- Apply a thin layer of glue for tips on the freed edge of the nail and the contact points of the tips. It is necessary to attach the tips to the nail at an angle of 45 degrees, and let it go so that the line of the foot of the tip and the edge of the nail are aligned.
- Further, without disconnecting, gently lower the tips on the nail and spread the glue in the same amount over the entire area with smearing movements.
- Again we put the tips at an angle of 45 degrees, bring them to the stop line and after the heard crackle, gently lower the tips onto the nail. It is necessary to hold for about 10 seconds.
- We shape the tips at the request of the client, taking into account the structure of the nail.
- We get rid of dust particles and degrease.
- We cover with a modeling agent on the area of the nail.
- With a slightly damp brush, apply the base gel along the entire length of the future nail and put your finger under the lamp for 1 minute.
- Using a flat brush, apply the sculptor, taking into account the structure of the nail. Leave under the lamp for three minutes.
- Remove the sticky layer with a lint-free cloth.
- With the help of a buff, we pale the area of \u200b\u200bthe nail.
- Degrease and cover with a finishing gel. Again, put your fingers under the lamp for three minutes.

Below we offer you video tutorials on building:
How to build gel nails on forms
- We treat our hands with an antiseptic.
- We clean the surface of the nail with a 220 grit file.
- Cover with degreaser.
- Next, cover with a base and put your hands under the lamp for two minutes.
- We clean the top layer.
- Fixing the form.
- Using a brush, apply the gel, while turning your finger down with your nail so that the gel is evenly distributed.
- Again, put your hands under the lamp for three minutes.
- Cover with gel again, form an “S” bend.
- After the lamp, clean the sticky layer.
- Getting rid of the form.
- Level the surface with a buff.
- We clean the dust with a brush and cover with a finishing gel.
- Again, put your hands in the lamp to dry for two minutes. Degrease the surface of the nails and cover the oil on the cuticles.
Below we propose to consider step by step extension in photo and video:


Ageless jacket
Under each type of jacket, you can see the finished work in pictures, as well as a video on design:
- french millennium

If it is not possible to visit the master, you can master nail extension yourself. The procedure is simple, and with regular training, the result will be no worse than in the salon.
Types of building: gel and acrylic
- The gel is a photopolymer with a special composition that hardens only under the action of ultraviolet rays.
- Acrylic is a connection acrylic powder and oxygen, as a result of which a thick viscous mass is formed, from which nails can be laid out different lengths and forms. Acrylic hardens due to acid evaporation. This process is accompanied by a rather unpleasant odor.
The choice of method depends on the structure of the nail plate, which depends on the type of hand skin. The gel is recommended for use by women whose nail plates have a dry or normal structure. Acrylic is a more versatile substance suitable for all women.
However, acrylic has a minus - due to the acid contained in its composition, it dries out the structure of the plate. The gel, on the contrary, has protective, strengthening properties.
Gel extensions are inferior in durability to acrylic ones. Under mechanical action, the gel breaks like glass. Modern cosmetology does not stand still. Methods have been devised to help strengthen the gel coat. But acrylic still remain more durable. If you break them, then only with your own nails.
By appearance acrylic is easy to distinguish from the gel counterpart in thickness. Due to the fact that the gel extension is carried out using a special C-curve arch technology, such a nail looks a little thicker. A procedure that uses acrylic allows a thinner layer to be applied. Due to this, acrylic looks more natural.
Another advantage of the acrylic method is the speed of the process. This material does not require prolonged drying under an ultraviolet lamp. Even considering the design, acrylic extensions are much faster.
The coating from the gel can be removed with any nail polish remover. Nail plates extended with acrylic require special care. It is forbidden to use cosmetical tools containing acetone. It will destroy the structure.
An important difference between acrylic and gel extensions is the degree of their harmlessness. Gel is much easier to get rid of. Such nails are cut with special tools. Acrylic will have to be removed with a strong liquid that will ruin the structure of your nails. After that, a rather long recovery process will be required.
We select the form
There are many forms that can be achieved through extensions. You can choose the length and shape of the free edge. The square shape is created thanks to visual parallels on the sides and a smooth tip. The master should pay special attention to the sides. There shouldn't be any voids. In addition to square, it is possible to order round, sharp, dagger-shaped or stilettos. It all depends on your desire and imagination.
Varieties of gel extension systems
Let's take a closer look at how to build gel nails. This variety is more popular among women than the acrylic method. There are three-phase, single-phase and two-phase systems of gel building.
A three-phase system consists of three stages. The first is the base, which is created from the base gel. It has a very liquid consistency and spreads easily. The base gel of some manufacturers has a pungent odor. It serves as a basis, allows you to firmly connect to the nail plate. The second phase is called modeling. It consists in applying a thick sticky gel, which is connected to the base. The final stage is the application of a fixing layer. Gel for connecting the first and second phases of a liquid consistency without a strong odor.
Single phase extension system. This system is more economical than the first. For it, you need to have only one active component. Such a procedure consists in applying universal gel containing substances that replace the three phase buildup. Due to this, you will have to spend much less money on the procedure, as well as time.
Features of gel extension
Failure to follow the rules of procedure can lead to disastrous results. The extension can quickly peel off. Or the protruding part of the nail will break. It often happens that during the procedure air gets under the nail plate, which completely spoils the result.
The surface of your nail should be rough and free of grease. On a smooth surface, an artificial nail will not last long.
Before proceeding with the procedure, a thorough manicure is required. Cuticles, as well as pterygium, must be completely disposed of, otherwise the overgrown skin over the nail plate will interfere with the smooth application of the gel. Pterygium is a thin layer of cuticle attached to the nail plate. It is practically invisible to the naked eye. However, it makes it difficult to do a neat manicure.
The overall physical condition of the woman affects the effectiveness and quality of the extension. Detachment can occur during pregnancy or hormonal disorders, while taking antibiotics or other medicines. Premature exfoliation can occur if the body rejects a certain type of gel. In this case, it is recommended to use another material.
materials
If you decide to have the procedure, you will need the following materials:
- Flat brush.
- A brush with a sharp end.
- Forms. They are of two types - templates and tips. Templates are single or reusable. Tips are similar in appearance and function to templates. But they are made of plastic, glued to the nail plate with glue.
- Guillotine - scissors for correcting tips.
- Cleaning brush. You can purchase special equipment or use an ordinary male shaving brush.
- Cleaning wipes for removing dispersion film and grease.
- Degreasing fluid.
- Several abrasive files of different sizes.
- Base, modeling, fixing gels (for a three-phase system of gel building).
- UV lamp.
- Single phase gel (for single phase extension system).
Instruments must be disinfected regularly.
Design
Along with the length and shape, it is possible to choose the most attractive design. Stylish, elegant looks "French" using combinations of different colors. An interesting option design is an aquarium. Thanks to this effect, a three-dimensional drawing is obtained, consisting of various details: dried flowers, pieces of foil or fabric, sparkles, feathers, shells, sand, and even mini-photos. It seems that the drawing is as if under glass. Due to this, such a design is called an aquarium. In the course of a three-phase build-up bulk material laid out in front of the modeling layer.
You can choose a simple design option - independently paint the finished nails with varnish of any color. There are also special acrylic paints with which you can paint anything you want. It is even easier to use ready-made drawings on your own - templates that can be purchased at the store. beautiful decoration all sorts of glitters and glitters will serve. But the picture should not be too bright and clumsy. Try not to overdo it with color, sparkles and volume.
How to remove extended nails
Sooner or later, a situation will arise when you have to get rid of extended nails. You can do it yourself. Acrylic extension is easily removed with a special acid that breaks down the artificial nail plate. It will be much more difficult to remove nails extended with gel. To do this, you need to get nail files of different abrasiveness.
Using a guillotine or tip cutter, carefully cut off the free edge. Make sure that the fragments do not get into the eye. It is safer to carry out this procedure with glasses. After the edge is cut, we begin to remove the surface itself, starting with the thickest layer. This is done using a nail file with an abrasiveness of 100. Having reached a thin layer, we change the nail file to a thinner one, and process everything else. Masters do not recommend removing the gel completely, but leaving a small layer that will serve as a kind of protection for your nails. If all layers are removed completely, reinforce them with a special biogel.
Fake nails
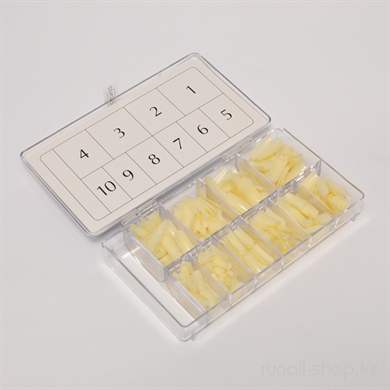
The fastest, most economical option is to buy art tips complete with special glue, read the instructions attached to them and stick them on. But such a manicure does not look very natural if you stick the tips inaccurately. Their shape cannot be changed, and the drawing is not distinguished by fantasy and individuality. The kit includes ten tips, and the glue dries almost instantly. Without a certain skill, it is difficult to glue such tips evenly. The glue deforms the horn plate, pulling it up to the rigid tips. After such experiments, your nails may need to be treated.
First, adjust the length of the tips. This must be done before you stick them. The longer they are, the shorter they will last. Next, prep your nails. Remove old varnish, cuticles, hangnails. File it. Wash your hands, dry them dry.
Pick up false tips for each finger, arrange them in order so as not to get confused. Drop a little glue into the center of the false nail, spread it with the spout of the bottle over the entire surface. Attach it to the natural, press for ten seconds. Now remove the excess glue that came out from under the plate, cover the tips with your favorite varnish.
To remove false nails, put some acetone nail polish remover under the plate, gently lift it with a manicure stick.
Acrylic building on forms
Wash and sanitize your hands before touching up with acrylic. Make a manicure, file the length. With a grinder, go over all the nails, remove dust from the nail plate, as well as around it. Apply a special cleanser and let it dry.
Set the shape, glue its ends to create a future nail. Then pour the liquid into the container, dip the brush into the monomer. Wring the brush well from the liquid so that it remains almost dry. Then pick up a ball with camouflage powder with a brush. It should look like a hedgehog. If the balloon is wet, you won't be able to work with it. Acrylic will just spread. Wait until the ball is saturated with liquid, apply it to the form. Roll it out according to the shape and zone of the cuticle, stepping back from the cuticle itself by one millimeter. Create the form you need.
Keep building up until you get the desired result. You can make yourself normal solid color design, or French manicure with white and pink powder. And you can also make fantasy drawings using different colors of powder, acrylic paints, various accessories.
Remove the mold with tweezers. File the free edge and the entire surface, sand, polish it.
Correction
File the nail, paying attention to the border between the artificial and natural surface. Then coat the work surface with degreaser and hitch fluid. Avoid getting liquids on your cuticles. Start the coating by laying acrylic on the surface of the nail, model an exact copy of the natural one. Wait three to four minutes for the material to dry. The next step is washing down the surfaces. Polish the surface until it is smooth and shiny. Repeat the procedure with the rest of the nails.
Gel extension on forms
Do a manicure, remove the length of the nails, but not completely. For the form, there should be a free edge of two or three millimeters, grind their surface. Put on the extension form, interlocking its ends under the nail.
Apply one layer of gel on half of your nail plate, extend it on the form to the desired length. Dry under a lamp to cure for about one minute. Apply a second gel coat, one to two millimeters short of the cuticle. Dry again under the lamp. Carefully remove the stencil for extension, give the desired shape.
Pick up a little more gel on the brush. Apply it to the middle of the nail and distribute it in both directions so that a tubercle forms in the middle. Turn your palm up for a few seconds, then dry again in the lamp in the normal position. Then use a file to give the final shape. Apply the last layer of gel - the thinnest. And dry under the lamp. Do not wet your hands after the procedure for thirty minutes.
Correction
The correction procedure is carried out in several stages. First, the cuticle is gently pushed back with a spatula. Then, with a rough file, about half of the old gel is removed. Then we file the nail that has grown at the cuticle for better adhesion with the new gel. The fingers of one hand are treated in turn with a disinfectant liquid, a primer, then a bonder, and placed under an ultraviolet lamp.
The next step is the application of the gel. It is better to do two or three layers, drying each under the lamp for a couple of minutes. We make the first layer the thinnest, the second and third - thicker. After obtaining the required thickness, the remaining sticky layer is removed with acetone. The final touch is the correction of the shape with a nail file (first coarse, then fine).
The correction procedure is almost the same as building. The only difference between the first one is that the nail needs to be cut very short, completely filed, treated with a primer, and the necessary tips glued. To cut the tips to the desired length, stock up on special wire cutters. The shape is given with a nail file. This technology gives a great look, prevents flaking and brittleness.
Contraindications
Before the procedure, make sure that there are no contraindications for you. Consult with your physician. Women suffering from regular bowel disorders or diabetes from the desired artificial nails, most likely, will have to be abandoned. The procedure is also not recommended during the period of antibiotic treatment.
Try not to wear artificial nails all the time. At least once every two or three months for a week, let your nails “free” so that they breathe and recover.
If you fail to grow properly, it can cause them to grow in waves, or worse, curl inward or outward.
manicure care
It is not enough just to learn how to build up. It is also very important to know how to properly care for them. Pamper your hands from time to time. Rub nail oils or regular olive and apricot oils into them. The oil must be warm. You need to rub it with light massage movements. After finishing the procedure, take a suede polisher and polish your nails.
Do soda baths regularly to strengthen the nail plates. To do this, dilute a tablespoon of soda in a glass of warm water. Dip your fingertips into the prepared solution, hold for a few minutes. To achieve a good result, carry out this procedure every day for a week and a half. Then take a short break and repeat the course again.
Make sure that the build-up and correction are carried out carefully. Never allow air to enter under the gel layer. Such an environment is a breeding ground for pathogenic bacteria.
Do disinfection, filing and degreasing the surface. If you see a greenish area under the gel, immediately remove the extended nail and disinfect it.
It is not the procedure itself that brings harm, but getting rid of the coating. Use only cosmetic products for this, follow the instructions exactly.
After getting rid of the extended nail, regularly use products that promote the regeneration of the nail plate. No matter how carefully you build up, your nails will suffer anyway.
Talk 0


