How to crochet a neckline with an elastic band. Beautiful crochet neckline: diagrams and practical recommendations
Now there are a lot of ways to tie the neck and armholes with knitting needles on the net, we have collected in this section the most unusual and interesting ones with which your models of pullovers and blouses will be stylish, elegant and fashionable.
The proposed methods of tying the armholes and necks are suitable for summer blouses connected with openwork patterns, or those where a delicate and delicate knitting is needed.

Rolling the neck
The roller will always turn wrong side up, so you need to make sure that the wrong side matches the design of your project.
Always knit the roller on needles 0.75-1 mm thinner than the main fabric. Front surface does not have such elasticity and ductility as an elastic band, but it is necessary to assemble your product and support it around the neck, which means that tighter knitting with thinner knitting needles will help here.
Closing the loops in the usual way, check if your head fits. But it is also not necessary to close the loops too stretched, because the tighter closed loops help the roller wrap beautifully inside.
To make the roller look like a roller, it is enough to knit only 3-7 rows.
1. Bray model . The first row of the roller is connected with purl loops. Further - in the usual way - facial.


2. Model Robin . Enough rows are knitted so that the roller wraps just up to the main canvas.


3. Wheat model . The roller here is crocheted with a thread of a different color, which does not allow the roller to wrap much. Also the roller is used for the pocket, edges and cuffs.


4. Hybrid model . Only 3 rows of roller create a thin line of a finished look and repeat the fragile lines of pentagons.


5. Model Sundial . Here the roller is connected on the contrary, not with the front, but with the wrong side and is bent to the wrong side.


6. Model Bewitched . Here, not only the neck is tied with a roller, but also the straps of the fastener. The roller here also bends to the wrong side.


Processing of armholes using the I-cord method “Lace”
 The armholes are tied manually, using the I-cord method, see the master class and description at the link. It is performed as follows: a set of loops from the front side along the edge of the entire armhole, turn the product to the wrong side.
1 row is knitted from the inside (it forms the edge with the simultaneous closing of the loops): knit 2, remove 2 loops separately as facial ones, knit these 2 loops together behind the back wall, remove all 3 resulting loops from the right knitting needle back to the left. repeat first until the last 3 loops remain, then knit 1, knit 2 together, thread through the first. tighten the thread. at first it is not clear what is happening, but after 10-12 loops everything becomes clear!
 The result - it looks like a lace of three loops is sewn with a piping, but in fact nothing is sewn on, and the edge is neat and tight. I noticed that foreign colleagues never crochet the edges, but use this method. This method is suitable for armholes, necklines and even front trims.
 Loop fasteners are knitted together with the placket. First plank according to the indicated method, then (when you need to make a loop) knit 3 loops in a circle: i.e. Do not knit the 3rd loop together with the next loop on the jacket, but knit separately, then transfer 3 loops to the left knitting needle and knit them again, etc. until the desired loop length is reached. Then knit the bar again.
Processing the cuts of the neck
Consider the method on the example of the neck and armholes of a sleeveless jacket.

1) When knitting the main fabric, decreases along the armholes and neckline should be done at a distance of 1-2 loops from the edge. (Here at the neckline at a distance of 1 loop, along the armhole - 3 loops). For example, a decrease from the right edge of the canvas will look like this: 1 front, 2 together front, then according to the figure. Decrease on the left: knit to the last 3 loops, knit 2 together with a slope to the left (most often this decrease is called a simple broach: remove the first loop as in knitting, knit the next knit and stretch it through the removed loop), 1 front. This is for classic knitting. Those who knit in the grandmother's way will turn the loops so that on the right it turns out 2 along with a tilt to the right, and on the left - 2 along with a tilt to the left.
With this method of reduction, the edge is already smooth and neat, which facilitates its further processing.

2) You need to learn how to beautifully raise the loops along the edges. If the cut is vertical, then 3 loops are raised by 4 rows (but this number may differ depending on the density of knitting). If the cut is slanted (for example, like the neck in this sleeveless jacket), then you need to lift each loop. The loops are pulled out between the broaches formed by the edge and first loops.
3) Here are the stitches on the needle. The first row (front) is knitted with purl loops to imitate a knitting pattern. The second row (purl) - also purl loops. Then a 2x2 rubber band. Upon reaching a length twice as long as necessary, all loops are closed. The bar is turned to the wrong side and sewn along the loops to the typesetting row (or to the edge loops of the cut being processed).
In this sleeveless jacket, in the armhole strapping under the armpit, I made reductions with a corner (as well as on the neckline) so that the strapping does not fold and does not gather in a lump.
Master class on how to close a narrow neck

From the wrong side of the neck I am gathering loops, view from the inside - photo No. 1,


I knit the required number of rows, usually depending on the density of knitting, more often 8-12 rows - photo No. 3.

 I close the loops in the most usual way, leaving, without breaking, the thread is twice as long as the length of the neck. This is because further work will be carried out on the front side and if the thread runs out, it will be very difficult to extend it imperceptibly.
 I hook the loop of the set with a needle - photo No. 4 and then I fake the pigtail formed when the loops are closed, for both slices, I stretch the thread - photo No. 5.
 Be sure not to skip loops, so the number of cast-on loops and closing loops is equal.
Tying the neck with knitting needles by belochka
I will show one of the strapping options that I use.
On the edge of the cut to be processed, type loops on the knitting needle with a thread of the color of the strapping:
For horizontal straight loops, we pull the loops from each loop of the last row, for vertical straight lines and bevels - between the broaches formed by the edge and first loops, pulling the loops in the ratio of 2 loops for 3 rows or 3 loops for 4 rows, depending on the density.
When knitting in a circle, we knit the first row with purl loops (for turning rows - the purl row with facial loops) to form a scar:
For training, it is better to use a contrasting yarn for the placket in order to clearly see the loops of the typesetting row on the wrong side. They are slightly "submerged" in the canvas and are hardly distinguishable. But it is necessary to cling to them, not missing, because. they pull up the loops from the front side, and the bar ends up looking like it was pinned.
TO rasiv way to process the neck
Raise the loops on circular needles, knit a purl row, then two rows of garter stitch and close with purl loops.


Crochet neckline from Svet@u

1-2 rows: single crochet;
3rd row: alternate a double crochet and one air loop;
4 row: single crochet;
5 row: crayfish step
Most often I knit 1 row of Art. without n. and "crawl step".

In a pink blouse after a row of art. without n. knitted, alternating 3 tbsp. from n. (with a common top) and 3 ch. Last row: 2 tbsp. without n. alternate with pico.
If the binding tightens the neck, take a larger hook
We tie the neck in a circle with a crochet "pigtail".
This will be the basis for a set of loops both from the front and from the inside.
With one pair of knitting needles we push the loops from the front side, with the second pair from the wrong side.
We knit two rows, making the so-called "pocket".
Third row - we connect the loops from the front and the wrong side together. And then we knit an elastic band of the required height.
We close the elastic loops with a needle.
Processing the neck when knitting with a garter stitch
Garter stitch seems to be one of the simplest, but this simplicity is deceptive. When you start. knitting and processing the neck, you are faced with a serious problem: the peculiarity of this knitting is such that it is very difficult to make the processing look neat. A step to the left, a step to the right and the rows lie unevenly, somewhere it pulled, somewhere a hole formed. I tried a lot of ways and as a result I found the only option that seemed really successful for me. The neck loops were not closed, but knitted in short rows with wrapped loops. I'll try to describe the process, maybe someone will come in handy. author Gala68

The model, as seen in the photo, has raglan sleeves, so the back and sleeves were finished in a straight line, without reductions, leaving the loops open. But before ... On the two halves of the shelves, at first I did not knit 13 central loops, leaving them on the knitting needle (their number depends on the thickness of the yarn and the shape of the neckline), and then knitted in short rows (not knitting one loop in each second row, wrapping her working thread).
We knit all the loops with a garter stitch to the last neck closest to the middle, remove it, without knitting, entwined.
The principle of knitting entwined loops:
1. Thread at work, remove the loop on the right knitting needle.
2. Bring the thread forward between the slipped loop on right spoke and the next loop on the left needle.
3. Slip the same stitch onto the left needle.
4. Turn the work over to the other side. The loop is wrapped. Continue to knit in garter stitch in the opposite direction of the following loops.
After knitting the shelves, collect the open loops of all parts (shelves, sleeves, necks) in order on circular knitting needles and tie the neck. At the same time, when knitting twisted loops, insert a knitting needle under the wrapping and into the loop and knit them together.
With this processing option, the connecting line of the strapping is neat, without holes and irregularities.
Dedicated to novice knitwear lovers who create them on their own. 🙂 Today I want to show you how to crochet the edge, and Lyubov Titova, who has repeatedly introduced us to her work, will help me with this. With her help, we knitted, takes and.
Crocheting the edge with a simple example
Four schemes are presented to your attention and descriptions are given that will allow you to understand how to tie a product and get an original pattern for decoration. Specially selected not complex schemes so that the novice craftswoman can understand everything in detail.


The binding of the edge will give any piece of clothing originality and some mystery. Sometimes it happens that the beloved knitted item still looks beautiful and stylish, but still the impression remains that something is missing in it. It is in this case that you can use such a method of improving clothes as crochet edge decor, the schemes for which we will consider in detail in this article. You just have to choose the right one and bring it to life.

It is immediately worth noting that the first, third and fourth schemes above are simpler and more suitable for tying dresses, sweaters, napkins, tablecloths, possibly curtains. The second scheme is more complex. This kind of harness can be used for a stylish cardigan.
Beautiful openwork crochet strapping
So, arm yourself with the information given in this article, and you will know everything about how to crochet a product simply and quickly enough. Having learned how to make such elements, you can easily decorate hats and scarves, tablecloths and towels, shawls, blouses, skirts, etc. with openwork. You will see how much it will change appearance products and how attractive it will become with such a knitted decor.
Take a look at this hat for an example. Is it really unusual?

Or for such variants of the pattern, each of which can decorate the edge of a knitted garment or cutlery (clickable).

Let's take a closer look at the mechanism for creating a beautiful strapping using the example of the first of the above schemes.
Binding the edge of the product
You need to start by knitting the first row. First you need to dial a series of air loops (rapport in this case will be 22 loops). In the fifth air loop of the created chain, you need to knit a single crochet, repeating the given algorithm until the end of this row.

Knit RLS.


Now let's move on to the second row. To do this, turn over the knitting. The first element to be done in the new row is one single crochet.

After that, dial four air loops, knitting in the third column (single crochet), which is in the previous knitted row of elements. Further, the sequence of actions is as follows: two columns with one crochet are knitted, then two air loops, again two columns with a crochet. Next, you need to create four air loops, and knit one single crochet into the third loop of the previous row. As a result, such arches should turn out.


Then everything repeats in a similar way until the end of the element. You will get such a knitted finish for your product - napkins, tablecloths or something similar.
And this is how the strapping according to scheme No. 2 looks like.

In general, everything is quite simple, you just need to take a little time to analyze the circuit itself. Quite a bit of effort and the edges of clothes or any other knitted element with your help they will find a beautiful decor.

Crocheting the edge, the diagrams described in the example, is an easy process to perform. Starting with the implementation of simpler schemes, in the future you will easily cope with even the most complex ones. In the meantime, you can practice tying the edge like this, or summer, or, having previously made a knitted base for, tie its sides. Good luck!
Thanks to the knitter for her story and detailed description throughout the tying process. I think this information will help beginner craftswomen take one more step in mastering knitting skills. That's all, see you!
Such a simple way as strapping tied neck with a hook, will give your things a second life. An ordinary discreet dress, tied with a beautiful openwork pattern, will look much more attractive. Moreover, now knitted, or with some trim in the form of openwork knitting, garments are in fashion.

We have several strapping options in which step by step description work, as well as schemes and patterns for finishing the edges.

Crochet neckline patterns
An untreated edge can be trimmed with one of the proposed options. We will offer the main ways to crochet a neck, as well as give the product a peculiar look.
First way- this is a tying by the type of a narrow border. Such a not wide edging will look perfect on children's or light things made in openwork knitting.
Second way- this is a border smoothly turning into a collar with a width of approximately five to twenty centimeters. This option is suitable for any things.
AND the last way there will be a finishing ornament, a width of one and a half to five centimeters. Best paired with a medium thickness knit. Suitable for cuffs and neckline on a jumper or pullover.
We turn to the correct processing of the product with a description
Most often, the edges of the product, the neck and the edges of the sleeves are tied in the same way. Usually, the first row should be knitted with single crochets, after which they are woven according to any pattern you like. by the most in a simple way It is customary to consider the “crayfish step”, so let's start with it. Since its implementation will not be difficult, it makes no sense to provide a diagram, but the description will be more understandable.
To begin with, we tie the edge of the canvas with simple single crochet columns.
Then, without turning the work over, insert the hook into the remaining fragment of the base. Then you need to direct it forward, and stretched to the left working thread pry through the hole. When two loops have formed, we knit them and, moving in the opposite direction, perform the “crawl step” to the very end of the row. The edging will look like corners obtained with overlapping threads.

Here are a few simple options. You need to knit on a ready-made row of single crochets (shown in the diagrams as a chain of air loops).
** - fragment repetition.
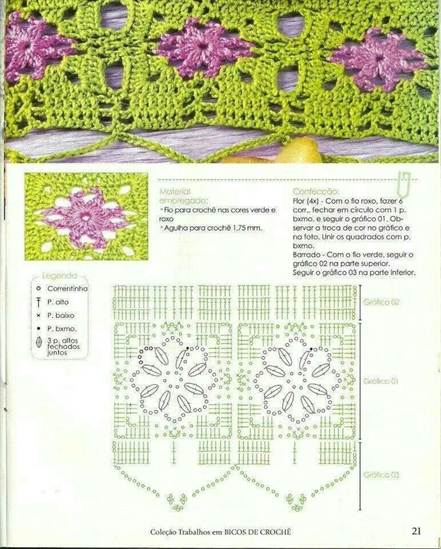
In the first row, knit * 2 post. with a crochet and 1 air. loop*. Start the next row with an arch of four loops above the column, knit one column in the air loop without a crochet *.
In the third and last row we knit five columns with a crochet in the form of a fan and four air loops in one arch of the previous row. After that, we knit 1 column b / n into another arch *.
The first row consists of * double crochet *. In the second row we make a fan of four columns s / n and 3 v / n *. Third row: *in the column of the previous row we knit two columns of s / n, three air loops, a picot of 3 ch, three ch / p and a double crochet *.
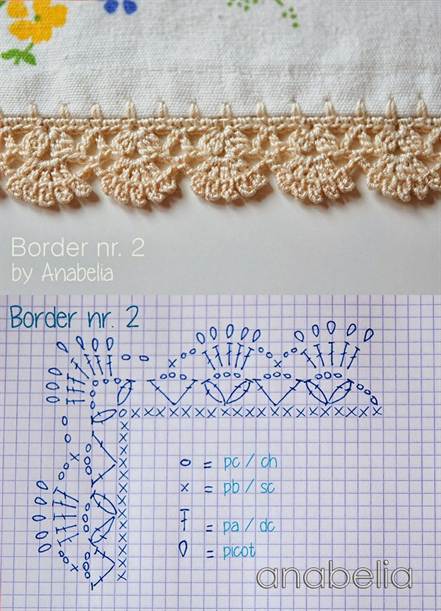
The first row - *column b / n, 3 pico and three v / p, column b / n and five v / p over three loops of the last row *.
Second row - * knit a single crochet into an arch of air loops, and make nine air loops above the pico group *.
Third row - * knit nine single crochets over the air loop. In the column located in the previous row, tie one column w / n.
We try to qualitatively repair the neck of the finished product

Any knitted item tends to stretch with frequent use. The throat part is especially deformed. But with the help of a thread and a crochet hook, you can give a deformed thing a second life by tying a beautiful border around the neck. First you need to prepare the product.
To do this, first cut off the stretched collar or edging. If the fabric tends to fray, then it would be advisable to initially overcast the edge with a wide stitch, tucking the edge of the fabric inward by literally half a centimeter. If the fabric is made of fine knit, overcasting can be omitted.
So, we knit the first row with single crochets, while pulling the fabric down. To achieve the desired width, weave the same number of rows. At the end, fasten and cut the thread.
Create a beautiful border in the form of an openwork border
You can also make a border in the form of such an openwork border.

1 row: dial a chain consisting only of air loops.
2 row: this row includes alternating single crochets and arches of three v / p.
From 3 to 5 rows, knit in an arch: two columns with a crochet, two air. loops (third row), three air. loops (4th row), 4 in / p (5th row), we knit one column with a crochet into the column of the base.
6 row: we knit columns with double crochets in the amount of 9 pieces in the arch, alternating them with one column with one crochet in the base.
7th row: in the first column of the base we knit nine columns with two crochets, alternate them with one loop, and in between perform two arches of four air ones. loops.
8 row: over the arches of nine columns with crochets, make four arches of three loops, and over the arches of air. loop - a column with 2 crochets.
You can somewhat modify the proposed ornament by completing only the first or second part of it.
Video selection on the topic of the article
Details, as you know, can ruin or save any thing. Bound in the different technique the product will have a complete look if it is supplemented with a strapping that is suitable in style. Hook - an indispensable tool for making the original edge knitted blouse, dresses, napkins or tablecloths. Strapping patterns are so diverse that they allow you to crochet not only the finished thing, but also hide the flaws that often happen when making the edge of the bar, bottom and other details. knitted product. In addition to interestingly completing the edge, crochet patterns are used to gracefully finish knitting cuffs, collars, tying necks and knitting borders for interior items. Tying the edge with a hook after this article will not be a problem, because we have selected patterns for work especially for you.
The most common ways of processing the edge are the crayfish step, pico, lacing, arched from air loops.
The method of tying the edge with a crochet with diagrams and descriptions
This type is considered the easiest way to make a beautiful neat edge, it is especially in demand in children's models. It is most often performed with single crochets, which are knitted into a loop to the right of the working loop. Such an unconventional move - from left to right - explains the fixed name.
There are several options for knitting a crayfish step, we will show one of them in the video:
Method 2: pico for beginners


Pico is a slightly more complicated way to crochet an edge. Interesting for tying the edge of the sleeve, cuff, hat, beret. There are several ways to knit a picot, based on the thickness of the thread, the number of air loops connected in a picot is selected. On the chart - different variants this knitting.

Method 3: arched strapping from air loops
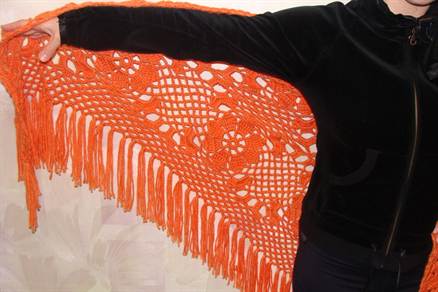
It is performed with air loops according to the scheme, it is often used in the border of stoles and shawls, it can be supplemented with a variety of brushes.

Method 4: we knit beautiful openwork
How to tie the edge of the product we need with a hook? Openwork, which combines all of the above patterns, as well as many others that require more complex patterns to create beautiful product. The choice of an openwork pattern is always determined by the style, the purpose of the product, it depends on the taste of the knitter and her skills in crochet work.
To decorate the bottom of the tablecloth, a large napkin, where you want to knit a beautiful border, you can use the schemes:


Most common openwork patterns we have collected in a selection of ideas, the schemes are taken from sources found in the public domain.
Each of us has a favorite thing that seems to have gone out of fashion, but we don’t want to get rid of it at all. Fortunately there is good way update it - crochet the neck. In this article, we will present several good advice for experienced craftswomen who know how to work with knitting tools, as well as for beginners, how to crochet a neckline.
Anyone who has never crocheted before should first practice, and only then proceed to create a strapping:
- Cast on a chain of about twenty loops (although 10 is enough for training).
- Knit several rows of six columns b / n (single crochet). It is advisable to follow the direction - from right to left.
- Subsequent rows need to begin to begin differently than in the first. Knit should be from air columns.
- Pass the hook under the third loop (you need to grab the thread and then pull it up).
- The resulting loops (there should be two of them) must be tied together.
As a result, you should get such an even canvas:

Now let's figure out how crochet a square neck sweatshirts:
- Pass the hook through where the shoulder seam area begins.
- Crochet the thread and pull it out (this is how you need to create air loops around the entire edge of the product)
This is the simplest crocheted square neckline:

An example of how to tie the neck of a dress with a hook?
Your favorite dress can be decorated with an original harness. There are two common methods that craftswomen are used to using:
- "Rach step"

- lace

Let's figure it out first how to tie a neck with a crochet hook using the “Step Step” method:
- Take a long thread (it should be several times longer than 10 times longer than the edge of the neckline)
- One end of the thread should be fastened at the edge of the shoulder seam
- Next, we make a regular loop (air)
- You need to put a hook under this loop to pick up the thread and pull it out.
- The resulting loops are tied together
- As a result, only one loop should remain (from it you need to start the knitting process from the very beginning)
Here are a couple of guides diagrams for beginners which will help learn how to tie a neck with a crochet hook"Rach step":


A beautiful way to tie the neck with a hook according to the "Lace" pattern:
- 1 - knit simple loops(you should get an “air” chain of ordinary loops)
- 2 - we knit a chain consisting of three columns b / n and three air loops (they must alternate in turn)
- 3 - we knit a chain consisting of two columns of s / n (with a crochet) and two air loops (they must alternate in turn)
- 4 - we knit a regular chain, as in the first row
- 5 - we knit a chain of 4 ordinary columns, which must be completed with 1 column s / n
- 6 - we knit a chain consisting of 1 column with two crochets and 1 column of s / n (these loops should alternate with each other along the length of the entire row)
- 7 - we knit a chain consisting of one column with two crochets and 1 air loop (alternation is repeated)
- 8 - we knit a chain with 1 column with two crochets and 3 air loops (again, the loops alternate in turn)

An example of how to tie the neck of a sweater with a crochet hook?
IN Lately pullovers have become very fashionable - knitted jumpers, which are worn mainly by women. Therefore, for many it may be a relevant topic, how beautifully crochet the neck of a half-belt. We offer you several options:
- Strapping the neck according to the type "Boat" with a hook
- 1 - we knit a chain from one column b / n and from an air loop (the loops alternate)
- 2 - completely tied out of the s / n columns
- Subsequent rows should be repeated one by one.


- Tying a v-neck with a hook according to the "Knots" pattern
- 1-3 - knit with b / n columns
- 4-6 - we knit only with ordinary loops (air)
- 7-9 - we knit as the first three rows with b / n columns
- 10-12 - we knit from 4 columns b / n and 3 air loops (they should alternate with each other)


An example of how to tie the neck of a vest with a hook?
Vests look very nice, the cutouts of which are crocheted with an openwork pattern.
- 1- knit for crochet neck tying with single crochet
- 2 - knitted from 3 air loops, one loop s / n, 2 air loops, one loop s / n and 7 air loops
- 3 - for crochet neckline knits like this: 1 column b / n, 4 air loops - so to the end of the row
- 4 - knit according to the scheme of the second row
- 5 - knit according to the scheme of the third row
- 6 - knit according to the scheme of the fourth row
- 7 - knit according to the scheme of the fifth row
- 8 - knitted from 3 air loops, 1 loop s / n, 2 air loops, one loop s / n;
- 9 - knitted from 4 columns b / n, pico, 4 columns b / n, pico, 3 columns b / n, pico, 3 columns b / n


You can also knit the neckline of the vest with a border. For this you need:
- In the first row, you need to make 6 single crochets
- The second row is knitted like this - 1 single crochet, 2 air loops, 4 double crochets, 2 air loops

It turns out a very beautiful border, which looks like elegant lace.
Crochet patterns for different types of necks


Do not rush to say goodbye to a thing that has worn out. Be creative, imaginative and make a beautiful neckline for your old sweater or dress with your own hands. Sometimes needlework can give things new life. We hope that the patterns and options for crocheting presented in this article will be useful to you in your work, because even those who have never held knitting tools in their hands can master them.
Video: "How to crochet a neck?"


