How to make a bride out of a bottle of champagne. Decorating champagne bottles for a wedding with your own hands
Wedding- an infrequent event in life, and it requires the expression of the emotional upsurge of young people entering into marriage in the form of beautiful things, solemn decorations, festive decorations. This also applies to the decor of the vessels from which young people drink champagne. Making wedding glasses and bottles with your own hands is what will help unite the bride and groom even more.
Features of bottle decor with ribbons
Preparing for the wedding, the future spouses choose dresses and suits, learn a joint dance, come up with the design of the place where the wedding will take place. And it is very important that style compliance is observed in everything. Based on the chosen style, bottles for the wedding are also made out, as well as glasses intended for a solemn sip for good luck..

As a rule, ribbons are used to decorate wedding bottles of champagne. The satin headbands and glass work together beautifully to create an airy and pretty look. Such ribbons themselves decorate everything they are attached to, and if the idea for decoration is chosen well, the design of champagne for the wedding becomes a work of art.

The most commonly used gentle, light colors:
- white;
- cream;
- beige;
- pale blue;
- light pink.
To emphasize and highlight the details of the background, black, red, golden color. However, future spouses can choose to decorate the bottles with ribbons in brighter, richer tones, if this matches their idea of \u200b\u200ba wedding look.
Containers can be decorated in the same way, as if symbolizing an inseparable couple, the community of a family, or they can be decorated in different ways, emphasizing the individuality of the spouses.. Moreover, the difference is expressed not only in the fact that one vessel - the “groom”, is decorated with darker shades and in simple style, the second - "bride" in light shades and big amount decorative elements. You can emphasize individuality with the size and shape of the container, for example, one is larger and higher, the other is lower and wider.
The decoration of vessels or glasses will be even more interesting if they are made according to the principle of complementary halves: on the surface of one, a picture is applied, on the second - its continuation (the bride and groom hold hands).

Champagne bottle design technique (master class!)
Despite the fact that there are a lot of decorating ideas, there are some general principles decoration of vessels for the wedding. What you need for decoration:
- themselves satin ribbons in sufficient quantity;
- scissors for cutting them;
- glue for fixing;
- decorative elements (beads, rhinestones, beads, lace, etc.).
You will need to show some perseverance and be careful, because the work ahead is subtle and unforgiving of a careless attitude. We offer a small master class on creating an exquisite bottle decor in the form of a bride.
1. The container must first be washed and cleaned of labels. The glass surface is degreased with alcohol-containing liquids.
2. Cut off a small piece of lace and try it on the neck. Apply glue on this place and fix the patch beautifully.

3. Take the tape and also attach it to the neck. We cut off the excess. We apply glue and apply the tape so as to wrap the bottle around it. In this case, the right end is superimposed on the left.

4. For the second and subsequent layers, try on other ribbons. They will be longer as the champagne's throat expands downward. We cut off the excess, apply glue and fix it.

5. When the bottle is completely pasted over with ribbons, we start creating jewelry. If the product is in the form of a bride, you will need to make a fluffy skirt.

6. The neck can be decorated with beads or rhinestone ribbon. We fix accessories with glue.

7. Finishing touch - a hat with a veil. It can also be made from a ribbon and a translucent fabric (the latter can be a piece of an old bow or a small piece from a white tulle).

Glue for working with glass is used so that all decorative elements are firmly attached to the vessels. If the tapes are not only glued with a solid surface, but also tied, the knot can be fixed with transparent double-sided tape.
On video: wedding champagne master class
Glass decoration
For decor, it is not necessary to take glasses of the same size. So, if you want to decorate the vessels in the style of "bride and groom", then it is more logical to take one glass large and tall as the groom, the second should be smaller, round shape and with a thin leg, reminiscent of a female silhouette.
Glasses are made with almost the same materials as champagne bottles. As a decor, you can use:
- satin ribbons;
- polymer clay;
- lace;
- artificial flowers;
- rhinestones;
- feathers.


Often glass is decorated with mother-of-pearl beads. They can be glued in the middle decorative flower or spread evenly over the entire surface.

Where to get ideas?
In order to adequately decorate their wedding bottles, the bride and groom can attend a special master class on wedding decor and get a lot of ideas for design there, as well as learn technical techniques. There are many glassworking techniques.
Decorating wedding glasses and bottles with satin ribbons and other materials does not require any special skills or hard-to-find fittings. It only takes desire, imagination and some time. The material used and the design technique depend, as was said, on the general style of the wedding design and on the imagination of the newlyweds.
The more effort is put into the decor, the more unique and inimitable it will be, the more memorable the event will become. The main thing is that the final result should be combined with the costumes of the bride and groom and be pleasing to the eye..

What form to choose a container?
The design of a champagne bottle is convenient because this glass vessel has a suitable shape, conditionally repeating the shape of the human body - a wide bottom and an elongated neck. It looks good when the decor of the bottles is planned in the form of figurines of the newlyweds - two containers repeat the appearance of the couple who are getting married. However, you can decorate any other vessels, for example, a bottle of martini or cognac left with new year holidays. Cognac containers have dark glass with clear rectangular or pyramidal shapes, which rather corresponds to the image of the groom.
Therefore, to decorate such a container, you can pick up not the most common decorative elements: wire, stones, shells, ropes. They are somewhat more difficult to connect and attach to glass surface, but good glue and the right decorating technique can handle this. Ribbons and paints in this case are used in darker, golden brown tones.
The “paired” design of bottles is a combination of cognac and vodka, the first has wide “shoulders”, the second is narrow and slender.

Making bottles for a wedding with your own hands is not an expensive, but very exciting activity, designed to make the future family even stronger. There are many ideas for decorating wedding bottles and glasses, their implementation depends only on the desire of the bride and groom to please themselves and the guests solemn event. The choice of materials used for decor is great - from traditional satin ribbons to ropes and wire. The main thing is that the idea of a merry event should be read in the decorated vessels, and they should please future spouses with their appearance.
Ideas for decorating champagne for a wedding (2 video master classes)
How beautiful to arrange champagne for a wedding (40 photos)


A wedding is one of the most important events in the life of every person, because it is not only the creation of a new unit of society, it is also an official statement for everyone around that young hearts have finally decided to unite now and forever! A wedding is something that almost every girl dreams of, and, one way or another, every growing up young man thinks about. On this solemn day, the beautiful half of humanity wants both herself and everything around to look as beautiful and original as possible, even such an integral part of this celebratory event like bottles of drinks, because what is a wedding without champagne? And so, let's make champagne in the festive style of the bride and groom!
Today I want to tell you about how you can decorate champagne bottles and dress them in practically real bride and groom costumes with your own hands, I am sure that you will enjoy what you read and see in this article.
We are trying to create a festive champagne "Bride and Groom" with our own hands
Let's take a look at the materials:- Bottles of champagne (the number depends only on your desire, at least, I think that two are better);
- Satin ribbons different widths white and blue (gray or black); colors;
- half beads;
- Flowers for boutonnieres and small decor;
- Strassies (optional)
- Glue gun or glue stick;
- Pencil;
- Ruler;
First, I advise you to tie a tie from a ribbon for our groom, you should choose a dark-colored ribbon, for contrast, as planned, it will be located on the background of a light shirt.
To facilitate your task, I advise you to use the scheme below for tying a standard and simple knot on a tie.

If you don't find the knot you like, you can search the internet for more options by just typing "How to tie a tie".
Tip, you can use a slanting inlay instead of a satin ribbon, because. It's stretchy, which will help avoid puckering and coattails, and may be easier for you to work with!
Now let's prepare the bottle. We need to remove all the labels and adhesive residue from it, for this you will be helped by plain water to make it easier to peel off the labels so that we can work comfortably and do not interfere appearance finished crafts.
The groom's tie is ready, and the bottle is ready to work with it, let's continue! Now it's time to move on to the groom's shirt!
We bend the white ribbon so that one edge protrudes, and we cut it off with needles or pins, it should turn out something like this:
After the collar is ready, we glue it on the bottle, using our hot glue gun, well, or glue in a pencil, and glue the “shirt” of our groom on top.

In order for our composition to be symmetrical, it is necessary to draw a line along the bottle with a pencil, which will play the role of a guide.
We put a tie on the neck of the bottle.
When we reached the place where the bottle becomes even and without bends, we, firstly, fix the lapel on which our buttons begin, the role of which will be played by half beads, in the way shown in the photo.
And secondly, we change the technique, and simply start wrapping the bottle in a circle, to the very bottom, periodically grabbing the tape with glue.
We hide the last turn of the tape under the lapel as follows:

glue buttons, you can glue half-beads of different diameters, this, with a reasonable approach, will give a zest to the appearance and, if desired, a boutonniere.
By the way, on the Internet you can find a lot of options with different colors and techniques. This will help you find inspiration, or borrow someone else's idea.
Bottle-bride.Well, it's time to dress up the bride, I won't describe the main process, because. it is not much different, let's limit ourselves to a couple of photos in which you yourself will see everything.
I will stop and pay attention, only to individual ideas and moments
to decorate the base for wedding lace, we use, of course, guipure. You can add volume to the dress by cutting out fragments of the pattern and pattern from guipure, and gluing it so that it protrudes beyond the bottle:

The matter remains small: so that the bride does not seem too modest and dull, you need to paste over the resulting dress with semi-beads and rhinestones to your liking!

And you can also decorate the details of our guipure.
Video on the topic of the article
Well, that's all, on this we completed our work and learned how to make beautiful wedding bottles, I want to finish this master class with a selection of videos on this topic. Hope you enjoyed! Show your imagination and share your inventions on the Internet!
Preparing for a wedding is a lot of work. It is necessary to choose beautiful outfits for the bride and groom, choose the style of the event, think about wedding decorations for the festive table and take care of other pleasant little things. One of the elements that reveal the individuality of the newlyweds is an originally decorated bottle of wedding champagne. According to tradition, on holiday table 2 special bottles of champagne must be present, one is opened on the wedding anniversary, and the second on the birthday of the first child.
The birth of a tradition
The custom to decorate alcohol at a wedding came from the times of Little Russia. On a significant day, the bride and groom were presented with a bull and a cow as a gift. Such a surprise was considered expensive and revered. The gift was tied together by the horns, symbolizing the strength of the marriage bond. When a couple had a baby, the newlyweds gathered relatives and friends to feed them meat and drink milk. Over time, the bull and cow were replaced by expensive liquor. A bottle representing a cow was filled with champagne or wine, for a bull they chose a stronger option - cognac or vodka. Today, brides and grooms prefer champagne, due to the lightness, sweetness and versatility of the drink.

Champagne decoration options
Decoration of wedding champagne can be entrusted to professionals or done original design with your own hands. A simple technique can be done even by beginners, if you devote a little time to the lesson. When wondering how to make a unique creation, it is worth remembering the style of the wedding. Every little thing must correspond to the prevailing atmosphere. In addition to decorating champagne with your own hands, you can decorate wedding glasses that blend harmoniously with the created bottles.

Types of decor for wedding bottles:
- Satin ribbons. This option is considered the most popular and requires a creative approach. A little imagination can help create a unique ribbon champagne costume that your invited guests will admire. In addition, there is a large number of master classes, which, thanks to step by step photo help to bring extraordinary ideas to life. In addition to the main component, beads, lace, rhinestones can be used to decorate the surface of the bottle.

- Lace decorations. This type of design will require a little time and desire. Necessary attributes: lace, satin ribbons, beads, glue.

- Decorating with flowers. original version involves the use of any colors that you can make yourself.

– Roses from polymer clay. Such decorations will turn wedding champagne into an elegant and touching masterpiece. You can make flowers with your own hands or purchase them in specialized stores.

- Knitted attributes. Lovers of spending evenings crocheting can spend time usefully and create unique clothes for champagne. You can also sew the bride and groom on your own, adding maximum creativity to the celebration.

Master class on creating wedding bottles
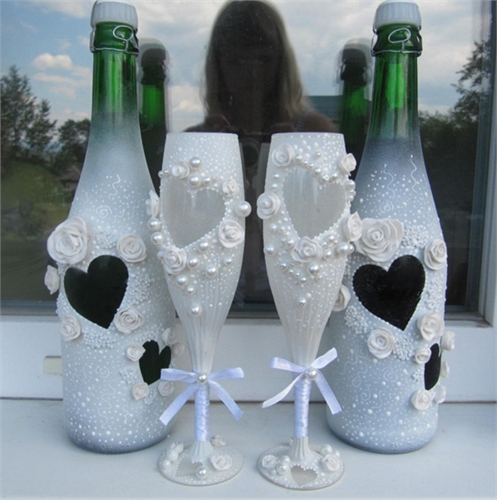
The presented master class with step-by-step photos will teach you how to create wedding bottles for the bride and groom. Pictures allow you to study the technique in detail. A beautiful representative of the weaker sex will be dressed in a charming white dress of the bride, the groom will put on an elegant black suit with a bow tie.

Before you start creating champagne with your own hands, you must remove the label from the container. You can create a neat decor only on a flat surface of the bottle. To do this, put the bottle in a container with warm water, add dishwashing detergent. You can get rid of paper after 30 minutes. After the procedure, the work surface must be wiped and degreased with acetone or alcohol.
The following attributes will help decorate the bottles:
- oblique trim or satin ribbon (black - 8 m, white - 10 m);
- glue stick "Moment";
- lace - 10 cm;
– wide bow- 3m;
- rhinestones or beads.
picking up necessary materials for decoupage, you should take into account the fact that the satin ribbon practically does not stretch. This property complicates the process of sticking to the bottle. To get jewelry work, you should pay attention to the oblique inlay.
The ideal glue for decorating a bottle should not leave marks or bumps, be completely invisible on the product. Based on these requirements, it is best to choose a glue stick.
Champagne decoration - brides
1. Lace should be glued onto the prepared container. Before the action, you need to try on to determine the size of the product.

2. The next step involves taping the bottle with tape. We first glue one turn, which should initially be measured. Subsequent revolutions are applied to the surface lubricated with glue, after which the excess part is cut off. After applying the first turn, you should outline the middle of the bottle, the place where the ends of the tape converge. Soap can be used for this procedure. Thanks to the basting, the edges of the tape should lie exactly on top of each other.

3. Each turn of the fabric overlaps slightly with the previous turn. When working with glue, it is necessary to coat the joints on the reverse side, fixing the position of the product.
4. After most of the product is pasted over with a thin white tape, we continue to braid the bottle with even turns to the very bottom of the container.

The main part of the work has been done, now you need to add jewelry for the bride. As additional decorations, you can create lace flowers, charming skirts, hats, veils, all kinds of removable covers for the bride and groom. One of simple ways create adorable bottles - use bride and groom stencils. Having printed the models you like on the printer, you can easily bring them to life. Connect fantasy - and original product ready. A wide selection of photo bottles will help you create a beautiful attribute, among which you can choose the perfect option.
To create a skirt, you need to take three parts of a regular organza bow. The length of one part is 1 m. The edges of each bow should be soldered together, making a circle. To carry out the procedure, you need to take a metal ruler, fix the ends and hold with a heated soldering iron. The resulting product is folded in such a way that one part is slightly longer than the other. Next, you should pick up the bow by applying small stitches. In order not to miscalculate with the width of the product, you need to try on the frill on the bottle. The thread should not be pulled tightly, leaving a small gap. In a similar way, you need to make 3 frills.

To decorate the upper part, you can use a gold-plated ribbon. To fix the frills on the bottle, use a glue stick. The distance between the parts should be about 2 cm. The top layer can be fixed with an inconspicuous monofilament, fastening the inlay and tape. To decorate the neck, you can use a thin ribbon, decorating it with rhinestones.
Is your family or friends getting married soon? White dress and a veil for the bride, a business suit or tuxedo for the groom. And... of course, champagne.
Wedding champagne is an indispensable decoration for the newlyweds' festive table. In addition, interestingly designed bottles can be wonderful.
Decoration of a wedding bottle of champagne Bride

Let's get to work. We take a braid, try it on a bottle and cut off a piece of the desired length. Glue. We work carefully with glue - we put a few dots on the entire segment of the braid and glue it.

In the same way, we try on, cut and glue the following pieces of the braid.

The result should be something like this kind of mummy

Now we will make a skirt for our bride. We cut off the organza of such length as we want to make the bride's skirt. The width of the organza should be 2 times the radius of the champagne bottle. Using adhesive non-woven fabric, glue the braid to the bottom of the future skirt.

We collect, trying on a bottle

With the help of glue, we attach the skirt to the bottle, we decorate it with braid on top.

The second tier of the skirt is done in the same way, attached on top of the first

Now we decorate the bride's bodice: carefully fasten a silver braid along the edge and jewelry in the middle with glue

Just like skirts, a veil is made, only going stronger. First, a piece of braid is attached to the “head” of the bride, and then a veil is glued to the “crown”. A veil can be made from organza, tulle, or from the usual wide white bow. Braid is also selected at will.
This is how easy it is to decorate a wedding bottle of champagne Bride.

We begin to decorate a bottle of champagne from the neck. First we make a "shirt".
We take a white slanting inlay, try it on our bottle, cut it off, glue it. Thus, it is necessary to glue 3 strips.

Let's get to the tailcoat. Cut off a piece of the required length from a black oblique inlay, stick it on.

We glue the bottle with strips of black oblique inlay to the very bottom.

We make a butterfly. To do this, we cut off a small segment from a black and white oblique inlay, put a black segment on top of the white segment. We fold our entire structure in half, sew along the side edge. You should get a two-tone ring. From this ring we form a butterfly and glue the "groom" on the tailcoat.

We make a hat. Cut out a rectangle from cardboard. Trying on the "head" of the groom, we glue the cylinder. We cut out 2 circles from cardboard: the diameter of one is equal to the diameter of the cylinder, the diameter of the second is taken taking into account the desired width of the fields of the future hat. Everything is collected, glued, dried. Then we paint our hat with black gouache. Dry again.

We cut off a strip from a white oblique inlay, slightly larger than the diameter of the hat. We fold the strip in half (you need to drop a little glue inside the strip so that it does not turn around), attach it to the hat.

On the "lapel" we attach any decoration. We dress a hat on a wedding bottle Groom.

I hope you have seen for yourself that decorating wedding champagne bottles is very easy. And it looks very nice on the wedding table.
A wedding is always a costly event, especially if you want to keep all the traditions and newfangled trends. Often, even such a thing as buying wedding champagne in a store becomes a significant waste. But you can easily do it yourself. For example, I have such a friend.
For it I needed:
Satin ribbons of medium thickness;
glue;
scissors;
lighter;
decorative flowers and half beads for decoration.
champagne.

It is best to start from the top, so the first thing we will do is the collar of the shirt. To do this, cut off a small piece of a wide satin ribbon, fold it in half like this and measure the required length.


Don't forget to burn the edges with a lighter! Now, that half of the front side, which will be adjacent to the bottle, is well lubricated with glue.

Glue so that the corners of the fold are in contact. The bottom corners will close afterwards, so don't worry about them.

For further work, we need tapes of medium width.

In order to measure the next segment, it is best to apply it over the collar.

The ends of the tape should overlap a little. Now we stick it right under the fold of the upper tape, having previously unbent the collar.

Thus, we seal the entire part of the bottle that the shirt occupies.

Now it's time for the tie. After reviewing many MKs on this topic, I came to the conclusion that best solution will tie the most ordinary tie. Having measured the desired length of the tape, I made a regular (or whatever it is called) knot and smeared it a little with glue so that it would not move somewhere.


In this technique, we glue the entire part of the neck of the bottle until it stops expanding.

Now you need to slightly reduce the angle of the tape to make a smooth transition.

Then, we glue one end of the tape to the bottle perpendicularly, grease the entire empty part of the champagne with glue and wrap it with tape.


Here is the result.

We start decorating. To imitate the buttons of a jacket, I decided to choose gold-colored half-beads in the shape of a heart. Glue them on carefully.

And in the place where the pocket should be located, we glue the flower. Boutonniere in place.


Now you need to build a cylinder so that the image is complete. For this I needed:
A sheet of cardboard (you can cover from a common notebook);
felt-tip pen;
glue;
scissors;
satin ribbons of medium width to match the jacket.

First of all, we cut a strip from the cardboard and glue its edges.

This will be the middle part of the cylinder. The main thing is that it sits well on the cork of the bottle. Now, attaching the middle to the cardboard, draw two circles on it. The inner should be equal to the circumference of the middle part.

We need two such circles: one for the top, the other for the brim of the hat.


