Crochet plaid for a newborn girl. Crochet baby blanket: patterns and description for beginners
Today in our master class - a charming crochet blanket for beginner craftswomen. This soft and cozy bedspread knits quite simply. And for those needlewomen who are just taking their first steps in this type of needlework, we have prepared a knitting pattern and step by step description with photo to make it easier.
Tools and materials Time: 48 hours Difficulty: 4/10
- crochet hook 6.0 mm;
- about 1490-1500 meters of worsted yarn in several colors;
- a darning needle to hide the ends;
- scissors.
Warm crochet blanket and a cup of delicious tea - the best remedy from any stress! Treat your household with a simple and beautiful blanket, knitted by you with your own hands! Do not hesitate, they will appreciate your work!
For this workshop, we used cotton yarn in white, red, brick, turquoise, light green, purple and gray shades. In general, everything that was in our house in the remnants. You, in turn, can use whatever threads you have in your stash and the colors you like!

Abbreviations:
- c.p. - air loop;
- CCH - double crochet;
- conn. st - connecting column;
- RLS - single crochet;
- p.p. - lifting loop;
- () - indicates the number of loops;
- * - indicates the number of rapports / repetitions.
Size of the finished blanket: approximately 100 x 112 cm.
Notes:
- All stitches are worked through both stitches unless otherwise noted.
- The dimensions of the finished blanket are approximate. They won't be accurate. The final size will vary depending on how tight or loose you crochet.
Step by step description with photo
So, let's get to work. In this plaid, a simple pattern is more than compensated bright colors thread.
Step 1: tie the base
Start: 130 air loops.
Row 1: 2 dc in 4th st from hook, *skip 2 sts, 3 dc in next st**. Repeat from * to ** until the end of the row. Turn. (129)
Row 2: ch 3, *3 dc between the next groups of 3-dc from the previous row**. Repeat from * to ** to end of row, 1 dc in sts, turn. (129)
Row 3: ch 3, 2 dc in the space between the 1st dc and 3rd dc of the group from the previous row, *3 dc in the space between adjacent 3-dc groups from the previous row**. Repeat from * to ** until end of row, 3 dc in space between last 3-dc groups and p.p., turn (129)
Row 4-71: repeat Rows 2-3.
Row 72: repeat Row 2.
For this bedspread, we knitted 6 rows in one color, 3 rows in white and continued to weave a colored pattern, alternating different colors and white in between. However, you can choose the colors and thread patterns you want. Since we knitted this plaid for beginners for ourselves, we used all the colors that we had available at home.
Step 2: Add trim
Connect the white yarn with comp. Art. in the last stitch of row 72.

Master class completed. Agree, this crochet blanket is ideal for beginner craftswomen! We hope you are satisfied with the results of your work. And if you have any questions or suggestions, write to us below in the comments. We wish you good luck!
A blanket is an indispensable thing in any home. For a newborn baby, it is necessary, it can be used both at home and on a walk. Moreover, a young mother can make a blanket on her own. Knitted bedspread can be crocheted. The product can be thick and warm, or it can have an openwork fabric that will be used for beauty.
You can start knitting even before the baby is born and make a blanket for discharge from the maternity hospital. A crochet blanket can be made in neutral colors and it will suit both boys and girls.
Materials for making a blanket
A beautiful product can only be obtained from the right materials. Therefore, you should first pick up threads and a hook.
Knitting tools

Some models may include a combination of knitting and crochet. Such a product is even more interesting, unusual and original.
We knit a beautiful plaid
Needlework bedspreads for knitting enjoy different ways. Some of them are simple. There are more complex models requiring some crochet skills and practice. For an extract, you can make the easiest way to crochet or choose a fillet knitting pattern. They will look even more interesting., if you perform them in delicate pastel colors.
Ways to knit a plaid for an extract

Plaid of squares
This blanket can be knitted in any size and can be used in any pattern. First you need to connect the required number of squares. And you can make up your own canvas from different geometric shapes, they can be multi-colored. Then the product will turn out bright and unusual.
There are no restrictions in knitting squares. They can be of different colors, can be knitted according to different patterns, can be of different sizes. Individual elements in one product can have different sizes, so the product will be assembled from large and small squares. A large square can be located in the center, and small ones around it.
When the needlewoman decided on the option knitting fabric, then you can select the appropriate yarn. Yarn manufacturers now offer a wide range of knitting threads.
Operating procedure
 Now is the time to start knitting one square. It is recommended to wash and iron. This is necessary in order to be able to assess the quality of the yarn, whether it will shrink, deform, and so on. If the yarn has come up, then you can gradually knit all the other squares.
When all knitted squares ready, you can sew them together. Moreover, it is possible to perform a seam on sewing machine. And you can tie them with a hook, such a connection will be more interesting and correct. The squares will have clear borders. You can tie the details with a thread of a contrasting color to emphasize the borders of each square.
Connected squares need to be drawn from all sides. This works well by crocheting the entire fabric. Moreover, the edging can be simple, for example, the entire canvas is simply tied with several rows of single crochets. But for a more interesting knitted blanket, you can make a very openwork delicate edge and then any bedspread will sparkle in a new way.
Warm yarn bedspread
Such a knitted bedspread should be in the wardrobe of any child, newborn and adult. It is light, gentle, but despite this it retains heat well.
You can knit the fabric using loin patterns. They are simple and easy to perform. They use double crochets and air loops.
knitting process
 You should start by doing a chain of 8 air loops. It is closed in a ring, connected with a connecting post. Next, the product is knitted in a circle, but you need to form a square, so in certain places it is worth making additions. A chain of air loops is tied with single crochets . Knit the first loop with a column single crochet, in the next loop to make an addition, then again an addition. Again knit a loop with a single crochet and so on.
The second row can be started with a pattern. In the first loop, double crochet, then knit one air loop, then the double crochet is knitted through one loop of the main chain. Thus, it is worth knitting to the place of addition. At the corner, it is worth making an addition, knit 2 double crochets in one loop, knit 3 air loops and again make 2 double crochets in one loop. Such additions should be done at every corner.
The product is continued until the moment when it becomes a suitable size. Then you can trim the edge. The beauty of the product can be emphasized with the help of an openwork edge.. Moreover, it can be knitted from thinner threads so that the edges remain light and thin.
A crochet blanket for a newborn is ready!
Fillet knit blanket
Any yarn is suitable for this model, it can be thin, thick, natural, woolen, any color. If you use several colors of threads and arrange them in stripes, then the product will turn out to be interesting. You need to pick up any filet pattern. For beginner needlewomen it is worth picking up simple patterns and practicing crocheting. The product is easy to make from double crochets and air columns.
Progress
First you need to tie a chain of air loops. The length of the chain should be equal to the length of the future plaid. Now, along this chain, it is necessary to knit the first row of the loin pattern. At the end of the row, the fabric is turned over and the second row is knitted. It is knitted in the first row. Thus, it is worth doing the work until the product reaches the desired width. The product may have a square or rectangular shape. If the plaid should have a rectangular shape, then the rows will need to be completed more or less than the number of pattern elements.
The benefits of crochet

Knitted plaid for a newborn crochet will a wonderful gift and will be used for a long time.
The baby does not have to be covered with a warm blanket. A woolen knitted blanket is much lighter and at the same time protects well from the cold. If the child plays on the floor, spread a blanket - he probably won't catch a cold. You don’t have to look for this convenient thing in stores - you can knit baby blanket knitting needles or crochet.
How to do this, and in several ways, tells a series of video tutorials that even beginners can use - they describe in such detail all the necessary actions. A little exciting work - and you will knit a blanket with your own hands, providing your baby with cozy warmth.
A blanket for a child is tied in a tangle through a row , the edges are finished with a garter stitch. If desired, you can add a soft flannel lining to the blanket. Knitted with yarn containing 25% wool and 75% acrylic. It is detailed how knit a plaid with knitting needles and shown in the thumbnail.
With a garter stitch, which trimmed the edges of the plaid, all rows are knitted, and when creating the main pattern, the front and back loops alternate alternately. The tangle is knitted with an offset. The lining, if done, is sewn on by machine or by hand. A plaid knitted from one-color yarn looks neat and beautiful.
Video lesson:

Plaid for a newborn crochet crocheted from yarn "Children's novelty" number 2.5. The dimensions of the blanket are 110 x 100 cm, a smaller size for a newborn will be too small. The pattern with which it is decorated is knitted very simply. It is openwork, with small gaps, so this blanket is used mainly in the warm season.
To make the blanket warmer, a lining is attached to it with buttons. The plaid is tied with a pattern with arcs of yarn white color, at the corners are knitted roses. The main pattern with small arches and gaps arranged in a checkerboard pattern is described in detail in the video tutorial.
Video lesson:

Plaid for a newborn Knitted from wool in half with acrylic. The video tutorial talks in detail about which loops follow which ones, and how they are knitted. The alternation of the loops results in a small checkered pattern, dense enough to make the blanket warm. The blanket is very soft and pleasant to the touch. For a baby, it will be enough to knit a blanket measuring 90 x 90 centimeters.
It is possible to make the blanket a little longer, up to 120 cm. It fits freely into an ordinary crib, providing the child with warmth and comfort. The yarn used for knitting is CASHMERE GOLD Madame Tricote Paris, 320 meters are placed in 100 gr.
Video lesson:

Eight skeins of Milk Cotton yarn were used to create the plaid (cotton - 45%, silk - 15% and acrylic - 40%). Crochet a plaid No. 2.5 is quite easy. To knit the main pattern of the plaid, you need to dial the number of loops that is a multiple of four plus one loop. The pattern turns out beautiful, with alternating crosses and small gaps that provide ventilation.
Rows 1 - 6 are repeated. When the main fabric of the plaid is connected, it is tied around the perimeter. A border of alternating arms, small and large, serves good decoration plaid. The child under such a cozy blanket will be comfortable to rest.
Video lesson:

The plaid is knitted from Jarn Art Jeans yarn, color No. 40, containing cotton - 55% and polyacrylic - 45%. Basic pattern plaid - zigzag lines of gaps. For its formation, it is necessary to calculate in detail the alternation of loops and draw up a scheme of work. The diagram shows the front and back loops and it is necessary to knit exactly according to the diagram.
The border framing the plaid is knitted with facial loops, forming a neat simple pattern 9-10 rows high. Then the extreme loops form a border, and the middle ones form the main pattern. After finishing work, it is necessary to knit a border, closing the final loops.
Video lesson:

Master Class offers to learn how to knit a simple but very beautiful blanket for young children. Loops when knitting are used only front and back, knitting needles on a fishing line with a total length of 1 meter number 3.0 were used as a tool. Yarn - wool in half with acrylic, 350 grams went to the whole blanket.
It is proposed to calculate the location of the loops. The border of the plaid is knitted with a garter stitch. So that it does not look stretched, the number of loops is less than for the main pattern. All knitting actions, starting from the first loop, are shown in detail on the screen until the work is completed.
Video lesson:

A children's openwork plaid for a newborn baby is knitted with dimensions of 80 x 90 cm, made of cotton yarn. Five skeins of yarn went to the plaid, but some of the yarn remained, and booties for the baby were knitted from the rest. Knitting needles used circular number 3.25. A similar knitting pattern is presented, and the entire sequence for obtaining a pattern is shown on the sample.
The main pattern is formed by four holes gathered together, resembling flower petals. Along the edge of the plaid, a side is knitted with a pearl pattern. It turns out a nice neat blanket for warm weather, which will protect the baby from the fresh breeze.
Video lesson:

The plaid is knitted from two types of yarn with circular needles 4.5. The plaid is knitted large viscous thick yarn, it has a variety of patterns, stretchable English elastic and voluminous pigtails. An odd number of loops are used on the elastic. This is followed by a strip connected with a tangle or garter stitch.
The edging of the plaid is made in garter stitch. You can choose any options for alternating patterns both in width and length of the plaid, they still look beautiful. A blanket is not only a warming thing, but also a decoration for a child's room, it can serve as a good backdrop for a photo shoot.
Video lesson:

The design of this plaid resembles a patchwork style, it seems to be knitted from patches, some of which are solid, and some have an openwork beautiful pattern, while others are made in garter stitch and tangle. Specific patterns can be selected according to the gender of the child and the wishes of the parents.
The edging of the edges is made using the garter stitch method, and the edges do not twist, remaining even. The thread, consisting of cotton and acrylic, is not at all afraid of the iron, and it is advisable to steam the finished plaid and iron it with an iron set to “C grade” in order to garter stitch stretched out a little.
Video lesson:

used circular needles number 4.5 meters long, the yarn is half wool and half acrylic. In the diagram, the entire surface of the plaid is bordered with a pearl pattern in which the front and back loops alternate with each other. For this pattern, 10 loops are allocated on each side of the plaid. The main pattern is divided into squares 10 x 10 loops.
Dozens of front and back loops alternate in each row. In the next row, purl knit over the front loops and vice versa. It turns out a chessboard of squares of different relief. A blanket measuring 60x90 centimeters is ideal for a newborn baby.
Video lesson:
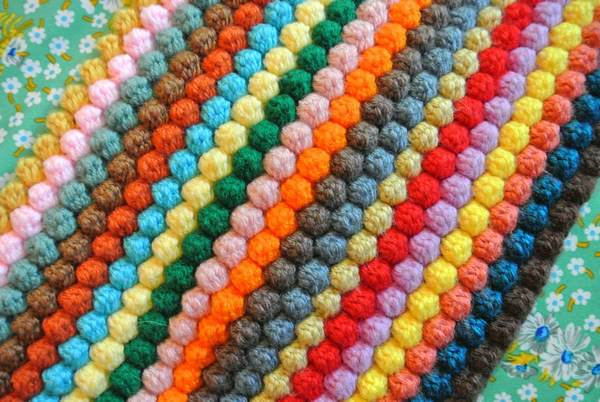
Experienced knitters can create real masterpieces with a hook and yarn, but even for beginners, it will not be difficult to crochet a plush blanket. Despite the fact that this product is quite large in size, the process of its manufacture is very simple and interesting. Armed with schemes and all necessary materials, you can safely start knitting, as a result of which you will be able to create your own masterpiece.
Experienced knitters are able to create real masterpieces with a hook and yarn.
Detailed description And simple circuits will help to cope with knitting even for beginners. A plaid knitted with squares of different sizes will exceed all expectations, it will become not only a salvation on cold evenings, but also an original decoration.
What is necessary:
- 6 skeins of yarn of different colors;
- hook number 4.5.
We knit according to the scheme:
- Cast on 8 loops and close them into a ring by connecting the first and last of them.
- Tie the resulting ring with single crochet columns and connect the first loop to the last.
- Start the second row with three air stitches, then make a pair of columns with one crochet, a pair of air loops, three columns with one crochet, two air loops. Repeat the last two steps twice more.
- Before connecting the initial loop with the last one, attach a yarn of a different color.
- Start the next row with 3 chain stitches and 2 double crochet stitches in the columns of the previous row, make a couple of chain stitches and 4 chain stitches.
- After that, knit a couple of columns with a crochet in air loops and three in the columns of the bottom line, continue according to the pattern to the end of the row.
- Perform the next row by analogy with the previous one, increasing only the number of columns in the corners.
- Tie the finished square with single crochet columns.
- By the same principle, increasing the number of rows and columns in the corners, tie the required number of squares.
- All details are well ironed and sewn into a single whole.
At the final stage, it is necessary to tie the finished product with single crochet columns.
Plaid crochet (video)
How to knit a cute baby blanket: instructions for beginners
Baby blanket with funny bears will definitely please the baby. This blanket is suitable for both girls and boys. Despite great amount motifs used in the knitting process, the creation of an amazing product, measuring 115 x 115 cm, will be simple and exciting.
What is necessary:
- yarn of different colors;
- hook number 3;
- satin ribbon.

Baby blanket with funny bears will surely please the baby
Progress:
- Knit nine motifs that will be located in the center (four with a circular pattern and five with a bear pattern).
- Perform alternating colors and small motifs.
- Knit 64 small motifs.
- Connect all the details together and crochet the product around the perimeter.
- Sew along the edge of the ribbon.
First motive:
- Cast on 24 stitches and knit the base row in single crochet.
- Make an additional loop and additionally knit a single crochet into the first stitch of the previous row.
- In the second stitch, make a double crochet.
- Knit by alternating columns with and without a crochet the entire row.
- On the next line, knit an air loop again and knit the entire row with single crochets.
- Repeat these two rows until the very end.
Second motive:
- Cast on 31 stitches.
- In the eighth loop, knit a double crochet and dial a couple of air loops, then make another double crochet, forming an arch.
- Cast on three stitches, skip four stitches of the base and knit the arch again.
- According to this principle, continue knitting until only three loops remain in the row.
- Cast on a couple of loops and knit a double crochet into the very last of the loops.
- Start the second line with three air stitches and on two of them make five columns without a crochet, forming a kind of shell.
- Thus, knit the entire row.
- Start the third line with five stitches of the rise, make an arch in the center stitch of the shell. Finish the entire row in this pattern.
- Start a row with three air loops, knit a shell and repeat this pattern until the end of the entire line.
- Repeat the scheme of the second and third row until the work is completed.
Third motive:
- Dial a total of four stitches and close them in a circle.
- In the first line, make five air stitches, then knit three columns with crochets in the center of the ringlet and additionally dial a couple of loops. Repeat these steps twice.
- Knit a couple more columns in a circle and connect with a column with the third stitch. Repeat the steps again.
- In the next row, knit a half-column of six air stitches into the arch, knit three more half-columns into the same arch.
- Skip three stitches, knit three half-columns and cast on a couple of loops.
- In the next arch, using a couple of additional loops, knit three half-columns.
- Repeat the pattern a couple more times, then pick up an extra stitch, skip three columns and knit a couple of half-columns into the same arch that was knitted at the very beginning of this line.
- Close the row and continue knitting according to this pattern, alternating the colors of the yarn.
Fourth motive:
- Make a chain of 26 stitches, then, starting from the fourth of them, knit double crochets.
- In addition, dial three stitches and knit a line by analogy with the previous one.
- Thus fulfill the whole motive.
Fifth motive:
- Cast on 33 stitches and work the baseline with double crochets.
- Start the next of the lines with three additional loops, knit one column to the back wall, and the other to the front.
- Pattern to execute according to the given scheme.
Sixth motive:
- Start with a set of 24 loops.
- Knit a couple of lines with double crochets.
- Only on the third line make three air stitches, and then follow this pattern to the end: three columns with a crochet and pulling the thread from the inside out.
- From the fourth to the eighth line, knit by picking up three additional stitches, and double crochet.
- Knit the ninth row in the same way as the third, and all the rest according to the scheme of the fourth.
Seventh motive:
- Make a chain of 26 loops and knit all the loops of the base with columns.
- Add three air stitches and knit with regular stitches to the end of the line.
- Continue knitting according to this scheme, alternating the colors of the thread.
Important! The height of each piece should be 11 cm.
Crochet plaid for a newborn for discharge: a master class
An openwork plaid is ideal for a newly born baby. After discharge from the hospital, such a product can be put in a stroller during evening walks, covered with a light blanket for a baby in a crib. For children, such a blanket will be simply indispensable.
What is necessary:
- 300 g of white yarn;
- hook number 3.5.
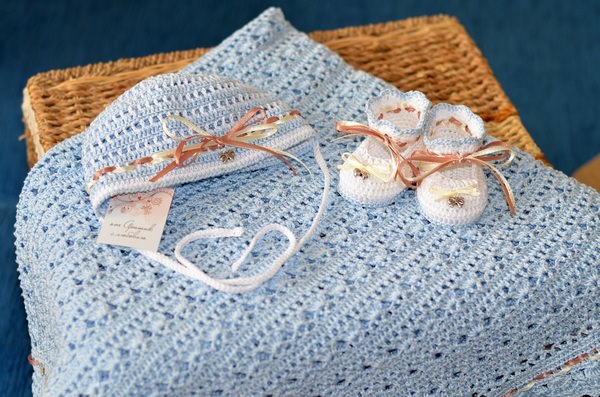
An openwork plaid is ideal for a newly born baby
Progress:
- Guided by the scheme, tie 25 identical parts.
- In the process of knitting, connect all the elements to each other.
- The finished product must be tied around the edge in three rows in this order: five columns in one stitch of the warp, a pair of air and skipping two loops, one column and a pair of air, skipping two stitches again. The cover is ready.
How to knit a blanket
Crocheted blankets and blankets look perfect, original and at the same time they turn out to be very warm. If desired, they can be additionally decorated with patterns of small flowers and even large flowers. Incredibly beautiful looks small three-dimensional ornament And flower meadow. But even without such details, the product looks amazing.
What is necessary:
- 800 g of yarn;
- hook number 10.
Crocheted throws and blankets look perfect
Progress:
- Make a chain with 122 stitches.
- Knit one line with single crochets
- In the next row, all columns are already double crochet, knitting three air loops into each column of the previous row.
- Do the next row in the same way.
- Alternate the scheme of the second and third lines until the work is completed.
The very last of all rows must be knitted in single crochet columns.
Choice of yarn for a blanket
The size and density of the future product depends on the yarn. Soft threads of medium weight are ideal. Knitting with them will be easy even for beginner knitters.
When choosing, you should also consider the following nuances:
- for a small children's blanket, only three skeins of yarn are enough, and for a larger product, you need to purchase at least six;
- it is advisable to take threads “in reserve”, since it is difficult even for experienced needlewomen to calculate the required amount;
- when buying, you need to carefully consider the articles on all skeins. If they are different, then the color of the yarn will be slightly different.
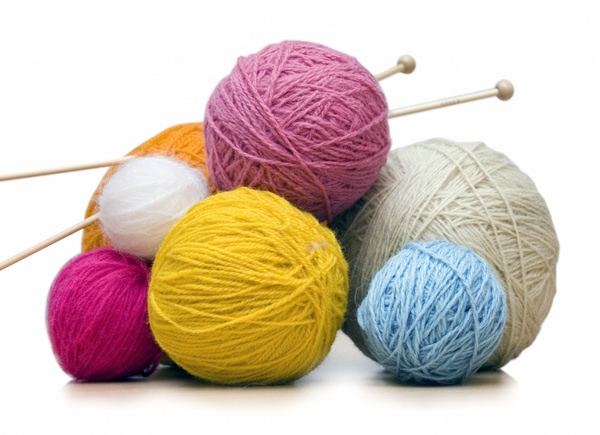
The size and density of the future product depends on the yarn.
What should be the size of the blanket
Before you start the process of making a blanket or blanket, you need to decide on its size. It will depend directly on who it is intended for and for what purpose it will be used. The main types of products should be like this.
There is a need for a thousand little things, often obligatory things that cannot be done without, and sometimes just cute accessories that make caring for a baby more comfortable. Such pleasant things include baby blankets.
A blanket for a newborn is easy to crochet, and a beginner needlewoman, barely familiar with the basics of knitting, can also handle this work. After all, a blanket for a baby is just a square of 100 by 100 centimeters, where there is no complex pattern and numerous calculations.
The length of the side of the plaid can vary from 80 to 120 centimeters. And, of course, a children's blanket does not have to be strictly square. It can be made, for example, exactly to the size of the baby blanket that you are used to.
A blanket for a child can be used in the most different situations- it has more functions than a baby blanket: wrap the baby in a blanket, take it with you for a walk to cover the baby in, cover the child in or use the blanket as a bedspread.
Such a knitted little thing can be not only very cute, but also practical.
We bring to the attention of craftswomen two blankets for newborns: a very simple, but dense and practical, and a more sophisticated blanket, with a more complex pattern, but no less soft and comfortable.
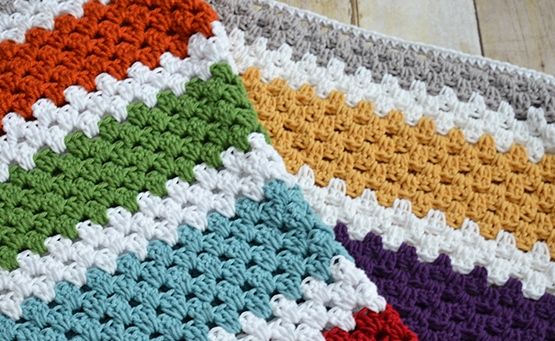
 For yellow ( photo 1) or striped ( photo 2) for a blanket measuring 80 by 100 centimeters, you will need 350-500 grams of yarn, depending on the quality and thickness of the thread.
Crochet No. 3.5 tie the original chain in 145 air loops. You may need 160 or 140 stitches for your yarn and hook. To find out exactly how many loops you need in the initial chain, and how much yarn you need for the whole product, you need to knit a sample of approximately 12 by 12 centimeters.
So you can make calculations for the entire blanket. Do not be lazy to make an imposition and make simple calculations - this is much faster than getting “wrong” in the end and dissolving an almost finished product. At the same time, get acquainted with the pattern, and find out the nuances of the transition between the rows - this is the only way the finished product will turn out perfect and will be the right size.
The first row is knitted as follows: 1 double crochet in the 3rd loop from the hook, then 1 double crochet in each loop of the chain to the end of the row. Turn work.
The second row and all subsequent ones: 2 air loops to lift the row and again to the end of the row with double crochets.
It is not necessary to make the blanket solid, you can alternate narrow or wide stripes, changing the color of the yarn every 2-8 rows. If you alternate two colors, then the thread can be pulled along the edge of the blanket. This will give additional rigidity to the edge of the blanket. If you use a lot of colors, then it is better to fix and cut the thread. Tie the edge of the finished plaid with a row of single crochets, and then with a “crustacean step”, when the single crochets are knitted from left to right, as if “backing away” back. At first, knitting in such a way is unusual, but the result is worth it: the edge is tight, does not stretch and looks great. Do not forget to carefully fasten the threads and hide their ends, because durability and appearance products.
Crochet products can always be decorated with contrasting silk ribbons by passing the ribbon “dotted” along a row of double crochets. Ribbon trim is not only relevant among needlewomen, but also looks very gentle on children's things.
Do you remember how you started your knitting career? Right. With a blanket for a doll. Now the doll is alive, and she needs a bigger blanket.
This throw is made in a more complex knit, but looks very sophisticated while remaining dense and warm. When knitting a blanket with leaves, you can alternate from two to five colors of yarn - the thing will come out impressive.
Below is a selection step by step photos and the only verbal description on the Internet of the pattern with which the plaid is connected. The blanket is double sided.
 The number of loops for this pattern should be a multiple of eight. For a sample, you can knit a chain of 48 or 64 loops. Next, to lift the row, we knit 2 air loops, in the next 3 loops we knit 1 double crochet, skip one loop of the chain, while doing one air loop, and in the next 7 loops of the chain we knit 7 double crochets. Again, we skip one loop of the chain, instead we make an air loop, and then - 7 double crochets in a row. And so we repeat until the end of the row. ( photo 3)
 In the 2nd row, we need to leave already 3 yarns (cells), into which we will then knit a leaflet of a contrasting color. To do this, we knit 2 air loops to lift the row, immediately skip the loop and knit 1 double crochet into the next, 1 air loop, 1 double crochet through the loop, 1 air loop, 3 double crochets in a row in each loop of the previous row. Then we knit to the end of the row: 1 air, 1 double crochet through 1 loop of the first row, 1 air, 1 double crochet through 1 loop, 1 air, 3 double crochets in a row in each loop. ( photo 4)
 The 3rd row is extremely simple: we need to knit a row of double crochets through one loop of the 2nd row, separating them with air loops. That is, 2 air loops for lifting, 1 double crochet, 1 air, 1 double crochet through 1 loop of the 2nd row - and so we alternate to the end of the row. Make sure that the columns are strictly one above the other. We do not need a “checkerboard”, but a clear geometric blank for knitting a leaflet with contrasting yarn. ( photo 5)
Now is the time to change the color of the yarn. Rows 4 to 7 are worked in a different color.
 The 4th row is the most complex and painstaking of the entire pattern. 2 air loops to lift the row, 3 double crochets into the loops of the 3rd row and knit the leaflet itself. Before us is a triangle of cells formed by air loops of the previous rows. We will use five cells along the perimeter of this triangle for a leaflet, two cells in the center (in the 2nd and 3rd row) will remain unused, they will be covered by the middle of the leaflet.
From each cell of the triangle, we will have to pull the thread twice to make the leaf convex and soft. You can try to pull out one loop from each cell - it's easier, but the pattern will be flat. We crochet the thread from the first cell of the 3rd row and (attention!) make a crochet on the hook.
 It is impossible to pull the loop twice from the same cell if you do not fasten the thread - the yarn on the hook will act as such a fixer. As an option, a half-knitted loop or half-column is allowed, when the loop pulled out of the cell is not knitted to the end, leaving the very first thread of the loop unused on the hook. ( photo 6)
After that, we dive for the thread into the same cell a second time. We tighten the threads to the desired length, monitoring the uniformity of tension. We perform the same sequence of operations with the cells of the 2nd, 1st, and again the 2nd and 3rd rows. Only five rays of a leaflet should turn out. If the yarn is multi-layered, you can draw one loop from each cell - then there is no need for an intermediate crochet or semi-knit loop.
 Now you have a lot of loose loops on your hook ( photo 7). Gently and slowly pull the thread through all the loops at once, pulling the base of the leaflet. ( photo 8) Knit 3 double crochets in the loops of the 3rd row - and again proceed to the leaflet.
 We continue to knit the next three rows with the same yarn, completely repeating the 1st, 2nd and 3rd rows described above. Then we change the yarn and knit the next row of leaves. ( photo 9)
 With the correct execution of knitting with a successful selection colors you get an incredibly beautiful and practical blanket that will delight the baby and you for several years. ( photo 10)
Both of the described products are dense blankets that will stay “in shape” for a long time and will not deteriorate after the first wash, which often happens with thin delicate things.


