DIY crafts and decorations for Halloween. DIY Halloween Crafts: Interesting Ideas and Recommendations DIY Halloween Crafts Easy
Web and spiders with their own hands
Web with spiders - simple and spectacular decoration rooms for Halloween, especially if a party is planned with guests and you need to create the right atmosphere.
The most obvious option is to wind woolen threads on the wall in the form of a web, fixing them with push pins. First you need to fix the warp threads (diagonal), and then wind the thread in a circle.

You can fix the thread-cobweb on a plastic disposable plate, populate it with a cardboard spider and hang it on a chandelier.

The basis for the web can be the crosshair of any sticks, for example, thin branches or ice cream sticks.


The web can be cut out of paper or oilcloth according to the same principle as a snowflake for the New Year.

Spiders for Halloween as a web decoration or as an independent decor, you can either buy ready-made or do your own crafts. It can be just a figure cut out of cardboard or a three-dimensional version.
These cute spiders can come from the same plastic plates. Of the materials you will need chenille (fluffy handmade wire) and eyes for toys of different sizes.

But such a not only funny, but also tasty spider can be made from lollipop and chenille:

More complicated in execution is the glamorous spider made of decorative mesh, designed in the form of a bubo.

Here you can make such a cute spider with your own hands from two foam balls different size.


And another version of the balloon spider, this time wrapped with acrylic thread.

A very simple to create, but spectacular looking spider is made of a black ball with paper paws. It may well frighten the guest who entered the room!

Halloween crafts from toilet paper rolls
Rolls (tubes) remaining after use toilet paper- excellent material for children's creativity. From it you can make figures of any animals and birds, but for Halloween - monsters, mummies and bats.

To create such mummies, nothing but toilet paper and a peephole will be needed. Wrap the roll with paper in random order, glue the eyes - the mummy is ready!


As for the creation of monsters, here you can show your imagination with might and main.


The same applies to making witches, ghosts and bats - no instructions are needed to make them.


Well, if you don’t have extra rolls lying around at home or there isn’t enough material to realize all your fantasies, use empty juice boxes as an alternative.

Candlesticks
An original decoration of the Halloween room decor will be a craft in the form of a candlestick. Making it is not as difficult as it might seem at first glance.

Take a glass container (jar) and stick thematic figures cut out of paper (witch, bat, pumpkin, spider, cobweb, etc.) on the outside. Place a candle at the bottom of the jar, light it - the lamp will light up spectacularly.


The drawing can also be applied with a marker, and the container can be painted with any color - then the lamps will light up in different shades and look monstrously gorgeous in a dark room. Boouu!


You can wrap the jar with gauze and glue the eyes - you get a mummy lamp.

Wrap the cans with thread and plant spiders on them - we are back to the topic of the web again.

Fairy lights
Option crafts for the holiday, representing unlimited scope for imagination. After all, you can hang anything on a garland!
Paper ghosts.

Skeletons, black cats and bats.


Skulls and ghosts made of felt.


Faces of monsters and witches.

Balls made of thread in the form of "sugar heads".

Paper pumpkins.

Thread ghosts.

Or fabric.

Halloween wreath
A wreath on a door or wall is a very popular home decoration. Now such wreaths are made for many holidays - and Halloween is no exception. As a blank, you can use a circle made of cardboard, plywood or a foam circle - they are sold in needlework stores.
These funny monsters can be made if many strips of tulle are tightly knotted on the workpiece.


Lyubov Gennadievna Pesotskaya
About the celebration of the day evil spirits Halloween is spoken more and more often today, therefore, Halloween crafts have begun to appear more and more often in children's art, especially in last years. This holiday can rightly be considered creative, not like the others. This is a great occasion to have fun, dress up in an unusual carnival costume or make a unique craft with your own hands.
In my master class, I will tell you how, together with children, you can quickly make crafts that are common attributes of this holiday. The creation of a lantern pumpkin, a ghost garland and a paper pumpkin will be described below. As my practice shows, children make such crafts with great pleasure and are very pleased with the result.
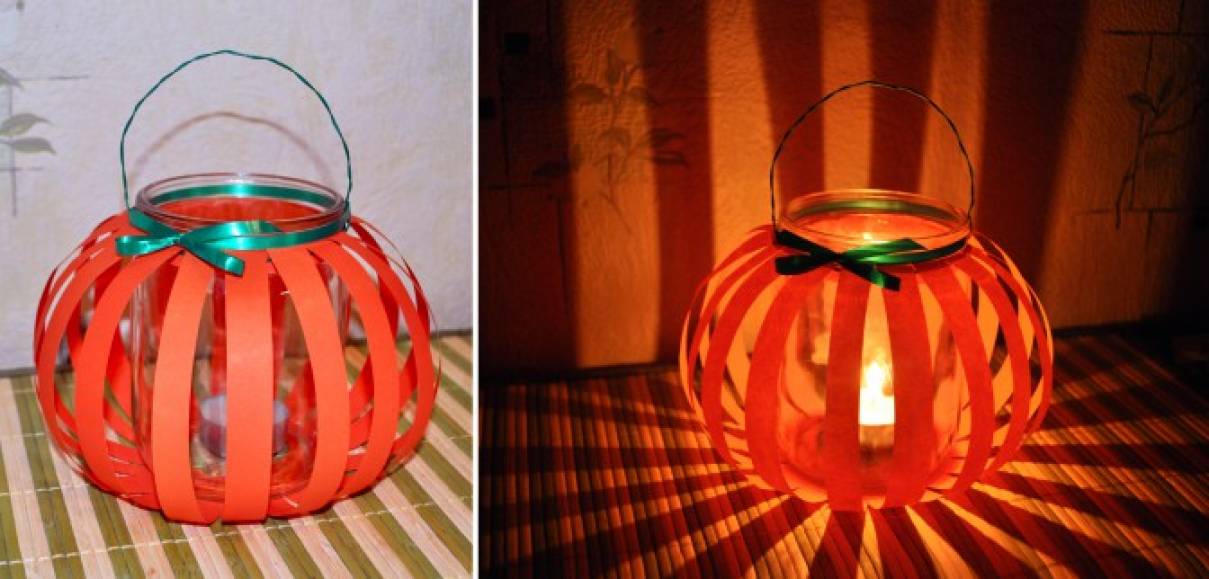
1) Pumpkin Lantern
We will need:
Glass jar
Colored paper (orange, preferably double-sided)
Scissors
PVA glue
Wire
Green ribbon for decoration (optional)
We cut colored paper into strips 1-1.5 cm wide. The length of the strips should be such that after gluing them to the jar, we visually get the shape of a pumpkin.

We glue the ends of the paper to the bottom and under the neck of the jar with PVA glue.

We twist the handle for our lantern from the wire. We also make a ring of wire under the neck of the jar and attach our handle to it. We decorate the neck with green braid. We put a candle in the jar. Our pumpkin lantern is ready! Very fast and efficient!
2) Garland of ghosts
We will need:
White napkins
Something round (in my case it's candy)
Thread and needle
black marker
To create the head of our ghost, you can use ping-pong balls, cotton swabs, large beads, etc. I used candy.

We place the candy in the center of the napkin, wrap it around and fix it with a thread. Draw the eyes with black marker. There was a little ghost.

If we make a garland of several, then we thread a needle and thread through each ghost. The garland is ready!

3) Paper Pumpkin
We will need:
Colored paper (orange, green and Brown color, preferably double-sided)
Scissors
Thread and needle
PVA glue
Cut out circles from orange paper, fold in half.

Sew along the fold line. We give the shape of a pumpkin. From green paper we cut out leaves, from brown we turn the tail. Glue to pumpkin. The pumpkin is ready!


I hope my master class will help diversify your thematic creativity and give joy to children and adults from making simple holiday crafts.
Thank you for your attention! 
Related publications:
For work you will need: watercolor paints, Finger paint, paper, plastic bag, brushes, water. We tint paper in an unconventional style.
"A flower for your beloved grandmother!" On the kindest day in the world In the brightest hour, Your grandchildren, your children We want to congratulate you! Dear.
Do-it-yourself postcard for mom valuable gift. For the manufacture, we needed cardboard, napkins, a stapler, double-sided.
Let me bring to your attention a master class on making crafts "Water lilies for mom" for the holiday of March 8. So let's start, we need.
Materials and tools We also need a candle to "solder the edges of the tape" divide the tape into squares: white into three, and blue and red.
To make your gift for the celebration original and memorable for everyone, you can make a masterpiece out of a simple bottle. For this we need:
It's worth getting ready for Halloween. But even if you have only one evening left, a rich imagination and a desire for a holiday will help you out.
Someone decorates the house, someone is going to celebrate the holiday in educational institution, arrange a Halloween corporate party or dress up a cafe for Halloween. Of course, you can order decorations in advance, but it is not always possible to take up the preparation in a timely manner. Therefore, when compiling a selection of Halloween decorations, we tried to take into account all the options. Well, you choose the one that suits you, and if you still do not know how to celebrate Halloween on October 31, our selection will help you.
halloween pumpkin
The most important symbol of Halloween is a pumpkin - preferably a large one, with a physiognomy carved on it. But if you did not have time to grow a pumpkin in the garden, and the holiday is already very close, you can replace it, for example, with apples. And this will not even be a violation of tradition, because Halloween treats have long been made from apples. Feel free to carve funny or scary faces on them, decorate them with caramel, place them on a dish in a pool of blood (raspberry jam is just right) - and the surroundings are ready.

What else to replace the main beauty of Halloween? balloons. Buy orange balloons, draw scary faces on them with a marker, and for more effect, if you have some time left, place a neon glow stick inside each balloon. And diversify the composition Christmas decorations or even ping-pong balls that can be wrapped in gauze and painted orange.

Halloween gauze ghosts
Without evil spirits, Halloween is not Halloween. So, let's try to create scarier creatures at home. The easiest way is to have a little ghost at home.
To do this, you need gauze and your imagination. You can throw it on a large floor lamp, or you can wrap coat hangers from the closet layer by layer. Or throw gauze over a white balloon. Complete the composition of the eyes and mouth, cut out of black cardboard.

If you have time, soak gauze in a starch solution and dry it on a frame made from improvised means - a bottle, a ball and wire or twigs. When the gauze dries and hardens into a bizarre form of a real ghost, the frame can be removed. Looks awful great.

DIY Halloween Spiders
Another indispensable attribute of Halloween is, of course, spiders. And if you did not plan to start a tarantula on the eve of All Saints' Day, create it from improvised material. For example, cut out spiders from cardboard or black fabric and attach them to walls, curtains, and ceilings. Silhouettes of cats, rats or ghosts will enhance the effect.
Like a pumpkin, a spider can be made from a balloon. Inflate a black balloon and attach eight cardboard legs to it. A terrible eight-eyed physiognomy will add horror to the spider. If you place such a creature under the ceiling on the fishing lines, it will definitely impress your guests.
And for children, you can arrange a less scary option - a spider treat. Wrap chupa chups or kinder surprises with black polyethylene. By attaching eight legs to each, you will get a whole flock of small and cute spiders.

witches for halloween
It is not necessary to invite a witch to a house or a festive cafe for a Halloween corporate party. But leaving traces of her stay is easy and simple. If you have a bank on hand, cauliflower and tea, prepare marinated brains for a scary potion.

Witch's shoes or pointy hats can also not only be worn as a carnival costume, but also decorate almost anything with them - for example, shoes look spectacular on table legs, and decorators advise hanging a hat from the ceiling, putting it on a pumpkin or turning it over and pouring it into its treats . And don't forget the broom. From a mop handle and dry branches you will get a panicle for a real witch, and she will certainly delight guests at the entrance.
Homemade Halloween Decor
To create a Halloween atmosphere, you can even use improvised means. For example, cardboard silhouettes in the windows will convince passers-by that a real Sabbath began in your apartment on November 31st.

Valuable helpers for Halloween at home are dry branches and gauze. From a bunch of rods, gloomy bouquets are obtained. Melt the wax and pour it over branches for beauty or hang spiders, cardboard pumpkins or candies there.

If you crumple the gauze and tear it with your hands, it will make a very convincing web. The walls and ceiling can be decorated with cardboard footprints - someone was in a hurry, running away from an aggressive zombie! And from faux fur and shoelaces will come out a garland of mice.
We wish you an atmospheric and successful Halloween. Do not limit your imagination, and then everything in your hands will turn into decorative elements. And to entertain guests, read about Halloween contests. and don't forget to press the buttons and
Evgenia Smirnova
To send light into the depths of the human heart - this is the purpose of the artist
All Saints' Night or Halloween has been revered in all English-speaking countries since pagan times. In Russia, this holiday is mainly revered by young people and small children, because only on this night you can fool around a little. For the celebration to be successful, it is necessary to create a special atmosphere in the house. Hang cobwebs around the house, sinister gauze ghosts with spiders, or make other Halloween crafts.
What is Halloween
The night of November 1 is the most sinister of the year. On this day, not only does the heat leave forever and winter begins, it was believed that on this night evil spirits come to earth, evil spirits wake up, terrible monsters from other worlds come. In order to somehow protect themselves from the invasion of evil forces, people began to change into scary costumes, decorate houses with images of vampires and witches, carve scary muzzles on pumpkins, thereby blending in with the crowd.
From these superstitions, an amazing holiday appeared - Halloween. Previously, the night of all saints was celebrated only in Great Britain and Northern Ireland, after the holiday other European countries were carried away, and in the 20th century the fashion for its paraphernalia spread to the CIS. Young people and children enthusiastically accepted this idea and since then, every year on October 31, they actively celebrate the "black" date, decorating their homes with various ominous symbols.
DIY Halloween crafts
In order for the night of all saints to be fun and a little ominous, you need to create a festive atmosphere at home: sew or buy scary outfits, in a special way arrange windows, doorways, tables. The main attribute of the holiday is Jack's lanterns, which are cut from fresh pumpkins and a burning candle is inserted inside. Garlands are very popular for decorating windows from autumn leaves different colors, paper ghosts and other spirits.
Doorways can be decorated with bat pendants, and in the center holiday table put up a cake in the form of a vampire's head. To decorate the table, they also use hand-made bloody candles, bake funny cookies in the form of lizard eyes, witch fingers, and serve special drinks to guests: Bloody Mary, Witch Potion, Bloody Devil and others. In the presence of simple materials and a little patience, you can bring to life any ideas for Halloween with your own hands.
Origami
The easiest material for home decorations, which is always at hand - paper, scissors, cardboard, glue. From such a simple basic set, you can create many various crafts for Halloween celebration. Paper can be glued original cobweb, and if you add a little fantasy in its center, a black spider will come to life. Try the DIY Halloween crafts below.
Spider
From black crepe paper, you can make a three-dimensional spider that will look like a living one. The toy can be used in the decor of the room, attached with adhesive tape to the wall or a homemade cobweb. To make a paper spider you will need:
- Cut out a piece of crepe paper measuring 50 * 20 cm.
- Measure a third of the length and bend the paper in half at the mark found.
- Squeeze each side into a tight lump, straighten the folds so that they are all at the bottom.
- From black cardboard, cut out the base of the same shape as the main part of the spider, reducing the size by a few millimeters.
- Glue the cardboard blank at the bottom of each hemisphere using double-sided tape or glue.
- From cardboard cut 8 strips about 9 centimeters long and 1 cm wide.
- Fold the strips in half, bend the edges in the opposite direction.
- Glue the finished paws to the body.
- Cut out small eyes from orange paper, glue a spider on the muzzle.
- The finished mummy can be hung in the corner of the room or decorated with a desk.

Ghost
A variety of garlands are ideal for decorating windows. You can make them from ordinary or corrugated paper. These cute ghosts make a great Halloween themed room decoration. To make a ghost garland, follow the instructions:
- Take a piece of roll paper, cut a strip about 8 centimeters high. The length should fit the window.
- On a separate sheet, draw a ghost template or download a finished sketch from the Internet.
- Fold the main strip of paper like an accordion so that the width of each square matches the stencil.
- Attach the sketch to the harmonica, mark the edges of the ghosts with a pen.
- Cut out the garland clearly along the lines, carefully processing small details.
- On the finished garland with fluorescent markers, draw eyes, nose, mouth.
- Thread the thread, attach the garland to the window.

How to make a do-it-yourself spider web for Halloween
You can make a lot of small cobwebs out of paper and hang them in the corners of the room. Such a decoration will look very original if the web is decorated with black-colored cotton wool, fine fluff or fluffy yarn, and plasticine spiders are fixed in the center. Instructions for this Halloween craft are as follows:
- Prepare a sheet of thick black sheet, glue, scissors, black thread.
- Make an accordion out of paper, fold it in half.
- Make small notches on one side with scissors, 1 centimeter apart.
- Cut out rectangular pieces from the sheet. For convenience, you can use not scissors, but a clerical knife.
- Based on the finished template, make the same cuts on the other side of the accordion.
- Tie the two halves of the accordion with threads. Unfold the web, fastening the ends with paper clips.
- Glue the joints, remove the paper clips.
- Pass the thread through the cobweb.

The bats
No Halloween celebration is complete without these bats. Bats are a symbol of evil spirits. In these animals, according to mythology, blood-sucking vampires turn. In order to make a beautiful bat, you must strictly adhere to the following instructions:
- Prepare a template. You can draw it by hand or take it ready-made.
- Fold a thick black sheet of paper in half.
- Attach a template to it, circle around the contour.
- Cut out the desired number of blanks with scissors.
- Draw ominous faces to the mice, attach to the wall with double-sided tape.

paper halloween pumpkin
The main attribute of All Saints Day, cut out of paper, can be pasted on the wall or decorated with a pumpkin front door. To make this Halloween craft, follow these steps carefully:
- Prepare orange paper, felt-tip pens, scissors in advance.
- Fold the sheet into a square. Print or freehand print Jack's pumpkin template.
- Redraw the template on colored paper, carefully cut it out.
- Paint the finished pumpkin at your discretion with felt-tip pens.

DIY fun
Preparing small details for the celebration of Halloween is only half the battle; you still need to surprise your guests with something. To make the party a success, come up with different jokes for your friends. These can be glow-in-the-dark eyes made of cardboard, or original bleeding masks. It all depends on your imagination and the availability of free time.
muzzles
Preparing for Halloween with your own hands is always a pleasant chore. If you started preparing for the holiday in advance, take the time to make the original mask:
- From plaster, make a cast of the upper half of the face.
- Let the plaster dry well, glue the workpiece with scraps of newspaper.
- After the glue has dried, remove the workpiece from the plaster.
- Decorate the base with nude or multi-colored paints. To get the base shade, mix white, blue and green paint.
- Blind a small slide from plasticine.
- Paste the plasticine with paper, leave to dry.
- Attach the slide to the cheek or forehead area.
- Paint with brown or red paint so that the effect of a festering wound is obtained.
- To keep the mask on, fasten a thin elastic band around the edges.

Halloween hand
A frightening-looking wound on the arm will be a spectacular addition to the image. To make the effect of a bleeding wound, it is not at all necessary to be a professional make-up artist, you only need to have PVA glue on hand, Foundation, hair dryer, shadows, brushes and food coloring:
- Lubricate the edge of the alleged wound with PVA glue, dry it with a hair dryer on the “Cold Air” mode.
- On dry glue, apply foundation with patting movements.
- Circle the edges of the wound with dark pink shadows on the outside to create the effect of skin irritation.
- Apply eye shadow on the inside brown shade, highlight the corners in black.
- For naturalness, blend the shadows with a brush.
- At the final stage, use a diluted red dye to make bloody smudges.

Eyes
Glowing somewhere in the dark eyes will scare any guest and give the holiday a special atmosphere. It is better to place such decorations in the yard: around the corner of the house, in bushes, grass. Making eyes is easy:
- In the center of a sheet of cardboard, draw and cut out different shapes of creepy eyes.
- Roll the paper into a tube, fix the edge with tape, a stapler or glue.
- Inside, insert glow-in-the-dark sticks or electric candles, fix with tape.
- Set the eyes in the desired location.
home decoration
A black tablecloth on the table, a burning pumpkin, a terrible cobweb in the corners of the room, a garland of ghosts and the right atmosphere for celebrating Halloween is ready. You can decorate the interior of your own home with the help of different things, the main thing is to make crafts with due diligence and love. Workshops on making a wreath and a lamp from jars will help awaken your imagination.
Wreath
It is better to hang this attribute on the outside of the door in order to shock guests from the threshold. To make a wreath, prepare willow branches, toy snakes, black spray paint and a hot glue gun in advance:
- From the branches, form a ring of the desired diameter.
- To the end with glue gun attach snakes.
- Cover the product with black paint.
- Let the paint dry and secure the wreath to the door with a nail.

From simple jars, napkins or white cloth, you can make original lamp type Egyptian mummy. With this decor, you can decorate the approach to the house, borders or place it on the window, and if you tie a wire to the bank, the lamp can be carried in your hands. This DIY Halloween decoration is done like this:
- Cut several long strips of gauze.
- Apply some glue to the jar.
- Wrap the jar with gauze strips, giving it the look of a mummy.
- Glue toy eyes on the top of the jar.
- Let the glue dry well. Place small candles inside the container.

DIY Halloween crafts for kids
IN kindergarten All Saints Day is not celebrated, but this does not mean that the child will not like the same action at home, especially if you involve the child in creating crafts. Try making your own Halloween toys. These can be applications from autumn leaves, plasticine vegetables, bat figurines or skeletons, simple drawings on paper. In the process of creating crafts, do not forget to tell the baby the story of the holiday.
You can adapt any improvised means for the decor for All Saints' Day. For example, you can make flying ghosts from an ordinary New Year's garland:
- To make crafts, take Christmas garland with small round bulbs.
- From a white, not too dense fabric, cut out the squares with which you will wrap the light bulbs.
- Poke a small hole in the center of the square with scissors.
- Wrap the fabric around the bulbs, leaving a hole at the top.
- Screw the balloons back onto the garland.
- Fix the fabric in the form of ghosts by tying a thread around the bottom of the ball.
- Use a marker to draw the eyes, nose and mouth of the ghosts on the fabric.

Salted Dough Pumpkin
original toy can be prepared from ordinary dough. Involve a child in the process of creating this pumpkin, ask him to twist the balls or cut out the leaves:
- To make the dough, mix 1 cup flour with 1/2 cup fine salt.
- Add a little vanillin, odorless vegetable oil to the dough.
- Knead the dough, divide into two parts.
- Color one half bright orange, the other green dye.
- Roll the dough into several orange balls of the same diameter.
- Press the balls on top, giving them the shape of a pumpkin.
- With a toothpick, make several vertical stripes on the sides that are inherent in a natural vegetable.
- Roll out the green dough. With a knife, cut out a few leaves, make a ponytail for a pumpkin.
- Give the leaves relief with a toothpick.
- Put the blanks in the oven at 180 degrees. Bake until the dough is completely set.

Little hats like a witch
If you are planning a real feast in honor of Halloween, these hats will be great decorations for a festive dessert or cocktail. Invite your child to participate in the miniature creation process by having them cut small circles out of paper. A complete process for making caps should look like this:
- Prepare black paper, scissors, glue, toothpicks.
- On paper, draw three circles: one larger and two smaller.
- Cut a large circle in half.
- Roll the paper into a cone using a toothpick.
- Bend the bottom slightly.
- Use glue to secure the top of the hat. Lubricate the lapel, attach the cap to a circle of smaller diameter.
- Let the glue dry.

Video
Did you find an error in the text? Select it, press Ctrl + Enter and we'll fix it!


