Snowflakes in kanzashi technique from satin and brocade ribbons. Snowflake from ribbons using the kanzashi technique Snowflakes how to make from ribbons on the rim
Kanzashi ribbon snowflakes presented in this detailed photo master class, made in strict color scheme, and therefore not only perfectly complement the New Year's image, but also fit school uniform. Girls can wear such wonderful jewelry at the very beginning of winter, without waiting for the arrival of a fabulous holiday. Snowflakes are made from a satin ribbon, collected in two- and multi-layer sharp kanzashi petals. We invite you to explore detailed instructions manufacturing of similar Christmas decorations in order to make them yourself if necessary. Snowflakes will perfectly decorate hair, a hat or carnival costume girls, and you can also hang them on a Christmas tree or decorate a magic wand. There is always a use for them. Soon New Year, and therefore you need to think over such useful little things that will be useful for a matinee or complementing a festive look.
To create snowflakes from ribbons using the kanzashi technique, you need to take (accessories are indicated for 1 product):
- a rich blue satin ribbon 5 cm wide - 14 squares, 2.5 cm wide - 35 squares;
- satin ribbon white color 5 cm wide - 7 squares, 2.5 cm wide - 35 squares;
- stamens with white or blue heads - 7 pieces;
- flower lace;
- a metal center and a transparent half-bead that matches it;
- felt;
- scissors, tweezers, glue; lighter.
How to make a snowflake from ribbons using the kanzashi technique step by step?
The proposed snowflakes will consist of two flowers (large and small) and branches. For the production of all layers, it is necessary to prepare sharp kanzashi petals. The main flower is made of five-layer parts, for their manufacture you will need 14 blue and 7 white satin squares with a side of 5 cm, 7 blue and 7 white squares with a side of 2.5 cm. All other squares with a side of 2.5 cm will be spent on small two-color petals designed to carry the top flower and branches. Having decided on the layout of the parts, proceed to their implementation.

To model the above indicated blanks, prepare the squares of the tape. Be sure to treat all sections with a flame to get rid of threads that have escaped from the satin.

Bend each square diagonally, then again along the height of the resulting isosceles triangle.

Lay the first large blanks on top of each other - a white square on a blue one, and another blue one on top. Press down.

Pinch the sharp ends with tweezers and singe. Hot satin should stick together. Then cut off the sloppy corner. Also align the bottom edge and singe the protruding threads.

In a similar way, make small petals, but they will be two-layered. Place the blue square on the white one, close the ends, fasten. Insert 7 small petals into the center of the large ones to form five-layer parts for the main flower. Pre-drop glue, and then enter the middle.
Also try to make white and blue:

Glue 7 five-layer petals into a flower. Glue 7 more two-layer blanks into a small flower. Glue the remaining 21 pieces into branches, combining 3 petals each.

Thus, all the details that were planned for the snowflake will be ready. Next, start assembling.

On big flower stick on the stamens. Position each of them along the petal. Glue a lace flower on top. In the center of a small flower, glue a hug with a half-bead. The middle can be chosen according to your taste or, based on the fittings that are available.

Glue triple branches into the voids between the petals of the bottom layer. They imitate the rays of a snowflake.
Another beautiful piece: 
Stick on the top layer. Elegant snowflake is ready. The diameter of the resulting product will be approximately 7 cm.

To make a pair of New Year's accessories, the number of pieces of ribbon should be doubled.

Next, it remains to stick felt circles on the back of the decorations and think over the purpose of the snowflakes. There are options for attaching the base in the form of an elastic band or hair clips, pins, decorating a bandage or a hoop. Such products are simply sewn on to a handbag, hat or carnival costume. Inspired by such a creative process, you can create many snowflakes from ribbons using the kanzashi technique to decorate the Christmas tree.
The New Year holidays are approaching, which means that it's time to think about creating original decoration and independently make a snowflake using the kanzashi technique.
What is kanzashi? It is the art of folding pieces of cloth so that they form beautiful flowers. Just using the kanzashi technique, you can make a beautiful snowflake.
Beautiful snowflake from satin fabric- excellent interior decoration, New Year's image, you can make a snowflake on a Christmas tree, a brooch or a hairpin.
Kanzashi snowflake - what you need to prepare for work
- Of the tools you will need scissors, a needle and thread.
- Glue (hot gun or Moment glue).
- Candle or lighter, tweezers.
- From materials, a satin ribbon 5 cm wide in white or pale blue.
- Cardboard or piece of felt.
- To decorate a snowflake, beautiful glue stones or small beads.
How to make a kanzashi snowflake
- We immediately draw your attention to the fact that it is necessary to prepare all the tools and materials, because the work to be painstaking, so be distracted by the search the right material and fixtures, not worth it.
- You need to cut out squares from a satin ribbon, 5 by 5 cm in size. In total, 42 squares will be needed. The number of blanks and their size may vary and depend on the type of snowflake. Therefore, if you want to make a snowflake with small petals, then you need to prepare another 3 cm wide ribbon and make blanks 3 by 3 cm in size.
- From each square you need to make a petal. How to do it: fold the workpiece diagonally, then again and again. Get a small triangle.
- The outer corners of the figure must be wrapped to the middle part of the workpiece to get a rounded triangle shape. It is best to work with tweezers, because it is very difficult to hold such a small detail in your hands. You can use a clip instead of tweezers.
- The first figure is ready, now you need to fix the corners. To do this, cut off the excess and use a lighter to melt the edges. When you melt the edge, press this place with tweezers. You can also press the cut point with your fingers a few seconds after reflow. The fabric will not be as hot, but it will still have time to grab.
- Look at the first petal - if it is uneven, you need to cut off the excess with scissors, trim and also melt the edges of the tape with a lighter.
- We make such 12 petals. There are still 30 blanks left in order to make pointed petals. The workpiece is folded in the same way, only the edges need to be made not rounded, but sharp.
- Cut off the excess, melt with a lighter. Make sure that all blanks are the same size.
- We take 6 petals, string them on a needle and thread, tie the ends of the thread. It turns out a round center.
- Now you need to glue sharp triangles together. Can be glued on with glue or strung on a thread. Only the petals are not glued completely, but in the corners.
- We made double petals, now we need to connect pairs of petals and insert a third one, this way we get blanks that need to be fastened in pairs (sewn or glued). Thus, the rays of the snowflake are formed.
- The workpiece must be attached to the base. We cut out a circle from thick cardboard (or from felt fabric). The diameter of the circle should be equal to the diameter of the central flower.
- From thin tape you need to immediately form a loop, glue to the workpiece.
- Next, you need to collect a snowflake: glue central part and successively rays. The work is painstaking, do not rush, everything will work out.
- The snowflake is ready, it remains to make a few touches: attach beads or glue rhinestones.
The New Year is already “on the nose” and I want to do something beautiful and very affordable in a New Year's way.
This time I decided to show the lightest and most beautiful snowflakes. Trust me, anyone can do it.
Let's get started.
In order for our snowflakes to turn out elegant, we will definitely take a metallized ribbon, or as they also call it, brocade. And any colors - satin ribbons. Tape width2.5; 4; 5. Tools.

Making the first snowflake.
Cut into 6 squares 5 * 5 cm - satin ribbon. And for 6 squares a brocade ribbon: either 4 * 4 cm or 5 * 5 cm - it does not matter.

We make 6 round double petals.


We collect on a thread or glue the petals, we get a flower.


I do so.

Pay attention to how I cut the petals, which I will glue between the petals. At what angle, a very common beginner mistake.

Now we collect 3 petals. First, glue the two petals together.

Then we turn them over and glue a third one between them.
.

We get 6 such details.

We take a flower and put it face to face. Spread with glue, where it is marked in red on the branch. And we put it under the round petal and straighten it right away. No need to pick up the flower, let it lie on the table.

We got our snowflake.

Now we turn it over and see what can be done with such a wrong side. To begin with, we will glue the junction with glue (marked in red).

Glue a circle of satin so that the flower acquires a base. Glue the felt only if it will be the final look. In our case, we don't need to.

Now I will show you how to decorate our wrong side.

Then we glue our snowflake to the rim.
Now you can glue all this with a circle and felt, but I decided to additionally fix the branches from the petals.


Now, we glue the whole flower with a square of brocade and decorate it all with braid at the same time, closing the joints.


Here's what we got, the photo is a little distorted.

You can see better here.

In this case, the branches do not bend.
All this must be sprinkled with hairspray.
Our headbands are ready.

Such a snowflake on a bandage.

Second snowflake.
Another version of the snowflake.
We make from a tape already 2.5 * 2.5-6 branches of 3 sharp petals (). Do not trim the bottom of the petals. We glue, as I showed.

We will make double sharp petals with an attachment.
We make a triangle by folding the square 2 times diagonally.

Glue our branch to this triangle.

And as if hugging from both sides.

Received such a petal.
Using the amazing kanzashi technique, you can create not only flowers, but also snowflakes that will be just as beautiful, but also fabulous. Such New Year's products can be done in white, additionally use sparkling elements of brocade, rhinestones, half beads and other decorations. In addition, blue, blue or golden colors are suitable for creating New Year's paraphernalia.
Beautiful snowflakes will shine on the Christmas tree, if you attach them to the branches, they will decorate the interior before the holiday. As well as elegant and expressive products can become the basis of hairpins for a girl. Young women of fashion will look like real Snow Maidens if they decorate their hair with such snowy accessories. A master class on making kanzashi snowflakes is given below.
For one snowflake you need to prepare:
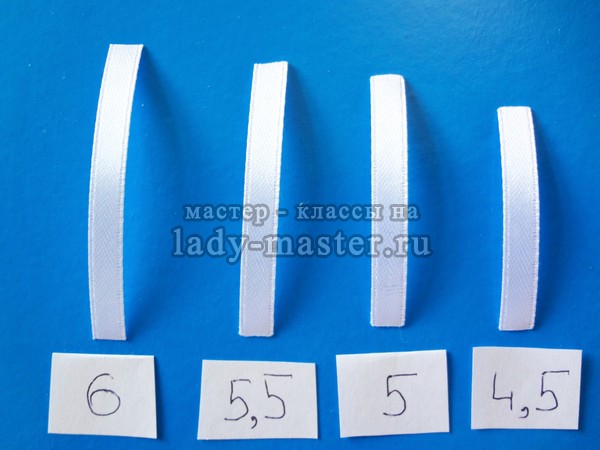
- - 24 petals from a white ribbon 0.5 cm wide (one petal consists of four segments 6 cm long; 5.5 cm; 5 cm and 4.5 cm);
- - 8 petals of silver brocade 0.5 cm wide (length of silver pieces 7 cm);
- - 11 sharp kanzashi petals from a white ribbon 2.5 cm wide (cut out squares with a side of 2.5 cm);
- - 8 diamond-shaped leaves from a white tape 2.5 cm wide (they will need 8 pieces of tape 10 cm each and a wood burner);
- - round felt base 4 cm;
- — 1 wide hugger and half-bead-stone 0.6 cm;
- - 8 small mother-of-pearl half-beads 0.4 cm each;
- - glue (transparent and strong).
Ribbon snowflakes, master class
1. Cut strips from thin 0.5 cm white satin ribbon to create layered droplets. The snowflake will consist of three layers of four-layer petals, in total, 24 portions of segments of each length listed in the list of materials will go to the indicated parts - 24 pieces of 6 cm must be prepared; 5.5 cm; 5 cm and 4.5 cm stripes.
2. Make droplets from the segments, gluing the ends together. This can be done with glue or a lighter flame. The size of the droplets-loops will proportionally decrease for segments of different lengths.

3. Glue the droplets in size together to get the petals. Connect the parts, overlapping each other, and fix at the glued base.
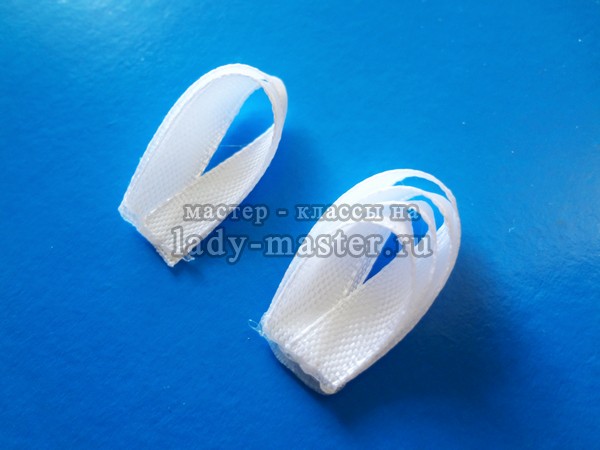
4. All 24 servings of droplets you need to turn into layered petals.

5. Divide all blanks into 3 parts of 8 pieces each. Cut out a 4 cm felt base. Glue the first layer of chamomile petals on it, consisting of 8 parts. When gluing droplets, step back from the edge of the circle evenly - by 05-0.6 cm.

6. Glue the second part of the petals on top in a checkerboard pattern.

7. Add the last row from below for splendor (but the loops should be directed upwards).

8. Cut out 2.5 cm squares from white satin or ribbon. Of these, you need to make classic sharp kanzashi petals for the inner flower. And 11 parts will be spent on this flower. Bend the squares diagonally (one).

9. Bend the resulting two-layer triangles in height. Close the resulting four-layer triangular blanks at the base, glue.
10. Cut along the line from the bottom to make the petal flatter.

11. Glue 11 petals into a chamomile. Prepare a hugger, a duplicate flower and a half-bead.

12. From 8 pieces of silver brocade 0.5 cm by 7 cm, also make droplets.

13. Glue the silver layer to the center of the snowflake.
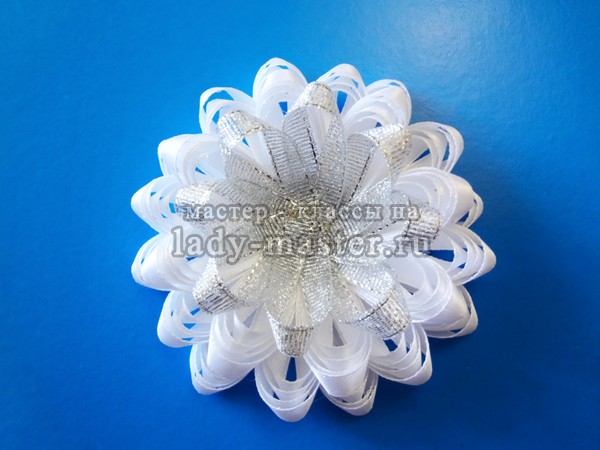
14. Drop glue and insert a chamomile inside, then a hugger with a pebble to make the snowflake sparkle.

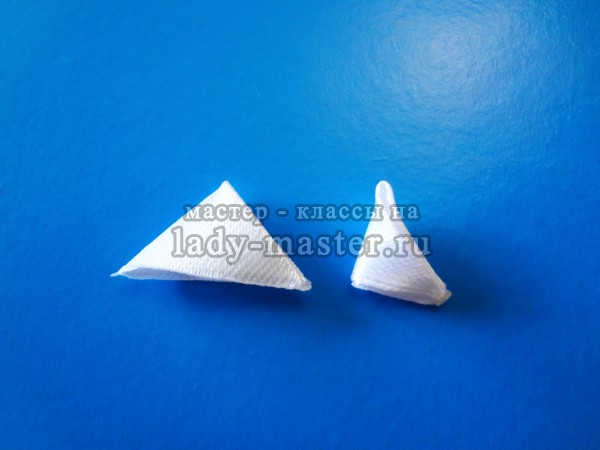
15. To create the bottom layer of white leaves that will resemble the pointed rays of a snowflake, use the last portion of the tape: 8 pieces measuring 2.5 cm by 10 cm. Fold each strip in half. Then divide the resulting rectangle in half diagonally with a burner. Unfold the pouches. Each rectangle will be divided into 2 portions, then use only those that look like sepals. Glue small mother-of-pearl half-beads on the tips.

16. Glue the leaves with the last layer from below. Arrange them evenly overlapping around the circumference.

Preparing for new year holidays- it is always exciting: you need to buy gifts, decorate the room. Very original version- kanzashi snowflake. It is easy to make and looks like a fabulous souvenir. Such a product can transform the interior or use as a gift, addition to it.
Christmas snowflake-kanzashi
As you can see from the photos presented in the article, these products look very beautiful and impressive. For their manufacture, only fabric is needed. Due to the volume of the design, the play of light and shadow in the kanzashi elements, the snowflake looks so beautiful. All parts are securely fastened, so you do not have to redo the decor every year, as is the case with paper decorations, which are torn and quickly become unusable. Another advantage of such crafts is ease of manufacture, because making them is no more difficult than paper ones. Decorate with satin ribbon decor can be a window, Christmas tree, new Year costume, and even make a garland.

What will be required
The kanzashi snowflake needs to be done neatly and consistently, so it's best to find everything you need beforehand. During work, do not be distracted by the search for missing materials. So, prepare the following:
- Satin ribbons different widths(from 5 mm for decorating the frame to 5 cm for making large elements).
- Fabric of suitable quality, color and texture (nylon, organza).
- Scissors.
- Lighter, candle, matches.
- Tweezers-clamp (for ease of use).
- Needle with thread.
- Thermal gun.
- Cardboard.
- Wire.
- Decor (beads, beads, sequins, for example in the form of snowflakes).
- Braid or for making pendants (optional).

The list is up to the mark. In the minimum set, you can get by with ribbons, scissors, a lighter and tweezers.
How to fold a single petal
How is a kanzashi snowflake made? The master class will teach you how to assemble simple blanks to create it.

Work like this:
- Cut the ribbon or other prepared fabric into squares.
- Treat the cuts over a candle flame or lighter.
- Fold the square in half and then in half again. You can glue the layers with a thermal gun, sew them together with threads, or heat the joint over the lighter and squeeze it properly with tweezers so that the parts fuse.
- Trim the bottom corner of the resulting workpiece so that it takes on the form of a petal that looks like a ring.
- Having completed many of these details, you can make elements of rays for snowflakes and centers from the required number of parts.
How to make a double petal
To make beautiful ones below), you will need to make double petals.

The technology is like this:
- As for singles, cut the ribbons into squares. It is possible to make a double element both from the same and from blanks of different sizes. In the first case, you will have to cut the bottom of the petal additionally. It is better to choose different colors and even textures. This will be more effective.
- Fold both squares individually into triangles.
- Repeat the previous step one more time.
- Superimpose one triangle on another (smaller to larger).
- Perform the third addition of both blanks together.
- Connect, like a single piece, with a lighter, thread or hot glue.
Kansashi snowflake: master class
If you have mastered the method of making simple elements (single or double), you can start creating a beautiful winter decor. To make the same beautiful kanzashi snowflakes (photo below), you just need to combine the manufactured parts in different versions.

To form the centers of snowflakes, you can make an element consisting of double petals bigger size with smaller single or the same double blanks glued into the middle. In addition, you can decorate the middle of each petal by inserting and securing a drop-shaped pearl bead. Variants are easy to create great amount. It all depends on your imagination, perseverance and desire.
The assembly of the snowflake is carried out in two ways:
- Without frame.
- On a wire and cardboard basis.
The second method is suitable for large products with long rays.

Small snowflakes can be made by the first method. In the version without a frame, the snowflake is simply assembled by gluing the elements together. First, blanks from several petals are assembled, and then large parts are assembled together.
Assembling a snowflake on a frame
If you decide to work with the framework, the sequence will be as follows:
- When the required number of petals is ready, cut out a circle from cardboard according to the diameter of the snowflake's turnover to close the joints of the parts. The same circle, only of a larger diameter, is made of fabric.
- Put the cardboard blank on the fabric and pull the edges of the fabric along the inner contour of the cardboard circle.
- Cut the blanks for the rays from the wire (3 large and the same number of small ones). The size is equal to the diameter of the snowflake (after the wire can be cut in half).
- wrap the wire corrugated paper(or replace it with a napkin). Coat with glue.
- Glue narrow satin ribbons to the wires suitable color(they will be on the back).
- Cut the pieces of rays into two parts.
- Start assembling. Collect the middle of the snowflake, for example, from 6 petals. Glue the blank to a round cardboard and fabric base.
Glue the prepared parts of the rays to the frame wire. - Glue all the rays to the circle on the back of the snowflake. This can be finished, but if a neater back side is required, make a second circle of fabric and glue it with the top layer. It is easy to attach a magnet to it. The circle can also be with a cardboard base inside.
- Finish the front side: decorate with beads, if desired, treat the corners of each element with glitter gel.
Thus, a kanzashi snowflake is a beautiful decor that is easy to make, and there are many options for its use.


