DIY paper flowers for scrapbooking. Flowers for scrapbooking
If you do scrapbooking with your own hands, it will be logical if various parts also made by yourself are used to design the album. And especially the flowers. They are not only easy to make, but also very interesting. There are no boundaries for fantasy, as well as restrictions in technology and materials.
A silk peony, a gardenia from a newspaper, a stylized daisy made from pressed paper petals, a cut-out cardboard rosette, and even flowers from polymer clay. Each of these methods carries its own mood and creates a special flavor for the decorated page.
Of course, paper is the most used material. It is not only the most accessible, convenient and cheap, but also the most studied by masters. In order to make do-it-yourself paper voluminous flowers for scrapbooking, we need:
- paper for watercolor or semi-paper;
- PVA glue;
- scissors;
- toothpick;
- ink and sponge. You can also use acrylic, food coloring, watercolor or gouache.
Master class on making paper roses
- Cut out two large blanks and four small ones. It is necessary to make 5 petals in them and circle the same circles in the middle with a pencil.

- Cut the petals to a pencil circle. With a sponge dipped in ink, tint the edges of each blank. Let the colored paper blanks dry.

- Twist one end of each petal onto a toothpick with your hands.

- Turn the flowers over and also use a toothpick to wrap the other edge of the petal in the opposite direction.

- Bend all paper petals slightly inward relative to the pencil circle.

- Assemble the rose by laying one blank on top of the other (two large, then four small ones) and fastening them together with glue. Rose is ready. In the same way, you can make petals for her.


Watercolor paper roses
Paper roses and butterflies in vintage style
In order to conduct a master class on making roses for scrapbooking from fabric, we need chiffon (nylon, silk) of two colors, a candle, scissors, beads and a thread with a needle.
- Cut out four pieces for the rose and two for the petals. Flowers should have wavy edges and slightly different diameters.

- Light the candle and gently burn the edges of the fabric. After such processing, the fabric will not crumble and the workpiece will turn from a flat one into a three-dimensional one.

- Assemble all the blanks with your own hands into one flower according to the pyramid principle (the largest at the bottom, the smallest at the top) and fasten them by stitching them with threads. With the same stitches, you can make a beautiful core by sewing on a few beads. Glue the leaves. The scrapbooking rose is ready.

These cute unpretentious flowers can be made with the children. All we need is: pieces of colored paper, paints, a brush, scissors and PVA glue.
- The master class begins with cutting out identical five-petal blanks. Then we take a brush, paints and tint the flowers, as shown in the photo. Cut each blank in one place to the middle.

- Now you need to make a small bag with your own hands by gluing two petals together. Carefully cut off the bottom of the bag to make a small hole.

- Cut a strip as wide as the diameter of the flower and about twice the length of the flower. Cut the fringe half the width of the strip.

- Cut the edges in a strip at an acute angle, roll into a tight tube. Then you need to make a small brush out of the fringe.

- Lubricate the middle of the flower inside with glue, insert a brush into the hole. Such small paper flowers can be collected into lilac or cherry blossoms, making out the next page of a scrapbooking album.

The paper twisting technique (as the word is translated) will help us make beautiful three-dimensional flowers for our album.
Let's start the master class with the simplest. Twist a spiral from a strip of colored paper, grab a few turns with two fingers, squeeze them and turn the disk into a drop.
It remains to make a flower for scrapbooking by collecting a few droplets in a circle and fastening them in the center. In the same way, do-it-yourself leaves are made using the quilling technique for scrapbooking.

See what charming daisies you can make with your own hands from strips of paper. We twist the core tightly from a thin strip of brightly colored paper. Then we wind a strip of medium width with a fringe cut on it.

And we finish the master class with a wide stripe with a fringe. We fasten everything with PVA glue. Great flower for scrapbooking.
From this master class you will learn how to make delicate paper roses with buds. They are perfect for embellishing scrapbooking.
We will need:
1. A4 watercolor paper;
2. Scissors;
3. Ruler;
4. Paints (I have acrylic);
5. Glue "Crystal Moment"
6. Rug (I have a quilling board, but so far I haven’t used a foam mouse pad - it’s also very convenient, it’s a little denser, but the essence is the same))));
7. Pen and Brush (as a replacement for a special tool, I don't have one yet);
8. Water.

Handle with rounded end

Let's start ... Surely, many of you know how to cut a flower without a hole punch, but since this is MK, I will describe the whole process)))

We bend the A4 sheet so as to get a square, and tear off an extra rectangle along the ruler, of course you can cut it off, but we don’t need the edges to be even! - we'll trim them later...
If you need flowers much larger, then instead of A4 we take A3 and do the same ...

We tear into 16 squares, from the rectangular residue we also make 8 more squares

Fold the square in half

and fold the corners inward

We get this "corner"

cut along the line outlined by the eye

We cut out our flowers of different sizes, 3x is enough, 8 pcs.

We unfold ... and voila the flower is ready)))
It is quite difficult to cut out, because the paper is very thick, and the flowers do not always turn out beautiful ... but this is not scary))) it is desirable but not at all necessary))) in the end we will glue them and everything will be beautiful))))

We tint the water as we need ... I need plain light pink roses, and I do not dilute the paint thickly ....

And we send our flower to bathe)))
If flowers from watercolor paper, then they definitely will not become limp even in a few days! Verified)))

All! All flowers are cut and "soaked",
turn them over in a bowl so that those who are "bathing" are on top for a long time)

We take our rug, a handle for large flowers and the tip of a brush for smaller flowers
We take flowers one by one.
Departing from the edge of the petal about 2-3mm. we press and scroll to the sides ... and the petal itself changes before our eyes)))
along the way, you will figure out with what force and how much and what to twist)))

This time, with a brush, I liked it more, due to the fact that the diameter of the brush is smaller - the petals are more interesting...

That's what happened))) We do the same with the rest of the flowers.

Ready! Now you can relax, drink some tea))) well, or do something else, we have 20, 30 minutes while our blanks dry ... Probably, you can dry it with a hairdryer, but since it takes 2 hours, I didn’t risk )))

Now that everything is dry, let's start assembly)))

Dropped into the middle of a small flower, petals up ..

and twisted, hold a little, so that the glue grabs, you get a bud)

To the second small or medium flower (which is more suitable), only now with the petals down, glue our bud


All our rose is ready)))
In total it turns out, from A4 sheet, 4 roses and 4 buds

Now the button:
Materials:
1. Flower preparation;
2. Crepe paper green;
3. Wire (I still have purchased flowers).
4. Glue "Moment Crystal"

Cut out a strip of 20x100 mm. This is more than enough for 4 buds)

Roll up and cut grass

I pierced a hole in the middle of the flower with a pin, otherwise the wire could not cope)

We bend the wire with a loop and into a flower, then we wrap it with our grass. Ready!!!)))

And one more time all together)))

I hope MC is helpful!
The idea of book design for postcards and photos appealed to many lovers of handmade. Modern materials and tools allow you to create real masterpieces. You yourself can get to know this technique better, learn how to make scrapbooking with your own hands or special paper for this kind of work.
In such a place it will be nice to keep memories of the most precious moments of life.
A fashionable direction in needlework allows you to design and create family and personal photo albums in various styles.
- European - a minimum of decor, the main attention is focused on the photo and its shape.
- American - the composition consists of many elements and decorations, represents a single whole.
- Clean and simple original solutions for free space, simplicity and neatness.
- Shabby chic - lace, bows and ribbons are combined with elements of drapery and scuffs.
- Vintage - the atmosphere of antiquity and the spirit of Victorian England.
With this technique, it is possible to various crafts for home
His common techniques are:
- cropping - photos are cropped so that only the most important details remain;
- stamping - various applicators and stamps with drawings are used;
- decoupage - special pictures are transferred to paper and other surfaces;
- journaling - small inscriptions and tags with its description are placed under the photo;
- distressing - a method of aging paper with ink is used.
They can use almost any material - from colored paper to thick fabrics and dried flowers. It all depends on your imagination and the given topic.
Necessary materials

List of tools and materials that will be needed for work
Beginners often ask themselves the question - how to make scrapbooking with their own hands and where should they start? For them, there are special sets of already assembled scrap paper. For non-you will need special tools:
- different types of scissors for cutting;
- punches and stamps;
- sharp clerical knife;
- glue, ruler and tape;
- cutting mat;
- decorative accessories.
How to make DIY scrapbooking paper
You can not buy a whole set, but make all the blanks yourself. To do this, follow the instructions on how to make DIY scrapbooking paper.
You will need - colored or white cardboard, napkins with decoupage patterns, sharp scissors, a spray bottle with water, an iron and ironing board, food thermal film.
- Separate the bottom layers from the napkin and iron the top one so that there are no folds or wrinkles.
- Lay the cardboard and evenly spread the thermal film on it.
- Place the prepared part of the napkin on top, aligning it with the edges of the cardboard so that a few millimeters of the film protrude beyond the edge.
- Cover the workpiece with a clean sheet of paper or the lower layers of a napkin and iron it with a hot iron.
- Turn the hot paper over so as not to dislodge the film and trim off any excess around the perimeter.
- Iron again - if wrinkles form, moisten them with water and repeat the procedure until they disappear.
So you can make scrap paper of any size, color and thickness, with any pattern you like, significantly saving on a store set.
DIY scrapbooking album - step by step
Creating albums is a more responsible and complex task, and at the same time incredibly exciting and interesting. If you don’t have your own ideas, you can get them from master classes on making a scrapbooking album with your own hands on the Internet.
Start with simple and small compositions that do not require a lot of decor, so you can practice gluing and decorating sheets so that further complex work turns out to be more accurate.
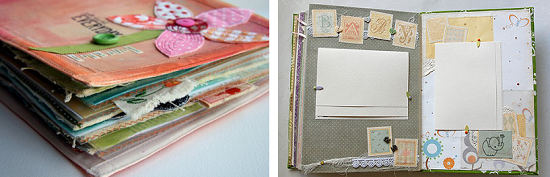
The choice of color and decor is a matter of taste for everyone
How to make a scrapbooking photo album with your own hands step by step:
- Take a sheet of thick white paper and divide it into 12 identical squares with a pencil and a ruler in three rows of four squares.
- Cut the sheet, separating the sectors from each other. Do not cut to the end one square on each side.
- Glue certain sections together to make a whole ribbon, fold it like an accordion.
- Assemble the album using washi tape or medium-thick paper, gluing the pages together so they don't fall apart.
- Make a book spine - glue a strip of tape of the desired size to its first and last page.
- Start finishing your album. Think in advance about its theme and the photos you will put in it, create some preliminary sketches.
- You can use any means at hand - stamps and curly scissors, small sewing accessories, pieces of thread and fabric, buttons and rhinestones. But remember that the smaller the album, the less voluminous details, otherwise it will appearance will be far from ideal.
- Bandage the finished item beautiful ribbon or sew it with an unusual thread. Optionally - write your name or its name on the cover in ink or paint.
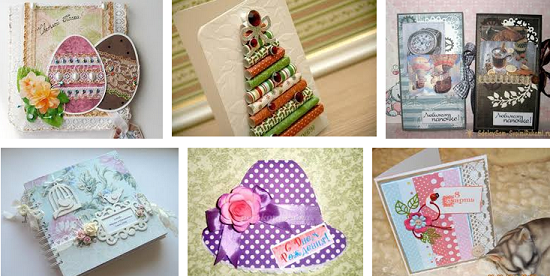
DIY postcards using scrapbooking technique
Postcards look especially touching in this style for any occasion in life.
All you need to create an individual postcard is whatman paper, colored paper, scissors, glue and a little imagination. Depending on who it is intended for, its content and form may differ.
How to make a DIY scrapbooking card?
- Prepare necessary items - colored paper, cardboard, scissors, glue, lace, ribbons, beads, artificial flowers.
- Make the base of the postcard out of heavy paper, preferably soft double-sided card stock. It can be colored, smooth or embossed.
- If you have a dark base, cut off a piece of light paper and place it in the wish area. Use ready-made templates for cutting even shapes.
- Do not be afraid to experiment, materials with different textures. They will give your product originality.
- For beginners, there is an easier way to create your own masterpiece. In the stationery departments, ready-made thematic sets for creating postcards are sold. They include all the necessary elements for creativity.
DIY scrapbooking notebook - step by step instructions
Scrapbooks of small size look neat and easy to use, can become a good gift for a loved one.
You can make a scrapbooking notebook with your own hands using this master class.
- Make a blank from A4 sheets to make an A5 size notebook. Fold each sheet in half and stack them in a stack of three sheets.
- Sew the structure with a thick thread, fill the seam line with glue from the fold side so that the threads lock in place and you get a neat spine.
- Fix the workpiece with clerical clips and let it dry. Re-glue the joint with glue and press it to it satin ribbon so that its edges protrude on both sides - one short, the second long.
- Burn the edges of the ribbon with a lighter to keep them from fraying. Bend the short end inward and glue it again.
- Make a binder. Cut out three cardboard shapes. corresponding to the size of the spine, front and back of the workpiece with a margin of 0.5 cm.
- Move on to cover design. Place the binding pieces on the material that your notebook will be covered with - scrap paper, textiles or leather. Cut off the top corners of the cardboard.
- Cover the binding by folding the outer edges of the material inward. Fix them with glue. Mask the attachment points with a flyleaf - fold two sheets of thin office paper in half and glue them to the cover on both sides, first to the block, and then to the top.
- Connect the pages with the prepared block - glue the sewn folds to the spine, and then proceed to the decor.
- Design the notebook at your discretion - cut out various shapes from leather or colored paper, tint the pages, use lace, beads and buttons.
How to make a DIY scrapbooking wedding album
All young couples want pictures from the most memorable day of their lives to last forever. The original way for their storage offers a master class of a handmade wedding scrapbooking album.
- Make an album, choosing the size of the sheets according to the size of the available photos.
- Place one picture on each sheet and deal with its design.
- Connect sheets of watercolor paper in pairs with glue, decorate them with gold patterns or use a stencil.
- For greater effect - run along the edges of the pages with a dry brush with gilding.
- Make separate substrates for your photos - apply pattern fragments on them with the same stencils, make cuts in their corners to fix the pictures.
- Take care of substrates for photo cards - stick lace, sequins or satin ribbon around their perimeter. Make sure that the pictures are not lost against the background of the design you have chosen.
- Cut out the cover from thick cardboard so that it is slightly larger than the size of the pages themselves. Paste it with velvet by analogy with the technique that is given in the manufacture of a notebook. Decorate the top of the cover with an applique of pearls or beads, small lace. For greater density - put a synthetic winterizer under it.
- For the convenience of viewing the wedding album - insert the rings into it. Make identical holes in the sheets and cover with a hole punch and fix the fasteners of the rings in them.
DIY scrapbooking flowers

The most delicate decor - various flowers
A variety of jewelry and small decorative elements allows you to create real miracles of handmade. But many needlewomen try to make various flowers and figures on their own. For those who are not afraid of difficulties - a master class on how to make flowers for scrapbooking with your own hands.
- You need - two hole punchers for 6 petals different sizes, watercolor paper and drawing paper, food coloring, plastic stamens, cotton swabs, water and glue.
- Make flower blanks using hole punchers - two large parts and one small one per flower. Cut the pieces and place them in a container of water.
- Dilute the dye in the proportion that is necessary to obtain the desired shade. How brighter color- topics more paint and less water, and vice versa.
- Make sure that the paper elements are well saturated with moisture. Take them out of the water, put them in piles of 6 large and 3 small figures, apply cotton swab diluted paint.
- Drip a couple of drops into the middle of the flower, and then spread it around the edges. Press the stack of blanks on top so that the dye penetrates all the elements and set them aside to dry. To speed up the process, use a hair dryer.
- Collect the dried petals with accordions - put the extreme petals in the middle, and the ones following them under the middle.
- Glue the parts together, slightly shifting them relative to each other, place the smallest parts on top.
- Make holes for the stamens in the center of the resulting blanks. Thread them with a thin wire and fix them at the base with glue.
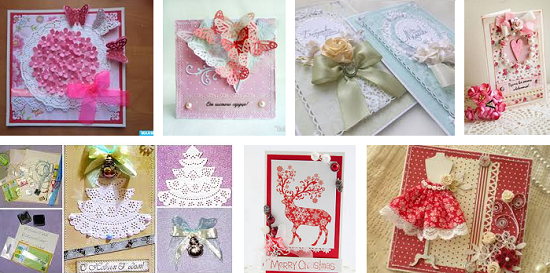
Scrapbooking valentines
Valentine's Day is a good occasion to please your loved one with a homemade postcard. Make your own scrapbooking valentines. To do this, follow the above technique.

One of my favorite holidays is Valentine's Day.
A couple of tips for those who don’t know how to make a scrapbooking card for February 14 with their own hands:
- make a valentine in red and pink saturated colors;
- use the symbol of the holiday heart as a form for blanks or decor;
- write a frank or romantic, memorable wish;
- think over the design and prepare the necessary materials;
- do not use expensive accessories if you are making a postcard for the first time;
- try to do the work neat and harmonious;
- Do not copy other people's ideas, bring something of your own.
Pedigree scrapbooking book
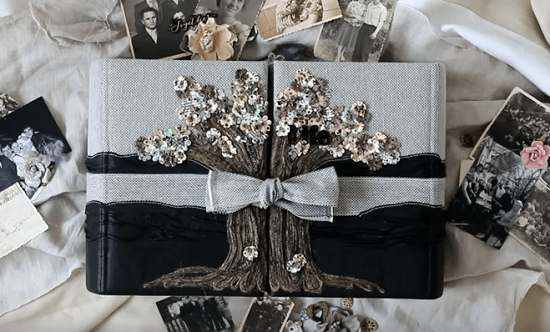
Design option for a family album in the form of a tree
The principle of operation is similar to a notebook or a wedding album. The scrapbooking family tree book made by their own hands differs from them only in some nuances.
- It must contain family tree. It can be drawn by hand or executed in the form of an application.
- Under the photographs of family members, it is worth indicating the names and dates of the captured events, put a brief description.
- The design of the book is best done in shabby chic or vintage styles, applying journaling and distressing techniques to it.
- It is worth taking care of the volume of the album in advance - there should be enough space in it for photos of new relatives.
Photo albums and photographs, as well as other memorabilia. The name of this needlework comes from the English words scrap - clipping, book - book, which can be translated as "book of clippings". Masters use special techniques in their work: aging pages (distressing), creating stamps (stamping) and raised elements (embossing). The only drawback of such a hobby is the high cost of consumables. But many of them can be made by hand. Scrapbooking flowers are one of the most popular decor elements, which are often used to decorate frames and gift wraps.
To create one bud, you will need the following materials:
- dried baby wipes;
- paints;
- small plastic cover;
- simple pencil;
- thick paper;
- scissors;
- transparent glue or glue gun;
- stamens;
- thin wire;
- candle.
DIY scrapbooking flower templates
To create a bud, you need to make two stencils of different sizes: draw a five-petal flower on thick paper, cut it out and make another one, but a little smaller. The edges can be left uneven, then they will look more natural. You will need two of these templates. Before making DIY scrapbooking flowers, dry the wet wipes, otherwise they will not take the desired shape. Fold the napkin three times, put on it larger template and outline with a pencil. Repeat with a smaller template, without capturing the outline. We make cuts between the petals, after which we separate the layers.

How to make DIY scrapbooking flowers? The master class consists of several stages:
- Coloring petals.
- Searing the edges over the candle.
- Assembly.
- Design of the middle and back.
Toning and singeing petals
We breed paint desired color in a plastic cover, we try the tone on the unnecessary part of the napkin and, if everything suits us, we start coloring the blanks, dipping them in liquid. We wring out and lay out the petals to dry - a wet napkin will not hold its shape. You can speed up drying with a hair dryer. Now we take a candle - it will help to make the edges of the flowers rounded, to give them a convex shape. We carry each petal over the candle, trying not to burn the edges.

At the next stage, we fasten the layers together, superimposing them on top of each other with an offset in order to achieve natural look. Glue and wait for complete drying. From felt and non-woven fabric, you can also make flowers for scrapbooking with your own hands. Paper templates are the same. The only difference: when using interlining, you need to make the bottom layer of an opaque material.
How to form the middle of a flower
For one bud, you need about 20 stamens - the more there are, the more magnificent the middle of the flower will turn out. We cut off about 3 cm from the wire and drag it in the middle of 10 double stamens. Now fold the resulting bouquet in half to form the core. All stamens should not be at the same level. Carefully make a cross-shaped cut in the center of the assembled parts with scissors, apply glue on both sides. We stretch the wire through the middle, cut off the excess. Holding the end, straighten the middle. On the reverse side of the flower, we distribute the tips of the stamens in a circle so that they do not interfere with work.
Making the back
Making flowers for scrapbooking with your own hands is desirable with a green base - this is how they will look complete. You can make it in the same way as the petals - cutting out a star-shaped part from a napkin and tinting it with light green paint. The edges don't have to be perfectly even. Another option: use for this. Glue the resulting leaves to the base. You can improve the flower by making it more rigid - then it will be more convenient to use it in your work. To do this, dilute a little glue, take a wide brush, coat the petals with this solution and leave to dry. Ready flower can be additionally tinted with paint or coated with glitter.

DIY paper roses
DIY scrapbooking flowers are also made from paper. They can be created in any color and size. To work, you will need special blanks for the petals: we cut out five-petal flowers from watercolor paper, and at the top of each petal we make small notches. For one product you will need 4 blanks.
Probably no element in scrapbooking is as popular as flowers. You rarely see a work where at least one small flower is not used. Apparently this is because flower arrangements give lightness and charm.
What types of flowers are there for scrapbooking?
First of all, they are divided into ready-made and home-made.
Now the market offers an incredible amount of goods for creativity. From ready-made flowers and compositions to blanks for their independent production. Of course, it is easier to buy ready-made elements and use them in your work. But, having spent a little time and applying imagination, you can get an individual product even from factory blanks.
According to the type of material, finished flowers are divided into three types - paper, polymer clay and textile, including knitted.
Paper flowers are diverse colors, shades and shapes. This is primarily due to the fact that paper itself is a very malleable material. It is easier to give it the desired shape, it is easier to paint in the desired shades.

Polymer clay flowers are more used for making women's jewelry and interior items. But even in scrapbooking, products made from this material find their place.


With fabric, things are a little more complicated. Here it must be taken into account that most fabrics tend to “crumble”, i.e. the edge of such a product is much more difficult to process in order to obtain a delicate and airy product. In the manufacture of factory textile colors, the fabric is often treated with special compounds to prevent its flowability and to stiffen the fabric. The most grateful material for textile flowers is felt. Doesn't wrinkle, doesn't crumble. But flowers and other elements from this material do not always fit the chosen style of work.

Another type of textile flowers is products made from satin and silk ribbons.


Knitted products also belong to textile colors.

For experienced needlewomen who want to bring exclusivity to their work, there is an option for making flowers on their own. Everything is the same here - paper, fabric, yarn, polymer clay, foamiran. The only thing is that this will require additional investments, both material - cuttings, tools and a mat for boule, wire, paints, irons, etc., and temporary. But, on the other hand, when making flowers on your own, there is no longer a limit to imagination and boundaries for creativity.
Homemade paper flowers.
What is the best paper for them? Basically, this is an ordinary office, crepe or corrugated paper. There is on the Internet great amount workshops on making paper flowers (for example, in our group we have an excellent selection of workshops on homemade flowers: link). There can be a lot of options - from origami or quilling flowers, in which, basically, no additional devices and tools are needed, to multi-layered products, where you can no longer do with just one handle. It all depends on the ideas and capabilities of the author. And, if you approach this matter with all responsibility, then home-made flowers are often impossible to distinguish from store ones.


Foamiran (FOM) is a plastic material for creating accessories, jewelry, interior items, scrapbooking items and other handmade products. When heated, it takes any shape and retains it. Unlike polymer clay, foamiran does not harden after cooling.


Polymer clay (plastic) is a plastic material for making jewelry, accessories, interior items. Plastic requires heat treatment, as it hardens and acquires rigidity only when the finished product is heated to 100-130 degrees.


Homemade textile flowers.
When choosing a fabric for a textile flower, the flowability of the material must be taken into account. To reduce the shedding of the edges of the product, the fabric can be impregnated with a solution of gelatin - 3 tsp. in a glass of water, let it brew for 20-30 minutes, then heat over low heat until the gelatin is completely dissolved. Wet the fabric completely in the solution, let it drain without squeezing, and dry in a straightened form.
The second option is to melt the edges of the blanks over the flame, but it does not fit every fabric.
Basically, thin cotton fabrics, organza, chiffon, silk, satin, felt, as well as all kinds of ready-made ribbons and laces are used to make fabric flowers.


You can decorate your work with a knitted element.


Of course, no matter what design option you choose with floral elements, it is advisable to adhere to the style of the entire product. Be it shabby chic, steampunk, vintage or something else.


