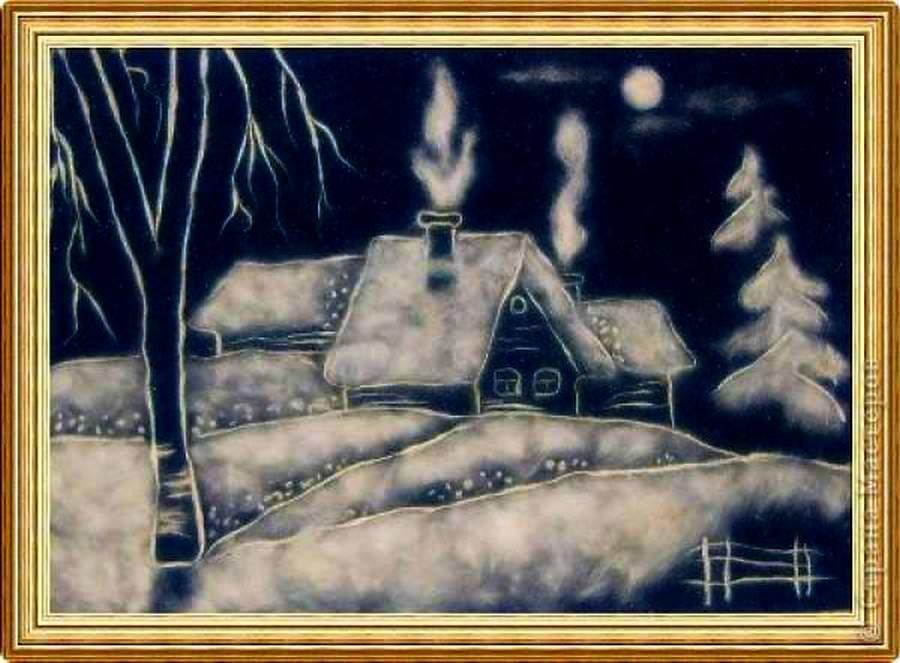
New Year's panel made of threads with your own hands. Panel of threads "Winter Day
From nails and threads, made with your own hands, it will become a worthy decoration of any interior. Nails and threads ... It would seem that these two elements are absolutely incompatible. Nails symbolize construction, which is considered a rough activity inherent in men. Threads are more feminine. However, the combination of these materials allows you to create real masterpieces for apartment design. What can be done, armed with ordinary nails, multi-colored threads and using a saw cut of a tree or an ordinary smooth plank as a base?
Tip: You can get ideas for creating paintings on the Internet or come up with your own. For example, a deer panel made of threads and nails will be relevant. It is not a shame to hang such a craft in your own home or give it to a friend.
A panel of nails and threads: a technique for creating
Even a child can create a panel of threads and nails with his own hands, this is a great advantage of technology. You do not need to have special artistic skills, just print a sketch or draw it by hand.
When the picture is ready, you should take care of the base, the role of which can be played by an ordinary cut of a wide tree trunk. If such material is not at hand, an ordinary board is quite suitable, which must first be well cleaned with sandpaper and varnished. Acrylic is sometimes used instead of varnish, and fabric can also be stretched over the base.
Tools needed for work:
- Small nails, the number of which directly depends on the size and complexity of the picture.
- Threads of different structure and color.
- Textile if it is needed for the background.
- Long-nose pliers for holding nails so as not to beat off fingers.
- Nail scissors.
The sketch is placed on the canvas so that the outline of the drawing does not protrude beyond its borders. The first nail is driven into any point of the line, but this is not done to the end, but only by 1/3 of the part. In order for the cloves to enter evenly, and the fingers to remain intact, it is necessary to use long-nose pliers.
When the first nail has entered, you need to check if the pattern has moved to the side. If everything is in order, the second nail is driven in on the opposite side of the first nail. All subsequent ones go one after another with equal steps (0.5-1 cm). Thus, it is necessary to fill the entire outline of the drawing.
Now the paper with the sketch is removed by simply tearing it off at the edges and in the center. It's time to fill the center of the pattern with threads. The thread is tied to any nail under the hat itself, and then it is randomly wrapped around the nails, moving both along the contour and to the opposite hats. Work continues until all the gaps between the threads disappear. The panel on the wall of threads and nails is ready. It can be supplemented with applique, beads, rhinestones and other decor.
Tip: If you add to acrylic lacquer glitter (sequins for manicure) and carefully cover the filament fabric with this composition, then after drying it will sparkle with hundreds of tiny multi-colored lights.
Create silhouette drawing and complex patterns
Silhouette images look no less attractive when only the background is filled with threads, and the central composition remains empty. To create such a panel, all the same materials will be required.
With this implementation, a frame is necessarily made, that is, nails are driven in along the contour of the substrate, and then, as in the previous case, along the contour of the drawing itself. The thread is tied on the nails that run along the edge and stretches to those that form the outline of the pattern. It turns out very beautiful and unusual.
An amazing panel can be created without a sketch. You need to take a dark base and bright threads. Nails or pins are stuffed only along the contour of the substrate. The essence of the technique is that the thread is pulled to the opposite edge, wrapped around the nail, comes back and clings to the neighboring nail.
How to choose the right drawing
At the initial stage of creativity, you should choose large and simple sketches. For beginners, it is recommended to make a panel in the form of a circle or a polygon from multi-colored threads. It may even be .
As the technique is mastered, they begin to more complex patterns in which the threads are not arranged randomly, but using some kind of system. Such panels look especially chic and can become the subject of additional income.
Applying thread different colors and pulling them at different heights, they achieve a 3D effect and similarity with tapestries.
What can be the plot:
- tree, Santa Claus, snowflake;
- heart, asterisk, bell;
- all kinds of flowers;
- animals - cat, hare, elephant;
- birds such as owls.
Actually ideas to create
Embroidered, woven, knitted pictures are created from threads. Make masterpieces from wool or yarn scraps using the gluing method.
DIY flocking

As mentioned above, paintings can be made using various techniques. Even if you only have small pieces of yarn left, do not throw them away, see how to create a painting using such waste material. This technique is called flocking.
To implement this plot, take:
- thread trimmings;
- scissors;
- a sheet of cardboard;
- brush;
- simple pencil;
- frame;
- organizer.
Now you can act in two ways. Cut the threads with scissors, laying out each color scheme in a specific organizer cell. If you want, pull the threads out of a waste piece of fabric, then shred them as well.

Apply glue to small fragments of the picture, attach threads of a certain color here, tapping lightly with your fingers. You can use a lot of glue, but you don’t need to make too thick a layer of threads.

When the general background of the thread picture is created, proceed to the design of the image. So, on the red head, create a few black and light spots, decorate the inner parts of the ears.

Such a wonderful picture will turn out, but first, you need to frame it.

So that there are no uneven thickenings on the canvas, tap the newly glued pieces of thread well with your finger. Apply glue not from a bottle, but with a brush.
Using flocking, children can also create beautiful canvases. For this, the following set of materials and tools is suitable:
- multi-colored woolen threads;
- foam slats;
- ceiling tiles;
- PVA glue;
- scissors.

Cut the foam strips at a 45° angle. Lay them on the ceiling tile, glue to it and in the corners.

Measure out 21 pieces of thread (7 of each color) to subsequently create a rainbow from them. The rest of the yarn will need to be finely chopped with scissors.

Apply the outlines of the future pattern on the flat surface of the tile, if it is corrugated, glue a sheet of cardboard on it at the stage of attaching the frame.
For each color of the rainbow, you need to take three of the same color of thread to weave the braids. Now glue them on the marked place of the rainbow, pay attention to the location of the color scheme.

We use flocking, for this we glue the circles on the base with glue, put the trimmings of yellow threads here, the butterfly can be made from the remains of pink yarn.

The next stage is the formation of greenery, the last is the creation of a blue sky.

Here is such a picturesque picture. It is made from waste material, fast, but looks cheerful and even chic.

Knitted patterns from threads - master class
Such canvases also turn out to be voluminous. They can be created using crochet or embroidery.
To implement the next work, you will need such fluffy threads, because we will create Christmas trees for the New Year or just to decorate an apartment at any time of the year.

To do this, take:
- fluffy threads;
- hook;
- frame;
- whatman;
- colored paper;
- wide silk band.

When you reach the top of the tree, fasten the last loop, tighten, cut the thread. Glue a frame of colored paper onto a rectangle of drawing paper or cardboard. When decorating the background, glue strips of white translucent lace here, then the picture will look even more elegant. After making three Christmas trees, attach them here. Admire what a wonderful picture of threads turned out.

Even if you have never embroidered, now quickly master this science. To create the next canvas, you will need to get acquainted with only three seams. Well, let's start in order, first prepare this:
- canvas on a stretcher;
- simple pencil;
- brushes;
- acrylic paints;
- glue Titanium;
- acrylic and wool yarn;
- floss threads;
- small and large gypsy needle;
- scissors.

Make a sketch of the future masterpiece on canvas with a simple pencil.

Take a brush in your hands, apply the main colors with acrylic paint with careless strokes.

When this layer dries, apply refinement strokes, and then draw the silhouettes of birds soaring in the sunset sky.

While the paint is finally drying, get acquainted with the three types of seams that you will use to decorate the picture. See how the stalk is performed.

Making a chain stitch is also easy.

To make small circles for small panels, you will need to learn how to make French knots. As you can see, three turns of thread are wound on the needle, then the front side is pierced with this tool, the needle goes inside out, fixing the resulting circle.

Applying the acquired skills, you will be able to create embroidered paintings. Pass an acrylic or woolen thread into the needle in one addition, you don’t need to make a knot, just hold the tip, and at the end of the work fix it on the wrong side with glue.
At first stalk suture Let's make a plant stem.

Form its inflorescences with French knots using white thread.

Having adopted three stitches for embroidery, make other vegetation on the right side of the picture.

Fold the floss threads 3 times, embroider white spikes on the canvas with them.

Create other plants with the help of threads, after which the picture can be considered complete.

Picture of threads for March 8
Although this holiday is not coming soon, let the child practice the technique of creating pictures from threads in order to congratulate the women of his family in the spring.

To create this little masterpiece, the child will need:
- photo frame without glass;
- polymer glue;
- colored paper;
- cardboard;
- glue stick;
- woolen threads.
- thin twigs or wire;
- glue;
- brown threads;
- fork.
Make lots of flowers out of pink and white threads, glue them to twigs or wire, from which you will create the same base.
Glue a sheet of blue colored paper to the rigid base of the frame.

To make the letters even, you can cut them out according to a template, for example, taking it from the Internet or draw those yourself. Attach the template to the cardboard, cut out the number 8 and the desired letters from it.

Now they need to be wrapped with a thread, and glued on the back side.

The child can do all this himself, if he can read and write, then he will arrange the letters correctly. If not, let adults help him with this.

Attach the made branches with flowers from threads to the picture so that they go a little beyond its borders.

Create a few additional flowers, let the kid decorate the panels with them. After handing the work to mother or grandmother on March 8, such a picture will become the pride of women, they will certainly hang it in the most prominent place, they will admire and be proud of the child's work.

Wool paintings for beginners
Such crafts can also be created by a child, but with the help of adults. The basis of such works is still the same, but the wool here is not spun. You can buy this at a craft store.
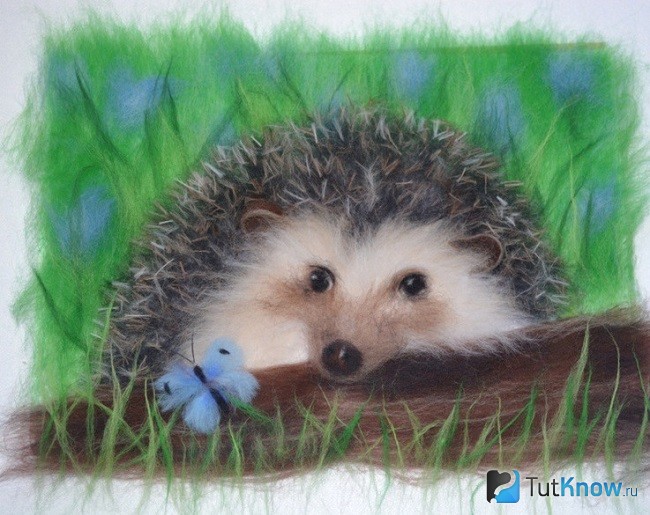
In just an hour, the child will acquire such a furry friend. To do this, create with your baby and cook:
- photo frame;
- wool of different colors;
- tweezers;
- glue stick;
- scissors;
- for the base - a rolled household cloth or interlining.
If you are making a picture of wool on non-woven fabric, glue this material to the rigid base of the frame with an iron. If you start using a rolled cloth, then attach it to the paper base with glue.
For this work, environmentally friendly felting wool was taken, which is also called combed ribbon. You will need patches of different colors. The photo shows what.

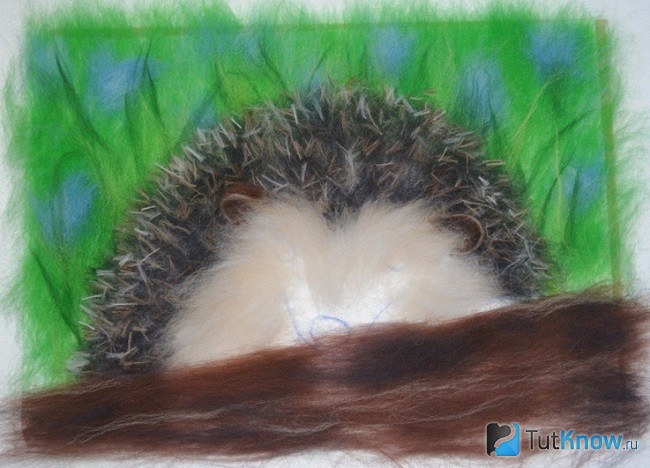
Draw a hedgehog on the substrate with a pen.

Pull out the combing tape Green colour to make it a background grass. Start with the top row, gradually put pieces of the second on it so that the backing does not show through the wool.

From pieces of blue yarn, make bells that peek out from the grass.

To create a natural shadow in the corners of the picture, mix green and black combed ribbons, apply on this side.
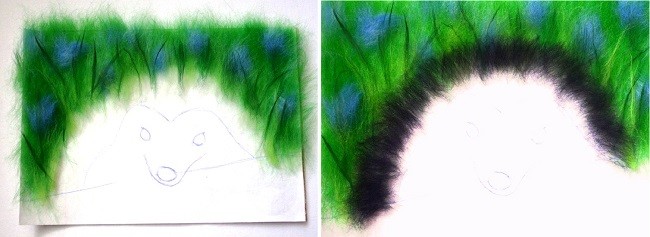
With black yarn, lay out the borders of the hedgehog needles that are near the grass and near his face.

To make the needles themselves, pull a few strands of sand and chocolate color, roll them into flagella. You will need many such blanks. They will need to be cut into fragments of 8 mm, spread out on the hedgehog's coat.
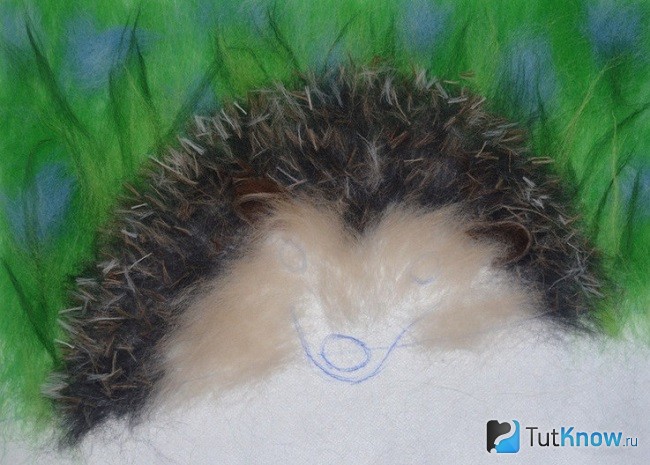
To shade dark needles, make the same ones from sand and white color, put them on a fur coat. Fill the face of the hedgehog with sand combed tape. Form his ears from sand and chocolate-colored yarn, these fragments need to be twisted in an arcuate manner. Add some white yarn to the face of the forest dweller.
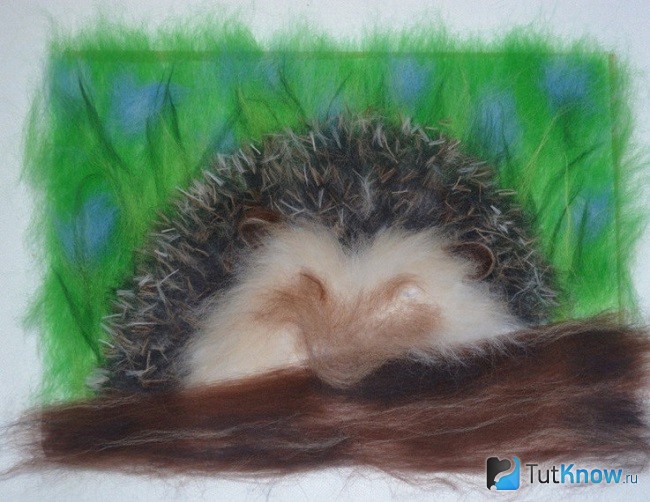
Taking a chocolate-colored ribbon and some black and white fibers, form a log, near which the hedgehog lies. Chocolate and sand color yarn will become the basis of his muzzle.
Cut the black yarn, make the eyes and nose of the animal out of it, create highlights on its pupils from pieces of white.
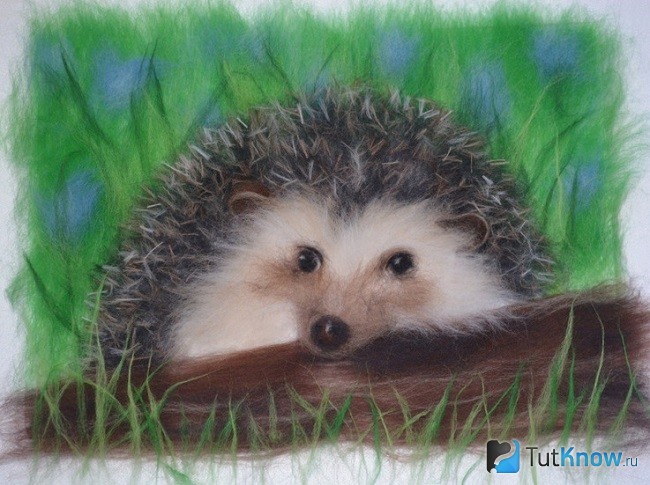
In the foreground, make grass from the villi of green wool, and a moth from blue.
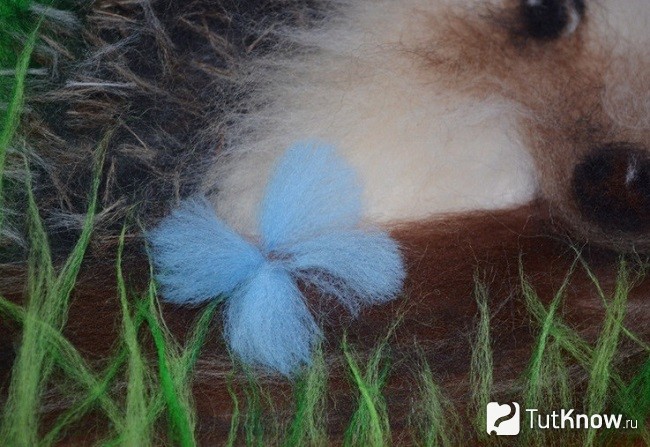
Add a body to the insect and a couple of circles on the wings of black yarn. After that, the picture of wool is almost ready.

Now you need to press down all the elements with glass from the photo frame, frame your work.
Do-it-yourself panel on a frame
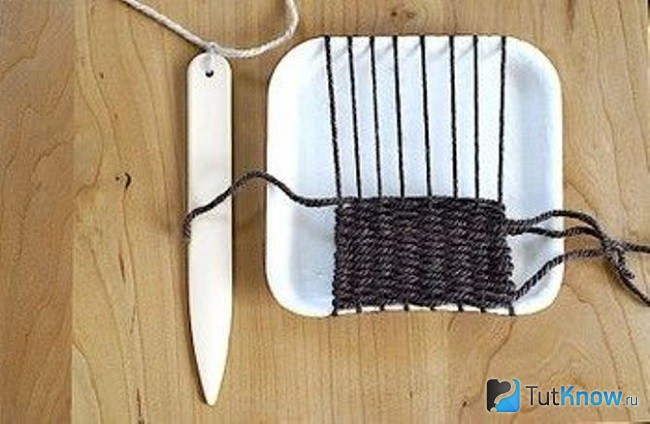
There are special devices that help create paintings like weaving. This set also includes a comb, with which the next row of threads fits well with the previous one. There is also a wooden needle with a large eye through which the thread is threaded.

If you do not have such a set, then use a sheet of cardboard, the top and bottom edges of which are slightly notched. Strong threads are fixed in these grooves. Consider the patterns of patterns that are used to create such home masterpieces. Having mastered them, you will move on to more complex options.
Weaving panels can be made not only on rectangular frames, but also on triangular, round, irregular shapes. You can still make the painting of your dreams, even if you only have:
- 2 wooden sticks;
- threads;
- needle.

Such masterpieces will decorate a modern apartment, become a highlight of the decor.

If you want to learn more about how to make a panel of threads of this type, then take:
- horn;
- white threads;
- colored yarn;
- scissors.

Now across the base, choosing the suggested patterns or using your own, create a beautiful weave.
If the craving for creativity is great, and only at hand Matchbox and threads, it still shouldn't stop. Wind plain threads horizontally on the box, and then decorate them vertically with yarn of a different color.
Thus, the emblem of the team, the city, or any other panel is created.

If you feel like creating, use whatever you have on hand, whether it's a styrofoam tray and a plastic knife or plant pointer. The last element acts as a flat needle if a hole is made in it with a hot nail into which the thread is threaded.
I use weaving technique, combining yarn, you can make it so that flaunted on the canvas bright flowers or berries, there were birds or animals.

An enthusiastic gardener can be presented with a picture of growing vegetables. If you do not want to embroider, then make them from fabric and glue them.

In conclusion, we offer to admire a few more paintings made in weaving technique in a modern way. Looking at them, you will feel unity with nature and the desire to create the same canvases.

To streamline the knowledge gained, watch the story about a weaving frame on which you can create rugs and panels from threads.
See how professionals make wool paintings. After reviewing this story, you can create the same bright and fluffy New Year's cockerel.
![]()
Today it has become very fashionable to make panels from nails and threads. An extraordinary creation beautiful inscriptions and interesting patterns was called string-art. This idea is not new, but very exciting. Pictures from threads and nails are made without glue. To work, a small hammer, small nails, thread and base are enough. A good choice of thread thickness will visually make the panel more expressive and voluminous. The main thing in this process is to have fun.
Amazing pictures can be created from ordinary nails and various threads. differ from each other depending on the curls of the threads of the pattern.
A panel of threads and nails can be made in two ways:
- Fill the space outside the drawing, leaving the middle of the silhouette empty;
- Weave the drawing directly, filling the space inside.
Also, winding threads on studs is done in two styles: radial and solid. With the ray method, the threads act as fan rays emanating from one point in different directions. The threads are superimposed on each other not in a thick layer. The solid method involves drawing a contour on the base using a template and a pencil. The pattern is drawn by chaotically winding the thread around the nails.

Pretty simple but interesting example applying the continuous method for a panel is considered a picture-square. It is done much faster due to the lack of a pattern. All that is needed to create it is a hammer, nails, thread and a base. You should start with the preparation of the base (hardboard), in which case it is recommended to paint it with paint, such as black. Next, we hammer in the carnations around the perimeter of the base, stepping back from the edge of 1 or 1.5 cm. Carnations should be placed at the same distance from each other. Then we tie the end of the thread to one carnation in the corner of the square so that the knot is invisible. We begin to weave a picture, hooking the carnations opposite to each other and pulling the thread a little. On a black background, threads of completely different shades will look attractive. The painting can be done in one color or in different colors. color scheme. Then it is necessary in advance or in the process of work to connect segments of threads of different colors with a neat knot. The result is a very beautiful picture with smooth transition one color to another.
For panels, it is better to choose strong threads, otherwise they may break during work, and you will need to do everything again.
Panels look very nice, the drawing of which is made of several elements.
Panel of threads and nails: important note
Drawing with nails and thread, like embroidery on cardboard, has a very fantastic and unusual look. This process is quite simple, but there are some points that you should pay attention to.

It should be noted:
- The base can be left plain or painted with paint, in which case the panel looks more noble;
- To sketch the background, it is better to choose acrylic paints, they are more saturated;
- The threads should be of medium thickness;
- For panels, it is better to choose simple figures without small details;
- To create a template, it is better to choose thick paper or cardboard;
- As a base, you can use fiberboard, cork board or foam plastic - this is a fragile material and therefore the thread between the studs should not be pulled very tight;
- For the convenience of weaving, the thread can be skipped instead of the ballpoint pen;
- The picture will look original if the drawing is pasted onto a substrate and one element is decorated with threads and nails. Thus, this area will look more voluminous.
Panels of threads and nails are often decorated with small stones or beads. Such material serves as an additional decor for decorating the panel. Multi-colored glass stones play beautifully under the rays of the sun. From this, the picture becomes more attractive and mysterious.
It is better to think over the panel fastener element in advance, before weaving the threads.
How to make a panel of nails and threads in the form of a tree: a master class
Today, the creation of such unconventional masterpieces from the most ordinary materials is welcomed. The technique of creating a panel requires care and patience. The end result of such an interesting work impresses with its originality.

To work you need:
- Paper tree template and pencil;
- Monophonic or multi-colored threads;
- Small cloves and a hammer;
- Paint and brush;
Several trees can serve as a template for a panel, but then weaving will be a little more complicated. Then the trees must be connected very reverently to each other, so that visually the density of the background does not differ from the general space. Consider creating a panel using an example with one silhouette.
The process of creating a panel:
- First of all, you need to prepare a sheet of fiberboard;
- We apply the template to the fiberboard and circle it carefully with a non-greasy pencil;
- We mark the silhouette of the tree with nails at a distance of one centimeter;
- We make markings along the edges of the fiberboard in the same step, driving in carnations to an equal depth (1/3 of the height of the nail) and at the same distance with the help of pliers;
- We tie a thread around the nail and carefully tie an inconspicuous knot under the hat.
- We gradually begin to wrap the carnations, connecting the perimeter with those that highlight the silhouette of the tree.

The main task is to fill the space around the tree. Threads should not cross the pattern inside. Nails around the perimeter significantly large quantity, so those that highlight the silhouette can be used multiple times. To do this, it is worth lowering each turn below the cap. At the end of the panel, you should make a small knot and hide it under the nail head.
Carnations need to be selected in a suitable size so that when driven in they do not look out from the back of the base.
Drawing for a panel of threads with your own hands
Threads and nails - enough unusual material for collaboration. Although in the end you can create a real work of art with your own hands. Such a beautiful panel will decorate any interior space.
Ideas for panels
- Owl. Such a panel is perfect for a child's room or decorate the guest room.
- Heart. Suitable for romantic people. Such a picture will a good gift for the day of all lovers.
- Inscriptions. Inscriptions or names of loved ones from nails and threads look quite stylish.
- Birds. A panel with two birds sitting on the same branch looks very cute.
- Christmas tree. It is interesting to make such a New Year's panel from woolen threads or knitting threads. Winter theme will be great gift for Christmas to dear and close people.
- Cats. Well, what about without these pets. The silhouette of a cat will be in harmony with any interior of the room.
- Hedgehogs. Such a panel will effectively decorate the nest of two lovers. On the one hand, in a sense, a childish idea, but on the other hand, it creates a unique feeling of romance and warmth.
30 photo panel ideas that will decorate the walls of any room in the following article:

Portraits made of black threads on a white background are especially popular. Of course, not everyone can do this art, but what skillful hands create with the help of threads and nails cannot be called a real masterpiece.
To make a small portrait, you need more than one hundred nails and a strong long thread that acts as a pencil and paints.
There is still great amount patterns and drawings. The main thing is to turn on your imagination and not be afraid to try something new, because your picture is individual in any case, and there are no others like it.
A simple panel of threads and nails (video)
Today, it is almost impossible to surprise us with anything. But such an exciting activity as creating a panel of threads and nails will allow you to create unique paintings in a single copy with your own hands. After all, the most valuable things are those that are made with your own hands. Such a creation will complement any modern interior, bring some mystery and mystery.
Examples of panels from threads and nails (photo)


More than one master class is adopted by both adults and children to make really some incredible New Year's composition. And you can meet 2018 with homemade decoration on the wall. This can be a craft on canvas, where not the most familiar things in creativity are used as the main material. You can hang elegant collages on the wall, plasticine panels, panels depicting the Snow Maiden or Santa Claus, or maybe the symbol of 2018.
It all depends on your imagination, what materials are not used for crafts - cereals, buttons, sparkles, old puzzles, etc.
Often parents have to work hard and do something with their own hands for children. These are the same decorative works for the kindergarten, as for the panels, every third master class is dedicated to them.
Or maybe you work in kindergarten, and you are faced with the task of making beautiful wall compositions? Then wind on your mustache!
New Year's pasta panel
Why from pasta - yes, because pasta remarkably age into figures, beautifully painted, glued, and from pasta, as from a designer, you can do anything.
A panel for the new year from pasta can be like this:
- Panel Snow Maiden. It is not necessary that the entire Snow Maiden should be made of pasta, you can trim the fur coat with pasta, or a hat. Snowdrifts can be made of pasta, or a sleigh in which the Snow Maiden rides. Or the Snow Maiden will be with two braids of pasta.
- DIY Christmas panel. Christmas panel dedicated to the theme happy holiday Christmas is a fir tree, the star of Bethlehem and, of course, angels. If the panel is for children, then everything that is depicted should be clear to kids. Volumetric paper angels, a star made of shiny textured paper, snowdrifts made of cotton pads. A panel for Christmas can be made by the children themselves from pasta - simple figures of angels are made from different types pasta.

Of course, this is not all, but the simplest way to use pasta is snowflakes. For the youngest children, this is a feasible task - to make a simple panel with your own hands, where they flaunt on a plain canvas big snowflakes from colored pasta.
New Year's panel of cones
A panel of cones is a more difficult job, since cones are not very easy to work with. By the way, snow-white can be made from simple pine cones, and all this with the help of simple whiteness. Well, already such white cones - where you just don’t use it.

Floral panels and collages New Year from cones:
- Herringbone. The composition can be large - Santa Claus, his granddaughter, animals. It is not necessary to make everything from cones, it will be enough just to lay out the tops of the cones painted in green with a Christmas tree.
- fantasy composition. To do this, you need to view the master class, where a lot is used at once. natural materials, where only the center of the composition, the dominant, is laid out from the cones.
- Minimalism. And this is the so-called empty panel of cones. Considering that such minimalism in decor is relevant today, it is worth taking note of the topic. Moreover, it is so simple: you hang or fix ribbons with bumps in the painted hollow frame at the top. It turns out that you have bumps inside the frame, right on the wall.
And from the cones you can make the same monkey, the symbol of 2018.
New Year's panel from disposable forks
And this good way make a big patterned snowflake.

The master class will be simple:
- In the center of the composition there is a dense circle where rays from disposable forks;
- This circle is decorated, wrapped with tinsel, the ends of disposable forks are fixed to it with hot glue;
- The wide part of the forks is also covered with tinsel in a circle.
It turns out that the forks are the faces of the snowflake. On the other hand, if you decorate such a composition more, you will get a New Year's wreath from disposable forks. In the center of such a circle, Santa Claus, or the number 2018, can be depicted.
Panel for the New Year using scrapbooking technique (MK video)
New Year's panel from cotton pads
From cotton pads, children are very fond of doing various things. You can start with a simple application, and finish with a beautiful panel.
Moreover, from cotton pads you can lay out figures with round outlines, or you can use cotton wool itself. For example, it is clear how to make a snowman or a hare from disks, the same snowdrifts. Well, the background can be made from cotton wool itself.
New Year's panel from plasticine
A plasticine panel can be a real work of art. And for 2018, this material is relevant.

From plasticine you can make:
- Panel Santa Claus do-it-yourself. Santa Claus is the center of the composition, but he can be surrounded by a spruce wreath made of plasticine, or snowflakes made of plasticine. The Christmas tree and Santa Claus is a story familiar to everyone, but Santa Claus and the monkey are already something interesting. You can also make a three-dimensional plasticine panel, where numbers can be three-dimensional (2018), or some details of the panel - the same Santa Claus or individual elements of his outfit. Or maybe use real candy in his bag?
- Panel for children with their own hands. Make your own master class, where a whole Christmas story. Ask the children to add something to the plot of this fairy tale, perhaps a small star or a bird, just let the kid do it himself with your help.
And interesting panels can be made on the window.
Panel-calendar for 2018 shabby chic (video)
New Year's panel on the window
Usually, under such words, plot compositions on the window are usually taken, where a whole New Year's fairy tale is played out. Here Santa Claus is riding in a sleigh, here are funny snowmen frolicking, and the Christmas tree is all under the snow.

How to stick such a panel on the window:
- Arm yourself with a regular brush and liquid soap, you can simply smear the parts on the reverse side with soap and glue on the window;
- There is one more interesting way where milk is used instead of glue;
- As an option - starch paste;
- If all else fails, you will have to use narrow tape.
And the snowflakes themselves and others christmas figurines you can print it on a printer by downloading a sample from the Internet, and then cut it out with a clerical knife.
New Year's panel on the door (video master class)
DIY panel for the New Year 2018
Panels with retro pictures are considered to be interesting and one of the most popular. Again, they can be downloaded on the Internet, and then cut out the necessary fragments. There you can also take the backgrounds that go under the name "backgrounds for decoupage."
You can make panels-collages, where symbols and stories of past times are intertwined, combining plots, heroes, patterns. Beginners can also make such decoupage collages, the main thing here is accuracy and varnishing to one final thickness of the panel.

Panel "Christmas fantasies"
New Year's fantasy is a composition in which there is more creativity than technology. It's just a combination of techniques.
Examples of such work:
- Batik + decor with beads and rhinestones;
- Decoupage + embroidery (embroidery can frame the work);
- Applique + patchwork;
- Application + quilling;
- Decoupage + painting with acrylics.
Well, the heroes of such works can be Santa Claus, and New Year's fairies, and angels, and children with pre-revolutionary postcards. Mix, match, decorate - the creative appetite also comes with food.
New Year's panel from a vinyl record (video master class)
If the New Year is around the corner, and you want something unusual for your home decor, and a hand-made series, this may well be a festive panel. If it is made with high quality, then for many years on the eve of the holiday it will delight you, filling the house with man-made beauty.
New Year's panel (photo ideas)


SVETLANA KUZERO
I would like to bring to your attention panel of cut threads.
Ordinary threads can be used not only for knitting and sewing, but also for making fakes. Cutted appliqué thread for children - a great opportunity not only to take the time of the child, but also to develop various skills and abilities. Moreover, both the smallest children and older ones will be able to make such applications. Manufactured products can be placed in a frame and decorate the interior.
Required to work: white cardboard, pencil, scissors, glue, glue brush, woolen threads of different colors.


First you need to prepare the threads. We fold the thread several times and carefully cut it.


Then we take cardboard and draw patterns, a bullfinch, a titmouse and tree branches.


Now let's start designing the application. It is necessary to thickly coat the necessary place with glue and fill with threads.


Then we send the templates under the press so that they dry out. After a few hours, it is necessary to shake the application, thereby removing non-adhered threads.


For the 3D effect, on the reverse side of the bullfinch, titmouse, twigs on which they sit, we paste a small piece of sponge. We glue our templates.
The work is done, so wonderful panel we got.

Related publications:
When teachers say that tomorrow will be Health Day, the children shout: "Uraaaa!" They are very fond of such days that pass in the fall.
Early in the morning the dragonfly flew to the river. She really wanted to sit on a water lily. So while I'm at maternity leave I decided to get creative.
Hello dear moms! I decided to bring to your attention, this work. Maybe you will find it interesting too! For the manufacture of.
I bring to your attention MK in the technique of quilling for Victory Day Required material: corrugated colored cardboard frame packing cardboard.
Raising a festive flag to the heavens, Enters the Ninth of May Square. Victory Day - the best holiday our country! Every child and adult.
"Money - to money" - this phrase, perhaps, everyone knows. Do you want to always have prosperity? Decorate your room with coins with.
I want to brag about the paintings I made using the Kinusaiga technique - an application made of fabric on polystyrene foam. To do this, you need foam (I took.


