Presentation - master class "autumn tree" in the technique of plateography. Application from plasticine on the theme "Golden Autumn": a fascinating lesson for kids Modeling from plasticine autumn forest
Plasticineography for children from 7 years old. Master class with step by step photos
Master class: "Performing a bas-relief based on creating an image of a tree using the Claudelography technique"
Puchkova Elizaveta Andreevna, student of the 6th "A" class of the Municipal Educational Institution "Gymnasium No. 19" Saransk of the Republic of MordoviaSupervisor: Puchkova Maria Vladimirovna, teacher of fine arts and MHC MOU "Gymnasium No. 19" Saransk, Republic of Mordovia
Description: this master class designed for children from 6 years old, teachers of fine arts, educators additional education, educators, parents.
Purpose: creative work, made by the hands of a child, will be a welcome gift for adults, will allow you to express warm feelings in an original way.
Target: execution of a bas-relief in the technique of "Plastilinography".
Tasks: introduce a new species artistic activity, to form the ability to use the acquired knowledge in the visual and labor activity, cultivate perseverance, patience, attentiveness, diligence.
Materials: cardboard sheet, plasticine, stacks, modeling stand, scissors, hand napkin.

Master class progress:
Researchers of folk art note that personifying the universe, the growth of all life on Earth, the image of the World Tree reveals the very essence of folk art. This is the essence of never-ending development. Indeed, the World Tree is, first of all, the center of the world. The Tree connects three worlds vertically: the sky (branches), the earth (trunk) and the underworld (roots). The entire animal world is distributed over these zones: above - birds, in the middle - ungulates, below - predators, nocturnal animals, amphibians, worms.
For artists and craftsmen, traditional images of folk art have become primarily poetic motifs, fairy-tale themes, which they often combine in their work with modern symbols and themes.
We will make a relief decorative plaque "Tree" using the prototype of the World Tree.
plaquette- this is a plate, a plate of rectangular or close to rectangular shape from metal, ceramics or other materials with a relief image. Plaquettes are usually created to decorate interiors. The relief on the plaquette can be made in the technique of bas-relief (the image rises above the background plane by less than half of the real volume) and high relief (the image rises - more than half).
We take a sheet of cardboard as the basis for the plaque. If desired, it can be covered with a thin layer of plasticine, but we use cardboard white color as a base.
Let's sketch with a pencil, creating an image of a tree.
What is an image? It is a phenomenon creatively recreated in a work of art. What tree images come to mind? The image of old age or youth, the image of love of life, courage, strength and others. Need to imagine what kind of tree it is? What size is it? Does he have a crown? Where is it located? What surrounds him? How does this tree feel?

We remind you the rules of safe work with plasticine:
1. Select a place to work with plasticine. This may be a part of the table on which a special stand for modeling is placed.
2. Carefully use plasticine, do not stain the table, clothes, sculpt on a board, do not take plasticine in your mouth; roll up sleeves before work.
3. Use stacks in work only under the guidance of a teacher.
4. After working with plasticine, put the workplace in order; clean the boards from plasticine, wipe the table with a wet cloth.
5. After finishing work, children should first dry their hands thoroughly paper napkin and then wash your hands with warm water and soap, dry with a towel.
6. Store plasticine in special boxes, in a strictly designated place
Relief image can be made different ways: gradually build up convex shapes in small pieces or immediately stick ready-made molded shapes in the right places of the picture.

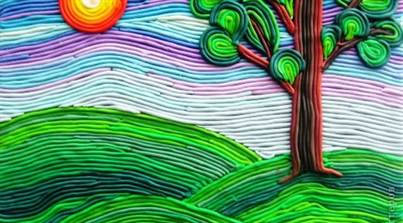
We form a tree trunk, choosing plasticine of various shades Brown. Roll out a flagellum in your palms or on a special stand. Fix it on a sheet of cardboard by slightly pressing on it with your palm. We fix the next flagellum close to the first, etc.

We form the crown of the tree from green plasticine, rolling out the flagellum and folding it into a spiral, gradually filling the entire space.


We fix plasticine on cardboard, create a lawn.

We supplement the product with small details (adhesives). We form balls of red and yellow color(different diameter). We fix them on the crown of the tree, one on the other, pressing with the palm of your hand, flattening a little.
We add flagella of yellow plasticine, making color accents.

From plasticine of blue color, forming spirals, we create an image of clouds. Our palette is ready! How not to remember Russian proverb"The apple never falls far from the tree"?! The image of a tree can serve as a motive for many compositions.


Is it possible to convey the mood, the character of the tree?! We can create a positive and negative image, evil and kind, gentle and formidable. Do you think a person is like a tree? Trunk, branches, bark, leaves - by the tree. A person has a head, torso, arms, legs.
Try to imagine some kind of tree.
Is there anything in common between people and trees? The image of a tree has always been and remains closely associated with man. Trees appeared on our planet a long time ago, long before the appearance of man. Trees also face such events as birth, development, reproduction, wilting, death. Looking at a tree, we can imagine what difficulties it faced in the process of its development, and these difficulties are clear to us, because we can compare them with the events of our life.
The tree turns out to be a convenient way to reflect our internal state and experiences. The process of creativity is associated with a reflection of the personality of the one who creates. Representing and drawing a tree is no exception here. No one else will represent the tree exactly as you present it, and this will reflect the uniqueness of you as a person, as a person.


Well, the long-awaited September has come, the children have gone to school. And in the very first months of study, they were probably given an interesting homework assignment - to make crafts with an autumn theme. Teachers often practice this kind of work with their pupils, and parents, in turn, should help the children.
So, what comes to mind when talking about golden autumn. Of course, bright autumn tree, decorated by nature. This is what we suggest you draw in this lesson, but use not ordinary pencils or paints and a brush to complete your plan, but sticks of soft plasticine and your own fingers. More information about plasticineography on autumn theme below.
1. Choose the right canvas for your drawing - white or colored cardboard. If there is no solid piece of paper, then take a regular waste material- cutting from dense cardboard box and wrap it with thin colored paper, fix the free ends with glue.
2. To sculpt the base of the picture, knead dark green, brown and beige plasticine in your hands.

3. Pull the prepared masses into thin long sausages.

4. Twist the sausages into one thick sausage by twisting the individual segments of plasticine together.

5. Attach the resulting mass to the bottom edge of the canvas and spread the plasticine with your fingers to get an even strip 1.5-2 cm wide.

6. Blind also between themselves dark brown and beige plasticine, stick the resulting mass instead of the pillar of the future tree.

7. With a stack, set the relief of the tree bark and make the ground rough.

8. Divide a soft orange piece into small portions and blind oblong leaves.

9. Stick the leaves in a thick layer, forming the orange crown of the autumn tree.

10. Add some green and yellow leaves.

11. Pretend that the leaves are falling from the tree. Also treat the surface of the leaves with a stack.

12. It remains only to show the changeable autumn weather. On one side, stick a black cloud, smearing dark plasticine, and on the other, a bright sun.

The plasticine autumn tree is ready. This craft is very easy to do, but its production requires patience and perseverance, because it involves sculpting many small details.
print Thanks, great tutorial +3
If you don’t know yet that there is such a way as plasticine drawing, and you have never tried to create voluminous applications thus, this photo tutorial is for you. Perhaps the easiest way to create landscapes is to add different color elements and create a believable stacking effect. Learn with us the creation of an autumn tree from plasticine. This natural object will be an excellent exhibit for an autumn exhibition at school or in kindergarten.
Other lessons on trees:Step by step photo lesson:
Work should begin not only with the selection of plasticine colors: green, brown and orange, but also with a suitable canvas for drawing. Take white or blue cardboard as the basis of the picture. In the first case, it will be necessary to design the background, in the second, the blue color will look like a real autumn sky. It is convenient to draw a relief on a soft mass in a stack. To create the sky on white cardboard, you will also need blue plasticine.

Knead some blue plasticine. For a more believable effect, mix it with a dash of white and black. Spread a warm soft mass on the top of the picture. Try to move your fingers along the rectangle.

Spread green plasticine casually mixed with orange on the bottom of the sheet.

From brown plasticine, create many elongated sausages.

Make the resulting sausages the basis of the tree trunk. Stick them in a row, tightly docking with each other.

Create a lot of small orange leaves from soft plasticine. Leaves may also be yellow or reddish.

Start in a chaotic manner to attach the leaves to the branches of the tree.

Form a dense domed crown from many yellowed leaves. Be sure to add an orange blanket to the base of the tree and fix a few leaves floating in the air.

The plasticine autumn tree is ready. In this way, you can mold a green tree with fruits, as well as a whole garden or forest.

We all know that autumn brought a lot of inspiration to Alexander Sergeevich Pushkin. But not all of us understand that inspiration is not always writing poetry. It applies to all areas of creativity: fine arts, dance, music.
Toddlers can feel the urge to create and draw too, especially if they have great materials and templates at hand, and a bunch of great ideas in their heads.
Plasticineography is a wonderful hobby for a child, because one of the most interesting materials for a child it is plasticine. From it you can create your own figures and whole paintings. To make the drawing voluminous and come to life, it is enough to use a little plasticine. Even if the baby does not yet know how to create voluminous figures and sculptures, plasticine will help to make wonderful works - a beautiful autumn tree, or even a whole autumn forest, can be obtained from ordinary plasticine flagella. Let's go and enjoy!
Plasticine painting - the most modern look visual activity. It allows the child to master the volume, make the picture embossed and, due to this, more expressive and lively.
When all the trees outside the window become truly colorful, you just want to capture a beautiful landscape and transfer it to a piece of paper! Or cardboard, because it is denser and better suited for creating a unique autumn application or panel.
In general, if you want to write poems about autumn - write, if you want to draw autumn landscapes - draw, sculpt autumn trees - sculpt and enjoy the process!
Plasticine must be chosen based on some important criteria:

Gallery: applications from plasticine Autumn (25 photos)


How to inspire children to create?
 Helps keep kids interested stand on the theme "Golden Autumn". Schoolchildren often make crafts from plasticine. If the crafts are planned to be done at school, then there will be no problems with this.
A great way to showcase other work for inspiration is to presentation. Can be used beautiful pictures landscapes, poems by famous poets and writers' stories about this wonderful time of the year in their presentation. The presentation must be decorated with drawings and applications of other children on the theme "Autumn", so that the children feel the magic that Mother Nature brings. The presentation can not only set children up for work, but also inspire them to create masterpieces.
Crafts from plasticine on the theme "Autumn"
Application "Autumn landscape" do-it-yourself
Help your child thoroughly wash and dry their hands before starting modeling. prepare the following materials:

This craft does not require templates. Following step by step master class, you can create a magical autumn picture:

Such a picture will be an excellent work for a children's craft fair or a material for presenting the possibilities of children's creativity.
Application "Autumn tree" do-it-yourself
To create wonderful autumn crafts, To you you will need:

So, let's start creating an autumn masterpiece. This craft does not require templates. You need.
In preschool and primary school educational institutions, it is no coincidence that a lot of time is devoted to modeling from plasticine. Working with this material develops in children fine motor skills, abstract thinking, has a beneficial effect on the course of psychological processes, therefore we advise you to familiarize the baby with the application from plasticine on the theme “Golden Autumn”. And since the centers responsible for the development of voluntary finger movements are located next to the speech centers in the cerebral cortex, modeling will also have a fruitful effect on the development of speech. The recommended age to start working with plasticine is 1.5-2 years. Therefore, the application of plasticine in kindergarten should occupy a special place among children's creativity.
We sculpt a birch
Consider step by step master class how to make an autumn birch from plasticine.

We will need:
- Glue "Titan";
- Plasticine;
- Board for modeling;
- Cardboard;
- Scissors.

Cover about 2/3 of the cardboard with a thin layer of white plasticine. This will be the sky.
Note. In order for the plasticine to fit well, first knead it in your hands until it is soft.


In some places, add touches of different shades of blue, imitating clouds. Cover the rest of the cardboard with brown plasticine. This will be the earth.

This is how the background turned out:

Now cut out a birch trunk from cardboard. With black plasticine, make characteristic black blotches on it. You can download the template. Glue finished structure to the background.

Roll up small flagella from black plasticine. Use them like branches.

From yellow plasticine, make small droplets - blanks of foliage, approximately as in the photo.


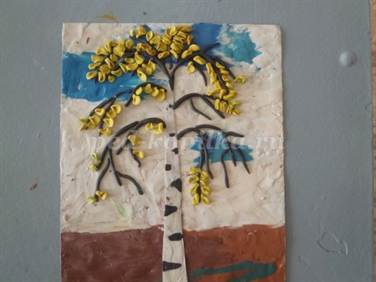

You can arrange the finished result in a frame. It turns out such a beauty!

autumn tree
Another interesting autumn tree. It can be done by grade 1, grade 2 of the school. A visual presentation will help the children better understand the master class.

You will need:
- Cardboard (blue or blue);
- Plasticine;
- Napkin;
- Modeling board.
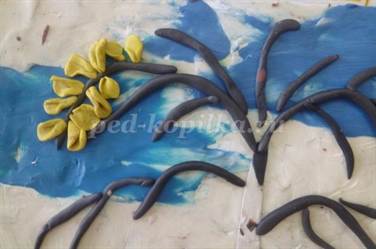
Roll out plasticine flagella of different colors.

Twist them like a "snail".


Form the crown of the tree from the resulting spirals.

Make a trunk out of brown flagella.


