Collective crafts in kindergarten autumn. Autumn crafts and applications for home, kindergarten and school: original do-it-yourself crafts made from natural materials on an autumn theme
Every autumn kindergartens announce contests for the best autumn crafts. Usually, nature itself suggests ideas for implementation: curved snags can be easily imagined as snakes and dragons, any men and animals can be made from acorns, chestnuts and cones, plots for applications suggest themselves from leaves. But if you have no time to fantasize, but you want to do an autumn craft with your child in kindergarten with your own hands - active mom I tried for you and created a selection of interesting ideas.
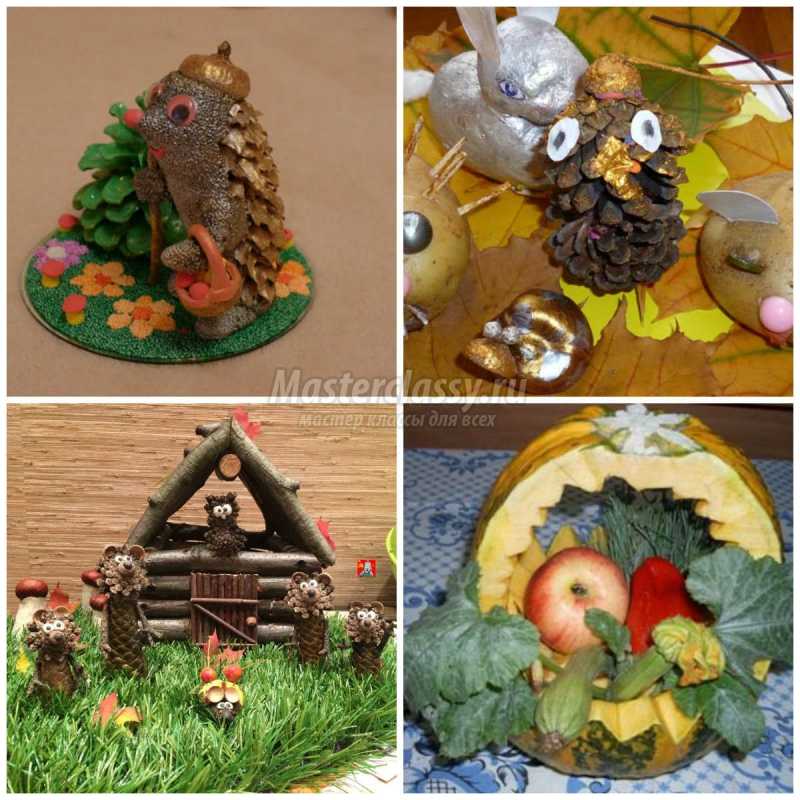
Crafts from acorns and chestnuts
Perhaps the most popular natural autumn material- acorns and chestnuts, which are in abundance in every park at this time, take them - I don’t want to. And we want to! And we return from a walk, carrying packages with these treasures in our hands.
Acorns and chestnuts make excellent topiary. To make such a decorative tree, crumple the paper into a ball, wrap it with thread and cover with white napkins / paper towels. The "trunk" of the tree will be a strong, even branch, which must be wrapped with twine, ribbon or corrugated paper. Any container can be used as a pot, the main thing is that the tree stands firmly in it.


But, of course, most of all, children love to make little men, animals and birds out of acorns and chestnuts, because this is a great opportunity to smoothly transform creativity into a game.

These charming owls are obtained from chestnut, acorn caps, paws cut out of felt, wings, beak and glued puppet eyes.

As additional material matches (toothpicks), plasticine, maple and ash fruits (for wings, ears, tails) are also required. Such autumn crafts for kindergarten easy and simple to perform even with a three-year-old child:

But not just a craft, but a real composition.

Overdoor wreaths of chestnuts and acorns look great. If the little animals seem too “childish” to you and with a preschooler from senior group I want to make not a toy, but an element of decor - this is your option. The basis of the wreath is an intertwined vine. For fastening acorns and chestnuts, Moment glue or liquid nails are used.

Candlesticks made using natural materials look stylish. Making them is very easy.

Crafts from cones
Cones are the second most popular natural material in autumn. From the cones, spectacular baskets and vases are obtained that can be filled with autumn gifts of nature: apples, grapes, mushrooms, twigs with mountain ash, wild rose, sea buckthorn. To make a vase, you will need wire, fishing line, pliers.


And look how charming flowers are obtained from cones if they are painted! Admit it, you did not immediately guess that these were cones?


Well, where would a kindergarten be without a variety of bumpy animals and birds.


Autumn crafts from vegetables and fruits
In creating compositions for kindergarten, you can actively use vegetables and fruits that autumn is rich in.

The most popular vegetable for making crafts is, of course, pumpkin. From it you can make a vase for flowers or autumn leaves, a basket for vegetables.

And you can use it as a blank for creating an animal or a bird ...

... or even such a madam.

From a pumpkin, you can build such a ship:

Apples, potatoes, zucchini will be an excellent material for crafts:


And the beauty of fading nature, and a rich harvest, and festive events in children's lives - all this can become a source of inspiration for crafts "Autumn" do it yourself. Creating beauty with your own hands is very simple, and our workshops will help you choose a topic for your next work at school, kindergarten, and simply to cheer you up.
DIY crafts theme "Autumn"
So, what do-it-yourself crafts does the theme “Autumn” dictate to us? First of all, among all the associations with this time of year, the thought of golden and crimson leaves on the trees, magically transforming nature, putting on a fabulously beautiful outfit, appears. Therefore, we can name those who, one way or another, sing of this feature. Here is the first example of such a product - a candlestick made from an unnecessary CD using decoupage technique.
Get it desired material not a problem - a matrix, if there is no unnecessary one on the farm, you can specially buy, pick up a napkin made of multilayer paper with a suitable print (in this case, golden leaves), and also buy a small candle in the form of a flower, a leaf, in extreme cases, you can take an ordinary tablet, but so that its color is in harmony with the shade of the base napkin. Separate the topmost layer on which the image is located, cut it to fit your disk. The base must first be prepared, covered with white acrylic paint. Our goal is a thin, even layer to which the paper will easily adhere, so you should not apply paint with a brush. It is better to use a piece of goblet, which you can use to remove excess paint from the surface if necessary.
After complete drying, you can start gluing, for this you can use decoupage glue, and ordinary PVA glue, diluted to the desired consistency. They need to glue the napkin on the bottom, and on top, which is why the glue must be liquid enough to soak the paper layer. After everything dries, apply an additional layer of varnish with a sponge, which will protect the craft. The final touch is the installation of a candle. You can make a mount that will hold the candle tightly or just use the disk as a stand.

It is generally accepted that wreaths are the prerogative of Christmas crafts, while decorating your apartment beautiful products from natural materials it is possible in the fall, when both acorns and cones are still fresh, beautiful, they do not need to be harvested for future use. Such a wreath is quite simple to make, you only need a base and a sufficient amount of the necessary decor. In this case, the basis is a foam ring, which is painted with paint to match the color of the elements selected for the application. So you need to spend a much smaller amount of them and gaps between them will not be so noticeable. Gluing halves of walnut shells, dried flowers, acorns and cones is easiest with hot glue, so you don't have to press or deform them.
When the largest decor is applied, you need to glue the smallest details between it - coffee beans, nuts, beads. Star anise, cinnamon sticks will look elegant. So you make the wreath not only beautiful, but also fragrant. The final touch is twine or twine, which are tied with bows. In the same technique, it will also turn out beautiful, only you will cover not a ring, but a foam ball.
DIY crafts for children "Autumn"
And for kids younger age, and for schoolchildren do-it-yourself children's crafts "Autumn”is not only a creative activity, but also a lesson, because in the course of work they can learn a lot about the world around them, study autumn fruits and vegetables, compare the leaves of different trees, consolidate the material about precipitation, the change of seasons and so on.

Therefore, you should not load children with unnecessarily complex techniques, because you can make an exhibition work from ordinary materials, if you show imagination. Here is our next work - a volumetric autumn forest on a reduced scale. The miniature trees will be depicted using dried yellow leaves that you can collect while walking in the park. The procurement of material for similar or from any other is a responsible process, since simple drying is not suitable, it will be lost bright color, the leaves may curl up and look like parchment. Moisture must be removed from them, therefore in a good way it is considered to iron them through the fabric with a hot iron. You can also put them under the press in a paper sheet, which adsorbs excess moisture and the sheet will become the texture we need. True, the second method is longer in time and will come in handy, perhaps, for the next season crafts "Autumn" with their own hands. Video in principle, you don’t need to create a similar composition, everything is already extremely simple. On the basis of each petiole, we attach a plasticine ball and place the resulting tree on a pre-prepared "edge" - a sheet of cardboard (you can use an unnecessary flat cardboard box) covered with colored paper. In this composition, both the hut, as in the example, and plasticine forest dwellers will look beautiful.

Crafts "Golden Autumn" do it yourself
The main color of autumn is, of course, gold, all shades of rich, hot yellow color. Crafts « Golden autumn» DIY always emphasize the luxurious shades of fading nature, so they can always be distinguished at a glance from all the others.

Applications from harvested leaves will look wonderful, but you can do and floral applique. Blooms at this time great amount colors that can be preserved in their original form by drying. Such a composition under glass will be an excellent element of decor in the apartment, a reminder of warm days. However, not only how wall decoration You can use the idea of a children's application, but also for such unusual products as wall or floor ceramic tiles. For decoration, it is worth choosing unglazed species, to the surface of which it will be easy to stick leaves. Additionally, you can cover them with a primer layer, which will increase adhesion. On top of the finished tile, you can already varnish it so that during operation the leaves do not tear and fall behind

For children's work, you can offer the quilling technique, which is always a win-win option for exhibitions or competitions, as it looks elegant and difficult, although if you know the basics, this is not at all difficult. Simple figures include gold Maple Leaf, which you see in the example. Since it has a complex shape, it must first be transferred to the base in the form of a sketch, and then with the help of pins and thin rubber bands, mark the boundaries. This will make it easier for you to fill the interior space of each section with elements of different shapes.
Crafts "Gifts of Autumn" do it yourself
Do not forget that not only the beauty of tree crowns gives us September, but also a rich harvest in the beds. This topic is also often devoted creative pursuits. Crafts "Gifts of Autumn" do it yourself can be varied, we invite you to look at a voluminous crop braid made of fabric.

We start with cutting out the foam bases of the blanks. The easiest way to do this is with a knife, first making a ball, and then forming notches characteristic of garlic on it. It will be easier with hot pepper - the blanks simply repeat its conical shape. We will tie all the blanks with the help of yarn and a hook, but if you do not know how to knit, you can decorate with a fabric by making an applique. We also need to tie the leaves of the pepper and additional elements - stems, leaves. When each vegetable is completed, we tie a thread to it, which we will weave into a braid. This craft can be presented as a housewarming gift, it will perfectly decorate the kitchen.
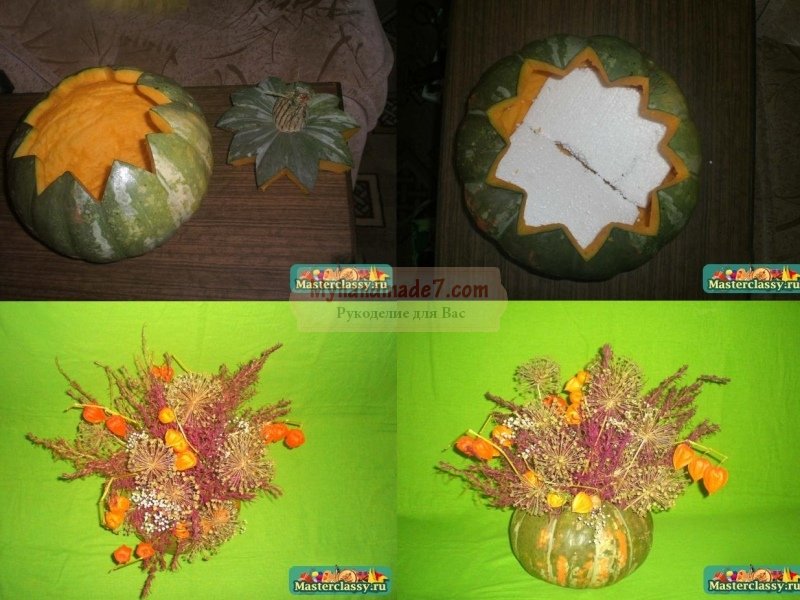
Natural vegetables are also great for crafts, especially the pumpkin, which is the star of all seasonal crafts, and not just for Halloween. In the above example, it becomes a wonderful vase for. The main difficulty in such a composition is to very carefully remove all the pulp from the pumpkin and clean it well, otherwise it will start to deteriorate and appear in the room. bad smell. The pillow for dried flowers will be foam, and if you want to put a freshly cut bouquet inside and want it to stand longer, then lay a floral sponge that you will fill with water as needed.

The theme of the harvest is also perfectly revealed by wheat ears, which make up an unusual bouquet. You can use them on their own, or pair them with fall colors.
Do-it-yourself autumn crafts: photo
Most do-it-yourself autumn crafts, photo which you will see below, cones of coniferous trees of various sizes are used for decoration. They are also precious gifts that we, if we wish, can receive from nature to decorate our homes without spending a lot of money on it.


Can allow you to make various shapes, complex compositions and coatings. To work with this durable material, stock up on metal scissors and be careful. You can combine this material with wood, yarn or fabric, feathers, dried leaves.

And in such a nice composition, checkers help to imitate hazelnuts, they look extraordinarily impressive. As a basis, you can take plastic capsules from chocolate eggs, they have the shape we need. So that their color does not shine through the burlap, it is necessary to paint the plastic with paint in Brown color. When the workpiece is completely dry, it is wrapped in a small piece of burlap, its edges are fixed with glue. A hat that looks like a nut hat is made in two stages. First, you need to cut a ring of scales from a pine cone with sharp scissors. Since the cones are quite hard, it is not recommended to entrust this stage to children. Thread this ring over the burlap so that its edges are pressed against the scales. At this stage, you can also additionally fix the elements with hot glue. Now we take the very top of a large cone, it is often flat, and glue it up. With small sticks we denote sprigs of nuts and that's it, the craft can be considered completed.
Autumn is the golden season and a great opportunity to create extraordinarily bright crafts.
It is this time that gives us a rich selection of bright material for creativity. Seeing all this beauty autumn landscape you can dream up and you will get great work. especially since this is the time when children no longer spend so much time on the street, and beauty and bright leaves with puddles beckon and call)))
We offer you ideas for autumn creativity that you can make with your children from inexpensive and affordable materials. It will be about wonderful crafts for the autumn holiday in kindergarten.
Crafts autumn in kindergarten
Autumn paper leaves
You won't need a lot of material for this easy but interesting craft. All that will be needed is:
- colored paper
- scissors
- double sided tape
- wire

You can use any color paper.
To begin with, on a colored sheet, in this case on an orange one, draw the outline of the leaf and cut it out.
Then we fold the accordion in a circle.
Now we proceed to our ponytail, we take the wire and wrap it with a strip of colored paper on adhesive tape.
When both of our blanks are completed, we transgress to the last stage of our work, and glue the tail to the leaf between its edges on the back of our orange leaf.

And now our bright autumn leaf is ready. Having made a lot of such leaves, you can make a garland and decorate the children's room.
painted leaves
Or you can not do it, but just collect the leaves in the yard and color them. It's just that the colors need imagination. And in order for the kids to like this activity, they just need to be prompted.
Look what original ideas, from the leaves you can make a fish and a dog and Indian feathers .... Well, of course you will come up with something else more interesting and fun. The start is given ... Crafts about autumn for kindergarten


Owl from cones

Tree - palm
This is very interesting craft, which is a must do with children, they will love it.
What you will need:
- paper black, white
- colored paper (corrugated)
- scissors

To start our work, we need to make as many blanks.
The first one is the trunk of our tree. Have your child trace their hand with a simple pencil on black or brown paper. And cut it out.
We also make leaf blanks. color mode, corrugated paper into small pieces and knead it with your fingers, your baby can handle it.
It is advisable to make leaf blanks from two colors, it will be more interesting.
Now that all the blanks are made, we proceed to our application itself.
We glue our stem-palm on a sheet of white paper, and on top of the leaves of two colors in a chaotic manner. As shown in the photo.

The autumn tree is ready. Such a children's masterpiece can be framed and decorate a room with it.
Application "Autumn trees"
In autumn, bright and cheerful crafts for children.
You will need:
- paper black and white
- scissors
- glue and brush
- simple pencil
- colored paper (corrugated)

At the beginning of the work, you should make some preparations.
To do this, you will need three sheets of white paper, the same size, approximately 10x20 cm.
We take colored paper(corrugated), it can be purchased at any stationery store, and mode into small rectangles of different sizes.
Having cut a sufficient number of colored pieces, we paste them on white blanks in a chaotic manner. As shown in the photo.

Then on black paper we draw the silhouettes of three trees and cut them out.
When our three sheets with colored rectangles dry up, we can start gluing our trees.

Optionally, pre-cut small light green leaves or any other color can be glued on top.
This is not for the smallest crafts for autumn day in kindergarten, but for those who are already older.
Apple tree
This unusual drawing colors that will undoubtedly cheer up not only your children, but also yourself.
For this fun drawing you will need:
- paper
- paints
- apple

In advance, on a sheet, draw a tree trunk with brown paint, as shown in the photo. Let the paint dry, 5 minutes will be enough.
Then the most fun and interesting part of drawing begins.
Cut the apple in half, paint one half red and the other yellow.
And we put prints, making the crown of the tree.
It is best to use gouache paints, they are bright and dry quickly.
This drawing does not take much time, but it will be interesting for children of any age.

The same beautiful apples can be made on pieces of fabric (burlap). You will get either an autumn garland or a vintage house decoration.

Here comes autumn
Autumn is a fascinating craft for children about the transition from summer to autumn. Easy to do, all you need is paper and colored pencils. Children with great pleasure turn the picture over, seeing different image. For them, it's like a mini-cartoon.
First you need to take a sheet of paper and fold it with an accordion.

Then you need to lay the paper on one side, draw a tree with a crown and leaves. We draw first with a pencil so that we can correct (wipe).

When you rotate, you get this picture

Then draw the branches for the autumn tree and the leaves for the summer one.

You paint it in green and summer colors.
Having painted the autumn tree, we get this picture.

And we get such a changing picture as a result:


Pumpkin in modern style)))
A very simple and very affordable craft about autumn. In autumn, a lot of pumpkins ripen and make another orange beauty just right.
Oka, by the way, looks like a pumpkin from a fairy tale about Cinderella. It is made very simply from ordinary colored paper in 2 colors. Well, all you need is:
- colored paper in orange and green;
- scissors;
- glue;
- marker.

Hedgehog from autumn leaves
A hedgehog can turn out to be both kind and economic and fat and thin. It all depends on how many leaves your kids will collect.
For the smallest, of course, you need to prepare a blank for drawing a hedgehog, so that they only have to glue the leaves collected in the garden. Adult children can draw a hedgehog according to the model themselves.
It is also important to show the children the autumn craft before they go to the garden and collect the leaves. You can spend a whole lesson in botany, telling the children the leaves of which trees they will collect on the back of the hedgehog.

Birds flying south
A very bright and funny craft for children about autumn.
What you need for such creativity:
- colored paper;
- disposable cups;
- scissors;
- glue;
- artificial eyes for children's creativity.
This is a creative lesson with a story about birds flying south. Birds can be made different by making tails from one-color or multi-colored paper.
If after the end of such creativity, you pour cocoa into these cups, the children will drink it even with a nasty foam.

dense autumn forest
Blanks need to be drawn and cut for each child in advance. and distribute before the start of the art class. And already with the idea of gathering the kids and going for a walk with them, collecting leaves.
If you have a large group of children, then it is interesting to make trees tall, with the growth of children. Then by putting them along the wall you will get a real autumn forest in the classroom or room for creativity.

autumn red apple
very bright and simple craft. It is made from used plastic bottles. Therefore, in parallel, you can conduct a lesson with children about the preservation of our nature and the use of already made things that will simply be thrown away.
To make an apple you need:
- 2 plastic bottles (transparent);
- a piece of green felt;
- red braid;
- a piece of wooden stick or twig;
- red colored paper;
- scissors;
- glue.
At plastic bottle cut off the bottom with a height of 5-7 cm.
Crumple the red paper with your hands and put it in the cut bottoms of the bottles
We connect the cut bottoms by inserting one into the other. We glue them together and tie them with a red ribbon.
We make a hole in the top of our apple with scissors and insert a twig there. If the red paper inside the apple lies tight enough, then the twig will not need to be fixed.
Cut out leaves from green felt and glue them on a branch.

Candlestick with leaves

Children are very creative people. They love to talk on stage, receive gifts, discover something new for themselves ... The only thing is that they cannot do this work without adults. And of course we must help them in this!

crafts in kindergarten on the theme of autumn
Crafts gifts of autumn for kindergarten - ideas from natural materials (video)
Collage "Autumn"
Prepare:
multi-colored threads
- flowers and leaves for decoration
- thin dried twigs
How to do:
1. Make a circle of dried twigs. Secure the structure with wire or thread.
2. Take colored thread and wrap the circle in such a way that you get a "cobweb". Secure the end of the thread with a strong knot.
3. Decorate the round frame with leaves. They need to be inserted between the threads of the web. For decoration, you can use any natural material.
natural crafts do-it-yourself on the theme of Autumn
"Crown of Leaves"
Necessary materials:
Scissors
- thick paper or cardboard
- colorful leaves and natural materials for decoration
- adhesive tape
Stages of work:
1. Measure the circumference of the child's head. Add a few centimeters to this length. These data will be needed to cut a strip 5 centimeters wide. If one cardboard sheet is not enough, you can cut 2-3 strips and glue them together.
2. Cut out one strip again, but now zigzag. Only one side should be cut with a zigzag.
3. Cut off a piece of adhesive tape the same length as the strips of cardboard. Lay the ribbons, adhesive side up, on a flat surface.
4. Glue 1 cardboard strip to the top half of the tape, and the notched part to the bottom. There will be an empty part of the adhesive tape in the center. This is where you need to stick natural materials for decoration.
5. PVA glue can also be used instead of adhesive tape.

Make some like that too.
"Finger Puppets"
Necessary materials:
Thin brush or thin branches
- cardboard cylinders
- leaflets
- colored paper
- PVA glue
- glue stick
- scissors
- small stones or buttons
How to do:
1. Start gluing the sheet evenly to one end of the cylinder. First you can glue the colored paper, and then the leaves.
2. Glue small branches on the sides - these will be the hands.
3. Glue pebbles or buttons along the cylinder.
4. Make eyes out of plasticine, fix on a cardboard cylinder.
Try also to do .
Craft garden autumn do it yourself
"Spider from the bump"
Prepare:
Thread
- thin branch - 4 pcs.
- cone
- plasticine or plastic eyes
- glue "Moment"
Stages of work:
1. Make paws from twigs.
2. Attach eyes to the bottom of the cone.
3. Tie a thread and hang the spider.

"Asterisks from branches"
Necessary materials:
Raffia or paper tape
- gouache or acrylic paint
- branches of the same diameter and length
- Super glue
Stages of work:
1. In the forest, collect branches, cut them to get the material of the same length. You will need 5 pieces in total.
2. Form a star from the branches. If desired, the branches can be painted with gouache or acrylic paint.
3. Using raffia, connect the branches to form an asterisk.
4. Wrap the craft with bright ribbons or raffia.
Craft theme autumn do-it-yourself photo:
Collect acorns in a forest or park, clean them of dust and dirt, rinse with water. Pierce each fruit through with a needle or awl. Pull a wire, fishing line or thread through the acorns. As a result, you should get a ring. Glue the acorn caps to the surface with superglue and varnish.
"Tree with acorns".
Separate the hats from the fruits, paint them with paint of any color so that the craft fits organically into the interior. Attach twine loops to the hats. If there are branches left on the hats, tie a rope to them. If there are no branches left, use glue. For best effect, place the vase on a tray strewn with autumn leaves and acorns.
autumn candle
The easiest way to decorate a candle is to place it in a glass dish. Beautiful handmade candlesticks will make the atmosphere in the house festive and cozy. First of all, pick up a beautiful glass vase. If the candle is too low, pick up any object that you can put a candle on. Perfect for a bowl. Just turn it upside down and install the candle. Decorate the bowl additionally to make it invisible. For decoration, you can use willow branches. They bend well, so you can wrap a bowl around them. Fill the gaps between the walls of the bowl and vase with hay, moss, etc. Place a candle in the center and decorate it. To do this, use red and yellow leaves. Just glue them on the outer wall of the vase. Weave the twine into a pigtail, tie the leaves. The rope not only fixes the leaves, but is also an additional decor.
Branches are an excellent ecological material. To create compositions from them, you do not need to have special materials and tools available. In simple branches and snags, you can consider unusual shapes and use them to create original crafts.
Be sure to clean and dry the collected branches. Branches can be used in pure form or cover them with paints or varnish. Large sweeping branches will look great on the walls. They will become not only a decorative element. They can be used as lamps or hangers.
Do-it-yourself autumn crafts of a kindergarten
Application "Pieces of autumn".
During the walk, collect chestnuts, acorns, beautiful leaves with your child. Even from the simplest leaves you can make funny little animals, as well as beautiful patterns and ornaments. Joint creativity will develop in the baby fine motor skills, imagination, mindfulness and perseverance. Creating an app is a simple process. Prepare dry leaves, clean them of dust and dirt, smooth them with an iron, laying them between two pages of a book or paper sheets. Prepare the paper, glue the prepared leaves with PVA glue. You can use scissors and cut out beautiful details. Children often carve animal figures. In order to cut a realistic silhouette, just use the template.

Candles make the interior cozy, interesting and magical. Prepare a large candle and decorate it with small ears of corn. Give your child the opportunity to color the cobs in all the colors of the rainbow. Insert an elastic band around the candle, insert heads of corn into it, tie beautiful ribbon. Coat each head with additional glue so that it is better fixed on the candle.
decorative basket
Necessary materials:
Leaves of beautiful color
- cones
- chestnuts
- acorns
- fruits vegetables
- wicker basket
- all kinds of cereals
How to do:
Line the inside of the basket with paper. If you have a floral sponge, place it on top. It is very convenient to insert autumn flowers into it. Place cereal and autumn leaves along the edges of the basket. Put the fruit in the center, insert the stems into the sponge. For better fixation, string the fruit on wooden skewers, insert them into the floral sponge.
Autumn felt leaves
Prepare 2 pieces of fabric different colors. On one segment, mark the veins, cut them along the contour. Pin 2 leaves together with pins, sew along each vein. For this purpose, use sewing machine or a needle and thread. Make veins in the center of the leaf using machine or hand stitches. From these leaves you can make a beautiful garland and hang it in the house.


