How to make crafts from acorns with your own hands. Ideas for original autumn acorn crafts
Autumn gives us a lot of materials for creativity. These are leaves of various colors, and chestnuts, and dried flowers, and acorns, and a decorative miniature pumpkin.
But, before you start making souvenirs from them, you need to properly prepare them, namely, dry them and, if necessary, varnish or paint them.
If you make crafts from unprepared raw materials, then this will be a short-lived product.
As soon as the material dries on its own, the souvenir will lose its shape and will have to be thrown away. And besides this, half-baked leaves can simply rot or become moldy.
Therefore, let's start by drying our autumn finds.
Let's prepare the leaves for the herbarium as follows:
1 way:
Put them between the book sheets and put them back on the shelf, pressing the other books firmly on the side. After about a week and a half, the leaves will become suitable for crafts.
This method is the best because natural color leaves do not change and then they do not break for a long time.
2 way:
This method is good if you do not have the strength to endure a week and a half and want to quickly get to work. Place the sheet between two white sheets of paper and iron on the lowest setting.

In this case, the yellow and red leaves retain their color, but the green ones can darken and become an ugly, brown hue.
We dry chestnuts, acorns and decorative pumpkin.
1 way:
Dry outdoors in the shade. It will be necessary to wait quite a long time before these materials acquire the dryness we need.
Sometimes this process takes a month. This is especially true of decorative pumpkins, from which wonderful autumn DIY crafts come out.
You will see for yourself when the moment of readiness of the gifts of autumn comes. Acorns and chestnuts will become lighter, and the pumpkin will become like a rattle, as the cavity inside will dry out and shrink, and dry seeds will beat against the walls.
2 way:
We use the oven for this. It must be set to a temperature of up to 60C, and dried until tender, stirring occasionally.

The main thing is not to rush and do not set a high heat, as the fruits will simply boil and become completely unusable.
Drying dried flowers
There is only one way and it is long-playing. Flowers should be strung on a thread threaded through the stems and hung in a dry place, peduncles down.
Drying in a book or an iron will not work, so the shape will be lost and they will become flat. After the dried flowers are completely dry, they must be covered with a layer of hairspray. It will give them the right density and will not allow them to crumble at the slightest touch.
Well, now, let's move on to specific master classes and examples.
1. Panel of autumn leaves
We offer you a great DIY leaf panel idea. It is not difficult to make it, but the result is quite impressive.
It would be nice if you placed other autumn decor elements next to the finished leaf painting. For example, pumpkins, spikelets and other gizmos suitable in style. Then you will have a whole autumn ensemble.

What we need to work:
- 1. Dried maple leaves of yellow-red color.
- 2. Tree branch for the trunk
- 3. A piece of square plywood
- 4. Stain or dark varnish
- 5. Simple pencil
- 6. PVA glue
- 7. A bunch of dry spikelets
- 8. Wicker basket for pumpkins
- 9. A few Jack Be Little or Baby Boo pumpkins
If you do not have such pumpkins, then the basket can be filled with chestnuts and acorns. But next year it would not hurt to grow them, as they look very colorful and festive. Of course, if you have a piece of land.
See what a variety of varieties and how harmoniously they combine with each other:

Master class step by step:
1 step. Sand the board, paying special attention to the edges. They must be smooth.
2 step. Cover it with stain or varnish, preferably with a brownish tint. Apply the coating in several layers, trying to make the board not of a uniform color, but slightly “spotted”.
3 step. Freehand draw a large maple leaf.
4 step. Start gluing on the maple leaves. Start from the edges, gradually approaching the middle. The edges of the leaves should match the edges of the sketch as best as possible. The next row of leaves should overlap the previous one. Do not glue the ends, they should be “overhang” so that the effect of volume comes out.
5 step. Glue the selected branch in place of the stem.
Now hang a hand-made autumn panel over a cabinet and arrange other decorative elements around.
2. Topiary from a herbarium and other autumn materials

Topiary is an ornamental tree. In autumn, you can collect beautiful leaves and make such a wonderful and cozy element of decor.
Any leaves, dried flowers, acorns, spikelets will be used here. The main thing is to understand the essence and make the right foundation. And what to fill it with - fantasy will tell.
What we need to work:
- 1. Ceramic pot of soft color
- 2. Smooth tree branch for the trunk
- 3. 1 ball of foam rubber, polystyrene or special floral foam
- 4. Dry moss, sesame or a handful of beautiful pebbles, acorns, dry mountain ash
- 5. Glue gun
- 6. Gypsum dry
- 7. Decorative elements: herbarium, dried flowers, mountain ash, acorns, etc.
Master class step by step:
1 step. Let's start with the base. Take foam ball and put it on a branch that will serve as your trunk. Then remove it and drop glue from the gun into the hole formed. Reattach the ball and let dry.

2 step. Secure the stem in the pot. To do this, put a drop of glue on the free edge of the branch, attach it to the base of the pot.
Then, dilute the gypsum with water to the consistency of liquid sour cream and fill the container. Keep in mind that you will still need to decorate everything on top with moss or acorns, so leave a gap of about 3-4 cm from the top.

3 step. Now we insert leaves, dried flowers into the ball, sticking their stems inside. If you want to add acorns to the composition, then first put them on pieces of wire.
4 step. Now you just have to decorate the top of the pot so that the gypsum is not visible.
That's all. According to this simple scheme, you can make a variety of autumn crafts with your own hands, not only from leaves, but also from dry peas, nuts and other things. All of them will look just fine!
3. Roses from maple leaves

Looking at this elegant bouquet of roses, it would never occur to you that it is made from ordinary maple leaves!
But, nevertheless, it is so. It is enough just to learn how to fold them correctly and you will get a chic basis for many ideas.
Such roses can be included in various autumn topiaries, wreaths, compositions and panels. They look great in combination with any natural materials.

Well, let's get down to business.
What we need to work:
- 1. Maple leaves not dried
- 2. Thread or soft wire
- 3. Matte hairspray
Master class step by step:
1 step. We form the middle of the bud. To do this, fold the sheet as shown in the pictures below. Try to twist it as tightly and evenly as possible. First in half, and then sausage.

As a result, we should get something like this:

2 step. Now take the second sheet, fold it in half again and wrap the base around it.

The sharp edges of the maple leaves need to be carefully hidden inside, like this:

3 step. We continue to build up mass around the base, fitting more and more new leaves. If you want to end up with a bud, then twist it tighter, and if you ate a more lush rose, then loosen the twist a little.

4 step. When you see that a real rose has “bloomed” in your hands, you need to fix it with threads, as tight as possible.

5 step. We cut the edges with scissors and put the rose on a lining of leaves, preferably already dry. We cover the composition with varnish and admire!

Such roses from leaves stand for a long time, for the whole autumn season it will definitely be enough. You can make as many of these colors as you like. The more of them, the more chic this autumn composition looks, resembling a fabric motif in appearance.
4. Compositions from decorative pumpkins
Even if you do not grow this vegetable on your site, in the autumn you can freely buy them on the market and then dry them yourself. How to do this, we have already told above, so let's not waste time talking.
Let's get creative!
There will be no master classes in this block, we will just show you examples of such decor, and how to make them is quite clear from the photo.
Of course, there are more complex techniques, for example, carving or painting on dry lagenaria, but this topic is extensive and worthy of a separate article. Here we will consider only the simplest compositions that even a schoolboy can do.
1 option. Basket with a scattering of pumpkins. It couldn't be easier, but the view is spectacular!

Option 2. Candlesticks from mini pumpkins. To do this, you need to cut a hole large enough with a knife so that you can put a foil-based candle in it.

Or this option:

Incredibly simple, right?
3 option. Wreath on the door of pumpkins. Take any circle as a basis, for example, an embroidery hoop, and attach mini-pumpkins to it.
Pierce the tails with wire and screw it to the base, circle. As additional decorative elements, use berries, acorns, twigs and autumn leaves.
It will look something like this:

5. Chestnut Topiary

To create this spectacular do-it-yourself autumn craft, we will need the same materials for the base as for creating a decorative herbarium tree. And for decoration, you just need other elements.
For work we need:
1. Ceramic pot
2. Styrofoam ball
3. Gypsum dry
4. Glue gun
5. Tree branch for the trunk
6. Cones, chestnuts, acorns
7. Harsh thread or twine to form decorative balls
Master class step by step:
- 1. We form the base of the tree in the same way as in the case of the leaf topiary.
- 2. We fix the base in a pot with glue and plaster
- 3. We apply drops of hot glue to chestnuts, acorns and other elements and randomly attach them to the foam ball-crown.
- 4. A wreath on the chestnut door

Such a wreath of chestnuts on the front door will cheer up not only you, but also passers-by. It is very easy to make it. Follow all the steps given for making a pumpkin wreath.
Find some kind of dense base, then pierce the chestnuts and other elements through the reverse side, insert the wire, form a hook and use it to screw them to the circle.
Complement the chestnut composition with leaves, acorns, berries and other autumn decorative elements that this fertile time of the year gave.
6. Autumn garland "Leaves" from salt dough

This is a very spectacular autumn craft with your own hands. The big advantage of such a garland is that it is not seasonal and will decorate your home for many years.
After all, it is made not from natural materials, but from salt dough, which does not deteriorate for years. The only thing is that such products are fragile and must be handled with care so as not to break. But, even if this happened, they can always be glued together, but the joint will not be noticeable.
What we need to work:
1. 2 cups flour
2. 1 glass of salt
3. 0.5 cups of water
4. Gouache
5. Sewing pins with hook eye
6. Twine
7. Oven
8. White landscape paper, pencil
Master class step by step:
1 step. We draw patterns of leaves of various types on the landscape sheet, but approximately the same size. We cut them out.
2 step. Knead a stiff dough of flour, salt and water. If the dough turns out to be non-plastic, then liquid can be added drop by drop. Mix well the resulting material and roll it out on the board. The layer should be approximately 5-7 millimeters.
3 step. We lay out the templates on the rolled out dough and cut them along the contour with a knife.

As a result, we should get about as many blanks.

4 step. We make holes with pins and carefully fix the heads. On them we will hang our leaves. We squeeze out the veins with a knife.
5 step. We dry the dough in the oven at a temperature of 50-60C until completely dry.
6 step. We color the blanks from the dough with gouache, trying to make natural tones and transitions.

7 step. We string the garland on the twine, making a knot over each leaf so that they do not move.

So our autumn do-it-yourself craft is ready. You can hang it anywhere, it will be in place in any corner of the house, especially if you have some other autumn-style decor elements.
7. Vases and houses from an ordinary pumpkin
Autumn is the season for pumpkins. It costs mere pennies and find nice shape and coloring is not difficult.
And to make an element of autumn decor on its basis is as easy as shelling pears! No need here step-by-step technologies and accessories.
All you need is pumpkins, a carving knife, a tablespoon to pick out the pulp and flowers to fill these colorful vases.
Look at our selection of photos of pumpkin vases. Looks very dignified and autumnal.


As you already understood, you only need to cut off the top and clean the core of the vegetable. Then fill the container with water.
And you can make houses out of pumpkins. To do this, you just need to cut holes in the right places. Where exactly they are located, you can see in the picture below. Kids love these things!

8. Wreath on the door made of natural materials
We have already given above an example of wreaths of pumpkins and chestnuts. How to make them - you already know. Here we just give a selection of the most spectacular, in our opinion, ideas.


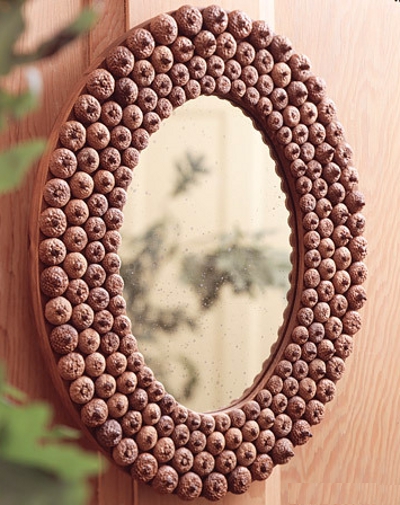
9. Frame of acorns for a photo or a mirror
Decorating any base in this way is very simple. We think no explanation is needed here.
The only thing we can advise is that you should not glue acorns on a glue gun or PVA. Much better if you use plasticine.
Because, most likely, you will soon get tired of such decor and have to throw it away. And so, you can always dismantle the acorns and get a regular photo frame back into use.
This is how it will look like.

There are whole acorns on the photo frame, and only hats on the mirror. Thus, you can create a variety of autumn crafts with your own hands and decorate any surface: caskets, bread boxes, and more.
10. A bunch of acorns

This autumn craft will look the best way, if you paint the "berries" in natural colors, and instead of grape leaves add a herbarium of their maple, of various colors.
Also, a bunch of acorns is a wonderful element of any autumn wreath on the door or a large topiary. After all, it can be made not only desktop, but also in human growth!
Only instead of a foam ball, you need to take some large, plastic one. Grapes from acorns are made very simply, we will now tell you exactly how.
What we need to work:
1. Acorns without hats
2. Shilo
3. Wire
3. Glue gun
4. Acrylic paint
5. Autumn leaves for decoration
Master class step by step:
1 step. We pierce holes in the base of the acorn with an awl.
2 step. We break or cut the wire into pieces 7-10 cm long.
3 step. Dip the ends of the wire in a drop of glue from the gun and insert into the punctured holes.

4 step. We paint acorns in any color you want. The main thing is that it is combined with leaves that will complement the composition.
5 step. We collect acorns in a bunch, forming a wire rod on top. Then we attach leaves to it.
Now you can make any decoration based on this fall craft. Panel, wreath and more.
11. Autumn crafts from felt
Working with this fabric is a pleasure! The material does not crumble, perfectly holds its shape. And this means that any beginner can make an autumn craft from felt with his own hands and it will turn out no worse than the products of experienced craftswomen.
We offer you a selection of the best and simple decors in autumn style, and you already choose any of them! They are so simple that they do not need to describe in detail their step-by-step technology.

As you can see, on the basis of felt leaves, you can make both a wreath and a garland, like the one we already made from salt dough. Here are a couple more options autumn wreaths with your own hands.

All you need to do is draw patterns, cut out the felt and decorate it according to our photos.
12. Pigtail of garlic and red pepper

How cozy it is when bundles of garlic, onions, red peppers hang in the kitchen! But if you hang them fresh, they will very soon lose their appearance or simply run out, because they will go to food.
Let's do something like this, but for the ages! Now we will look at how garlic and pepper are made, from which we will form a pretty braid for the kitchen.
For work we need:
1. Nylon tights white color or plastic bag (for garlic base)
2. Cotton wool or synthetic winterizer (for filling)
3. White harsh thread (for dressing and forming lobules)
4. Glue gun
5. Buckwheat or twine (to simulate garlic roots)
6. Fabric for sewing peppers or salty dough for his molding
Master class step by step:
1 step. We form the body of garlic. To do this, we need to cut into squares or nylon tights or plain plastic bags. Garlic made of nylon looks, of course, more realistic.
But the package looks good too. But most importantly, this material is always at hand. So, cut out a square, about 7 by 7 cm in diameter.
2 step. We roll a ball out of cotton wool or synthetic winterizer, put it inside a flap of nylon and form a head of garlic. It looks like it is shown in the photo.

3 step. Then we begin to tie the head with a harsh thread, forming garlic cloves. First, divide in half, then into quarters, then into 8 parts.
Look at the photo, the process is clearly shown there.

4 step. In the place where the roots of real garlic are located, we drip a drop of glue and sprinkle this place with crushed buckwheat. If you want, you can replace it with twine, which needs to be unraveled and finely chopped.
5 step. We make a pigtail out of twine and attach the resulting garlic cloves to it.
6 step. Now it's time to do the pepper. You can sew it, but a pepper made from salt dough looks much better.
We have already given the kneading recipe, in the subsection “Garlands of autumn leaves". This is how the peppercorns should turn out in the end.

7 step. We make holes in the tails of the peppercorns (we will then thread the twine into them and with its help we will fix them on the pigtail with garlic). You can do this with an awl or any item at hand.
The main thing is to make them large enough so that you can thread the thread freely later. Otherwise, after drying, you will not be able to attach the finished product to the composition in any way.
And one more thing: if you make a hole, make sure that the edges of the legs remain more or less large. Otherwise, after you pull the thread, the thin walls may crack and the pepper will fall to the floor.
8 step. Dry in the oven, paint with acrylic paint, after drying, cover them with varnish. When the pepper shines, it looks more natural.
Dry at a low temperature, do not rush, because otherwise, your work may burst and you will have to sculpt everything again. Cracked peppers can no longer be painted the way you would like.
9. We fasten the pepper to the garlic and hang this autumn composition to the kitchen. You can make several of these links. You can make carrots from salt dough, and from brown tights you can make an onion bunch.
The principle of making bulbs is the same as garlic, only even simpler. Slices do not need to be formed.

Also, a bunch of mushrooms on the wall will look great, which you can also mold from dough and paint realistically.
Here comes the end of our great review. You saw many examples and any kind of autumn crafts with your own hands. We really hope that our master classes will be useful to you and you will definitely take something into service.
Any changes in nature are a great opportunity to train your creative imagination. For example, I really like to decorate my house according to the season. Now, I have, decorative pumpkins, reminiscent of a generous harvest and yellow chrysanthemums. Every year to my collection decorative ornaments for the home, something new is added.
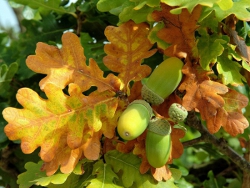
So this year, I decided to make crafts from cones and acorns. Not far from the school where my son goes, there is a chic oak tree that gives us acorns every year. With the help of acorns, oak leaves, create a magical atmosphere of comfort and warmth in the house. Even a simple bouquet of twigs with oak leaves looks chic.
So rather go for a walk in search of natural materials, and then grab scissors and glue to create your charming autumn crafts from acorns.
DIY autumn crafts from acorns
For autumn crafts, acorns, chestnuts, and cones are suitable. Collect everything! Found in nature different types acorns - large, small, thin oblong, thick and short. The shape of the cups is wide and flat, with a hairy surface, small. Collect everything! These are almost ready-made animal heads, human torsos for autumn crafts for kindergarten and school.
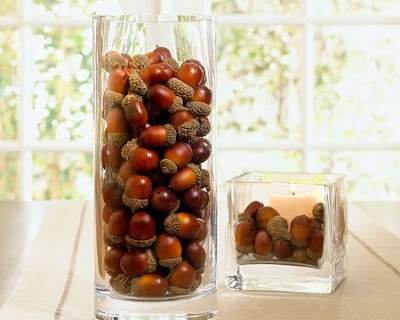
1. A cup of abundance from acorns
Such a bowl of abundance will look great with autumn bouquet from chrysanthemums or a bouquet of dried flowers. To make it, take a glass vase geometric shape, pour on the bottom 2 cm of any cereal, such as peas, or lentils, then a layer of acorns, you can add bright rose hips, nuts, cones and chestnuts, small pumpkins and carrots, halves dried oranges and apples.
2. Napkin ring for autumn table decoration
It is very easy to make such a do-it-yourself napkin ring. Take 10 acorns of the same size, glue the hats to them with hot glue. They tend to fall off. And in the center pierce them through with an awl. Pass a wire or rope through the hole. Connect the ends into a ring. Acorn craft is ready!

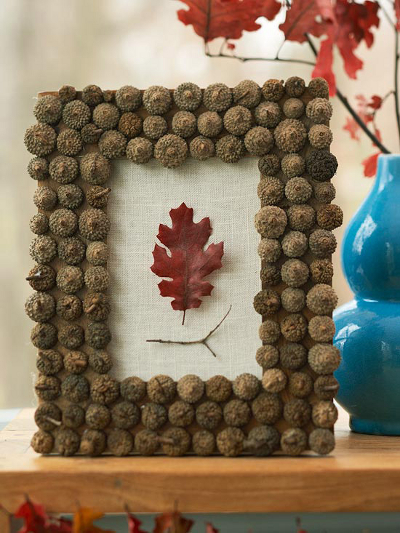
3. Photo frame
In such a frame, not only photographs will look great, but also your favorite pictures of Autumn, prints, inspirational phrases, children's drawings. To make it, you will need acorn caps in a large number, hot melt adhesive and acrylic clear lacquer. It is better to take a simple wooden frame for decorating, from the Ikea store. Glue a decor made of natural material on it, so that you like it, and apply on top acrylic lacquer. Dry the autumn crafts from acorns and put them in a conspicuous place.

4. Cozy panel made of natural material
For it, you will need a cross cut of a fairly large tree. The surface will need to be treated with fine sandpaper to make it more even. Glue thin branches of shrubs or blades of grass on it with a thermal gun. Above each branch are several acorn caps and acorns themselves. They will imitate flowers and leaves. Small cones will also come in handy for this cone and acorn craft. Set the panel on a decorative plate stand and decorate your home with it.

5. Children's crafts from acorns and chestnuts
Children are very fond of making crafts from acorns and plasticine. Literally with the help of a few pieces of plasticine, you can revive almost everything.


To make a bird, you'd better take chestnuts (they are larger). From soft plasticine, blind the beak, eyes and wings. Stick everything in place. If you do not like plasticine, take a bright felt and make your own bird details from it, and then glue it. Complement your natural composition with a tree branch with leaves and flowers. Makes a great decoration for a child's room.

6. Autumn home decor
Any autumn crafts decorate the house. Perhaps I will adopt this idea with a mirror.

7. Autumn frame
This autumn style photo frame is more geometrically ordered. If you like symmetry in everything, then this acorn craft is for you. You will only need hats and a base with a wide frame. The result is incredibly stylish!

8. DIY crafts from acorns for children
My niece loves these dolls. Any beads are suitable for the head, not even necessarily wooden ones. Scarves can be made from felt, fleece or knitted yourself. The pupae can live in a jacket pocket and can be taken out while walking in kindergarten and play with them. Just look what a simple and cute autumn acorn craft turned out!

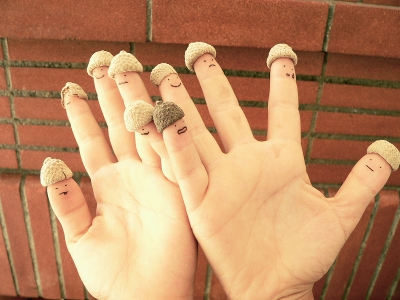
9. Funny acorn family for kids
Together with preschool children, you can fantasize as much as you like and make a Rototo family. For the calf, take acorns or chestnuts, for the ears - cone seeds. Using white acrylic paint, a thin brush and permanent markers you can draw any facial expression. You can do anyone, even minions!

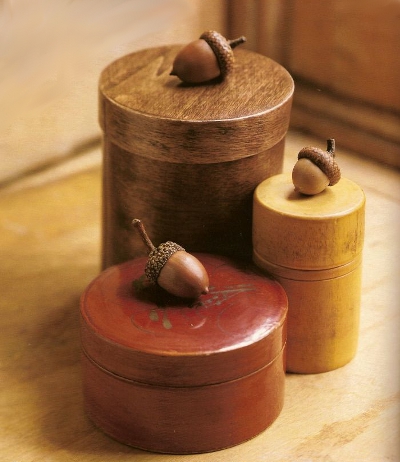
10. Caskets
Even individual large acorns can give your home an Autumn charm. Just lay them out in different prominent places, or stick them as decoration on those items that you often use. For example, boxes.

11. Autumn wreath made from natural materials.
To make a really beautiful autumn wreath, you need to make an effort, but it's worth it.

You will need:
prepare decorative materials - dip the autumn leaves in wax and dry (then the leaves will not crumble), glue the acorn caps tightly, pick up suitable berries and herbs.
make or purchase a base for a wreath - the simplest is a circle cut out of cardboard.
How to make a craft from acorns in the form of a wreath:
first, glue long blades of grass with a thermal gun, then dry the leaves;
then glue acorns and berries;
spray everything with hairspray.
Such an original vase was made from the most inconspicuous plastic pot. Acorns and acorn caps are glued to it with hot glue or superglue. They begin to stick acorns to a plastic container from the bottom up, and cover the top of the container with hats.
Such an autumn vase is good for the street. So much natural material will attract insects.

13. autumn decoration for home.
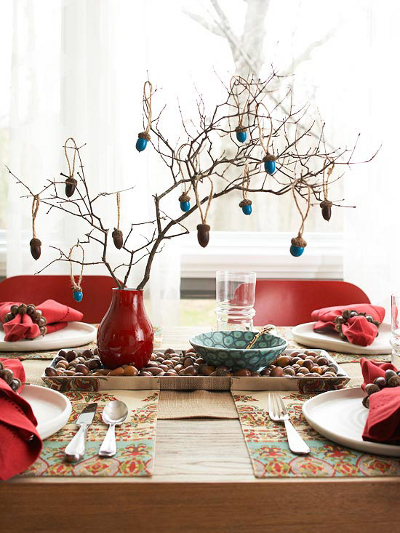
If your family has a birthday in the fall, then be sure to make such an autumn tree from branches and painted acorns. It looks very unusual, stylish and will set a festive mood in any room. And if you like to fool around on Halloween, then throw a web on top. It will be very intimidating.

14. Basket Gifts of Autumn
I just had a basket from the bouquet that was given to me! Great idea- just glue it on.

Autumn crafts from acorns. Crafts from acorns photo. Fall craft ideas.
Summary: Crafts from acorns with their own hands for the autumn holiday. Crafts from natural materials. Children's crafts from natural material. Fall craft ideas.
Summer is coming to an end, it's coming soon Golden autumn - favorite time years of many poets. Autumn, like no other season, is rich in natural materials for children's crafts: acorns, chestnuts, cones, nuts, autumn leaves ... you can't list everything!
In addition, in autumn we spend more time than in summer at home, and this circumstance also encourages us to start making autumn crafts from natural materials. We have already talked about crafts from autumn leaves before. See link >>>>
In this article we will talk about crafts from acorns. In the future, we will also teach you how to make crafts from cones, crafts from chestnuts and nutshells.
1. Crafts from natural material. Crafts from acorns
Acorns suspended on twigs look original. You can paint them with acrylic paints or cover them with nail polish.
If you decide to make colored acorns, then remove the hats from them before painting. Paint the acorns with acrylic paint or varnish, then glue the hats back on.

Those who are fond of felting wool can make beautiful colored acorns from felted wool.

Now let's move on to the crafts from acorns.
2. DIY autumn crafts. autumn festival
The most common crafts made from this natural material are all kinds of men and deer. Handles, legs, horns can be made from toothpicks, matches, thin twigs. It is convenient to pierce holes in acorns with an awl or toothpicks (if the acorns are still young). To do this, of course, should be an adult.
It is very convenient to use a glue gun when making crafts from natural materials. But if you don't have one, Super Moment glue will do. It has a very small hole from which glue comes out, so it is convenient to use it. Instead of glue, plasticine can also be used in some cases.


The head of the little men can be made from a wooden bead of a suitable size. Look at what a simple and at the same time cute autumn acorn craft we got.


Another one interesting craft from acorns for children - forest gnomes. To make them, you will need acorn caps and tree branches of suitable thickness.


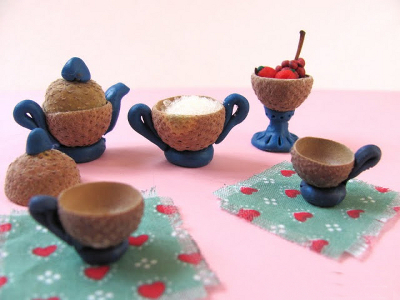
Little men need a small dish, also made from acorns. See how to do it.


And here is another version of dishes from acorns. This natural material craft is made of plasticine and acorn caps. See link >>>>
3. Children's crafts made from natural materials. Fall craft ideas
With a little imagination, you can do more unusual crafts from acorns.
For example, little owls. The eyes, beak and wings of babies can be made from felt or colored paper. By the way, do not forget to make a mother for them! To learn how to make a mother owl, read our next article "Crafts from cones for children."

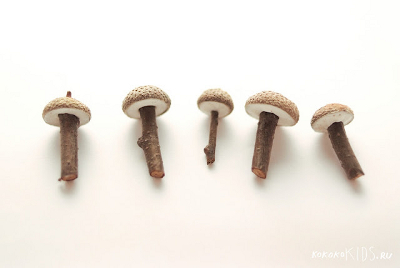
From acorn caps, plasticine and a few sticks, it is very easy to make small toadstools or mushrooms, whichever you like best. Instead of plasticine, you can glue the branches to the hats with a glue gun.

4. Make crafts from natural material. Autumn crafts for kids
Another autumn acorn craft - a woodpecker on a tree

or just sister birds.
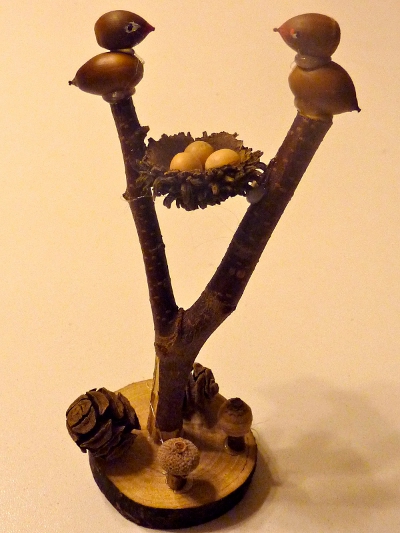
Since we are talking about birds, we will tell you about another autumn craft made from natural material from the wonderful site Kokokokids.ru
Look at the photo below. These blue eggs are made from acorns and the nest is made from yarn. The craft is very simple to perform, but, meanwhile, the result is amazing. You just need to paint the acorns with acrylic paint: first blue, and then make brown spots on top with a toothbrush. detailed wizard see the class for making this craft from acorns at the link >>>>

And if you paint acorns dark purple and green colors, then you can make bunches of grapes or an olive branch from them. Detailed instructions for the manufacture of this autumn do-it-yourself craft, see the link >>>>


5. Crafts on the theme of autumn. Crafts from acorns
With help glue gun it is very simple to make such flowers from acorns and their hats.

In addition, you can decorate a picture frame or a mirror with acorn caps.
Or make an autumn panel of acorns and saw cut wood.

You can decorate a frame for a photo with whole acorns.

Look beautiful wooden boxes decorated with acorns.
And here is another example autumn panel. The picture is made on canvas pasted on thick cardboard for rigidity. The oak leaf is cut out of a viscose kitchen napkin, the acorn and the stick are real. Link
Hello, friends. For the benefit of your health, we have already published an article . The benefits of oak bark were also mentioned in the article .
Today I will tell you a few useful tips the use of acorns in the treatment of diseases of the gastrointestinal tract and in everyday nutrition.
Treatment of diseases of the gastrointestinal tract.
Acorns contain a lot of tannins and other useful natural substances, which have a very beneficial effect on the elimination of ulcerative formations in the stomach and intestines, as well as getting rid of the putrefactive intestinal microflora that occurs in corpse eaters (“lovers” of the meat of innocently killed animals, birds and fish ).
The folk recipe for eliminating ulcerative formations in the stomach, intestines and getting rid of putrefactive intestinal microflora is as follows:
- Collect high-quality (not wormy) acorns (wormy - float in water) and germinate them in cotton cloth, abundantly moistened with water.
- When the acorns “hatch” sprouts, peel them, cut them into pieces and lightly fry them in a pan with vegetable oil.
- On an empty stomach, in front of roasted sprouted acorns, eat a little salad of raw greens and vegetables that you are accustomed to taste. After that - eat up roasted sprouted acorns until you feel full.
This should be done in the morning, and if you like it, then 3 times a day for as many days as it takes to heal ulcers and eliminate putrefactive intestinal microflora. If you stop carcass eating, then acorns will eliminate your ulcerative and putrefactive problems of the gastrointestinal tract fairly quickly (at least in 1-2 weeks, maximum in a month). Be healthy and no longer turn your gastrointestinal tract into a cattle burial ground.


The use of acorns in daily nutrition.
Acorn flour(old recipe).
Golden autumn, our favorite time, we will cook acorn flour. You can collect acorns from the beginning of their shedding from oaks until the beginning of October. True, in October it is already difficult to do this, because. acorns begin to sprout, and the rains press them into the ground.

The first stage - they need to be cleaned:
Someone breaks them with a rolling pin, others with a nut splitter. My way is exclusive. We take a cast-iron frying pan, lay out part of the acorns so that they all come into contact with the bottom, put on maximum heat and shaking often, fry until they crack (no more than a minute). They will sap and hiss.
The shell may burn, but do not let the acorns burn.
After that, with a slight movement of the hand, we take out the acorns from the shell. Remember, they are easy to take out while warm, as soon as the acorn cools to room temperature, it becomes difficult to take it out.


The second stage is to sort and grind:
The second part of the process is best done during cleaning. Only slightly brown acorns, almost milky, suit us. Cut each acorn into 4 pieces.


The third stage - bringing to readiness:
Pour the resulting acorns cold water and soak for two days. Every day you need to change the water 3 times.
After two days, fill with new water and bring to a boil. Remove from heat, drain water and let drain.
From the experience of past years, it is known that at this stage it is better to immediately pass them through a meat grinder (because then it will be easier to grind in a coffee grinder). Spread on a baking sheet and dry in the oven at 40 degrees until completely dry. Dry acorns can be stored in this form or ground into flour. It is best to grind before use. It is better to store it in paper bags, but you can also store it in clean glass jars.


Acorn milk soup.
Pour the acorn grits in a thin stream into boiling water, stirring all the time, cook until the grits are ready, then add homemade milk, sugar, salt and bring the soup to a boil.
When serving, put a piece of homemade butter in a bowl with soup.
Products: acorn grits - 30 gr., milk - 250 gr., butter, sugar, salt, turmeric, cinnamon - to taste.

Sweet cakes made from acorn flour.
Warm up homemade sour cream, pour acorn flour into it, boil slightly, remove from the stove and cool. Add grated cheese, sugar to the resulting mass, mix well, cut the cakes and brown in a pan.
Consumption of products: acorn flour - 30 gr., cheese - 20 gr., sour cream - 30 gr., sugar - to taste, vegetable oil.

Acorn dumplings.
Homemade cream or sour cream, salt, water are added to the acorn flour and a soft dough is kneaded, which is rolled out 1/2 cm thick and cut into squares.
Dumplings are boiled in salted water. Onions are fried in vegetable oil and mixed with boiled strained dumplings. Served hot.
Food consumption: for 2 cups of acorn flour - 1/2 cup of water, 1/2 teaspoon of salt, 2 onions, vegetable oil, homemade cream or sour cream - depending on the density.
Acorn coffee.
Ripe acorns are peeled, cut into 3-4 pieces each and dried in the oven. Then they are fried, making sure that they do not burn, but turn into a brittle mass, easily turned into a brown powder in a coffee grinder. Brewed and drunk like ordinary coffee, with milk or sugar, but it is better to use honey instead of sugar.
Acorn coffee is especially useful for children suffering from scrofula and rickets (acorn coffee strengthens the abdominal organs and eliminates hardening of the mesenteric glands). Children are given twice a day: in the morning and in the afternoon.

Kissel from acorn coffee.
Mix acorn coffee with sugar, dissolve in a small amount of hot water, then add water (180 g) and strain. Pour potato starch diluted in cold water (20 g) into boiling coffee from acorns, pour into a glass and sprinkle with powdered sugar or granulated sugar to prevent the formation of a film. It is better to use honey instead of sugar, and carob instead of powdered sugar.
Consumption of products: acorn coffee - 7 gr., potato starch - 10 gr., sugar - 15 gr., water - 200 gr., carob and honey - to taste.
Porridge from acorns.
Pour homemade milk and water into a deep saucepan, add salt, homemade butter or ghee, heat to a boil, add grits and stir. After the cereal swells, boil the porridge over low heat, stirring until it becomes thick. Then cover the dishes with a lid and cook at a low boil on the stove or in the oven.
Serve hot, topped with homemade butter or ghee.
Food consumption: acorn grits - 150 gr., homemade milk - 200 gr., water - 100 gr., homemade butter or ghee - 10 gr., salt, spices - to taste


Acorn dumplings.
Boil porridge from acorn grits, as indicated above, and cool to about 70 degrees, add thick homemade sour cream or cream to it in 3-4 doses, mixing thoroughly after each added portion.
Take the porridge prepared in this way for dumplings with a tablespoon, then hold this spoon against the edge of the dish so as to cut off the excess porridge. As a result, the spoon is filled with porridge flush with the edges.
With the second spoon, having previously dipped it into water, take half of the porridge from the first spoon and dip it into a bowl of hot salted water (10 g of salt per 1 liter of water). Then pick up the spoon again, etc.
Boil the resulting dumplings immediately at a very low boil in the same water in which they were immersed during cutting. Serve grated cheese in a separate bowl with boiled dumplings.
The consumption of products is the same as indicated above, but thick homemade sour cream or cream is added to it.
Acorn pudding with apples.
Put the acorn grits in boiling, lightly salted water and, stirring with a wooden paddle, cook until half cooked. Then, throw the cereal on a sieve, transfer to a saucepan, pour homemade milk and cook until tender.
Put cheese, finely chopped apples, cinnamon, homemade butter into boiled acorn grits, mix well and bake in the oven.
When serving, pour the pudding with jam, which is preferably preheated.
Food consumption: acorn groats - 40 gr., homemade butter - 5 gr., apples - 30 gr., cheese - according to the required pudding density and taste, sugar (preferably honey) and cinnamon - to taste, homemade milk - 60 gr. ., jam - 30 gr.
Enjoy your meal and good health!
Acorn crafts are an interesting and simple form of creativity. These fruits can be fastened together with toothpicks, painted in any color or patterned on them. It is appropriate to use plasticine in crafts on the theme of autumn.
Children's crafts from acorns that you can make with your own hands are incredibly popular not only in schools, but also in kindergartens.
Family of acorn men
The family of funny little men is the most simple craft that even kids can make.
Materials:
- acorns of different sizes with caps;
- toothpicks or thin twigs;
- leaves from trees;
- pencil;
- glue.
- If the caps on the fruits do not hold well, then they must be glued with glue.
- On acorns, with a pencil or felt-tip pen, you need to draw a mouth, eyes and nose. If you turn on fantasy, then the facial expressions of the little men will be different. They can be made funny, sad, angry.
- To make the composition more unusual with the help of branches or toothpicks, little men need to make pens and nights. You should not be limited to this master class, you should connect your imagination and then crafts on the theme of autumn will become unique.
The family of little men is ready, it will be the same as in the photo or a little different if you use other decor elements.

Craft "Owlets"
Creating such crafts will be interesting not only for kids, but also for adults.
Materials:
- different acorns;
- multi-colored felt;
- beads;
- glue;
- scissors.

Acorn horse
Crafts from acorns using plasticine are able to make the most of children's imagination and use natural materials in the process.
Materials:
- a couple of acorns that have an oblong shape;
- plasticine;
- toothpicks;
- glue;
- dry grass.
- One oak fruit should be large, and the other smaller and with a branch on the cap. In a large fruit, you need to make a hole and insert a branch. To keep the head, you can further strengthen it with plasticine or glue.
- Now the horse's legs are being made. With the help of an awl, four holes are made in the body, into which toothpicks are inserted.
- Eyes are made from plasticine and beads.
- Dry grass is collected in a bundle and attached to the body as a tail, and the second bundle will serve as a mane and be attached to the head.
You get such a horse as in the photo, but you can not stop at this result and decorate it additionally.

Grapes from acorns
The craft "Grapes" from acorns turns out to be very beautiful and realistic, a simple master class will help with this.
Materials:
- acorns in the amount of twenty pieces;
- thin wire;
- green corrugation;
- purple gouache;
- paper;
- pencil;
- scissors;
- glue;
- Using a large pin, make a hole in each fruit. This stage is dangerous and difficult, so if the grapes are made with children, an adult needs to do this.
- A thin wire is inserted into the holes obtained. To prevent the oak fruit from slipping, the wire must be twisted at the end.
- With the help of green corrugations, the wire must be carefully wrapped so that the future grapes look realistic.
- Next, the acorns need to be painted with gouache. If used acrylic paint, then one layer is enough, and if gouache, then several.
- After the paint has completely dried, the grapes can be harvested in bunches. So that the fruits do not fall apart during the assembly process, you need to collect four berries and rewind with wire and so on until the very end.
- After assembling the bunch, the leg is cut off and wrapped with the help of corrugations.
- When the grapes are ready, you need to varnish the painted berries with gouache paint so that the look is natural. If acrylic paint was used, then this step can be skipped.
- While the grapes will dry out, you need to make leaves and antennae. Leaves of the desired size are drawn on white paper and cut out. Then they are applied to the green corrugation, circled and also cut out.
- To make the grapes look realistic, veins are made on the leaves. To make them you need to wrap small pieces of wire corrugated paper and glue to the leaves from the inside. Ready leaves are glued to the grapes.
- Next, the antennae are made: the wire of the desired size is wrapped with corrugation and wound onto a pencil. After that, the wire will look like a spiral, and it can be attached to grapes.


