A bow made of thin ribbon for a gift. How to make a ribbon bow for a gift
There is nothing nicer than receiving a gift that is decorated with my own hands. You can give an unusual festive look with the help of your own imagination and a certain amount of paper, ribbons, scraps of fabric. , after all, this art is both complex and simple at the same time? Be sure to apply patience, a little skill and fully apply your own rich imagination.
Making paper bows
The very first paper decorations can be made, starting with ordinary office paper, magazines and other paper products. They also make festive unusual decorations that are suitable for finishing a box, bundle or gift bag. For example, these could be gift bows:
- classic bow
This is the very first thing that lovers of home decorations usually start doing. To do this, make sure that two types of tapes, adhesive tape or glue are preferably available. We make a small or large ring, glue its edges and squeeze, placing the gluing place in the central part. Next, glue the top and bottom of the tape in the center. We wrap a tape of a similar or contrasting color (optional) around the gluing point and fasten it from the back. A simple and original bow is ready.

- Curls and curls
Original and funny crafts can be made from paper if you take and cut them into ribbons of different thicknesses. And then you can simply glue them, fasten them with a stapler or tape and make curls by running the blunt edge of the scissors along the wrong side. The result is unusually original curls. Such curls can also be placed around the perimeter of a bundle or box, gluing them with one edge. You can also make such compositions by decorating a large cylinder or cone, a cube and other three-dimensional geometric shapes with curls.

- Lush bow
This is the most beautiful, at first glance, seemingly complex, decoration that is worth practicing making. You need to make a magnificent bow in stages:
- To create it, you will need about 3 m of paper tape of the width you want to see the decoration (usually from 2 to 5 cm), scissors, ribbon or thin wire, double-sided tape. The result is a bow, the diameter of which can reach 15 cm.
- We take the edge of the tape and fold it into a ring, on top of which we put the rings, firmly fixing them with each turn with one or two fingers. When winding the tape, it should be flattened in such a way that the place where the tape was torn off takes central part.
- On the right and left sides, we cut out such notches, in the form of rectangular triangles, doing this above and below the fold. Then we shift the tape so that the places of the cuts are exactly in the middle. This place should be tied with a ribbon or thin wire.
- And then comes the most important part of the work: you need to fluff the bow. To do this, gently pull the formed loops so that they are directed in different directions, up and down. It is necessary to unfold the loops in such a way that each one is turned a quarter of a turn more than the previous one. After you're done, secure the bow to the box or bundle with a piece of double-sided tape.
- If this bow is made more original, you can cut the folded rings into 2-4 parts: either make everything thin and curly, or make one strip wider, the other narrower.

How to create gift bows from ribbons?
After the hands and fingers have learned a certain dexterity when working with paper material, you can safely buy ribbons made of silk, polyester, satin, guipure, tulle and other materials. The main rule: the fabric should be rigid and as stable as possible, of course, have a festive gloss and be especially elegant. With these materials, you can make the following types of gift bows:
- Simple but elegant bow design
To make a simple but original bow, you need to take a roll with a ribbon of any color and, retreating 10-15 cm from the edge, tie a rather wide knot. To it it is necessary to lean the tapes from this skein in two, four or six additions (depending on what splendor we want to achieve). We pass the wire through the knot and fix it from the inside. We twist the wire and cut the tape. A lush and elegant bow is ready. It can be attached with a piece of wire to the ribbons that intercept the package or box with the gift crosswise.

- Terry bow- a true work of art
To make such a bow, you need to take and wind the tape in several layers, so that there are at least eight turns. Choose an arbitrary width, but not less than 15 cm. When the turns are wound, you just need to take and cut small triangular notch pieces on both sides (there should be four in total). We move the cutouts to the central part and tie tightly in two or three girths with a ribbon. We press, lifting up, both sides and begin to carefully remove the loops. We direct one up, the other down and, alternating the direction of the loops, thus, we get a magnificent bow as a result.
By a similar principle, you can make a very lush guipure bow. In the same way, several turns are wound, which are then cut and tied. The result is an unusually magnificent product.
- Bow "Dior"
This model is also quite simple, because it can be done in just a few minutes. We cut off several pieces of tape, fix them along the edges and in the center with a few stitches, tape or even a stapler. Then we connect these loops, overlapping each other. We take the smallest piece and place it across this composition. And we connect, passing through the thinnest ring. To heighten the effect, you can make two such bows and attach them, fastening them together.

The most important thing is to learn the basics of such art, and only then further each such product will be a real amazing masterpiece of art that will perfectly decorate any gift, from a teddy bear to a box with a piece of jewelry.
Gift wrapping matters a lot. A beautifully wrapped box with a pompous or original bow makes a good impact. In the article, we will present several options for how to tie a bow on a box in various ways. To do this, you need to purchase a satin ribbon in the hardware store and wrapping paper in stationery.
There are many gift options. This is the simplest single with two rings, lush multi-layered. You can make a separate flower or a ball of ribbons and then introduce it into the tying already in finished form. You will also need templates made of dense material and scissors for this. Such finished flower some simply put it on the tape in the middle of the lid, without tying the box itself.
The tape is absolutely used different widths. It can be very thin - 5 mm, or you can take it wider - 5 cm. It all depends on the creative idea of the author. If you are trying this simple art for the first time, then see how to tie a bow on a box in the easiest way.
Plain single bow
They begin the design of such a bow by running the ribbon under the bottom of the box. Both ends are crossed from above in the center or with a shift to the side, and the long edge of the tape is once again drawn under the bottom of the box, but already in a vertical position. Then a knot is tied at the intersection of the two ends. It remains only to make a simple bow, like on laces.

With this method, there will be no knot on the bottom of the box, the ribbons are even, so that the gift will have a solid base. The edges of satin ribbons can be cut in different ways: bevel, corner, evenly. It is advisable to singe them with a lighter or a candle so that the tape does not split.
Lush bow
Let's look at another way to tie a bow on a box. The tape is divided into two parts. One is used to tie a gift. The ribbon is passed under the bottom of the box and tied in a knot in the center. Then work begins on laying another piece. To make the bow lush, you need to fold the ribbon in turns one on top of the other, as in photo number 3. Then this pack is woven into a knot. To do this, it is placed in the center of the box and tied with the ends of the first ribbon.

The more turns, the more magnificent the finished decoration. It remains only to spread each ring with your fingers and unfold it so that they are arranged in a circle.

Such a magnificent bow will turn out only from soft and thin tape if the material is denser, it will bulge and the knot will be rough and thick. This can be avoided if you know how to tie a bow on the box in the following way.
Stitching individual elements
This decoration is made separately. Subsequently, it can either be glued to the box with adhesive tape, or tied into a tape in finished form. Make such a flower from several strips different lengths. Since the turns are sewn in pairs, you need to prepare two long segments for the bottom, two medium and two short ones for the middle. Consider step by step how to tie a bow from a satin ribbon.
1. Prepare segments of the desired length. The shortest is the middle, it is presented in a single copy.
2. From each segment, you need to roll up the figure eight and sew the middle with a stitch.

3. Fold the same eights perpendicular to each other and sew together. Cross-shaped blanks are obtained.
4 - 5. All parts are fastened together. From below - the largest, then - the average size, from above - the smallest. A part is inserted into the middle, represented by a simple ring. Place it with the seam down so that it is not visible.
6. It turned out a magnificent and durable bow. It can be made from any material, even from dense rep or velvet.
paper version
From a special paper packaging tape, you can make beautiful composition. To do this, you will need a template and sharp scissors. Instead of a template, you can make several turns around the palm. Then it is folded in half and on one side cut off from two sides, as in the photo below. This is done so that the central knot is not thick. The ribbon is unfolded so that the cuts are in the center, and tied with a thin strip. We look further, how to tie beautiful bow from tape.

It remains only to carefully straighten all the turns and deploy in all directions. This is done so that they are distributed throughout the circle. At the end, the bow is attached to the gift box or tied into a weave of stripes around the box.
Now you know how to tie a beautiful ribbon bow. But you can arrange the edges of a lush flower in different ways, and it will look more original.
1. A lush paper bow is made, described in the previous section. Next, you need to cut each turn of the ring in half with scissors. If you look at the red sample, then all the edges are notched with corners, forming aster petals.
2. The second pink color option in the photo has rounded edges with a hole in the middle. To do this, each end of the tape was folded in half and a corner was cut off from one side and the other.

3. A pale green flower looks interesting. Before tying a bow on a gift, each of its turns in the middle of the ring is cut with the ends of the scissors into several parts, depending on the width of the ribbon. It turns out a chrysanthemum, which looks very impressive on the gift wrapping.
You can come up with your own method of notching the edges. There will be the most unique design solution.
original decoration
From satin ribbon? It’s not difficult, and this method looks unusual. After all, the bow is horizontal. It is possible to do it different methods. The first option is to correctly fold the tape in turns, from the largest to the smallest in the center. It is better that the bow does not spread apart, fasten it with glue or grab it with stitches.

The second option is to compose a composition of individual elements, gluing together segments of different lengths, folded in half. We insert a separately cut piece of the strip into the central coil and tie a bow beautifully. From satin ribbon can be cut and large quantity turns, then it will be more magnificent. It's a matter of taste and quality.
Composition of several elements
The gift wrapping made of several ribbons of different quality and color looks beautiful. Consider also such an option as tying a bow. From a satin ribbon, wide and narrow, cut into two pieces. For a change, an element from a different material can be included in the creation of the product, as in the photo below. Then three bows are sewn separately in descending order.
Then you need to attach the finished bow to the package.
In the article, we introduced you to the various basic options for tying bows. These skills will be useful not only for those who do not know how to arrange gifts in a box or bag, but also for mothers who want to learn how to tie a bow on their daughter's dress beautifully. So try it, and maybe you will come up with your own way, the most unique and original. After all, this is a creative and interesting process.
Beautiful packaging is an integral part of a gift. And a frequent attribute gift wrapping is a bow. This decorative element can be anything: strict and frivolous, classic or fantasy, tiny or huge. In the photo you can see variety of options bows decorating gift boxes. If desired, you can learn how to do this decor with your own hands.
Consider how to make a ribbon bow for a gift. To make this decorative element beautiful, you will need an eye, a certain dexterity and a little patience. You should not take on a complex option right away, it is better to first practice on simpler bows.
What tapes to use?
What kind of ribbon can be used to make a beautiful gift bow? The most varied! However, it is desirable to select a material that holds its shape well. Often used for decoration satin ribbons, but you can also use satin, velvet, nylon. Materials such as organza, tulle or polyester have proven themselves well.

To decorate a bow, you can use a variety of decorative elements: self-adhesive rhinestones, beads, beads, beautiful buttons, pieces of lace, feathers, etc.
You can also use a combination of materials to create a bow, for example, combine nylon and satin or silk and velvet in one element.
Classics of the genre
Formal gifts and presents intended for men should be decorated with simple classic-shaped bows. If you want to make a decorative element more elegant, you can decorate it with beads, sequins, rhinestones.
Everyone probably knows how to make a classic ribbon bow, but just in case, let's recall the sequence of actions:
- the tape, without twisting, is folded four times, so that two loops form at the top, and one at the bottom;
- fold the upper right loop crosswise with the upper left loop;
- tie a regular knot;
- stretch and straighten the upper loops, as well as the middle of the bow;
- free edges can be shortened or cut into them (on the end part) recesses in the form of triangles.

There is another version of the classic bow. To do this, you need to use two pieces of tape, one of which is significantly shorter:
- we fold a long piece of tape in half and fasten the free ends with threads, we have a ring;
- fold the ring in half so that the attachment point is in the bottom row in the center;
- now we take a short piece of tape and, folding it several times, we form a false bow knot. To do this, simply wrap the structure from a long piece of tape at the attachment point. It remains to fasten a short segment with threads, giving it the shape of a magnificent knot.

Tiered and multicolor bow
Using the technology described above, more complex bows can be made. For example, it is easy to make a multi-tiered bow from a non-shrinking material. This will take several years (the number depends on the number of tiers, optimally three), which differ in width. We cut the ribbon so that the widest is the longest (the length of the segment is equal to the length of the bow), and the narrowest is the shortest. We fold the ribbons with a “sandwich”: at the bottom is the widest, then the middle and narrowest, in the center we tie this design with another ribbon (the width of this segment is to your taste). It remains only to trim the ends, giving them a curly shape.

Similarly, you can make a multi-tiered and multi-color bow, for this you need to take ribbons that differ not only in width, but also in color.
Bow fan
This option for decorating a gift is also called a Dior bow. For its manufacture, it is recommended to use a rigid, well-kept tape.
To make a "fan" you will need to make several rings from the tape so that they differ in length. To tie a magnificent bow, you will need at least five of these rings.
Then you need to fold the rings in half so that the attachment point is at the bottom, and stack them one above the other from largest to smallest. Now we take another piece of tape, draw it under the bottom of our structure and through the top (the smallest ring, no more than 2 cm in diameter). We fix the segment and straighten the resulting "fan".

Bow flower
A beautiful large bow in the form of a flower can be made from satin or silk ribbon. You need to take the end of the tape and fold a ring out of it, holding it with your index and thumb. Then you need to make at least a dozen more such rings (the splendor of the bow will depend on the number of rings). The resulting rings should be tied in the middle with a thin ribbon and carefully, alternately straighten each loop, forming the “petals” of the flower.
One version of the flower bow can be done like this:
- take two types of tape, the first should be twice as wide as the second (for example, 5 and 2.5 cm);
- the color of the ribbons can match or just blend beautifully with each other;
- cut from wide tape five pieces of 10 cm long (for a medium-sized bow), and five pieces of a narrow ribbon 7 cm long;
- we begin to form a bow: we fold the first segment of a wide ribbon in half and sew along the edge with “forward needle” stitches, making an assembly;
- “string” all five petals on one thread, then cut the thread, leaving a long tail;
- then we pull out part of the thread from the side of the knot and tie both free ends, having previously straightened the petals of our flower bow. We got a semblance of a five-petal chamomile;
- we make a similar chamomile from a narrow ribbon;
- we impose a smaller flower on a larger one so that the central parts coincide;
- in the center of the flower we sew a beautiful button or bead, you can stick a large rhinestone.
Terry bow
To make this bow, you need a material that holds its shape perfectly, for example, polyester.
Sequencing:
- we fold the ribbon, forming several rings nested one inside the other, the size of the future bow will depend on the diameter of the rings;
- fold the rings in half, smooth and cut off the corners on both sides so that the integrity of the ring is preserved;
- turn the rings over so that the cut out place is in the center;
- if at this stage several cuts are made on the ribbon, then the finished bow will be appearance resemble a chrysanthemum flower;
- we tie in the center with a narrow ribbon, and then carefully straighten the flower petals.

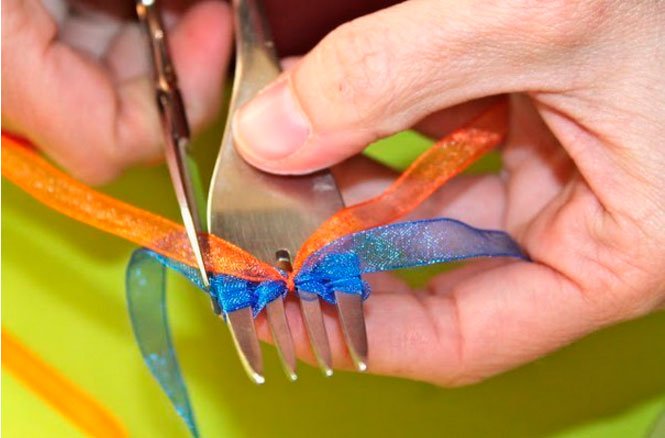
Bow on a fork
To decorate a small gift box, you need to make tiny bows. It is convenient to tie them on the most ordinary table fork with four prongs. For the manufacture of jewelry will require a piece thin ribbon or braid about 15 cm long.
Procedure:
- put the ribbon on the center of the toothed part of the fork, leaving a small (non-working) tip of the ribbon. Hold it with your thumb;
- we take the second (working) end of the ribbon, wrap the fork and skip the end between the second and third prongs below the loop formed;
- now, on the reverse side of the fork, between the same 2 and 3 teeth, we draw the working end above the loop;
- pull the working end of the ribbon, tightening the loop;
- it remains to remove the resulting bow from the fork and decorate the gift with it.

So, there are many options for bows for decorating gifts, and learning how to make them is not difficult at all.
Gathered for a visit, chose a gift, now you don’t know how to pack it? Then you are at the right place. In this article, we will look at how to make a bow from a ribbon for decorating gifts, and also tell you how you can make an exclusive present for every taste from a regular ribbon.
How to create a festive mood?
Nicely wrapped gift original decoration always creates a festive mood, and it doesn’t matter if you give it or gave such a present to you. It is a beautiful bow, which can be called a classic decoration technique, that “warms up” the fantasy, making you tremble in anticipation of a surprise. The originality of this decoration lies in its versatility, since a ribbon bow can be made in different shapes or sizes, and today's market offers the widest selection of colors, from plain to complex patterns. Such decorations can give the souvenir more solemnity. Initially, you need to pack a surprise in gift paper how to do it, read the article: well, we will teach you how to make a bow from a ribbon, most importantly, be patient and do not quit work after the first failure, because the wonderful grateful smile of the hero of the occasion, to which you are going to visit, deserves a little effort.
How to make a voluminous ribbon bow to decorate a gift?

To get a really voluminous bow, you need to give preference to cuts made of hard material. Having picked up the ribbon, we do the following:
- Having decided on the size of the bow (the longer the loops, the larger the bow will be), you need to make loops from the tape in 5–9 additions, laying them one on top of the other.
- Smooth out the resulting loops and carefully trim the edges, as indicated in the photo below. You should get almost triangles around the edges.
- Take the loops in the middle and part them on the sides so that the cut parts are in the center.
- Fasten the narrowest central part. You can do this:
- the same ribbon
- sew with threads;
- fasten with a stapler;
- twist with wire.
- Straighten the resulting half-loops, give them volume and a beautiful bow is ready!

How to make a fluffy ribbon bow? Video lesson
How to make a simple ribbon bow to decorate a gift?

You can make a strict version for a “male” present. It will look great both on the packaging and on the bottle of an expensive strong drink. And you can read more about souvenirs for the men's holiday in the article:. Let's get to work:
- Cut off a piece of wide ribbon of the desired size, fold, glue the edges with glue. Should be a ring.
- Flatten the resulting ring.
- Hide the joint under the same, but thinner cut.
- Gently glue the edges and a strict decoration is ready.

How to make a bow from a ribbon - a classic version
The classic version of the decoration is very simple in execution, while creating an excellent frame for any present.

With such a bow, both a book, a box of chocolates or a service, as well as ordinary wild flowers, will look great. Such a classic is performed according to the following steps:
- Take a long ribbon and fold it into two loops, as in the photo below. In each hand, there should be one addition.
- The loop that is on the left to start at the back, crossing two additions. It turns out a circle at the bottom.
- Pull the right loop through the formed circle, pull it off. The center should be in the middle.
- Straighten the loops - a beautiful bow is ready! If necessary, you can cut the lower ends to the desired shape (oblique, triangle, etc.).

Video lesson: how to tie a ribbon bow classical style to decorate a gift?
How to make a Dior bow from ribbon for decorating souvenirs?
The Dior bow is used not only in decorating gifts. With it, unforgettable decors for parties, weddings and other celebrations are created. By the way, take note of the rules of conduct at the table at such festivities. They are described in the article:.

To make such a bow, you need to follow these steps:
- Prepare four cuts, of different lengths.
- Roll each of them into a circle and fix with threads or glue.
- Fold the circles in ascending order one on top of the other.
- Tie the resulting design of ribbons in the center by inserting the strapping tape into the upper (smallest) circle, as in the photo below.
- Attach the structure.

How to make a ribbon bow on a fork?
Do you believe that you can tie a beautiful bow on a fork? No? Then let's learn, we offer to try out two options for the execution of such an ornament.
Option No1
Let's try to solve the following equation: Ribbon + Fork = Original bow. To resolve, you need to do the following:
- Cut a narrow ribbon of the desired size. For convenience of work, it should be at least 18 cm.
- Conditionally divide it into a long and a short side. The short side will not be used.
- Pass the long part between 2-3 cloves of the fork used.
- And its end, bring up between the same teeth.
- After these steps, you should get a small loop. Don't tighten it just yet.
- Pass the rest of the long end through the loop inward again.
- Pull this end out and tighten the knot.
- Trim the long ends to the desired length, singe them with matches or a lighter.

OptionNo2
To get a beautiful bow in the form of a lush flower, you need to use two different ribbons:
- thin;
- wide nylon.
Execution steps:
- Insert a narrow ribbon crosswise into the center of the fork. It will be needed almost at the end of the work.
- Braid the fork teeth with a wide nylon cut, as shown in the photo below.
- Pull off the bindings with a thin ribbon, tie.
- Remove the workpiece, straighten.
- Scorch the edges with fire.

The decoration is delicate. It will ideally complement any souvenir intended for the beautiful half of humanity.
Video tutorial: how to make a ribbon bow on a fork
Photo ideas for decorating gifts with bows


Holidays and solemn events constantly accompany our lives, and there are regular occasions to give gifts. Agree, it would be great to learn how to pack them beautifully?
Motherhood.ru has already offered, and today we offer instructions for tying bright creative bows for a gift!
Ribbon bows
For the manufacture of gift bows from ribbons you will need satin ribbons, or pieces of braid or fabric that “does not fray”. For some designs, you can use paper, thin plastic, fixing the components with a stapler or glue.Strict horizontal bows are perfect for stylish minimalist gift wrapping. In this case, you can use several tapes of different shades.


From scraps of multi-colored ribbons, you can make such a cute bow:

We make larger lush bows according to the following schemes:


We do a bright contrasting bow of two narrow and one wide ribbon as follows:

You can tie a gift with real hair bows. Delicate, beautiful and reminiscent of school childhood! This option is great for wrapping a gift for a teacher.

Ribbon and ribbon animal bows
For gift wrapping for children and themed celebrations, we use the idea of animal bows. See what a cute elephant or bunny you can make!


The dog breeder will be pleased to receive a gift decorated with an elegant dog muzzle.

Paper bows
Fold up paper tapes for quilling or strips of colored paper in the form of multiple rings, cut out an inscription with a wish or anniversaries from other paper. Pin them together for a personalized gift bow.

From paper curls you can collect a large flower, in the center of it there is a place for wishes, additional decoration.


We make a holly flower from many cut-out paper circles. We turn them into a cone and glue them along the edge. Then we collect in the form of a flower.

Paper bow with - simple and beautiful!

If you really want to surprise your loved ones with your original packaged gift, then you should familiarize yourself with detailed diagrams cutting, folding and attaching extraordinary bows. Let's take a look and get to work!


Even a child can make such a bow: fold the paper “in a fan, fasten it with a thread - and the bow is ready! In doing so, you can use colored paper, newspaper and magazine clippings, wallpapers, geographical maps.

Men's bows
For a gift to a man, we are preparing a special bow. It can be a gift decoration with a tie or suspenders.
A paper bag with a gift inside can be made in the form of a shirt with a tie. Use colored ribbons or paper.


As wrapping paper and a bow, you can use the shirt itself. See what you can do!

Jewelry for a gift from natural materials
A bow made of grass or straw is an original and simple solution.
Combining jewelry and a bouquet is a great idea. We decorate the gift with fresh flowers!

Use fresh green leaves and branches to decorate the gift.

We decorate the gift with a vintage masterpiece: sequins, a beaded flower and a real feather.

Unconventional Solutions
The gift can simply be closed with a button.
A gift related to photographs, or a gift for a photographer, it would be very useful to decorate with an old photographic film.

You can make fabric packaging and a bow from a single piece of fabric.


How beautiful to wrap a round gift? A piece of cloth with a handle and double rows of bows will do.

When a pie is given, it is usually brought on a baking sheet in a towel. And what if you add a work of your culinary art beautiful packaging? edible gift can be decorated tissue paper and decorate with a "bow" of spoons.

Combination of simple bows
Everything ingenious is simple. If you don't want to spend a lot of time tying original bow do a lot simple bows. The main thing is to observe their harmonious combination.


flower bows
Flowers are always bright, solemn and tender. Therefore, we take note of decorating gifts with flower bows.We make a flower from two different ribbons.

simple paper flower

From paper, you can make a flower with leaves according to the scheme:


Delicate voluminous flowers can be made from crepe paper or ordinary napkins.

See what kind of flower can be made from ordinary newsprint.


Fabric flowers are very similar to real ones. If you “burn” the edges of the fabric, you can get the effect of real petals. Similar flowers can be made from plastic bottle heating its edges.

We hope that our ideas will surely inspire you to create. Maternity.ru wishes you and your loved ones pleasant gifts!
Photo sources:


