How to make a big star out of paper. How to make a paper star with your own hands
For interior decoration or themed holidays, such a decorative element as a star is often used. There are a lot of variations on the theme of making a star: large and small, voluminous and flat, double or single. Materials for making crafts also vary significantly. It can be paper, cloth, foil, wire and other improvised means. In this article, we will consider the most popular formats for making paper stars. Well, a selection of thematic photos, detailed diagrams and video material of a master class on making a star with your own hands will make the task easier.
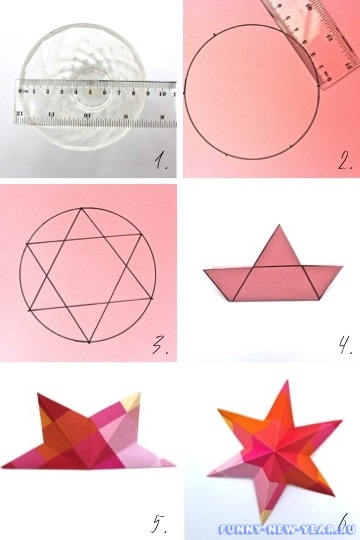
How to make a small paper star
Such stars are small (1.5 cm), but in in large numbers look very impressive and original.
To work, you will need colored or glossy paper (you can also use old glossy magazines) and scissors.
- First, blanks are made: paper strips are cut, 29x1.1 cm in size. The width and length of the strips can be changed according to the desired size of the future star.
- Make a small loop from the strip (at the edge), then bend the protruding short end. It turns out a pentagonal figure, press it slightly.
- Turn the product over (pentagon) and continue working with the long end of the strip.
- With a strip, we begin to tightly, gradually wrap the pentagonal figure, without pinching it too much. At least 10 such wraps are obtained, that is, each face of the star is wrapped twice.
- Hide the remaining edge of the strip under the bottom.
- The next stage: the transformation of the pentagon into a full-fledged star. Holding the workpiece with one hand, with the nail of the other hand, press on the middle of the face of the pentagon, forming the rays of an asterisk. Five pressures - and the star is ready!

- Such stars look very stylish in the interior: they can fill a glass vase or a jar. And if you do this business with the children, the motor skills of the fingers are perfectly trained.


How to make a paper star
For the manufacture of such bulk stars You will need thick decorative paper, scissors and glue.
- Draw blanks for the rays of the star, print and transfer to the desired paper.
- Bend along the lines and glue along the edge (gluing allowances are given).
- Then, glue the five prepared templates together, getting a three-dimensional star.


- The size of the stars can be adjusted independently by increasing or decreasing the size of the template.

How to make an origami paper star
Such stars look great and stylish from newsprint or music paper.
- Fold a square-shaped sheet in half, then bend the triangle of one of the vertices.
- Do the same maneuver with the other vertex of the rectangle.
- Attach the opposite corner of the rectangle to the intersection point of the previous folds.

- Next, bend the rays of the future star along the drawn lines. The remaining shapeless tail of the workpiece is cut off.
- With the correct execution of all the folds, on the spread you can see the pentagon pattern.

- The final stage is the most difficult. To get a star, you need to carefully bend and wrap the resulting template along the lines.


So, in this article, the most popular ways of making a paper star were considered. Completely different in appearance and the method of manufacture, the presented options will ideally fit into the festive interior and become a spectacular decoration.
Helpful Hints
If you want to decorate your home for a holiday or just because, and you want to do it yourself, then an asterisk is one of the elements that will always look beautiful in a room, on a stele, on a chandelier or Christmas tree.
In this master class, you will learn how to make stars with your own hands, using great amount various ways.
All methods are quite simple, so everyone can choose what he likes best.
Read also:How to make a beautiful SNOWFLAKE
What can you make a star out of?
The main material from which you can make a star with your own hands is paper. You can use cardboard, plain paper, thick paper, magazines, old books, newspapers.
How to make a three-dimensional star out of paper. Five pointed star.

You will need:
Printer
Thick colored paper
Scissors
1. First you need to print the blank. To do this, download the templates from this link. There are two sizes of stars in the template - you can make one star by printing the first page, and a larger star by printing the 2nd (twice) and 3rd pages.
2. Cut out the templates, bend them in the places indicated by the dotted line.
3. Glue all the pieces together and you have a three-dimensional five-pointed star!
How to make a star


How to make a voluminous star with your own hands

Such a star can be hung in a room (on a wall, window, chandelier) as an interior attribute or used to decorate a gift.
You will need:
Thick colored paper (colored cardboard)
simple pencil
Scissors
Thread (ribbon)
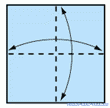
1. You need to start with two sheets of paper, each of which should have a square shape.
Each sheet of paper must be folded in half horizontally and vertically. Next, you need to bend twice in half diagonally (see picture).


2. Using scissors, make cuts along the line of perpendicular folds. The incision should be about half the line or a little less. In total, you need to make four such incisions.


3. Bend the edges as shown in the image.


4. Now prepare the glue and grease one of the sides of each ray of the future volumetric star and glue it (see picture).


5. Make a soul mate following the same instructions.
6. Finally glue the two halves and decorate to taste.


How to make a paper star

It is very easy to make such a star. It is made from just two stars cut out of cardboard or thick paper.
You will need:
Pencil
Ruler
Thick colored paper or cardboard
Scissors
1. Draw a star on thick paper or cardboard. You can do it by eye or use the video tutorial.
How to draw a five pointed star
2. You can decorate the stars however you like and cut them out.

3. Now you need to make an incision on each star - on one it should go from top to bottom (from the outer corner to the center of the star), and vice versa on the other, i.e. from bottom to top (from the inner corner to the middle of the star).

4. With the help of cuts, connect the two stars by inserting one into the other.

How to make a paper star. Bulging star.

These beautiful little paper stars will be an excellent decoration, both for the interior and for a postcard or gift.
You will need:
Colored paper (you can use pages from an old magazine)
Scissors (clerical knife)
* Key moment V this master class is the correct cutting of paper strips.
* Stripes must be even. In this example, they are 9mm wide and 221mm long.
Scheme:

1. Cut paper strips.
2. Take one strip and make a loop out of it (see picture).
3. Next short ponytail paper strip wrap and tie a knot. Do everything carefully so as not to tear the paper. Slowly tighten the knot, press it down and hide the remaining tail by tucking it in the middle.
You should end up with an even pentagon.

4. Let's move on to the most interesting and at the same time simple process - making an asterisk.
Wrap a long strip around each side of the pentagon. You need to do 12 to 15 wraps. This means that each face must be wrapped at least twice.
5. Hide the remaining tip of the paper inside your star.
6. Now be very careful and careful.

Hold your pentagon with two fingers of one hand. At this time, with the tip of the finger of the other hand, lightly press on one face. You need to hit the middle of the edge.
This process must be done with all the faces and you will get a beautiful star.


How to make an origami star


How to make a big star. Book pages.

Despite the fact that this star looks very beautiful, many may be unhappy with the damage to books. In this case, old, unnecessary, technical books are used.
You'll need:
paper or plastic bulk star
* You can make a three-dimensional star out of paper yourself (see or) and proceed further according to the instructions.
Old book
Scissors
1. Cut off one-fourth of the book's pages and fold into small bags.
2. Glue the bags to your star as shown in the picture.
3. Put a little glue on the edges of the bags and sprinkle them with glitter.
Scheme:


How to make a Christmas star

You will need:
Double-sided thick colored paper
Scissors
1. First you need to prepare 4 sizes of squares. You should have 8 squares of each size. In this example, the following sizes were used: 18cm, 13cm, 10cm, 7cm.
2. Fold each square as shown in the picture


3. Start gluing squares according to size. The first is large and then descending.


You should get such a star.
How to make a star on a Christmas tree. Decorative star.

You will need:
Star pattern
White cardboard
Green and red felt
Ruler
simple pencil
glue gun
brown thread
1. Prepare white cardboard and circle the template star on it. Next, cut out the star.
2. Now, slowly, you need to draw another star inside. It should turn out as shown in the picture.
3. Cut out the star inside the blank.


4. Using a glue gun, attach brown thread to the star and cover the star with it.


5. The star is almost ready, you just need to decorate it a little. To do this, prepare the felt of red and green colors. Cut out two circles from the red. And from green leaves. Glue the cutouts to the star.

How to make a Christmas star


DIY paper star. rainbow star.


How to make a star of Bethlehem with your own hands

This beautiful decoration perfect for any space.
The step-by-step instruction “How to make a three-dimensional paper star” will help you create lovely New Year crafts with your own hands and you can decorate whatever you want for the holiday.
Photos and diagrams "" will make the creative process unpretentious, exciting and fast. We offer 3 options for volumetric stars.
For a volumetric star you will need:
- Sheets of colored paper. For the third version of the star - colored cardboard. And you can make white stars and paint with paints, felt-tip pens ...
- Pencil and scissors
- Glue for connecting figures and their parts.
The first option is how to make a three-dimensional paper star
From sheets of colored paper, cut out two squares of the same size.
We fold one of the squares in half on one side, then on the other:
Then fold the square in half diagonally twice, as in the picture:


We make 4 cuts from the edge to the middle of the folds, which we mark in advance with a pencil:

We bend the edges of the future volumetric star. We carefully look at the photo and repeat:

Glue the edges of the rays under the fold and glue:

One half of the volumetric star is ready:

Step 6
In steps 1-5, we make the second half of the star:

Step 7
We smear with glue the rays of one of the halves from the inside:

Connect the shapes carefully. An amazing voluminous star made of paper is ready:


The second option is how to make a three-dimensional star out of paper
The star consists of two parts. Cut them out like this:

It turns out such cute details for a three-dimensional star:

Carefully, along the fold lines, bend the parts, as shown in the photo:

Bend back the places for gluing parts. The first detail of the future volumetric star is ready:

Do the same for the second part for the star. Use paper of a different color, then the star will shine even brighter :).

To glue the two halves of the star, smear all the places for gluing with stationery glue and carefully connect the parts:


The five-pointed paper star is ready!

The last and the simplest option how to make a paper star
For one craft, cut out 2 of the same size from colored cardboard. five pointed stars. Draw them yourself or use this diagram:

Make cuts on each star as shown in the diagrams.
Scheme of a notch on one star:

Scheme of the notch on the second star:

Connect the stars by inserting one into the other through the cuts made according to the schemes and you get a pretty star:

Any voluminous star made of paper can be decorated with drawings or applications, then hung by a thread. They will be great neighbors or.
Good luck!


Print 2 blanks.
Cut out both stars and decorate them as desired. Bend back the places for gluing and gently push the lines indicated by the dotted line with a blunt thin object.
Now glue the 2 halves together. It turned out to be a big star.
Volumetric star origami
Volumetric star origami
Could you think that these stars can be done with just strip of paper and nothing else?
I didn't believe it either until I tried it. do-it-yourself origami voluminous star. I managed!
In general, meet the new origami craft, an asterisk.
As always, I present Master Class so that you can also plunge into the whirlpool of stars with your head.
Preparatory stage
It is quite simple to make this, its main advantage is that nothing special, complicated and special is needed for it. Need only paper cut into strips.
I used paper width about 1 cm. From a strip about 1/2 cm wide, you can also make an asterisk, but it turns out to be very miniature, so the work becomes more complicated. From a wider strip, a rather rough star is obtained, so a width of about 1 cm is the ideal value.
paper you can take almost any, I don’t advise you just to take too dense, which is difficult to bend, and newspaper, magazine, and any other paper will do. I used, for example, wax paper and used wrapping paper from gifts. Very beautiful stars are obtained from color glossy magazines.
Plus this stars in that paper can be beautiful and colored only on one side, the wrong side of the paper will not be visible.
Cut paper of your choice stripes. With a strip width of 1 cm, about 26 cm in length is enough, but as I understood in the course of work, it is much easier to first glue all the strips together, and then simply tear off or cut off after winding the next asterisk. It is probably convenient to make such stars from paper serpentine, but I didn’t have it at hand.
Origami star base
Now from the prepared paper strip you need to roll basis future star. It will be a regular pentagon. I never thought that a regular pentagon is so easy to fold from a paper strip, but it is. We make a loop, pass the tip down through it, tie a knot from paper tape. The moment is crucial, here the strip should not be too tight, but not too loose, so that in the corners the parts of the strip are close to each other. We bend the tail back so that it is not visible from this side. Now let's start wind the tape. This needs to be done quite tightly. First of all, we direct the working end of the paper strip to where the tail was just bent so that it is not visible. So the very regular pentagon appeared - the basis of the origami paper star.
Winding up an origami star
We do not flatten the paper at the edges of the pentagon, we simply tightly bend around its side with it. After that, we bend the tape inside out and point it up to the right, go around this side of the pentagon, direct the tape down to the left. Now the tape should itself lie in the right direction (if you have correctly folded the pentagon). Move the tape to the right. In general, you now need to go around each side of the pentagon a couple of times. This is true if you are making a star from a very long strip of paper that you will cut into pieces; if your paper is about 30 cm long, then go around the pentagon until the paper tape runs out. We continue to wind the tape around the edges of the pentagon.
Give the star volume
When the tip of the paper tape remains approximately 1-1.5 cm long, you need to hide it under the previous turn of the tape, thus securing it. We get a ready-made "semi-finished product" stars, which now needs to be given volume. This is the second crucial moment in the work on the asterisk. It is convenient to give volume with a small length nail. The nail should be directed across the middle of each side of the pentagon. In the meantime, we hold the workpiece with the other hand by the edges (without squeezing the plane of the pentagons, so as not to prevent the star from becoming voluminous). We try to bend all sides stars about the same towards the center. In the photo you see asterisk side and finished sprocket. Finished dimensions stars- about 1.5 cm in diameter. And another STAR Star in origami technique
Star in origami technique
Star always relevant: New Year it can be seen at the top of the Christmas tree, a star from the sky can be obtained for your beloved on Valentine's Day, stars are strongly associated with Defenders of the Fatherland Day. They also say that when you are born new person, lights up in the sky new star why not light a little star in honor of the newborn on a postcard (and give it to happy parents)? The star may be guiding, give people who go on a journey a star so that their path will be illuminated with it and they will be lucky. The stars accompany us throughout our lives. Are you able to do handmade stars? In this article, I will tell you how to make star self made in paper folding technique. The idea is taken from this site (igrushka.kz/vip77/salf7.php). To make an asterisk, I cut it out of a yellow sheet of A4 paper 10 square leaves measuring 7x7 cm (5 leaves for each star). If you have a block of square colored notes for notes then you can use them. To make a block, first of all we bend a piece of paper on four parts: We bend all the corners of the square in the direction to the center: We reveal back two corners lying opposite each other: Now we bend the sheet in half By horizontal line: Such blocks for one star need to be made five. Now we insert the blocks into each other, the remaining not bent corners (which we bent, and then straightened again) will act as tongues, which will hold the entire construction of the star without glue at all: Be careful. Blocks must go friend to friend: fixing corner of the right block inside the left, and the left - inside the right: We continue to put blocks into each other handmade star, four blocks have already been folded, the last one remains: Insert the last block and enjoy the resulting handmade star: From the "inside out" handmade star, looks no less beautiful: In one of the corners I glued eyelet with PVA glue: In this star, the only thing that did not suit me was that it was pretty easily bent and unbent, from a beautiful pointed shape became flatter, so I decided to make exactly the same second asterisk and paste in the first from the inside out. To give handmade star firmness: mine handmade paper star took over rigid form: Then I still wanted New Year's decor, I armed myself with a golden outline and began to draw various “squiggles”: stars and snowflakes: From such a paper star you can make not only Christmas tree toy , gluing a loop in one of the rays, but also crown for the Christmas tree, gluing a cardboard tube between the two rays of the star to insert the top of the trunk. And not far off February 23. Do-it-yourself small voluminous stars may well decorate a gift or postcard. When doing this, please note that the back side of the star is not flat. If you do not glue the second star on the back for strength, then your decorative element can be glued on postcard only five points (“hollows” between the rays), so you will need a very good glue (an ordinary glue stick for paper will not hold an asterisk on a postcard). Well, if you paste the second star on the back, then it will completely become mutually convex (therefore, if you intend to use star for handmade postcard decoration I advise you not to do this). The star looks beautiful and very stylish even without additional decorations. What they will be and whether they will be at all, you decide! I wish you stellar creative success!
It is hard to imagine the New Year without a dressed up, bright evergreen beauty, who gathers the whole family near her, helps to create a festive atmosphere, fills the house with a fabulous exciting aroma. To decorate the Christmas tree, it is not necessary to run to the store for toys, you can make them yourself, using improvised materials that can be found in everyone's house. Today we will tell you how to make a star on the Christmas tree with your own hands in order to decorate the top of the tree.
A very beautiful decoration for the Christmas tree will turn out from completely ordinary materials that can always be found at hand. Such an asterisk top will look very original on an evergreen beauty, create a festive New Year's mood. And the process of its manufacture is quite simple and does not take too much time.
Materials required for manufacturing:
- cardboard from the box;
- wire;
- special tool pliers;
- comfortable scissors;
- scotch;
- dry glitter;
- bright tinsel;
- Polish for hair.
Let's get to work
It is necessary to cut out two identical five-pointed stars from cardboard. Bend them in such a way that they turn out to be voluminous. Glue together with adhesive tape, after putting pieces of fabric, crumpled paper, cotton wool inside to give more volume. In order to subsequently put the finished product on the top of the Christmas tree, a wire spiral must be placed inside the asterisk. To prepare such a spiral, you need to take the wire and wind it tightly on a stick. The excess piece of wire must be cut off. The product is best created when the Christmas tree is already installed, and you can more accurately match actual dimensions spiral and the star itself.
Lubricate the voluminous star with plenty of glue and carefully sprinkle with sparkles so that the cardboard is not visible under them. Let the product dry thoroughly. Later, use hairspray to coat the glitter on top so that they do not crumble. The edges of the star can be decorated with elegant tinsel. The asterisk-top is ready, it remains to put it on the Christmas tree.
Beautiful, easy-to-make star

Such a star for the New Year 2019 is very simple. therefore, small children can also be involved in the manufacture of these stars.
For this decoration you will need:
- thick double-sided colored paper or cardboard;
- scissors.
Make such a template in any scale, what size you want.

Copy the template to colored paper 2 different colors and cut out 2 blanks. Then bend each of the 2 blanks 3 times at each of the 3 corners, as if 3 ribs are formed.

You will get 2 halves like this:

Now we connect the 2 halves together:

If you stick a stick or pencil inside one of the halves, you get the top on the Christmas tree. From such stars you can make garlands for the Christmas tree, or decorate a room with them.

A five-pointed three-dimensional star made of paper will wonderful decoration for the Christmas tree. A large product can decorate the top of a tree, small ones will look beautiful on Christmas tree branches.
For such decoration you will need:
- paper;
- Printer;
- scissors;
- glue.
To make a three-dimensional five-pointed star, you can use any thick type of paper. It can be cardboard, old magazines, books, or other similar material. For large tops, you need to use dense materials, for small stars, you can limit yourself to plain paper. For a large five-pointed top, you need to take five sheets of cardboard. Choose your favorite decoration size. Using the printer, print 5 blanks for the rays of the future star. The resulting templates must be carefully cut. First, glue each blank separately. Then all 5 rays must be glued together. Such decoration can be made more festive. For example, decorate the rays with sparkles, sequins or beads. It is possible to make each beam of decoration from different colors paper. Then you get a beautiful, multi-colored top.
Volumetric eight-pointed top
Making an eight-pointed star on top of paper is easy enough. Such decoration can be decorated not only Christmas tree. Similar products can decorate a room, window, lampshade and new year gift. The size of such a decoration for the New Year 2019 depends on the size of the paper.

We will need:
- thick paper;
- pencil;
- glue;
- scissors;
- decorative thread.
Let's get to work
You need to take two sheets of colored cardboard, or another type of thick paper, and give them a square shape. After that, each sheet must be bent in half. Once - horizontally, another time - vertically. After that, you need to bend twice in half diagonally. Next, with scissors, you need to make small cuts along perpendicular folds. Such cuts should be half a line long. In total they need to be done 4. One opposite the other. After this, the edges of the cuts need to be bent one to the other. You should get four triangles. The next step is to glue one side of each ray with glue, and glue the second to it. The result is one half of the future star. In the same way, you need to make a second blank. After that, they must be glued to each other. When the Christmas decoration is ready, you need to make a hole in one of the rays and thread a decorative thread into it. If you do not have colored cardboard, you can safely use plain multi-colored paper. It is very impressive if you decorate the product with shiny details, beads or other New Year's tinsel.
Star 3D
These tops are easy to make. They are made of thick paper and are a very original New Year's decoration.
We will need:
- colored cardboard,
- ruler,
- pencil,
- scissors.
![]()
Let's get to work
On thick paper, you need to draw two five-pointed stars. To do this, you can use cardboard as one color, and several. The next step needs special attention. We make cuts. On one of them it is necessary to cut from the top of the corner to the center, on the other workpiece - from the inner corner also to the middle. After that, the blanks must be inserted one into the other. Such a decoration can be decorated with sparkles, artificial snow or other New Year's tinsel.

Small paper stars will perfectly decorate a Christmas tree, a house or a holiday gift for the New Year 2019.
We will need:
- colored paper;
- scissors.
Let's get to work:
For such small stars, any kind of paper will do. It can be both ordinary colored sheets and pages of glossy magazines, packaging or any shiny paper. main feature when working with it - cut the strips correctly. Their length should be 221 millimeters, and their width should be 9. The paper must be cut into pieces of a similar size. After that, you need to take one such strip and fold it in the form of a loop. In this case, one tail should be much shorter than the other. A small tail must be wrapped in such a way that a knot is obtained. This is very neat work. It will require a lot of patience and delicacy. After that, the resulting knot must be very slowly tightened (so as not to tear the paper) and pressed. The result is a flat pentagon. The tail must be tucked into the middle. After that, the strip with the resulting pentagon must be turned over, and the tail must be tucked inside this figure. If the strip turned out to be very long, it can be folded in half and only then hidden in the middle. Next, the long end must be wrapped around each side of the existing pentagon. It is necessary that there be about 15 turns, but not less than 10. Each face must be wrapped at least twice. The end of the ribbon is hidden inside. Everything is ready 🙂 .
Master class with video instruction:
It remains only to gently press on the middle of each face. Get voluminous New Year's craft. It can be decorated with shiny New Year's tinsel.
origami star
A beautiful star - paper origami will perfectly decorate not only a festive Christmas tree, but also a room for the New Year 2019.
 step 1
 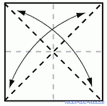 step 2
  step 3
 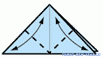 step 4
  step 5
  step 6
step 7 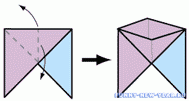 step 8
  step 9
For such crafts you will need:
- sheets of plain paper.
The main thing is that the material is not too dense and bends perfectly. And you can use both children's colored paper and regular newspaper.
Let's get to work
First you need to make a square with even sides. After that, such a sheet must be bent twice. Once vertically, once horizontally. On a paper sheet, you will get 4 marked squares. The corner of each of them must be bent to the center. Two corners that are located opposite each other need to be opened. After that, the paper must be bent along the horizontal fold. This turned out to be one of the blanks for the future top. Similar figures need to be made 5. The blanks must be inserted into each other. Those corners that you folded back and will keep finished structure. When folded christmas decoration, pay special attention to ensure that the corner of one block is inside the second, and the corner of the second is inside the first. When you attach the last part, you need to glue a loop to one of the corners.


