Handmade chest of drawers from old suitcases. What can be done from an old suitcase
Helpful Hints
If you have old suitcases left at home, in the country or in the pantry, then you should not immediately throw them away.
The fact is, from suitcases, even the oldest and hopeless ones, you can make completely new things that will be more functional and useful.
Here are some interesting ideas and useful tips how you can remake an old suitcase to give it a second life:
Useful things from an old suitcase
Coffee table
Small enough to put even in the hallway and functional enough to use as a coffee table.

Column
You might not want to turn a suitcase into a speaker, but this conversion looks pretty impressive.

Dollhouse
You can make such a house yourself or buy it online. It all depends on your capabilities and desires.

Bed for cats
If you have one or more cats at home, then you may want to make a comfortable place for them to rest.

Bathroom cabinet
Looks nice and holds a lot of different useful things for the bathroom.

How to make other things out of a suitcase
Dresser
For such a chest of drawers, you will need several suitcases. However, it can be made from 2 or 3 suitcases. It can store tools or various things that do not lie well.

See also: DIY crafts from old things
Cabinet for face and body care products

needlework box
In a suitcase, you can neatly organize a whole department for needlework. Such a suitcase can also be decorated from the outside and taken with you if necessary, for example, if you were invited by needlework friends.

What can be done from suitcases
Coffee table

Mini bar
This suitcase minibar was made by designer Dane Holweger. It is perfect for various parties or just to decorate the house and improve its functionality.

Seamstress suitcase


Tray
Remove the lid of the suitcase, decorate the inside of the lid with a cloth, using, for example, a stapler.

How to make a beautiful DIY organizer from an old suitcase

1. First you need to process the suitcase with sandpaper to remove the paint.

2. Paint the suitcase any color you like, using a special paint - in this case plastic paint.


3. Using thick cardboard or plastic, divide the inside of the suitcase into several sections. Cut to desired size and glue with superglue to each other.

4. If desired, you can paint plastic or cardboard with spray paint. However, this is best done in a well-ventilated area, wearing a respiratory mask and goggles.

Now you can safely fill the organizer with the necessary things.
What to make from an old suitcase: a picnic suitcase

You will need:
old suitcase
Sandpaper
Stationery knife
Paint tape
Cream wax (optional)
tassel
paste glue
Decoupage glue (PVA glue)
Adhesive for fabric
Ribbed elastic band
stapler.
1. Remove all stickers from the suitcase (if any). Wipe it clean.

2. Remove the old lining with a utility knife. An old lining can not only smell bad, but can also tear quickly. It also accumulates a lot of dust under it.

3. Cover with masking tape all parts of the suitcase that you do not want to paint. First of all, it concerns the mechanisms.

4. Paint with 2-3 coats of paint.

5. To protect the paint, you can apply cream wax on top of it.

If you have an old suitcase in your garage or closet, you don't have to throw it away. Turn this thing into a designer one and you will know that only you have such a suitcase.
Restoration of an old suitcase

It will be good not only outside, but also inside. You can make compartments and store all sorts of things here.

But first, take out the old suitcase from the mezzanine and prepare:
- acrylic paint in a can;
- stencil;
- acrylic varnish in a can;
- needle-punched material;
- fabric for lining;
- furniture carnations;
- glue Moment.
You can buy acrylic paint in a spray can at a car dealership.
If the suitcase is fairly worn on the outside, to make the surface more even, sand it with fine sandpaper. If the inside is dirty, then carefully rip it off and wash it to then sew it back into place.

But you can then sew a lining from a different material by these standards.
The paint is quite toxic, so you need to paint the suitcase outside.

Put on a respirator and cover the surface with spray paint. Let this cover dry completely.

This is how old things are given a second life. Now put the stencil on the surface of the suitcase, circle the lines of the drawing with an old pen that does not have a writing rod.

Take black acrylic paint and use a brush to make the barely noticeable scratches of the picture more visible.

Rest 40 minutes during this time acrylic drawing will dry. If you don't want to tear off the old lining, then choose a material that you can use to decorate this part so that the old thing turns into a vintage suitcase.
You can make its bottom softer by putting needle-punched material inside. On one side of such a fabric is wool, and on the other, synthetics. You need to glue it with Moment glue.

Now we need to prepare the lining. To do this, measure the inside of the suitcase along with the sides, add allowances for the seams. Attach this material to the base with furniture studs.

Decorate the interior of the suitcase lid in the same way. You can sew a pocket from a shiny fabric and attach it here, so that you can then fold various small items.

Such a vintage suitcase can turn into a place to store toys. The child will be happy to put his pets in it and learn to order.

If you want to keep your craft items in place, then use double-sided tape to attach small jars to the inside of the suitcase lid. You can put pins, needles, buttons and various other little things in them.
Put larger items in boxes, a cosmetic bag, and wind the braid into circles and place next to each other.

Here is such a vintage suitcase. The house will be in perfect order. You can store handicraft items in a suitcase by sewing pockets here or using existing ones. Separate sections of the suitcase to store other items at the bottom.

You can turn an old suitcase into a showcase. See the workflow.
Master class - showcase suitcase

This will be the final work. To make it work, take:
- suitcase;
- white and pink acrylic paint;
- drill;
- electric jigsaw;
- stapler;
- plastic rectangle;
- lace;
- paint in a can of blue and gold;
- lining;
- bolts with nuts;
- sandpaper;
- metal brush;
- decoupage napkins;
- oil paint;
- brushes; PVA glue.

If you need to decorate old metal parts, then first cover them with gold spray paint and let it dry.
Measure the width of your suitcase to find out how long you need to measure two boards of lining. Then paint them. Take the lace and lay them on the cut, using PVA for this. Lay folds at the corners. You can decorate these parts with artificial flowers. Attach a stencil to the sidewall and use white acrylic paint and a sponge to apply the selected pattern here.

Now, using metal corners, attach the shelves in place. Take screws for this, but take them so that they do not crawl out of the surface of the suitcase. Here the corners of this item are decorated with decoupage napkins.

From the Plexiglas, cut out a rectangle that is slightly larger than the cutout in the suitcase. Stick it on glue gun. Then make holes with a thin drill bit of a drill and screw fasteners for the mirror to them.

Now it's time to arrange the various items in the window and place the new vintage suitcase in a prominent place.

Craft on the theme "Autumn" from an old suitcase
If you love this time of year and have an old suitcase, then you can turn it into a great designer thing. This is how she will turn out.

But first prepare:
- suitcase;
- paint in a primer can;
- decoupage napkins;
- PVA glue;
- acrylic paint "Antique bronze";
- brush;
- file;
- water-based paint;
- texture paint;
- acrylic lacquer;
- glue Dragon;
- spray.

Regardless of whether the suitcase is old or new, you need to clean it by taking a damp cloth and detergent. To make it more convenient to work, temporarily remove the top cover of the suitcase.
The metal parts of this item must be cleaned with kerosene or petroleum jelly. But if they are in good condition, then this should not be done. Paint the outside of the suitcase using antique bronze paint. And then primed it with yellow paint. If you have white, use it. Then the picture will be clearer and brighter.

In this case, three-layer napkins with an autumn pattern were used for decoupage. Leave only the top layer, remove the bottom two.

Mix the PVA glue well and grease the top of the suitcase lid with it. From a spray bottle, moisten a napkin with water, place it on a surface smeared with glue, put the file on top. It is needed so that you now iron the napkin, removing air bubbles, and it does not tear.
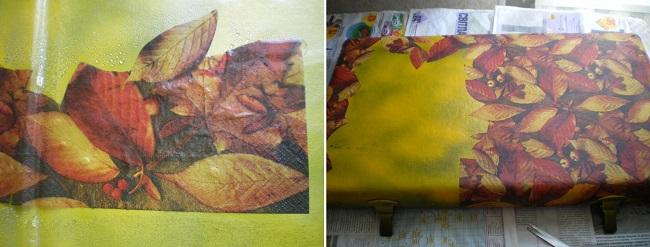
It is better to start decoupage from the sides, and then decorate a large surface on the lid of the suitcase.
When the glue dries, walk over the decorated surface acrylic varnish. It is necessary to paint in 5-6 layers, allowing each to dry completely. Then a glossy crust will be obtained on the surface, which will allow the pattern to shine and make the thing more durable.

But the interior also needs to be updated. To do this, decorate the inner edges with openwork braid, and the sidewalls can be coated with special stone-like paint.
Add autumn motifs, making embroidery on a fabric similar to burlap. To do this, sew the canvas with two lines of perpendicular stitches and translate the pre-printed autumn pattern.

To make the embroidery more voluminous, you can make a double layer of fabric, between which lay interlining. This canvas is decorated with embroidery on the hands or on a sewing machine.

How the decorated suitcase will look like, the photo shows. On embroidery there can be not only an autumn drawing, but also words of wishes that will always cheer you up.

From fiberboard, cut a rectangle that matches the dimensions of the inside of the lid. Glue the embroidered canvas to the fiberboard, tucking its edges.

Use Dragon glue for this, and in order for these two materials to grab well, place something heavy on the surface while the PVA glue dries. For example, you can arrange a flat tray or boards, and place a load on top.
Glue the burlap to the bottom of the suitcase, then paint it with textured spray paint.
Using self-tapping screws, attach the bottom to the lid, and the handle needs to be decorated with leather. Here is such a vintage suitcase.

Sometimes suitcases are in a very deplorable state, but these can be turned into unique things if desired. After all, this container is perfect for storing Christmas toys. Look at the magical transformation process.
Suitcase for storing Christmas decorations

This is how it will become after you try. But at first, this suitcase had such a deplorable appearance.

To carry out the magical process of its transformation, the following materials and things came to the rescue:
- acrylic paint;
- acrylic primer;
- mold spray;
- bitumen;
- sandpaper;
- rust primer;
- glitters;
- building glue PVA;
- synthetic paints;
- acrylic water-based varnish;
- glue Moment Crystal;
- printout on photo paper;
- paper masking tape;
- stencils;
- quilted synthetic winterizer.
Dermantin also fell into disrepair, so remove it, helping yourself with a clerical knife.

Here is what this suitcase looks like at this stage. It has black mold spots, a swollen bottom, and an uneven surface of the lid. You can level the bottom if you moisten it with water from a spray bottle and put a load on top.
Now you need to place a piece of beer cardboard on the bottom, on top of a load, for example, dumbbells.

It is necessary to distribute the circles from them over the entire surface of the bottom of the suitcase.

In a warm room, this container should dry for 2 days. If there is mold on the suitcase, then you need to process it twice special tool from this misfortune. The vapors of this substance are toxic, so you need to dry it either under a canopy on the street or on a balcony.
If there are adhesive residues on your suitcase that cause the surface of the lid to be uneven, remove them with sandpaper. Do not overdo it too much so that the material does not tear.
Fine-grained sandpaper can also be used to treat locks that have been damaged by corrosion.

Now this fittings need to be coated with a rust primer. Then with acrylic primer, using a wide synthetic brush, you need to paint the surface of the suitcase with this tool.

Since it is intended for storing Christmas toys, the drawing should be New Year's. Here's a snowman.

The craftswoman printed this picture using an inkjet printer on photo paper and divided it into 2 parts. Each turned out size A. The printout must be covered with acrylic varnish - three layers. Then this printout must be glued using building PVA.
Sand the perimeter of the glued pattern with fine sandpaper.

To make the lower part striped, you need to glue strips of masking tape here, decorate in this way.

To Christmas decorations not beaten in the suitcase, you need to sew a cover. The same quilted synthetic winterizer, as in the photo, is perfect.

Cut this material to the size of the lid and bottom and glue it in place.

This is how you can turn an old suitcase into the right beautiful thing that will become your pride.
Such containers are useful not only for adults, but also for children who can store their many toys here. The child will be delighted if you make a suitcase specifically for his doll. And you can make such a thing from leftover materials.
Do-it-yourself suitcase for a doll

To do this, take:
- kraft paper size A4;
- tin can;
- skin;
- stationery clothespins;
- paperclips;
- cotton fabric;
- lining material;
- glue Moment;
- universal glue;
- tools: tweezers, core, pliers, pencil, hammer.

Make a suitcase box with a lid. To do this, cut out the details using craft paper. Here it is necessary to immediately draw the folds that are visible in the drawing.

The suitcase for the doll will look just wonderful. To do this, place the base of the kraft paper suitcase on the selected piece of fabric. Circle and cut out.

As you can see, you need to leave fabric allowances in the indicated places. Bend them onto craft paper, attach, and you also need to glue the material to fill the cardboard almost completely. Press the elements with paper clips to dry the materials.

Now we need to make a handle. To do this, use a paper clip. It needs to be bent, glued a ring of thin skin, which is put on this workpiece.

Cut out iron plates from the tin can, glue them on the inside of the suitcase, make a through hole. Here you will stretch both handles and wrap their edges to fix.

To make the interior decoration, take the parts numbered two and three, glue them with a cloth. These sides will be internal.

Glue them to the box and lid. At the box, such a side will protrude outward, and at the lid it will be inside. This will help the suitcase close well.

Now you need to glue the bottoms to the bottom and top of the suitcase using fabric for this. Put it on the piece of craft paper and attach. Then glue the pieces in place.

If you want the doll case to have the same metal parts as the real one, then cut them out of a tin can, but be sure to sand the edges so they are not sharp. First you need to cut out such squares, then cut through half the diagonal of each and turn into a pyramid.

How to do this, the diagram clearly demonstrates.

Glue these elements in place.

It remains to decorate the suitcase with clasps, belts, buckles. Make belts from strips of leather, and make loops for them from a tin can.

Cut out the buckles from it, also attach them in place. Here is such a wonderful suitcase for a doll.

The child will be delighted. Now you know how to turn an old suitcase into a new one or make a small copy of it for a doll.
We offer you to see how you can make a vintage one from an old suitcase.
And if you want to turn this item into a convenient table, then look at the second plot.
Luckily, we got an old suitcase from 1980. Appearance and the chiffon fabric has been worn and soaked with dirt over the years. It was decided to completely restore it. Initially, the idea was to put it in a prominent place, as a decor. Major work has been done. Let's take a look soon detailed wizard class — restoration of a suitcase.
We will need:
- Suitcase
- Chiffon fabric (We recommend you buy chiffon fabric at a good price in an online store)
- Foam rubber
- newspaper sheets
- Furniture glue and PVA glue
- Furniture stapler
- Scissors
- Leg-split
- Acrylic paints
- Pictures for applying decoupage technique
- brushes
- Acrylic lacquer
- and other small tools
Step 1
Here is such a suitcase fell into our hands. The photo may contain our cat. The curiosity of the kitty is off scale, so it was not always possible to remove it from the frame. 🙂


The restoration of the suitcase begins!

The suitcase inside became soaked with dust and dirt over the years, so it was decided to completely remove the lining and replace it with new material.

Step 2
Let's start the fun! Removal of old material and complete analysis of the suitcase!


After removing all the excess, we got a certain cardboard box. Dirt and dust was more than enough! 🙂 So we washed it with a damp soapy cloth. The main thing is not to soak the cardboard.


Step 3
Let's leave the suitcase, let's get upholstered! These frame frames are made from raw wood, so everything was in sharp splinters. To prevent damage to the material, it was decided to glue the frame with a newspaper. Let's dry!

This will be our inside of the suitcase. Here we simply cut out the required size foam rubber (we calculated it based on the inside of the frame) and covered it with fabric. Staples were attached to the frame.

To strengthen the upper part, cardboard sheets were glued to the PVA glue. After drying, the lid became unbendable.

This is a blank for the side walls of the suitcase.

In order to carefully fix the fabric and strengthen the base, we decided to attach cardboard to the frame.

Fasten the cardboard with tape. On the inside, glue the foam rubber on furniture glue. This fix will suffice. After we tighten the workpiece with a cloth, fasten it to a furniture stapler and carefully close the corners. For reliability, we glued each bracket with furniture glue.

By analogy, they made the bottom of the suitcase. They cut out cardboard, foam rubber and covered it with fabric. Brackets and adhesives.

Step 4
Before applying acrylic paint, all old Soviet glue must be removed. We didn’t have soil at hand, so we applied paint over fiberboard. By the way, acrylic paints are quite expensive. And it would take to paint our suitcase a large number of jars. Therefore, we decided to replace art paint with construction paint. The cost of a 500 g can cost us 80 rubles. The main thing is to take water-based paint. It is only for sale white color, but you can buy a dye of absolutely any color for them. Such a dye costs 30 rubles. During work, we realized that the primer is applied so that the fiberboard does not absorb too much paint. So the primer is necessary for those who want to save on paint consumption.

We applied 2 layers of acrylic paint with intermediate drying of each layer. The paint dries very quickly. After using the decoupage technique through a file. Instead of decoupage napkins, we used ordinary office paper. Scotch tape helped us to thin the layers. Here is a little technical guide.
- We print the necessary picture on the printer
- Lay it face down on the table
- Tape on top
- And carefully tear off along with an extra layer of paper
- We thin the paper to the maximum. The main thing is that there are no holes
- Cut out the picture
- We put the resulting drawing on the file picture down
- Pour water on top, spreading over the entire surface of the image
- Drain excess water
- We transfer the drawing to the suitcase, carefully removing the file. See that there are no bubbles
- From above, from the center of the image, we coat the drawing with a solution of PVA glue and water in a ratio of 1: 1
- Let the glue dry
After that, we covered our suitcase with another layer of acrylic paint. We wanted to achieve the effect of an old suitcase without bright images. Therefore, we also slightly painted over the picture with paint. In order not to obscure the image, part of the paint was diluted with a small amount of water and applied only to the drawings. We are waiting for drying.

Step 5
The next layer is applied gold artistic acrylic paint chameleon. The beauty of this paint is that it is almost transparent, but at different viewing angles it gives a different shade of gold and a glossy sheen. We are waiting for drying.

This is our suitcase from the inside. Restoring a suitcase doesn't seem so difficult anymore?!

Step 6
Close the handle and corners. For this we used ordinary twine. Everything is very simple here. We coat the handle with PVA glue and wind the twine. Knitting needles were needed to create the corners. Cast on 12 stitches. In each row, close 1 loop and bring them to 1 loop. We should get a triangle. We fix it with PVA glue.

Cunning 1
Visually, it seems that the drawing was applied by hand ... but ... no. 🙂 Initially, it was another decoupage drawing. But when covering the image with a layer of paint, we overdid it a little and generally covered the entire drawing. The lines were barely visible to the eye. Therefore, it was decided to add more dye and outline the image by hand. After drying, the drawing was covered with chameleon paint, it gave a rich golden color. In the left corner put a small "signature". 🙂

Cunning 2
At first glance, you might think that craquelure paint was applied to the sides of the suitcase to create mother-in-law... but... no 🙂 We could not remove the Soviet glue from the sides of the suitcase. We decided to paint over it. But almost immediately after applying the paint went into a crack. 🙂 To preserve this effect, we immediately covered the acrylic paint with gold paint and varnish.

At the end of the work, we completely cover our suitcase with acrylic varnish. By the way, we recommend that you thoroughly paint over the twine (handle and corners). After varnishing, they will take on a stone shape, which will give extra shine.
Recently, while sorting out the mezzanines, I found a huge old suitcase. His appearance was pretty shabby with life, and his insides smelled of old age and mustiness. Of course, in our time, it would never even occur to anyone to embark on a journey with a large, uncomfortable, angular Soviet suitcase, however, as usual, the hand did not rise to throw it away. But, like any craftswoman, I know perfectly well that an old suitcase can be turned into an interesting interior item, an accessory for photo shoots, or just refresh it a bit and use it as a storage container :)

To decoupage a suitcase, we need the following materials and tools:
A piece of fabric for the upholstery of the suitcase inside;
Wide flat synthetic brushes, paint roller, sandpaper, degreaser, stationery files, pencil, scissors, ruler.
Master class on decoupage of an old suitcase with your own hands
The work will be long, because the suitcase is large. First of all, carefully sand all sides of the suitcase with sandpaper. It is better to use a sandpaper holder to speed up the process.

After sanding, we carefully wipe the suitcase from dust and treat it with an alcohol-containing liquid in order to further ensure better adhesion of the material to paints.
We dilute the acrylic soil with water to the state of liquid sour cream and begin to cover the sides of the suitcase. Suitcase, I repeat big size, so the primer will go faster and smoother if applied with a roller rather than a brush.

But the brush is useful for processing locks, handles, corners.


After the primer is dry, apply mahogany acrylic paint with a roller.

We refine corners, locks and other hard-to-reach places with a brush.

We cover the reinforced corners of the suitcase with bronze paint.


Time to start decoupage your suitcase. I decided to paste over only the lid of the suitcase, choosing a decoupage card for it with a motif from vintage candy wrappers. To finish the sides of the suitcase lid, I chose polka dot decoupage cards.
We take measurements from the suitcase, draw narrow strips for the side parts of the lid (leave a small margin to bend the napkins inward, under the lid.

Cut out the strips according to the pencil markings.

Use masking tape to separate the sides of the suitcase and the top of the lid.

With a wide flat brush, apply decoupage glue-lacquer to the side faces.

Lay each strip face down on a stationery file. Spray with water from a spray bottle. Gently smooth the decoupage card with a brush, drain the remaining water.

And directly on the file we transfer paper strip on the side part, pre-coated with decoupage glue. We try on so that it is even, lower it to the surface.

We smooth through the file, expelling air bubbles and preventing wrinkles from forming.

Remove the file carefully.

And on top we cover with decoupage glue-lacquer.

We bend the small edges of the decoupage card inside the lid. And it's best to do this with an open suitcase, so as not to accidentally glue the lid and the main part :)

Glue decoupage cards in the same way (the suitcase is large and I needed several of them in A4 size). First, apply decoupage adhesive varnish to the surface.

Then we transfer the decoupage card on the stationery file.

We smooth, we remove the file.

With a palette knife, a blade or a clerical knife, we undermine the cards in those places where there are corner rivets on the corners of the suitcase.

We cover the top with decoupage glue-lacquer.
After the decoupage glue dries, we cover the entire suitcase with several layers of acrylic matte varnish (we apply each layer after drying!), To form a protective varnish coating.

Let's start decorating the inside of the suitcase. In addition to giving it a neat look, it will also help get rid of bad smell dilapidated inside.
The old suitcase inside was pasted over with some kind of wallpaper. We ruthlessly rip them off where possible.

Top with plain white paper. I used decoupage varnish glue.

From above, the paper was also covered with decoupage varnish to consolidate the result.

To support the polka dots on the sides of the lid, I decided to decoupage the suitcase with polka dot fabric inside. I bought a piece of fabric, washed it, ironed it. The most difficult part is to cut out the internal elements.

Pasting itself is simple - decoupage glue is applied.

A strip of fabric is laid out on top, neatly and evenly. We press well in the corners.

We also glue a large piece of fabric to the bottom with decoupage glue. Smooth out to prevent wrinkling.

And on top we iron it through the paper. Then the already dried decoupage glue melts again and better impregnates the fabric, gluing it to the surface.

Ready! We ennobled an old suitcase using decoupage technique. Now you can use it for interior purposes, for storing things, for interesting photo shoots.


Most of all, those things that are made or restored with your own hands bring pleasure, especially if they have been breathed a second wind into them. It could be decoupage of an old suitcase. In order for a unique vintage product to be born, certain skills and abilities are not needed, it is enough to choose a decoration technique and allocate some time for your creativity.
Decoupage technique (applying a decorative pattern to the surface) has been known since the 17th century. In our time, not only has it not lost its popularity, but it is also experiencing its revival. The methods of work and materials have changed somewhat, but the essence of creativity has remained the same. Among the things that are given a second life, old suitcases are especially popular.. These items can be turned into a variety of useful and, most importantly, beautiful things for the home.
There are several stylistic trends in decoupage technique:
- Shabby chic style. The main background is white, with shades of ivory or pink tones. The thing should have a slightly aged look, for which scuffs and the effect of cracks (craquelure) are artificially created. The compositions are dominated by light colors;

- Provence. Reminiscent of shabby chic, only olive tones are added. Pictures of various plants, twigs - the main theme. Here, patening is more often used (blurs resembling copper plaque). You can find a master class on the Internet, where this technique is shown in detail;

- simplecity. It uses old newspapers, magazine clippings, postcards, notes, photos of ancient sights;

- Victorian style . The main leitmotif is engravings and thematic pictures of the 17th-18th centuries. Shades of burgundy, gold and beige predominate.
It is clear that any classification is conditional. You can fantasize, mix styles, add something new.
Decoupage of an old suitcase with your own hands
Let's start with the materials that are needed for decoupage. With the advent of acrylic varnish, paints, special napkins, the process accelerated and became somewhat easier. Materials for decoupage of a suitcase and other things can be bought at art shops and specialized points..
What you will need:
- acrylic varnishes and paints (when dried, they become resistant to water);
- stains, primers;
- brushes and trowel for mixing paints (palette knife);
- decoupage napkins, pictures, newspapers and other photocells (at your discretion);
- sponges, sponges, brushes, roller;
- PVA glue or decoupage.
This is the base set. Further details that can be used depend on the imagination and the purpose.

The decor of an old suitcase with your own hands includes the following steps:
- Surface preparation. We clean the thing from dirt, wash it, let it dry. Restoring damaged areas, sealing. We prime the surface, wait until it dries. With fine sandpaper, we remove the bumps after the primer.
- We paint the suitcase with acrylic paint in the color we need. If necessary, we create the effect of wear, cracking.
- We apply a drawing from a napkin or picture, newspaper to the prepared areas. This is done using PVA (decoupage glue) diluted with water and a brush. Gently press the pattern with a roller and force out the air. Let's dry. In the case when you need to create an additional effect of patination or a shade of a different color, apply a second layer and wait for drying.
- We cover with acrylic varnish. The varnish layer depends on the product, up to three layers can be applied. Varnishes are different: matte, glossy, with a mother-of-pearl shade and sparkles.
- We fix a new handle and additional overhead parts. The handle can be made from beads, an old spoon, a belt, etc.
The internal content depends on the purpose for which the thing will be used. For example, home improvement magazines might have interesting master classes and detailed recommendations on how to decoupage a suitcase with your own hands.
On video: Volumetric decoupage of a suitcase with painting elements

How can you use a suitcase in the interior
Old suitcases in the interior can become useful thing. An object decorated with your own hands (an old suitcase) takes on a new look and a new place among household items. From an old suitcase you can make a comfortable place for pets (cats, dogs). To do this, sew special pillows with a removable cover and lay them on the bottom of the walls. You can attach ordinary or wheeled legs for convenience, and decouple the sidewalls with thematic pictures.

Banquettes, bedside tables, tables are made from a roomy medium-sized suitcase. To do this, decorate beautifully old thing outside. If you plan to do decoupage on your suitcase to get a banquette, prepare a convenient place inside for glasses, glasses or bottles. It is better to line the inner surface with a velvety fabric in a contrasting color.

You can make a collection of bedside poufs by attaching legs to decorated items. It is better to strengthen the bottom with a layer of thin plywood. The upholstery of the soft part is made in the style of the decor of the suitcase. For example, if you are remodeling an old shabby chic suitcase, then suitable fabric with flowers. Classic legs and burgundy velvet look beautiful in Victorian style.

Some interesting ideas
- Large suitcases-chests are ideal for a vintage chest of drawers. In this case, the facade of the furniture can be decorated with overlaid leather straps and antique-styled handles.
- The children's room with cheerful suitcase shelves for toys, pencils and other things will delight your child. He himself can take an active part in the decor, helping his mother. Bright colors, funny pictures have a positive effect on the mood of children.
- Home flower bed will decorate the room if the flowers are placed in an old but updated suitcase.
- By attaching the suitcase in a vertical position to the wall, you can get a convenient locker for household trifles. From a small children's suitcase you can make a key holder. Shelves are made inside or decorative hooks are attached.
- A newly decorated item will turn into an interesting independent detail of the interior in the bedroom. The product will stand out with its individuality. In this case, you need to build on the style of furniture, but it is possible to play in contrast.

An updated suitcase in the interior of your home can be a real “icing on the cake”. Using our tips, you will get a great opportunity to realize your creative potential. Decoupage of an old suitcase is a very useful and exciting process!
Ideas for the restoration and decoration of a suitcase (2 videos)
What can you turn an old suitcase into: interesting decoupage ideas (40 photos)


