Small and light beaded crafts. Handmade beadwork for beginners
Beading is a vast field of activity, here you can create completely different products: flat, voluminous. This article will tell you what you can quickly and efficiently make from an affordable bead house, And will show schemes for working with their own hands for beginners.
How can you make a wedding tree from beads with your own hands?
A tree created in the shape of a heart, which can be presented for a wedding or for a couple in love on any date. It is made only using beads and wire.
For weaving you will need:
- thin wire;
- Coil of thick wire;
- Green beads;
- Pink beads;
- Yellow beads;
- Floral green paper;
- Fishing line;
- Clay;
- Heart shape.
We start weaving the product:
- The first element will be the leaves. For them, you need to collect fifteen green beads on the wire and twist them into a loop, twisting the wire in four turns, placing them in the middle. Then we collect fifteen more beads of the same color on both ends and again form loops by twisting the wire. Here are three leaves ready. And below we collect eighteen beads on both sides and again we form loops. Here is the first thread. Such branches need to be made fourteen pieces.
- We begin to weave the main part - roses. Here we will use pink beads. We make fifteen loops of fifteen beads, but they must be adjacent to one point, then they must be pressed against each other to make a flower. We flatten each loop separately a little from above and we get a beautiful rose. They only need to make seven pieces.
- We attach a pair of branches with leaves to each small rose with a wire. At the same time, we do not cut the wire, but leave long ends.
- We create a heart from a thick wire with the help of folds and make a support at the bottom so that it can stand.
- We wrap the entire contour with floral paper and attach the flowers, distributing them evenly.
- The final element can be made from both fishing line and thin wire. To do this, we collect five green beads and twist them into a loop (you will need to make a couple of knots with a fishing line). And we make small cuts of five such loops.
- Then we attach these green branches to the heart, between all the flowers so that they completely cover the space between them.
- Now we leave the product alone and proceed to the stand. In a special heart shape, no more than ten centimeters, pour clay and wait until it hardens a little, that is, about ten minutes. Then we immerse our product exactly in the center and let it harden to the end. After complete hardening, we carefully take out the entire structure and, if desired, you can decorate it below with the help of paints and the remains of beads.
It turned out here is such a beautiful product, which fascinates with its beauty.
And you can also string on a wire or fishing line a large number of white beads, evenly placing large or medium beads between them and process the composition made, wrapping along the contour and passing between the flowers. And also glue cream-colored beads along the contour of the stand.

We are trying to make a small bird in the master class
Great cute product that can be used as a keychain or just a souvenir.
For weaving you will need:
- Wire;
- Yellow beads;
- pink beads;
- Black beads;
- White beads;
- Blue beads.
We start weaving.
The bird can be made by parallel weaving according to the scheme:

Or as described below:
- We start weaving with a beak. It consists of six black beads and six rows (that is, one bead per row). Rows are made by crossing the two ends of the wire crosswise, passing through the bead.
- We build further rows in this way: yellow with blue on top, and all the rest on the bottom.
- First row: three yellow and three pink.
- Second row: white, three yellow, white and four pink.
- Third row: white, black, three yellow, black, white and five pink.
- Fourth row: nine yellow and pink, four white, pink.
- Fifth row: seven yellow and eight white.
- Sixth row: a pair of yellows, blue, a pair of yellows and nine whites.
- Seventh row: a pair of yellow, a pair of blue, a pair of yellow and nine white.
- Eighth row: a pair of yellows, three blues, a pair of yellows and ten whites.
- Ninth row: a pair of yellow, three blue, a pair of yellow and eleven white.
- Tenth row: a pair of yellow, a pair of blue, a pair of yellow and ten white.
- Eleventh row: two yellow, blue, two yellow and eight white.
- Twelfth row: four yellow and six white.
- Thirteenth row: three yellow and four white.
- The fourteenth row consists of one yellow and a tail: four lines of eight beads, as shown in the diagram.
- Now let's make the wings. Six blue lines of ten, nine, eight, six and the last two of five beads. Then we take yellow and continue in rows, in such a number of beads: 1-2-3-4. We thread the ends of the wire into the sixth and seventh rows from the top.
A beautiful bird is ready, and the result can be seen in the photo, along with the diagram.
Check out some more figurine diagrams:


Video selection on the topic of the article
And a few more simple products in the video selection:
Beads are the material from which you can make almost anything. Even the most ordinary-looking thing with the help of these small beads can be decorated in an original way and give it a festive look. In addition, working with beads is an incredibly exciting and interesting activity.
Of course, it is not suitable for the smallest children, but starting from 5-6 years old, boys and girls can already start making beads with their own hands. As a rule, initially, kids create figurines of funny animals and small decorations, for example, bracelets on their hands.
In the future, when the child masters the technique of beading and learns to understand patterns, he will be able to do different crafts from beads with their own hands, including quite complex ones. In particular, on the eve of the next holiday, the kid will be able to independently make original accessories for decorating the interior, as well as nice little things as a gift to his loved ones.
In this article, we bring to your attention several detailed instructions on creating crafts from beads with your own hands for beginners, with the help of which each child will be able to understand in detail the intricacies of working with this material and independently make an original decoration.
Simple DIY bead crafts for kids
Most simple crafts- these are animal figurines made of multi-colored beads and thin wire. As a rule, beads of the same size and texture are used in this case, but there are still exceptions. All the necessary elements and the rules for their connection to create such crafts are always reflected in the diagrams.
In particular, the following visual instructions are suitable for beginners, with the help of which even a child can easily figure out how to make this or that craft:
 |
 |
 |
 |
 |
 |
How to make Easter crafts from beads with your own hands step by step?
On the eve of Easter, or Bright Christ's Resurrection, beading becomes especially relevant. With this technique, you can decorate original way and make gifts for your loved ones. In addition, having spent quite a bit of time, you can make interesting crafts for interior decoration from beads with your own hands.
In particular, with the help of the following detailed instructions, you can easily figure out how to make original Easter eggs from beads and sequins:
 DIY beaded bonsai
The bonsai tree will fit perfectly into any interior, especially if it is made by hand. The following master class will help you do this craft with your own hands:

Articles on this topic:
|
The variety of materials for crafts has no limit, as does the imagination of the craftswomen themselves: both small and large. Next, we will consider such an unusual, but extremely popular direction today as weaving from rubber bands. |
Evgenia Smirnova
To send light into the depths of the human heart - this is the purpose of the artist
Content
The creations of bead weaving masters are a whole art, and some works are rightfully called masterpieces. Learning to create beautiful things from beads is not so difficult as they think, the main thing is to learn necessary technicians. Bead weaving lessons for beginners are easy to learn, but you need to have such qualities as perseverance, patience and a great desire to create beauty. If you decide to try beading, you will never be disappointed with the result.
Basic beading techniques with patterns
If you decide to create a beautiful thing from beads, but still do not know how to do it, then first choose a convenient weaving pattern for yourself. But most importantly, you need to find large beads that are more suitable for the base of beading by beginner needlewomen. Do not take too voluminous products into work for the first time - they require skill and a lot of time. To a large extent, the type of finished work will depend on the quality of the material chosen. Therefore, if you notice irregularities on the wire or foreign inclusions on the beads, then discard such material.
To choose the right material, follow a few tips:
- Choose beads according to the shape and color indicated in the diagram.
- When buying, inspect the package or jar so that there are no defective beads.
- The size of the beads is determined by the number. The smaller the number on the package, the larger the beads.
- For beginners, it is recommended to choose a wire that models the outlines of finished elements. The fishing line is different in thickness and color, and also involves the purchase of a needle for work.
Mosaic weaving
For most needlewomen, the technique of mosaic weaving is banal and simple. But even experienced craftswomen make mistakes, so it is important for beginners not to miss all the details of the scheme. With mosaic weaving, the beads are staggered, forming a dense canvas. Its main principles:
- work is done on a single thread;
- the number of beads must be a multiple of 2;
- in order to weave a fabric for an uncountable number of beads, additional passes of the thread are needed through the extreme beads.

Weaving an even mosaic canvas begins with a set of an even number of beads that make up the first row. For the second row, you should dial one bead, and pass the needle through the second bead from the end of the row. Then pick up a bead, stitching through the fourth from the end of the row and so on. To finish the row, pass the needle through the first strung bead. In order to dial the third and all subsequent rows, sew a new bead through the last one strung in the previous row. Before you break the thread, pass the needle in a zigzag pattern through the entire weave.
brick
Although brick weaving is a bit like mosaic weaving, it differs greatly in execution technique: it is weaved in a different direction and takes more time. Brick and mosaic weaving are similar, so they are often used in one product, and the connections look completely invisible. The principle and procedure of brick weaving:
- The first row consists of 5 beads. First, two pieces are put on the needle, and then the third, after which the needle is threaded through the second towards weaving, and through the third in the direction of weaving. Then the fourth bead is put on the needle, and the needle is passed through the third in the direction opposite to weaving. The same is repeated with the fifth bead, after which it is necessary to return to the beginning, passing each bead in turn in the countdown.
- The second level of brick weaving can be expanded. To do this, you need to string two beads on a needle, make a stitch, clinging to the thread connecting the two beads of the first level, and bring it out through the second bead of the second row. Next, the third bead is put on, and the stitch is drawn between the second and third bead of the first row. You also act with the fourth and fifth beads, and when the sixth is typed, the needle is inserted from top to bottom through the fifth bead, and output through the fourth bead of the first and second row.
- At the third and second level, the canvas expands in the same way, and starting from the fifth row, it should already be narrowed. To do this, the first two beads are strung, and the stitch is made under the thread connecting beads six and seven in the fourth row, and through the beads two of the fifth row is returned back. Next, the needle is led in the direction of weaving on the fifth row through the first bead, and then through the second. At the fifth level, they stop at seven beads, and so on.

Circular (French) technique
French weaving is very common among needlewomen. And this is understandable, because all the little animals, flowers and other decorations come out airy and openwork. With circular (French) weaving, at the base of any leaf or petal there is a thick central wire rod, on the base of which several beads are strung, and a thinner wire with beads is attached below. Two wires are arranged in parallel, fastened with one curl. This results in one half of the arc.
On the other side of the rod, another wire with beads is attached, fastening to the main rod from below. If you weave a couple more of these arcs, alternating the fastening of the wire from below, then from above, you will get a full-fledged leaf. The wire of the last row is fastened with the help of two turns, and its tip is cut off. One side of the axial rod is cut so that a small end of the wire about 0.5 cm remains. Then it should be bent into the inside of the decoration.

Parallel
Many needlewomen start their way in beading by mastering the technique of parallel weaving. This is the most easy option, flowers and other interesting products. The essence of parallel weaving is that the beads of the first and second row are strung on one end of the wire, and its other end is threaded towards the first level through the beads of the second.
Two rows are pulled tightly to the middle of the wire or fishing line, and tightened tightly. After that, both ends of the wire come out from opposite sides of the decoration, and the rows are parallel to each other. Such lowering easily creates not only flat products, but also volumetric ones. Only for weaving volumetric figures the rows are stacked one under the other, and when creating flat ones, they are stacked in the same plane.

Beading workshops for beginners with photos
Beading products is very fashionable. Today, many Fashion Houses in their numerous models decorate bracelets, bags, rings, clothing items with beaded weaving. That's why modern women and are fond of beading, because every thing created by one's own hands takes its rightful place in the wardrobe, and becomes a matter of personal pride. To learn how to create beautiful things with beads, beginner needlewomen will need the following materials and tools for work:
- beads, stones;
- fasteners for weaving necklaces, bracelets, necklaces;
- needles different sizes for large and small beads;
- kapron threads, fishing line or wire for the base of the product;
- pencil, notebook sheet in a box for sketching diagrams;
- scissors.
Before starting to practice, a beginner should arrange the workplace so that he enjoys the process, and does not suffer from inconvenience or lack of lighting. You need to work at the table on which everything is cooked the right tools and material. And so that the eyes do not get tired, the light should not be too bright, but not too dim. It is better to start weaving with beads with some simple figures or bracelets, and complex jewelry should be left for later, when some experience has already been gained.
Bracelet
Trees
Weaving a tree is not as difficult as it might seem to a beginner at first glance. The main thing is to know the step-by-step procedure:
- To weave leaves, cut the wire into equal pieces of 80 cm each. Take 7 centimeters of green beads for one of them, and then, stepping back from the edge of 20 cm, make twists of 3 beads, and then twist the wire in a zigzag.
- Make 7 identical branches, then connect the composition. To do this, twist two branches, and after 3 mm add another one. Gradually twisting the finished branches, a beautiful, branched tree is created.
- So that the trunk does not look too thin, it is better to ennoble it. For this, a floral tape is suitable, which should be wrapped around the trunk, gradually wrapping new branches to the base.
- At the end of the work, all that remains is to plant the tree on plaster in a pot, and to make it look like a birch, draw brown stripes with a marker that will imitate birch bark.
Rose
Weaving the simplest rose or violet from beads is also possible for a beginner, the main thing is to follow the instructions clearly. Master class step by step:
- Cut one piece of 10 cm wire for the base of the flower, and another 50 cm piece that will become low.
- String 5 beads on the base, and then wind it to the bottom.
- Dial beads on 2/3 of the wire, form an arc, covering the low axis in series.
- Make 5 arcs on each side - this will be a rosebud.
- According to this principle, make 5 more (or more) petals, and in order for them to be sharp, they should be wound to the axis at an angle of 45 degrees.

- Let's start collecting roses. Bend 3 petals in half horizontally, arching slightly outwards.
- To avoid spilling the middle, the wire should be squeezed tightly.
- Take a thick wire, insert it between the petals so that the stem is stronger. Then, with floss threads, wrap all the petals very tightly to the stem in order.
How to weave a bauble
If you want to present fashionable and original gift, then the most suitable option is a bauble. This jewelry is now popular not only among young people - many respectable people wear a variety of openwork bracelets. We offer a master class on weaving beaded baubles with flowers:

- Attach one part of the bracelet lock to a thin fishing line, as in the photo.
- String small beads on 2 pieces of fishing line so that each is 3 cm long.
- Pass a transparent bead through both fishing lines (blue in the picture).
- String the beads again on each piece of fishing line, and then thread both through the white bead - it will become the core of the flower. Unfold the fishing lines and thread each one again through 2 blue beads.
- Follow this principle to make all the remaining links so that the end and beginning of the bracelet are the same.
Crocodile beading
Connect your imagination and create funny crafts from beads. We offer a master class for beginners on making a simple crocodile, on the basis of which you can make earrings, a key chain or a bracelet pendant:
- String one bead of dark color on the wire - this is the nose of our crocodile. Secure it by parallel weaving in the middle of the segment.
- With one end of the wire, grab two green beads, pulling them close to the nose, and then insert the second piece of wire into them. After fixing it, you will have the second row.

- The third row is three green beads, the fourth is four, and in the fifth row you should alternate green beads with beads of a different color - these will be the eyes of a crocodile. Starting from the sixth row, the head narrows.
- Once you narrow your head down to three beads, by adding two loops, make paws on the sides.

Beads have been known to people since ancient times. Needlewomen create unique jewelry from it. Often the hobby turns over time into a source additional income. Beadwork is very useful for children, as it develops perseverance, attentiveness, fine motor skills and fantasy. Let's talk about how to create lungs in stages.
stringing
Stock up to get started necessary materials:
- beads of the desired size, shape and color;
- fishing line or wire for the base;
- a special needle;
- clasp for creating bracelets or necklaces;
- scissors.
Choose a well-lit area where you can sit comfortably. It is better to start with the lightest bead crafts. These are simple beads or bracelets for dolls, little fashionistas. It is not difficult to make them: you need to string colored beads on a fishing line or wire.
Clasp attachment
The first crafts from beads are made easily and quickly. The hardest part is attaching the clasp. At its ends is a metal bow. Pass the fishing line through it and dial 3 more beads. Now thread the thread through the last three beads of the product to make a closed ring. To be sure, pass the needle through it a few times, then cut the line and hide the ends inside the jewelry.
If you pick up beads of harmonizing colors and string them on different pieces of fishing line, you can assemble three-dimensional products. Here you will need in addition to the usual fasteners:
- crimps (clamping fixing bead);
- hats for beads (accessories that hide small flaws);
- trailers (elements hiding the edges of the fishing line).
We collect all the segments with strung beads from one edge together, carefully thread them into a hat. Pull it as close to the beads as possible. Now put on the cap. Slide the crimp into the groove of the limit switch, press it with round-nose pliers. We cut off everything superfluous, close the limit switch. Threads with beads can be beautifully intertwined with each other. Then the second end is fixed in the same way as the first. A carbine is put on.
Elegant bracelet for fashionistas
Flat jewelry is one of the easiest beaded crafts for beginners. Let's try to make the product more complicated. We need round beads, as well as elongated large beads. You can experiment with colors, materials. We tightly string beads onto the base. The total number of beads must be a multiple of five plus one extra. When everything is ready, the clasp is attached.

The edge is not cut off, but passed again through the first bead and the clasp bow several times. A bead is put on it. Then we thread a thread or wire through every fifth bead in the opposite direction. In between, we string beads either from below or from above from the main chain. The result is an elegant bracelet that can decorate a woman's hand.
Working on the first products, listen to the recommendations of professionals. They will help you master the basics of beading in the shortest possible time.
- Initially, give preference to larger beads.
- Buy it separately for each occasion with a small margin.
- Wire is easier to work with than line. The latter requires a needle, although many needlewomen have learned to do without it.
- Do not buy material with flaws, chips.
- Choose easy beaded crafts with a clear pattern. Volumetric products will take you a lot of time and nerves. As a result, you will simply lose interest.
- Starting work, cover the table with a cloth so that it is not slippery. Choose a color where small beads will be noticeable. Pour the beads from the bags onto the fabric, but try not to mix the colors. Many people prefer to store beads in small containers, sorting them by shape, size, and shades.
- Collecting overturned beads is a dubious pleasure. If this happens, stick double-sided tape to a small bar. Go over the entire surface, and then use a knife to drop the beads into the box.
- When starting to weave an ornament, leave an end of 7-10 centimeters for attaching the castle.
- If you are afraid to miscalculate with the length of the bracelet, leave a line of about 25 centimeters on both sides. So, if necessary, you can lengthen the product.
Monastery weaving
Even a beginner can create beautiful and easy beaded crafts. Let's master one of the basic weaving techniques, which is called "monastic", or "cross". With its help, you can create interesting decorations and even collect canvases. We'll start with the basics by making a wristband.

Follow the following instructions carefully:
- Dial four beads on the fishing line.
- Pass the thread through the first bead, then through the next two.
- We string three more beads.
- We introduce the fishing line into the fourth bead of the lower link.
- We pass it through the two upper beads of the product, getting the second cross.
- Weave further in the same pattern until an even chain of the desired length is obtained.
It's easiest to use one color. But it is more interesting to play with different colors and shapes of beads.
Baubles for girls
As you can see, it is easy to make crafts from beads with your own hands. Consider the most a simple circuit weaving baubles. To create it, you can use beads of various shapes, unusual beads. Estimate in advance the length of the product being made, unwind the thread twice as much. Place a clasp and a large bead in the middle.
On both ends of the fishing line you need to string the same number of beads. How much is up to you. Usually, beads of a smaller size and a different color and shape are taken. Some needlewomen combine several types of beads. The main thing is that a symmetrical pattern is typed on both threads.
After that, the ends of the fishing line are crossed and threaded through a large bead, the same as the very first one. The selected scheme is repeated until the bauble is finished. The result is products that are not similar to each other. The ancient Indians gave handmade baubles to friends. It was believed that friendship would last until the thread on the bracelet broke. You can continue the tradition by delighting your comrades with pleasant surprises.
Parallel weaving
Let's learn a technique that will help us make many fun and useful products. Having mastered it, you will understand how to make beads easy craft according to your own plan. So, what is the essence of parallel weaving? It involves stringing beads in rows following one after another. You will need detailed diagram. At one end of the selected base, beads of the first two rows are collected and placed in the middle of the fishing line or wire. Then the other end is threaded through the beads of the second row from the opposite side.
The beads are tightly attracted to each other. Beads of the third row are strung on one end of the base, and the other end is passed through it in the opposite direction. Let's master this technique on the example of crafts "Lizard". We need a thin wire 40 centimeters long, some beads of any color. The lizard can be bright, as in the proposed scheme. More traditional will be the choice of green with brown, yellow accents. Make the eyes contrast, otherwise the animal will appear "blind".

Weave a lizard
Let's start making from beads with a tail. In the middle of the base we string a bead of the selected color, spread the ends in different directions, thread through the bead in opposite directions. We pull tight. On any end of the wire we put on the next bead, the second passes towards the first.
Thus, you need to dial 7 single beads, making sure that they lie flat. In the eighth row we string two beads at once, we spread the ends to the sides. On each of them we will weave a foot.
It is necessary to string 6 beads on the ends. Then the wire is threaded through the first three beads in the opposite direction. The rest will be fingers, straighten them. We pull the paws tightly to the body and work further according to the scheme with parallel weaving, picking up three rows of three beads.
Then we make the upper paws, finish weaving the torso. The head is made using both ends of the wire. As a result, it turns out funny toy. If you attach a carabiner to the lizard, you can use it instead of a keychain.
Learning to draw diagrams
Lungs, beautiful crafts from beads for children can be made using parallel weaving. It can be animals, insects, fairy-tale characters, transport, all kinds of objects. The resulting products will please adults in the form of a funny keychain or brooch. In the photo below you can see made of beads ladybug, emoticon, piece of watermelon.

However, other ideas may come to your mind. You know the technique, it remains only to learn how to draw your own weaving patterns. Stock up on paper and colored pencils. Draw a silhouette of the future product. Circles indicate the number of beads in each row. They must be the same size. It is convenient to create diagrams on a piece of paper in a box. Now think about the color scheme. This is where pencils come in handy. Stock up on the necessary materials and get to work.
Easy crafts from beads for the New Year
Passion for beading allows you to create unusual gifts for loved ones at the lowest cost. Before the holiday, needlewomen create themed products. Let's make a Christmas tree and Santa Claus using the mastered parallel weaving.

A good wizard begins to weave from a hat, in each row increasing the number of beads by one. It turns out a triangle. The face is made by stringing five rows of 7 beads on a wire. Here it is very important not to make a mistake with the colors in order to get the desired pattern. The beard consists of four rows, the number of beads in them consistently decreases.
The Christmas tree is just as easy to make. In the middle of the wire we string a beautiful, bright bead - the top. The second row consists of three beads. Then we increase their number by two, reaching 13 beads in a row. The next row is reduced to 9 beads, and we collect five more rows with the addition of two beads in each. We make green the main color. In some places we dilute it with unusual, multi-colored beads. The trunk should be brown. To designate it, two rows of five beads are typed.
winnie the pooh for kids
Flat figurines of people and fairy-tale characters are light beaded crafts. For beginners, it will not be difficult to make, for example, such a funny bear. This time we will choose a fishing line as the basis. The technique is the same - First, two legs are made according to the scheme, each separately.

Then, on the right foot, the fishing line is cut off and fixed. We put the left leg on the table. We string a bead on the right end, thread the fishing line through the top row of the other foot. From the opposite side, we collect the next row, we pass the fishing line through both legs and again through the first row of the body. Toward we stretch the other end of the base. According to the usual scheme, weave the body and head.
Ears and handles
Each ear of Winnie the Pooh is woven with one end of the fishing line. For handles we take another thread. We collect one paw, then we stretch both ends through the top row of the bear's blouse, fixing the limb well. On the other hand, the second handle is woven according to the pattern. The main thing is to pull the fishing line tightly so that the legs do not hang separately from the body.
You will find many schemes for easy bead crafts on the Internet. There are bunnies, dolls, princes, mermaids, puss in boots. You can create a whole puppet theater for children. If you want to come up with your own scheme of a little man, keep the proportions. Otherwise, the product will look messy.
Easy crafts made of beads allow you to quickly master the basics of craftsmanship. Subsequently, you will learn how to create voluminous works, orientate yourself in complex schemes. The main thing is that needlework gives you joy. Then everything will definitely work out.
Beads are one of the most famous materials that people use to create various decorations, clothes, decor. Beads have been known since ancient Egypt, but until today, they do not lose their relevance. Experienced craftsmen create real masterpieces from it, and today we will tell you in detail what you can do with these small beads with your own hands. So let's get started.
You can make all kinds of jewelry from beads: necklaces, necklaces, bracelets, pendants, brooches, chains, hairpins, earrings, rings.
Accessories and garments: collars, belts, handbags, clutches, openwork gloves, key rings
Decorative interior decorations: trees, flowers, paintings beaded, figurines of animals, angels.
And many, many other items. Beginners in beading, looking at the work of experienced craftsmen, do not cease to be amazed at the quirkiness of forms and fantasy, they dream of creating something extraordinary. But it’s more correct to start with something simpler and get your hand on less complex products.
What can be made from beads: product diagrams for beginners
Glass bead bracelet
One of the lightest pieces of jewelry. It has a very simple scheme:

And for its manufacture, we only need 6-7mm glass beads and wire. As a result of simple actions, you will get such a bracelet:

Star

It can be used as a decoration for flowers, a key ring or, if weave a pair to it, as earrings.
To weave such an asterisk, look at three patterns for weaving it.
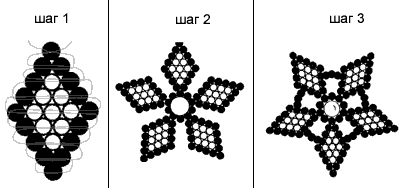
First you need to perform 5 rhombuses with a technique in two threads, as in fig. 1. Then, the diamonds need to be combined. To do this, you need to pass the wire through the first rows, and insert one bead between the diamonds. Take large bead and insert it into the middle of the asterisk (in Figure 2). Diamonds are also connected at the level of 4 rows, and 3 beads are inserted between them, as in the 3rd figure. We have a pretty star.
For weaving jewelry, it is best to use fishing line - it is stronger than many threads, and it is easier to work with it. Wire is suitable for weaving decorative elements, animals, accessories, as it allows the product to keep its shape.
What can be made from beads, fishing line and wire? For example, a beautiful heart pendant.
Heart pendant
It is used to create copper wire, about 1 mm thick, beads, beads, crystals, glass beads of various colors. Following a simple pattern. We can make such a heart very quickly and then use it as a keychain, pendant or interior decoration:

necklaces
Beautiful and stylish necklaces are obtained on the fishing lines:

Such a necklace, as in the photo, is made very simply. It is only necessary to string red beads on 12 pieces of fishing line, the length of which is about 70 cm. At the ends of the fishing line, you need to make a knot so that the beads do not crumble. Then, divide the resulting threads of beads into 4 equal parts (three threads each) and weave a necklace according to the following pattern:

After the necklace is woven, special fittings are put on its ends - locks and the necklace is ready!
extra beads
No craftswoman will ever complain that she has extra beads left. In such a business as beading, there is no superfluous material. What can be done with the leftover beads? If the remnants of the beads are not enough for something large, then the simplest and most variant is thin and elegant beads, for example, these:

The main thing to remember is that if we string only beads, such beads will look extremely boring, but if we add several beads of different sizes, in tone or in contrast, they will immediately play differently.
You can make an original bracelet of lace and beads.
To do this, take a piece of lace:


And embroider on it (you can repeat the pattern of the lace itself), beaded flowers or an ornament.

A clasp can be attached to the ends of such a bracelet, if available. Or sew on thin strings of ribbon or lace.
We also invite you to watch a video of a master class on making stylish long beaded earrings. Good luck with your creativity!
Video for beginners
Here is such a stylish birch:
Crocodiles in the form of key chains:
Collar:


