Snowflakes and paper trees. Do-it-yourself voluminous paper snowflakes: templates, stencils, master classes, video
The paper snowflake has been the most popular and most affordable Christmas decoration for many years. They are cut out in kindergarten, and at school. Shops, offices and apartments are decorated with snowflakes. In order to make this patterned miracle, you need a little: paper, scissors and patience. You cannot create truly beautiful snowflakes from a swoop. But you should not be afraid. We will tell and show how to easily and quickly make amazingly beautiful, openwork and unusual snowflakes.
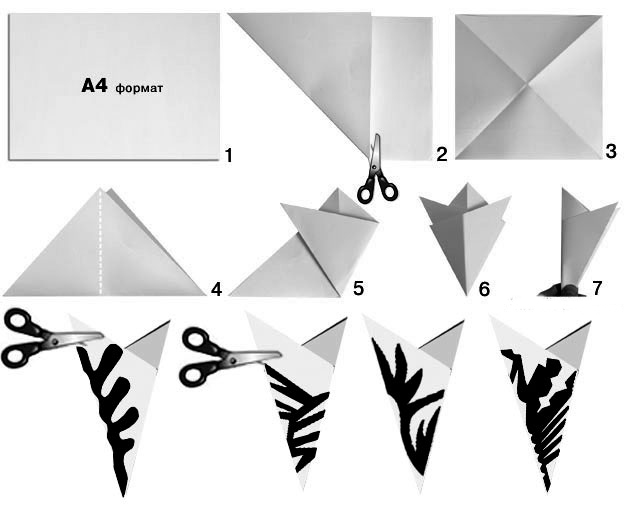
We make a blank from paper
First, fold the paper from which we will cut the snowflakes. The diagram in the photo will tell you how to do it correctly.

When we have made paper blanks for making snowflakes, the most interesting part comes - drawing a picture. You can come up with your own drawing, or you can download diagrams from the Internet. We also publish a number of schemes that will help you make a truly beautiful snowflake. The most important thing in this case is to make sure that the lines do not reach opposite sides of the workpiece, otherwise the snowflake will not work.


When you have applied the drawing, the excess is cut off with sharp scissors. We remove small details with nail scissors or a clerical knife.
Snowflake with a story
Recently, unusual snowflakes with figures of animals and people are gaining popularity. Snowflakes where you can see the real story. Take these pictures as an example and come up with your own.

.jpg)

What paper to cut snowflakes from?
From any, as long as it is easily cut. You can decorate your home with gold or silver paper snowflakes. You can use colored or translucent paper. And someone prefers to create using old newspapers and magazines.
Ballerinas at the window
By the way, ballerina snowflakes have not lost their relevance for many years. From these figures you can assemble a real garland. In this case, you will have to cut out the silhouette of a dancer (preferably from cardboard) and a snowflake, which you can put on the figure as a skirt.

This is how you can decorate the windows of your apartment with snowflakes-ballerinas. It turns out charming and gentle.
\
Volumetric snowflakes
Volumetric snowflakes look unusual and very elegant. They are also made quite easily and quickly. A good example is in this video.
And finally, a few tips from readers of the site:
- Use tracing paper to cut out snowflakes, it is thin but strong. Snowflakes made of tracing paper are more airy.
- Roll not on a hexagonal snowflake, but on an octagonal one, so a finer pattern can be made, and the rays paper snowflakes nobody thinks.
- It is easier to cut snowflakes with nail scissors than regular ones.
- Snowflakes look better not uniform, but with larger details, alternating with thinner ones. For example, thicker rays, thinner branches from them.
- And try to cut all the same snowflakes, not lace napkins, so less roundness, leave less paper.
The frantic rhythm of modern life does not always allow you to feel the festive mood before the New Year. Therefore, we try to decorate the room to create an appropriate atmosphere.
To decorate a room, it is not necessary to buy decorations in a store. But it will be more pleasant to decorate the room with your own hands. It is enough to gather the whole family on a day off and start preparing for the New Year.
The simplest element of holiday decor is a snowflake. In Soviet times, children folded a sheet of paper several times and cut out geometric shapes. In the unfolded state, a snowflake with openwork patterns was obtained.
With the development of modern technology, it became possible to learn about the various methods of manufacturing design elements.
In today's article, we will consider several options for making a popular New Year's attribute.
DIY snowflakes made of paper for the New Year
As a result of the click, a new window will open, in which you should click on the "Printer" shortcut and set up printing.
Snowflakes for the New Year in the form of a ballerina (templates and patterns)
As you already understood, snowflakes can be given a very different shape, structure and volume. But if you want to diversify the decor elements, then use the ballerina templates.
I have selected several options. If you wish, download or print them, after the stencils there will be a PDF file label with all the images.


Click on the PDF file shortcut and download the templates.
If you know how to draw, then try to make a stencil yourself. You will succeed.
A step-by-step snowflake tutorial for beginners
If you have never made a paper snowflake with your own hands, then I offer you a step-by-step and detailed instructions. This method is one of the easiest.
We need A4 paper, you can use colored material. To make an equilateral square, you need to connect the top side to the side. And then cut off the bottom.

We fold the resulting triangular blank in half, then smooth the corners.

In order for all edges and corners to be even, we outline points for further manufacturing. We unfold the triangle so that the square is folded only diagonally.
Now connect the top corner to the center of the base and iron the bend with your hand to mark the point.

To create the next point, bend the base to the first bend.

Then we connect the upper corner of the triangle with the previous inflection.

Now we need a ruler. We bend the triangle along the line that runs from the end of the upper segment to the center of the base. We do the same on the other side.

We fold the workpiece along the side lines. We carefully iron the bend lines.

Cut off the excess paper along the fold line.

As a result, we get a hexagonal blank, from which we will continue to make a snowflake.

Again, fold the workpiece along the lines and fold in half.

We need to draw some kind of pattern. To get started, use the finished version in the photo below, and after that you can experiment with the drawings.

Cut out the pattern.

Carefully unfold and we should get such a snowflake with 6 rays.
The main thing is to remember all the steps, and then the whole process will take you no more than one minute.
An easy way to cut out a paper snowflake for kids
Engage children for New Year's decoration premises. For them, this process will be exciting. Watch the video, how a girl makes a simple but beautiful snowflake in just a couple of minutes.
It is possible that the first couple of attempts will be unsuccessful, but then you will not notice how you have been manufacturing for a long time Christmas snowflakes.
Turn on your creative imagination and come up with original crafts along with their children.
Good day to all!
The most wonderful holiday – New Year. Many are preparing for it for a month. Say something too early? However, it is never too early to acquire jewelry, and even vice versa. Especially if you decide to make some decorations with your own hands, for example. What can be interesting to do. First of all, it is, of course, snowflakes. What are we making them from? From paper.
In this article we will try to make paper snowflakes, as well.
It is quite easy to make snowflakes out of paper. You need paper and scissors. We take paper, fold it several times to make a triangle. Like this:

Now it remains only to cut out the patterns. Draw the desired pattern along the edges of the triangle and cut it out. After that, we unfold the paper and get a beautiful patterned snowflake.

From what pattern you draw, this will be the snowflake. There is no limit to the imagination here. You can cut, for example, such a snowflake:

Or like this one:

In addition to ordinary snowflakes, you can make a three-dimensional one. Here the production scheme is somewhat different.

If we make a snowflake of six rays, we will need six sheets of paper, if we make an eight-ray snowflake - eight, etc. On each sheet of paper, cut out a square measuring 10x10 cm or more. The larger the size of the sides of the square of the blank, the larger the snowflake itself will be, respectively. Now at some distance from each other we draw parallel lines to get several squares inside a sheet of paper. Approximately as in the diagram.

The next step is to take scissors and make cuts along the drawn lines (red). We do not cut it out, but we only cut it so that these squares are fixed from two opposite corners.

Next, take the central square (shown by an arrow in the figure) and fold its edges into a tube, towards the center. Glue the ends. Then we turn the sheet over and on the reverse side we do the same operation with another strip. Then we turn over and fold the tube again, and so as many times as you have drawn squares.

In the same way we make all the other blanks. After that, we fasten them together and, as a result, we get a snowflake.
We cut out snowflakes from paper according to patterns that can be printed
You can cut snowflakes not only by folding paper. You can pick up special templates, print, and then cut out your craft using them.

Another fairly simple option.

And this snowflake template is a little more complicated.

If you bend a sheet of paper, but have no idea what drawing to draw, what would it turn out beautiful pattern so here are some templates.

Or, for example, like this.

This template is a bit complicated, but the result is a beautiful snowflake.


Several templates at once, some of them are simple, some are somewhat more complicated. However, patience and perseverance will help create a masterpiece. And, of course, children, how to cut snowflakes without them.

And a few more templates

Also beautiful, even somewhat openwork patterns.

Here are some great templates you can use.
Schemes for cutting beautiful snowflakes
In this section, you can see some patterns for making snowflakes, according to which you can cut out beautiful crafts.
According to this scheme, you can cut a snowflake, following the step-by-step drawings.

And here is another selection of schemes from several beautiful patterns.

According to this scheme, you can cut several different snowflakes.

Another example is how to fold a sheet of paper and cut out a snowflake.

This diagram shows how to cut out unnecessary parts of the paper (shown in color) to get a beautiful pattern.

Variant of the snowflake scheme with hearts.

And look at this diagram, quite interesting and original drawings.

And according to this scheme, we make a snowflake not only from a square sheet of paper, but also a round one.

Here are some wonderful schemes to choose for manufacturing.
Simple snowflake patterns for beginners in origami technique
Origami is the manufacture of paper crafts without cutting. Snowflakes can also be made using this technique. Here are some diagrams.

In this version, scissors are used, but only to make cuts.

You can make such a snowflake out of paper:

To do this, use the following diagram:

In this version, you make a snowflake from prepared modules.

Then from them we collect the snowflake itself.

Try another scheme by which you can fold a snowflake.

It was all snowflakes, shall we say, in 2-D format. But voluminous snowflakes are also popular.
How to make voluminous paper snowflakes with your own hands step by step video master class
Volumetric snowflakes look, of course, more beautiful and original. And if you make them big size, then they will look quite impressive.
And here, watch the video, which clearly tells about the manufacture of such a snowflake:
And also in our new article!
We make snowflakes from paper strips with our own hands
Volumetric snowflakes can be made using colored strips of paper. For example, you can do something like this:

For this we take colored paper(colors can be any, to choose from). We cut strips 29 cm long and 0.5 cm wide. We cut about 20 strips.
Now we put strips in the form of a cross, 4-5 pieces, alternating colors. We put them intertwining with each other.

First, we glue the most extreme strips with each other (they are yellow in the figure) we should get something like an auto-decoupling on the map.


The remaining strips (white in the figure) are glued to the corners of the opposite yellow petals. As a result, we get a snowflake, as in the sample at the very beginning of the description.
An easy way to make 3D snowflakes step by step
Volumetric, or 3-D snowflakes look a little better than simple ones. Let's try to do this.

Take a square sheet of paper and fold it several times until you get a triangle. You need to make six such triangles. And they should all be the same. Now, on each triangle we draw parallel lines at a distance of about 1 cm. The number of such lines depends on the size of the triangle and there can be three or more of them. Now we cut through these strips from one edge to the other, but, of course, not to the very end.

Expand the triangle back into a square and central part fold and glue.

We turn the square over with the other side and glue the next notched square in the same way.

Flip and repeat. And so on until we glue all the cut strips. A similar procedure is carried out with all blanks. After that, we fasten together first three figures, then the remaining three.
As a result, we get such a snowflake.

or such.

Its size depends on the paper size. This craft requires a little more time and more painstaking work compared to simple snowflakes. But the result is worth it.
Quilling snowflake master class for beginners (video)
Quilling is a technique for making paper crafts that are cut into strips and rolled. After that, all these twisted blanks are connected and we get the intended craft. For example, such wonderful snowflakes.

How to make snowflakes using quilling technique, see this video
So, we looked at various ways to create New Year's snowflakes. Choose, craft and decorate your homes. Good luck!
There are various variations of creating paper snowflakes, and for the New Year, all the best is required. That is why we have prepared for you the most original ideas and techniques for creating paper snowflakes with your own hands.
To make a classic simple snowflake you need to fold a sheet of paper according to the scheme, then draw a pattern, cut it out and unfold it finished snowflake. Follow step by step photo instructions and you will get original snowflakes.
Scheme
shiny snowflake
You will need: shiny cardboard in blue and purple, a stationery knife, glue gun, ruler, simple pencil, toothpick.
Master Class

A shiny volumetric snowflake is ready!
exquisite snowflake
You will need: 6 blue square sheets, 6 white square sheets, blue paper circle, pva glue, rhinestone.
Master Class

Exquisite voluminous paper snowflake is ready! I recommend watching this video!
Snowflakes ballerina
You will need: white cardboard, white paper, scissors, transparent fishing line or white thread, needle, simple pencil, compass or saucer.
Master Class
- Choose your favorite ballerina templates.

- Print or redraw them.
- Cut them out.
- Circle the patterns of ballerinas on cardboard.
- Cut them out.
- Make a small hole with a needle in each ballerina's head.
- Make a tutu skirt this way: take a piece of paper, draw an even circle and cut it out.

- Fold the circle in half 3 times.
- Choose a pattern and cut out a snowflake.
- Cut a circle in the center of the snowflake.
- Dress a snowflake skirt on a ballerina.

- Pass the fishing line or thread through the hole in the ballerina's head.

- Hang decoration.
beautiful snowflake
You will need: 2 square sheets of blue paper, scissors, glue stick, pencil, rhinestone.
Master Class
- Fold the square sheet diagonally.
- Fold twice more.
- Draw 3 lines for the cuts. Do not cut all the way through at the fold, as this is the center of the snowflake.

- Cut along the lines.
- Make triangular cuts at the bottom of the workpiece.
- Expand the workpiece.

- Bend and glue the middle stripes of each ray in the center.
- Make the second blank in the same way.

- Glue the blanks together so that the rays are staggered.
- Glue a rhinestone in the center.
A beautiful voluminous paper snowflake is ready! I recommend watching this video!
3D snowflake with Christmas trees
You will need: 6 sheets Green colour size 8x8 cm, scissors, simple pencil, glue stick, rhinestone.
Master Class

original snowflake
You will need: 2 sheets yellow paper A4 format, scissors, a simple pencil, white threads, glue stick.
Master Class

The original voluminous paper snowflake is ready!
You will need: 2 sheets of colored paper, scissors, glue stick.
Master Class

Snowflake in kirigami technique
kirigami is the art of making paper figures using scissors. Consider step by step master class. Using his example, you can create snowflakes of any shape, size and various patterns.
Master Class

The kirigami snowflake is ready! We present to your attention the patterns of patterns for kirigami.
Snowflake in origami technique
Origami is the art of paper folding. No wonder it's called art. To make such a snowflake you need time, patience, perseverance, understanding and attentiveness. Learn the manufacturing process and only then get to work. IN this master class only the preparatory part is described, and the main part is in the video lesson.
Master Class

Modular origami is considered more difficult than ordinary origami. Fold the first module according to the photo scheme, make them great amount and proceed to the assembly according to the photo master class. Creating such a masterpiece requires a lot of time and patience. There are also huge advantages - you develop fine motor skills hands and you can surprise others with such a chic snowflake.
Master Class
- Start assembly from the middle by forming the center of 12 modules.
- Insert the edges of the module into the pocket of the other modules.
- Attach the modules in a checkerboard pattern from one edge, a chain of two fastened rows should form - the outer row of 6 modules, and the outer 5.
- Unscrew the remaining module and connect the ends of the chain with it, forming a ring.
- Increase the length of the beams by attaching modules.
- Add a module of a different color to each beam and continue building with the main one.
- Add modules until the snowflake is the desired size.
Snowflake in technology modular origami ready! I recommend watching this video!
Snowflake in quilling technique
quilling is the art of creating compositions from twisted strips of paper. The basics of quilling are described. We present to your attention the most a simple circuit to create a snowflake using the quilling technique.
You will need: cardboard, corrugated paper, wooden skewer or pencil, scissors, glue.
Master Class
- Cut out a regular hexagonal snowflake from cardboard.
- cut into corrugated paper into squares.
- Twist the squares using a skewer.
- Glue over the snowflake, placing the blanks - tightly to each other.
Volumetric snowflake from components


