How to make a snowflake craft for the new year. Fancy DIY snowflakes
Many have already learned how to make paper snowflakes.
Such snowflakes can decorate windows, a house and a Christmas tree, while snowflakes can be the most different colors and sizes.
But there are difficult snowflakes that look very beautiful and are made a little differently.
Some of these original snowflakes are not easy to make, but if you succeed, you will see that your efforts were not in vain, as complex snowflakes are sometimes very beautiful and unusual.
Unusual snowflakes for the New Year: a simple volumetric snowflake

You will need:
Paper of any color
Scissors
Glue (if necessary)
stapler.
1. Prepare 6 paper squares.
* If the snowflake is small, use plain paper, and if it is large, use thick paper or cardboard.

2. Each square must be folded in half diagonally.
3. Put the resulting triangle in front of you, draw the stripes with a pencil and a ruler as shown in the image (not reaching the fold) and make a few cuts along the lines.
4. Lay out the square and bend the first row of strips into tubes. You can fix them with glue or a stapler.
5. Turn over the square and fold the second row.
6. Repeat this process (remembering to rotate the square) until all strips are folded into tubes.
7. Repeat steps 3-6 for the rest of the squares.
8. Using a stapler, first connect 3 blanks into one half of a three-dimensional snowflake, and then 3 more. After that, connect both halves. You need to connect in places where the workpieces are in contact.
* Stripes can be made wavy, then the snowflake will turn out even more original.
Making a three-dimensional snowflake (video)
How else can you make a 3D snowflake (video)
Unusual paper snowflakes

You will need:
white or colored paper
stapler
Double sided tape or glue
Scissors.
1. Take a sheet of paper and start folding it like an accordion. If after the last fold there is a little sheet left, cut off an unnecessary piece.

2. Staple the paper accordion in the center with a stapler.

3. Draw a simple pattern on the harmonica and cut it out with scissors.

4. Open your harmonica and join the ends with double-sided tape, creating half a snowflake.

5. Repeat the whole process to create the second half and connect both parts into one beautiful snowflake using double-sided tape or glue.

Unusual do-it-yourself snowflakes for the New Year: snowflakes in the form of characters from the movie "Star Wars"
Here you will find the necessary templates for snowflakes Star Wars.

You will need:
Printer
Scissors
Stationery knife
Print them out, cut out a circle, fold (preferably with an accordion) and cut out the gray area from the snowflake (you can use a clerical knife).
The entire set of Star Wars themed snowflakes can be found .


How to create an unusual snowflake (video instruction):
Unusual do-it-yourself paper snowflakes: spirograph snowflake

What does the drawn diagram mean:
- - - (dash-dash-dash) bend the ends of the paper up. It's called the fold of the valley.

- . - (dash-dot-dash) bend the ends of the paper down. It's called a mountain bend.

You will need:
square sheet of paper
Scissors
Protractor
Pencil.
* The paper must be either very thin or large format as it will need to be folded many times.
1. Fold in half diagonally to make a triangle.


2. Fold the triangle in half again.

3. Rotate the shape 45 degrees (see image).
4. Use a protractor to make marks every 18 degrees.

5. Starting on the open side, fold the top layer along the markings, maneuvering between the mountain fold and the valley fold. Should be an accordion.


6. Turn the figure over so that the harmonica is on the bottom. Fold the end of the figure in the same way as in step 5, using the already folded accordion as a template.


7. Press down the entire structure well.

8. Use scissors to cut off the top and some of the bottom of the folded harmonica.


9. Cut off a small triangle as shown in the picture.


10. Expand the shape and you should have a very unusual and beautiful snowflake.

Complicated snowflakes with Doctor Who characters

You will need:
Pencil and eraser
Scissors
Stationery knife.
1. Take a square piece of paper and fold it in half diagonally. Next, fold the resulting triangle again and then again.


2. Draw one of the suggested patterns on the side and carefully cut it out.


* Use a utility knife to cut out the inner parts of the workpiece.

* Since everything that will be drawn will be mirrored on the other side of the paper, it is worth drawing only half of the drawing (half of the face or building).
* Cutting small parts is not easy, so be patient and carefully cut out the paper with a utility knife or scalpel.

A few more options:


Hello ladies and gentlemen. I want to ask you to read and solve the riddle:
There are no two alike in the world,
But each one is like light fluff.
In winter, everything is in them - fields, paths
What is it dear friend...
That's right, snowflakes! This phenomenon of nature probably rejoices every person on earth, and especially children. And not only because they can be caught with the tongue and tasted). And also due to the fact that these graceful beauties are a bright attribute of the New Year holiday. After all, it is they who create the New Year's atmosphere in the house, after of course.
Moreover, snowflakes are different: flat, voluminous, carved and even knitted. Today I propose to analyze in detail the methods of their manufacture, not only, but also from other materials. And if you want to turn your home into a real snow kingdom, then you have definitely come to the right place.
So, let's recreate a fabulously magical and festive atmosphere live with the help of graceful snowflakes. Prepare materials and your pens, we will needlework!
By the way, from beautiful snowflakes you can then make a creative New Year's craft.
Many people believe that these products are created only from paper. But it's not. Although at the very beginning we will just consider this most popular manufacturing method.
And of course, when it comes to such crafts, the first thing that comes to mind is cutting paper snowflakes.
In order to properly cut a snowflake, you need to take a white sheet of paper or napkins and fold it into a triangle. Then draw a pattern on the triangle. After it is cut out, and the paper unfolds. And the result is a carved beauty.

Keep in mind that not everyone can succeed the first time. After all, work requires concentration. So first practice simple options carvings, not so carved, and only then, when you fill your hand, move on to complex ones.
And now I will teach you how to make a standard snowflake.

You will need: paper, scissors.
Manufacturing process:
1. Take an A4 sheet and cut a square out of it. To do this, bend the corner of the paper and pull it to the opposite edge, bend it. Then cut off the extra piece.

2. Fold the triangle that you get in half and place it with the top up.

3. Now take the left edge of the triangle and pull it a little further than the middle. Then, overlap the right edge.

4. Turn the workpiece over and cut the lower part at the level of the strip.

5. Draw a stencil pattern.

6. Carefully cut out the pattern and unfold the product.

As you understand, in order to properly cut a snowflake out of paper, you need to prepare the base and come up with or find (print) a template for cutting. Then translate the selected pattern and cut it out. Special difficulties should not arise. The only thing is, if you are tight with imagination, you will have to look for stencils. Although in this article I will kindly provide them for you. Look for templates below!
By the way, in addition to plain paper, you can use colored, corrugated, as well as unnecessary newspapers and brochures.
And I want to show the second way to cut products for New Year's decor.

You will need: White paper; scissors; stapler; pencil.
Manufacturing process:
1. Cut a sheet of A4 paper in half lengthwise.

2. Then fold each half of the paper into an accordion shape.

3. Connect the resulting accordions in the middle with a thread or a stapler.

4. Now draw any simple pattern on the side of the accordion and cut it out along the contour.
5. Straighten the resulting workpiece and glue its ends. Your craft is ready.

There is also a third way. But it's about volumetric decoration. This is a separate issue. And I will reveal this question in a phased master class, but a little later. In the meantime, just enjoy this art.

If you have very young children, and if they really want to take part in the creation of paper beauties, then for them there is a simple option for cutting and making.
All that is required of them is to cut out paper strips and glue them with an asterisk. And then decorate each strip with felt-tip pens, paints, stickers, sparkles, etc.

This is such a simple but great idea!
Beaded snowflakes: schemes + step-by-step master class
Now it's time to offer you options for making patterned beauties not only from paper, but also from other materials. For example, from beads.
I'll show you how to weave simple snowflake from beads.
You will need: thin wire; large beads golden color; small beads of golden color; red beads with tubes (glass beads); round nose pliers, wire cutters.
Manufacturing process:
1. Measure and bite off the desired piece of wire (30-40 cm).
2. String 6 large beads to the middle and close into a ring. Now you can twist the wire, or you can simply stretch the ends into opposite beads.
4. Return the working tip of the wire to the second red bead, making a loop around the second small one. You will get the end of the branch.
5. Bring the working end between the first red and the first small bead to the side.
6. String again a small golden bead, a red bugle, a small golden bead and return the end to the middle of the resulting triangle.

7. Repeat steps 3-6.
8. String small, red, small beads and return the end to the very beginning of the branch between large beads.
9. Draw the working end of the wire inside a large bead and bring it out between this bead and the next one.
10. Repeat steps 3-9, weave all the rays of the product, working first with one part of the wire, then with the other.
11. Twist the ends of the wire, cut them off and thread the remaining ends into large beads. Your beaded jewelry is ready.
Also weave christmas decor on a Christmas tree or to decorate doors, walls (for example, you can make a whole garland) you can not only use wire, but also fishing line or ordinary threads.
For such work you will need: small round beads of white and blue colors; silver glass beads; fishing line; scissors; needle.
Manufacturing process:
1. Start weaving from the middle of the product and lead the whole process with one long end of the fishing line in a circle.
2. When you string all the rays according to the scheme and the fishing line returns to the beginning, tie the ends in a knot, cut off the excess and hide the antennae in beads.

Once you master the beading technique, it will not be difficult for you to make many beaded snowflakes. However, in order to weave them, you will need schemes. So I found them in advance and now I'm posting them for you. Save, print and weave to your health. 🙂


Volumetric paper snowflakes for the New Year
It's time to show you the option of creating three-dimensional, so-called 3D snowflakes. They are made from paper. Moreover, it is better if it is not white, but colored paper for printing on a printer. She is denser. Or you can even combine several colors at once.
Ready to go? Then let's get started!

You will need: white and blue paper; scissors; ruler; glue stick; decoration elements (sequins, beads, flowers).
Manufacturing process:
1. First cut 5 long white strips. Then 10 medium blue stripes and 10 smaller white stripes.
2. Glue the ends of the strips.
3. Now assemble part of the snowflake from 5 strips as shown in the photo.

4. Assemble the entire product from 5 parts.
5. Well, at the very end, glue any decoration in the center.

You will need: 2 square sheets of blue paper; scissors; glue stick; simple pencil; rhinestone.
Manufacturing process:
1. Take a square sheet and fold it diagonally.
2. Then fold twice more.

3. Now draw three lines (cuts will go along them). Do not cut all the way through at the fold, as this is the center.
4. Cut along the lines.
5. Now make triangular cuts at the bottom of the workpiece.
6. Expand the product.

7. Now bend and glue the middle stripes of each ray in the center.
8. Then make a second exactly the same blank.
9. Glue the two blanks together so that the rays are staggered. Glue a rhinestone in the center.
Also volumetric snowflake can be obtained using the origami technique. I also show such manufacturing technology.

You will need: 6 blue square sheets; 6 white square sheets; blue paper circle; PVA glue; rhinestone.
Manufacturing process:
1. Fold a sheet of blue paper diagonally.
2. Then unfold the square and fold the sides to the center fold.

4. Bend the sides towards the center to form a diamond shape.
5. Turn the workpiece over to the other side again.
6. Now bend the top layers to the sides.

7. You need to stack 5 more blue pieces in exactly the same way.
8. Take a white sheet of paper and fold it diagonally on both sides, then unfold it.
9. Bend the corners of the square to the center and turn over to the other side.

10. Bend the sides to the center.
11. Unscrew the side holes from the reverse side of the module.
12. Bend the sides to the center.
13. In the same way, fold 5 more white modules.

14. After making all the modules, glue 2 blue modules on the circle opposite each other.
15. Then glue 4 blue modules.
17. The final touch is gluing a rhinestone to the center.
If you do not have much time, then try to make a New Year's beauty in just 2 minutes! Watch the video plot and repeat the technology. The craft is made from white paper bags without a handle.
Crocheted snowflakes. Step-by-step instruction:
If, on the contrary, you have a lot of time and want to make creative decorations that no one else has, then simply tie the decorations. Knitted work is perfect for decorating a Christmas tree.

You will need: hook, thread.

Manufacturing process:


If you are not new to this business, then it will be very easy for you to understand the diagrams and tie the product.
So catch ready-made ideas for crochet.


AND conventions for the above diagrams.

Also, do not forget after knitting patterned snowflakes with cotton threads, give them a shape. Let me tell you about one such way.
You will need: potato starch 2-3 tbsp. spoons; hot water 1 glass.
Actions:
1. Pour starch with a small amount of water and stir it.

2. Then add boiling water in a thin stream, while stirring the mixture continuously.
3. The solution is ready. Put in it knitted decoration and leave for a while.
4. Then wring out and straighten the product well on a flat surface with pins. Wait for complete drying.

5. After drying, the product will keep its shape perfectly.
How to make a snowflake for a competition in kindergarten and school
Now that we have reviewed the most popular DIY snowflake making methods, it's time to look at the ready-made options and choose among them those that our children can make. After all, no one has canceled winter competitions in children's institutions!
And we will get acquainted with very interesting and completely different technologies.
Variant of volumetric decor.

And here is a cool idea for making a winter beauty from children's hands.

How do you like this creative approach? Painted and assembled pasta!

Or help your child cut out a styrofoam snowflake.

Or maybe you glue it from feathers?

Or just mold from plasticine. Toddlers will love this art.

And you can assemble the product from ordinary wooden clothespins, and then glue sparkles on them. And the holiday decor is ready.

Or connect the buttons together. Well, why not decorate the Christmas tree.

You can also use cones.

Don't forget about salty dough. You can mold anything from it, and then paint it with any paint.

Another snowflake can be made from wire and salt. It turns out like a real one!

Can buy stained glass paints. By the way, such an ornament made of this material is great for decoration.

Oh, and don't forget the toilet sleeves.

Also use the quilling technique. I'm sure the students will be up to the challenge.

Again, take into account the origami technique. Bright things come out.

What do you think of the ice cream stick idea? I think it's great!

Or cut strips out of paper and twist them. Simple and beautiful!

If you are overwhelmed plastic bottles, then cut off the bottom and draw a pattern. Your craft is ready to participate in the competition.

Variants of stitched snowflakes. In this case, the material is felt.

Well, everyone's favorite cotton buds. They are just perfect for such crafts.

And I want to show sewn work from felt. It is done easily and simply, I think according to the photo schemes and mine brief description you will be more than clear.

You will need: white and colored felt; needle and thread; scissors, hole punch.

For one snowflake, use: 2 white circles and one colored circle + felt strip or ribbon for hanging.
Manufacturing process:
1. Cut out circles of the same size from felt. On the white circles, draw lines as shown in the photo. Poke a hole in the middle with a hole punch. Cut the lines according to the pattern.


3. Connect all the details and sew together beautifully.

As you can see, there is a large variety of carved beauties. And any material can be used. So for the competition, you will definitely do something with your children and you will surely receive an award.
Do-it-yourself Christmas snowflakes from paper for windows and a Christmas tree (cutting patterns inside)
Well, I'm coming to the end and in conclusion I want to say this about. No matter how bright and original snowflakes are made of beads, threads and other things, the most popular and fastest way to make them is paper cutting.
Therefore, I pumped up schemes and templates. Save, print and cut to your heart's content. And decorate your home!


That's all for me! And remember that it is better to make snowflakes in advance and decorate your home with them, because this way a festive mood and a magical atmosphere will soar in the air! With coming!
There are only a couple of weeks left before the New Year, which means that it's time to think about how you will decorate your house. If you think that a Christmas tree and festive garlands will be enough, then you are deeply mistaken. The forest beauty can become a decoration of the living room, but in all other rooms you can feel the festive mood. will not be.
If you want to recreate the New Year's atmosphere in every corner of your house, then do not be lazy and decorate everything around with New Year's attributes. Volumetric snowflakes made of paper are best suited for this. And although such decor at first glance seems very simple, it is he who can turn your home into a fabulous snow kingdom.
Therefore, find some free time in your busy work schedule, stock up on white paper and scissors and start creating a New Year's fairy tale for yourself and your family.
How to make a 3D 3D paper snowflake for the New Year?
Volumetric snowflake 3DIf you want to really surprise your household, then decorate your house with 3D volumetric snowflakes. Such a craft, depending on the size, can be placed on a Christmas tree, a window, a wall, or even on furniture. A garland made from such a man-made decor will look very beautiful.
Try to make snowflakes of different sizes and fasten them on a thread so that they are all at different levels. If you are not too lazy and make several of these garlands, you can make an imitation of snowfall in some room.
Materials for making volumetric 3D snowflakes:
- White paper (you can use any other color if you want)
- Stationery stapler
- Paper scissors
- Ruler and pencil
- Any glue
 Figure #1
 - First of all, start making a stencil, with the help of which in the future you will be able to make separate blanks for the future decoration. To do this, take a thick sheet of paper (you can even use cardboard) and draw six straight lines on it at right angles. Make sure that they are placed on the sheet parallel to each other and do not intersect anywhere. Draw them at a distance of 1 centimeter from each other.

 Figure #2
 - After that, take six sheets of the same size (square shape), fold each of them separately diagonally and, using a pre-made stencil, cut three cuts into them. If you did everything right, then you should have six isosceles triangles with parallel cuts on your table.
 Drawing No. 3
 - Take one of the blanks and carefully unfold it. On the table in front of you should be a square, consisting of several smaller squares. The corners of the smallest square (it is located in the very center of the workpiece) must be carefully tucked to the center and fastened with glue.
 Drawing No. 4
 - After that, the sheet must be turned over to the next side and in the same way fix the free corners of the next square. It is necessary to continue such actions until you get a semblance of a multi-layer icicle. Thus, it is necessary to glue all the remaining five parts.

 Drawing No. 5
 - Next, take the finished icicles and carefully fasten them together with a stapler. We do this in two stages. First, we fasten three icicles into one. Then, with the same stapler, we fix the two formed halves together. Do everything as carefully as possible, but at the same time do not spare the brackets, if you fix them poorly, then the finished product will simply fall apart.
Do-it-yourself voluminous paper snowflakes: step by step instructions

 Step-by-step instruction
Volumetric snowflakes always look very beautiful, but unfortunately, it takes a lot of time to make them. In view of this, if you want to decorate your home for the New Year with just such a festive entourage, then try to make a simpler version of the volumetric decoration. It will have a slightly different forum, but most importantly, you will spend a minimum of your time making it.
Materials:
- Sheets of paper
- Thread and needle
- Compass
- Pencil and ruler
- Red or yellow fabric
Manufacturing rules:
- Take a sheet of paper and draw four circles of the same diameter on it. For the manufacture of small snowflakes, a diameter of 5 centimeters will be enough, and for creating larger products, this figure can even increase to 10 centimeters.
- Carefully cut out the drawn circles with scissors, and then, using a ruler and a pencil, divide each circle individually into eight equal parts. Along these lines, the workpiece will need to be cut with scissors from the edge to the center.
- Then the ends of the formed petals must be carefully bent to the center and fixed together with glue. If you can't get the petal to fit properly, try helping yourself with a simple pencil.
- So make three more of these paper flower, and then start fixing all the blanks together. This can be done with glue, or you can take a thread with a needle and simply sew all the parts of the snowflake together.
- In order for such a snowflake to look complete, be sure to cut a small circle out of the fabric and attach it in the very center of the product. If you wish, you can decorate it a little with sparkles and small sequins.
Types of volumetric snowflakes - origami: photo
 Volumetric snowflake
  two color origami
 - For many of us, origami is associated with something very complex and incomprehensible. But in fact, this technique just requires a little more concentration than any other man-made process. Therefore, if you show just a little bit of patience, you will surely be able to make voluminous snowflakes in this way. But even in this case, there are several methods for creating Christmas decorations.

 Snowflake origami
 - The first type includes the usual origami, which involves folding paper sheets in a certain order, after which a three-dimensional product with a 3D effect is obtained. In this case, you do not have to glue and fix anything. All that will be required of you to create decorations is just to fold the sheet correctly.

 Snowflake Karigami
 The second and more complex type of this technique is the so-called karigami. In this case, the process involves both the correct folding of the sheet and the most accurate cutting of the pattern. If you are making such an origami snowflake for the first time, then it will be better if you first draw the future pattern and only then start cutting it out.
You can do this with both standard scissors and manicure scissors. The latter option is preferable for beginners, as they will make it possible to correctly cut through the most intricate pattern. After cutting, you just have to bend some parts and the voluminous karigami snowflake will be ready.
 Modular snowflake
 Modular snowflake elements
 - The last way to create snowflakes is the most difficult, but the finished decorations are truly fabulous. This species is also called modular origami. In this case, you will first have to make quite a few different small parts, and then put them together in the correct order. The downside of this origami method is that if you make the smallest mistake during the connection process, then this will spoil the visual perception of the decoration quite a lot.
Volumetric snowflakes from strips of paper: schemes

 Volumetric snowflake in the form of a star
 If you want to get the most voluminous snowflake, then make it from paper strips. In this case, you will be able to independently regulate how much one or another part of the product will protrude, but most importantly, you will not have to constantly monitor how you bend or draw lines.
To create this decoration, you will need scissors, glue and thin strips of paper of any color. If you want to make the most airy snowflake, then use strips 3 to 5 millimeters wide to make it. If you plan to decorate the house with large voluminous snowflakes, then cut strips from 8 millimeters wide.

 Scheme No. 1
 Volumetric snowflakes from stripes:
- So, first of all, we take a sheet of paper and cut off five strips of the same width from it. The length of these blanks will be different. In order to make one part of the snowflake you will need 1 strip 25 cm long, 2 strips 21 cm long and two strips 19 cm long.
- At the next stage, we coat the ends of the blanks with glue and carefully fasten them. We let the petals dry a little, and then we begin to form a voluminous leaf out of them. Be sure to check whether all the parts are well fixed together and, if necessary, then additionally fix them with a thread or an ordinary clothespin.
- Thus, we make at least eight more paper sheets. If you want the finished product to be more voluminous, then make 10 or 12 leaves. Let the blanks dry well and start assembling the product.
- Cut a 1 cm wide strip of thick paper and glue it into a circle. All previously made blanks must be carefully attached to this circle. If you see that the design is not very strong, then first try to glue the leaves themselves together and only then fix them on the core.
The next way to create a three-dimensional snowflake is considered quite complicated, but still, if you decide to make an ornament using this method, you will be satisfied with the result (scheme No. 2). To create a medium-sized decoration, you will need 6 strips 25 cm long, glue and paper clips.

 Scheme No. 2
 So:
- At the first stage, we begin to weave the strips together so that a square forms in the center. We fix each strip with glue or a paper clip.
- At the second stage, we begin to connect strips that are closely spaced to each other. To do this, first grease their ends with glue, and then carefully fasten them together. After these steps, you should get some kind of leaf.
- We form the three remaining parts of the blank in this way and proceed to the creation of another such part of the snowflake. After it is ready, you just have to put them together in such a way that visually your product resembles a flower. After the glue dries, the paper clips can be removed and the snowflake can be hung on the Christmas tree or attached to the window.
Beautiful volumetric snowflakes - balls: schemes, photos

 Photo #1
 Photo #2
 A little lower we will tell you how to make a Christmas snowflake ball out of colored paper. If you want it to look more like a snowflake familiar to us, then before you start gluing all the parts of the product together, cut an interesting pattern on them. This will help make the decoration lighter, airier and more festive.
 Figure #1
 - Take paper of any color and draw 12 circles on it. In order for your Christmas decoration turned out perfect they should all have the same diameter.
 Drawing No. 2
 - Bend all the blanks in half and fold them into one neat pile. If you use multi-colored paper to create a snowflake ball, then do not forget that the colors must be alternated.
- Put this blank for a while under something heavy and leave it there for 10-15 minutes. During this time, the inflection line of the circles will become very noticeable, and you will be able to properly fix them together.
 Drawing No. 3
 - To do this, gently straighten the workpiece, and then use a stapler to connect all twelve parts together. Make sure that the staples are located exactly on the fold line.

 Drawing No. 4
 - When you're done with this process, you can move on to creating the form. Straighten the circles and start using glue to glue them together. It is necessary to connect them in such a way that each individual half of the circle, on one side, is on top, and on the opposite side, on the bottom, is attached to the adjacent part of the product.
Large voluminous paper snowflakes: templates
 Template #1
  Template #2
Today we have already introduced you to the most common ways to create voluminous New Year's snowflakes. And as you probably already understood, if desired, even a child can make this beautiful Christmas decoration out of ordinary paper.
But in the end, we still decided to introduce you to another method of creating holiday decor. Below we will tell you how you can easily and quickly make a large voluminous snowflake.
 Scheme for manufacturing
 Snowflake accordion:
- To get started, take paper and cut strips of the same width from it. Their width can vary from 7 to 15 centimeters.
- Fold the blanks in half, and then draw the outline of the future ornament on them. Take scissors (you can use nail scissors) and carefully cut through the pattern.
- If you chose not very thick paper for making a snowflake, then you can fold two parts at once and cut them together.
- Then fold each part separately with an accordion. Make sure that all segments of the workpiece have the same size. If at least one of them is larger or smaller than necessary, then you simply cannot glue the two parts together.
- When the accordions are ready, coat their edges with glue, fasten them and wait for them to dry completely. After that, take a snowflake and straighten it with smooth movements.
If you want the Christmas decoration to be brighter, then use paper of different colors to make it. For example, combine White color with blue, pink, peach or mint. Also, if you wish, you can glue a few small beads or bright glass pieces on the snowflake.
Video: Do-it-yourself volumetric snowflake
What is New Year without snow and snowflakes? But if suddenly the weather failed, and the snow did not fall, then good mood You can make your own with paper snowflakes. DIY snowflakes- a traditional decoration for the New Year's interior during the winter holidays.
Necessary tools and materials:
- 2 sheets of A4 white office paper
- scissors,
- white threads
Procedure:
- The ballerina's skirt is made of plain paper in the form of a snowflake. To do this, take an A4 sheet and fold any one corner so that you get a square. Cut off the rest
- Then fold the square in half to make a triangle.
- Now fold the right corner in half so that the tip of the corner extends beyond the edge of the sheet.
- Fold the left corner in the same way and fold in half again.
- Draw patterns for the future snowflake with a pencil
- Cut out the drawn patterns
- A beautiful snowflake for a ballerina's skirt is ready
- Print out the template and cut out the ballerina figurine.
- Insert the ballerina figure into the center of the snowflake. Straighten your skirt. Snowflake ballerina is ready.

Volumetric paper snowflakes from Tifani Lyn will create a special fabulous charm in your home.

To create these snowflakes you will need:
- Old book,
- glue gun,
- fishing line or thread
- glitter paint or glue
- acrylic lacquer.
From book sheets cut out strips about 2 cm wide.

In total, you need to cut 140 strips. We cut the first 20 strips along the length of the page, cut the next 40 by 1 cm, cut the next 40 by 2 cm, and cut the last 40 by 3 cm.

Now fold each petal using 5 strips of each size. The longest strips, for the central beam of the snowflake, are taken once, the rest twice (once on each side).

We glue and place under the press for gluing.

For reliability, you can temporarily tie the tip of the petal.

In addition, we cut out more strips for the central part of the future snowflake. We also glue this ring and fix it for the successful setting of the glue.

When the petals are glued glue gun processing the end face of the workpiece.


Then glue the petal blank to the central ring.

Thus, we glue four petals, gluing them so that we get a cross.

Then glue the remaining petals. This method allows you to glue all the blanks symmetrically.

Then we glue the petals together so that the snowflake does not fall apart.

Decorate the snowflake with sparkles.

Your snowflake is ready! Let's hang it on the tree!

- 8 strips of paper (1 cm wide x approx 11 cm long)
- toothpick
Sequencing:
- Fold each strip of paper so that one end is about 2 cm longer than the other
- Twist the ends of the strips with a toothpick
- Glue the strips of paper first in pairs, and then all 4 pairs together. you will succeed beautiful quilling snowflake
- You can attach a silver thread to it and hang it on the Christmas tree as an original New Year's decoration.

To make a quilling snowflake, cut thick paper into strips. Using a ballpoint pen or a knitting needle, twist each strip of paper into a tight spiral. Let the paper unwind a little, then glue the ring. You can fasten the ring with a paper clip while the glue dries.
You can slightly squeeze the resulting spiral ring on one side, and then you will get a “droplet”. Or on both sides, then you get an "eye".
Make more blanks for future snowflakes using the quilling technique, then glue them together.

You can decorate your house for the New Year with the help of very beautiful snowflakes grown from a solution of borax crystals in water. You can buy borax at a pharmacy, hardware store, or supermarket in the laundry section.
Necessary tools and materials:
- special brushes for cleaning smoking pipes (sold in tobacco shops)
- food coloring (optional)
If you were unable to buy pipe cleaners, you can replace them with wire wrapped in thick woolen thread.

Sequencing:
- First you need to get a supersaturated solution of borax in water. For this in hot water Gradually, stirring, add borax. The approximate proportion is 3 full tablespoons per glass of water. Only having achieved complete dissolution of the last portion, add the next. Borax should be added so much that the water becomes cloudy, almost opaque. As you add, if you clearly see undissolved borax crystals in water, you should not add more: undissolved crystals in the mixture will play the role of a “distracting” element, and the crystals will begin to grow around these particles, and not around your snowflake. Therefore, it is better to strain the solution.
- Pour the mixture into a glass beaker, bowl, jar or pitcher (depending on the size of the crystal you want to grow). Glass containers must have a sufficiently wide mouth.
- Make a snowflake out of a pipe brush. Tie a rope to it or attach a wire. Wind the other end of the rope (wire) around a pencil (stick) 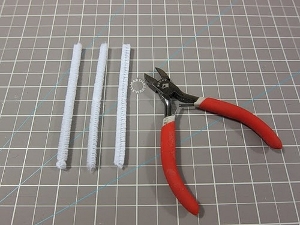

- Immerse the snowflake in the borax solution 
- Place a container with a suspended structure where no one will disturb all this for a long time. In about a day, the snowflake will be ready! 
1. If you want to get colored snowflakes, add dye to the borax solution, or use colored brushes to clean smoking pipes. 
2. The borax solution can be reused by preheating in the microwave. But the crystallization process will take a little longer.
3. If borax starts to crystallize when you pour the mixture from the pot into a glass container, try preheating the container with clean, hot water.
4. Keep borax and borax crystals out of the hands of small children! If you swallow borax in enough large quantities it becomes toxic to the body. All materials that have come into contact with borax must be thoroughly rinsed. Materials contaminated with borax should not be used for cooking and eating.
5. Growing a crystal snowflake from borax is not only fun, but also a rewarding activity - an entertaining science experiment to grow crystals at home.

Necessary tools and materials:
- matches,
- cardboard,
- scissors,
- PVA glue,
- a little fantasy.
Sequencing:

- On paper, draw the silhouette of a snowflake.
- We burn matches from the side of the head.
- We lay out the drawing from the matches on cardboard, glue the matches.
18.09.2017 by baby-malavki
On New Year's Eve, most families try to decorate their home original crafts reproduced by hand. Therefore, they seek suitable ideas, which can be repeated from improvised items, looking at the step-by-step instructions.
That is why in today's article we decided to make the task of our readers easier by talking about the most important decor, directly related to winter and New Year's fairy tale- snowflakes. The following are examples of manufacturing various techniques and materials varying in complexity and size.
Paper snowflakes for the New Year 2018, 20 New Year ideas
Not only children, but also adults love to make paper crafts. Therefore, it is a good and simple idea to cut out small, medium and big snowflakes to decorate apartments and houses. They will serve as the basis for creating hanging garlands or become a beautiful decoration for window glass or curtains. Well, in order for the masterpiece to look skillful, it is important to print out the template in advance, prepare scissors and paper in white, silver, blue or gold.
The stencils suggested below can also be made by a child, as homework for kindergarten or labor lessons in primary school schools.


Snowflakes from pasta, a master class in the photo
In order to decorate a beautiful Christmas tree, it is not necessary to spend money on buying expensive Christmas decorations. Enough to turn on creative imagination to make with your own hands a masterpiece that no one else will have. For example, from the same pasta that is sold in any store in the cereal department.
- pasta of various shapes: horns, vermicelli, spiral, snails, fusilli, spaghetti, ravioli, farfalle, etc.;
- glue;
- fine or sea salt (you can also use glitter);
- acrylic paint.
Step-by-step instruction:
1) To make a snowflake from pasta, it is enough to connect all the elements on a flat surface so that it turns out beautiful work.
2) After all the elements are connected, they must be glued together so that the shape remains even and beautiful, as it was originally.
3) If the product is well glued, then it can be painted with white paint and sprinkled with sparkles to give them extra shine.
4) After drying, the finished product remains to be hung on a satin ribbon and hung on a green beauty - a Christmas tree.


New Year's snowflakes from toothpaste and brushes, a master class in the photo
A snowflake on the window will give any room an atmosphere of comfort and warmth. However, in order not to spoil the glass and after the holidays it is easy to wash it, it is better to use proven techniques, such as: vytynanki or toothpaste. But if the first allows you to reproduce even pictures, the second - exclusively individual objects, such as snowflakes.
Items needed for crafting:
- stationery scissors;
- A4 paper;
- a simple pencil or black pen;
- 1/2 sponge for washing dishes;
- toothpaste (you can use the cheapest);
- convenient plate;
- old toothbrush.
Step-by-step instruction:
1) On a white sheet, draw a snowflake with a pencil and cut it out with scissors.
2) Wet a sponge with warm water and wipe the surface of the glass with it, where the snowflake will be applied.
3) Apply the finished template to this place and moisten it with gentle movements with a sponge so that it sticks.
4) Dilute a small amount of tooth. paste with warm water so that the finished mass is not too thick and liquid.
5) Using a toothbrush, spray the induced solution along the contours of the snowflake and inside.
6) Let it dry a little, and then remove paper snowflake.

Glue snowflake, photo tutorial
Oddly enough, but New Year's crafts can be made not only from improvised means, but also from glue. To do this, it is enough to allocate 30-40 minutes of free time, having prepared the following items for the start of work: hot glue and PVA, a thick bag, stationery scissors, sparkles, a satin ribbon or rope, a brush.
Step-by-step instruction:
1) On a package that will definitely not melt, draw a snowflake with hot glue.
2) After the glue dries, remove it with running water.
3) With your own hands, cut off all the bumps and give the crafts a skillful appearance.
4) Cover the snowflake with PVA glue and glitter.
5) Hang the finished product on a Christmas tree or decorate a window with it.

DIY beaded snowflake
On the eve of the New Year 2018, with the help of beads you can make not only a snowflake, but also the symbol of the Chinese horoscope - the Dog. However, if even a child can reproduce the first, the master will not always repeat the second craft. So let's start off easy...
Items:
- white beads and blue color;
- thin wire;
- wire cutters;
Step-by-step instruction:
1) Cut the wire into even 10 pieces, making a hook on each to hold the beads.
2) String beads and glass beads on each part, repeating the pattern of the snowflake proposed in the photo below.
3) Leave 0.5 mm blank at the end, connect all the pieces together and twist.
4) Cut off the excess wire with wire cutters, and hang the finished product on a satin ribbon or string.

Do-it-yourself 3D paper snowflake
You can hang a voluminous snowflake from the ceiling, which will give the interior airiness and lightness. And thanks to the 3D effect, it will seem more multifaceted and interesting.
Items:
- ruler;
- black pen;
- 6-8 sheets of A4 white paper;
- stationery scissors;
- stapler.
Step-by-step instruction:
1) Cut all the sheets into even squares, and then bend each one so that you get a triangle.
2) Make several cuts at a distance of 2 cm, long - up to 3 cm.
3) Connect the cut incisions to each other by connecting with a stapler.
4) Do the same with the rest of the petals, and then connect them together.

What snowflakes can still be made for the New Year 2018?
There are many variations of snowflakes, the main thing is to choose the option that will bring only benefit, and not torment. Therefore, if none of the above crafts is suitable, you can try to make a snowflake with your own hands from other materials:
- rubber bands;
- felt;
- plasticine;
- cotton wool;
- satin ribbons;
- balls;
- thread;
- napkins;
- polystyrene;
- gypsum;
- newspapers;
- newspaper tubes;
- bottles;
- bushings;
- glaze;
- salt dough;
- disk;
- rain;
- isolon;
- origami;
- ear sticks;
- foil;
- plywood.
Beautiful paper snowflakes for the New Year 2018, a master class on the photo:


