New Year's card with a Christmas tree made of felt with your own hands. DIY Christmas crafts from felt #19 Very simple DIY Christmas card
Do you want to try making New Year's cards with your own hands for your family and friends? Today we bring to your attention a few ideas and master classes for making New Year's cards.
Christmas cards with origami Christmas tree
Cut out a few squares from matching paper. different sizes- the quantity should be equal to the desired number of tree tiers. Bend each square diagonally (Pic 2). Then fold each future fragment of the future Christmas tree, as in photo 3-4.

Bend the resulting triangle, as in photo 5 (one element towards the other). Glue double-sided tape to the resulting modules, as in photo 6-8. Form a Christmas tree by threading one paper model into another. You will receive a creative Christmas tree to decorate your New Year's card.


New Year's cards with a Christmas tree made of felt
To make a New Year's card, you need:
Cardboard, scrap paper;
- green felt;
- decor: lace, semi-beads/beads/buttons, beautiful thread;
- tools: ruler, cutting mat, breadboard knife, scissors, PVA glue, glue stick, needle.
New Year card step by step:
Initially, prepare a blank for the base of the postcard (here the size of the postcard is 10x15). Mark the center on the form - for the fold and draw a line with the blunt end of the scissors, do not forget about the ruler. Fold the base of the postcard in half (Pic 14). Get a neat and even fold (photo 15).

Circle the silhouette of the Christmas tree on the felt and carefully cut it out (Pic 17). Next, with a contrasting thread, mark a “garland” line on the Christmas tree, fasten it on the reverse side (photo 19).

Give volume and density to the felt Christmas tree. Cut out a similar Christmas tree from cardboard, but cut off 1-2 mm along the edge. Glue it on the back side of the felt Christmas tree so that the cardboard is not visible from the front side (photo 21). Prepare a congratulatory inscription (photo 22). Measure the lace to the width of the background (Pic 23). Lay a line around the perimeter of the background paper, bring the threads to the wrong side, tie a knot, cut off the excess ends (photo 24).

Machine stitching will not only perform a decorative function, but will also fix the lace along the edges (photo 25). Glue the Christmas tree and the inscription to the background using double-sided bulky tape (Pic 26-27).

Then glue the prepared background with a Christmas tree and the inscription to the base of the postcard. It remains to decorate the Christmas tree, for which put a small drop of glue on the Christmas tree and glue a bead or other decor to the floor (photo 29-30).

Funny winter holiday New Year It's not just fun for kids. Many adults also, with undisguised trepidation, are waiting for the onset of New Year's Eve in order to once again plunge into the atmosphere of a magical time, when one year replaces another. In the New Year, you can hope for a fabulous miracle, for the fulfillment of your most cherished dreams.
And if new year celebration will begin on the evening of December 31, then preparations for wonderful holiday- much earlier. You need to think through everything to the smallest detail - what to cook, what outfit to wear, how to surprise guests, how to decorate the Christmas tree and apartment, and, most importantly, what to give to relatives and friends.
Any gift will be precious and meaningful, and a hand-made present will certainly bring joy and happiness. good mood not only to the giver, but also to the giver.
Just before the New Year, it's time to remember the good old tradition of giving each other New Year's cards. Despite our age of nanotechnology with its modern means communication, it is not worth relegating real, “live” postcards to the background. After all, it is an incomparable feeling to pick up a colorful hand-made postcard and, literally, breathe in a piece of New Year's mood and atmosphere.
Want to do DIY card for the New Year 2017 and please your friends, family and loved ones? Our site will help you with this. It will not be a shame to give a stylish craft to a colleague and, thereby, congratulate an employee or employee on the New Year and wish them happiness.
You can make a New Year's card with a child and make grandparents happy. Making a greeting card for a friend or relative is not at all difficult, and the joy of such a manifestation of attention will linger in the soul for a long time to come.
Postcard "Cockerel" in quilling technique
To make a postcard "Cockerel" you will need:
- multi-colored stripes for quilling;
- glue;
- a sheet of cardboard for the base;
- pencil or template;
- decorations and decor.
Step 1. On thick paper you need to draw a picture of a cockerel.
Step 2 Twist each strip according to the instructions and, dropping a drop of glue so that the bobbin does not unwind, give the desired shape with your fingers.
Step 3 Having put on a lot of bobbins, you can start “assembling” the cockerel, filling the space of the picture, simply gluing paper bundles onto the most ordinary PVA glue.
Step 4 When the cockerel is ready, you can add some chic to the card by decorating it with sparkles, beads, snowflakes, ribbons and other cute decor elements. You can also write a wish for happiness in the New Year.
New Year's card using corrugated paper

To make a New Year's card from corrugated paper You will need:
- colored cardboard or colored thick paper;
- corrugated paper;
- scissors;
- glue or double-sided tape;
- any decorations of your choice (beads, sequins, beads, sequins, etc.).
Step 1. Fold a sheet of cardboard or heavy paper in half.
Step 2 Using a simple pencil or double-sided tape (if you take double-sided tape, glue is not needed) you need to outline a layout of the future Christmas tree.
Step 3 Prepare rectangular pieces of corrugated paper different lengths.
Step 4 Slightly picking up, glue strips of corrugated paper so that you get a Christmas tree.
Step 5 It remains only to decorate the card to your taste and / or add a cute inscription wishing you happy holidays.

To make an embroidered New Year's card, you will need:
- a sheet of cardboard for the base of the postcard;
- knitting threads or floss different colors;
- button, needle or pin;
- masking tape;
- printout of words or drawing;
- small decorations.
Step 1. Fold a sheet of cardboard or heavy paper in half.
Step 2 Print out the words or pattern you want to embroider and temporarily attach it with masking tape to the postcard.
Step 3 Now, very carefully, with a needle or pin, make holes along the contour of the inscription or drawing.
Step 4 To fill the pattern with embroidery, use multi-colored threads and a sewing needle. It is advisable to first "outline" the contour, and then "paint" inside.
Step 5 When the card is ready, you can slightly steal it to your taste using ribbons, bows, beads, etc.
New Year's card from threads

To make a postcard from threads, you will need:
- dense colored paper or cardboard;
- threads for knitting (preferably thick and different colors);
- scissors;
- glue;
- decorations and decor.
Step 1. Fold a sheet of colored cardboard in half and set aside for now.
Step 2 The threads must be cut into pieces of different lengths (in descending or increasing order).
Step 3 Now you can start gluing the threads, starting with the longest one, and gradually moving up and adding shorter threads, complete the thread Christmas tree. Alternate colors as you like.
Step 4 Glue a couple of small pieces of thread of the same length under the base of the Christmas tree to represent the trunk of the New Year tree.
Step 5 A few beads or sequins will look good on such a laconic Christmas tree.
Do-it-yourself New Year's card "Geometric Christmas Tree"

To make a Geometric Christmas Tree postcard, you will need:
- a thick sheet of white paper (ideally - cardboard is green on one side and white on the other);
- stationery knife;
- ruler and pencil or printout of the drawing.
Step 1. Fold the cardboard in half with the green inside.
Step 2 With a pencil, using a ruler, try to draw a triangle evenly, and inside divide it into small identical triangles. It will be easier to draw diagonal lines - first in one direction, and then in the other, stepping back the same distance.
Step 4 With a utility knife, carefully cut out the triangles without touching the base.
Step 5 Now fold the small triangles down from the outside of the card. The original New Year greeting card is ready!
Postcard for the New Year 2017 "Christmas tree-accordion"

To make an accordion Christmas tree postcard, you will need:
- thick colored paper or colored cardboard;
- colored paper (you can take green, or you can take any other color);
- scissors;
- glue or double-sided tape;
- various decorations (sequins, tinsel, sequins, etc.).
Step 1. Fold a sheet of cardboard in half - this is the basis of the postcard. After folding the thick paper, set it aside for now.
Step 2 From paper of green (or other) color, you need to cut out six rectangles of the same length, but of different heights (each next rectangle should be 2 cm less than the previous one).
Step 3 Now fold each of the rectangles into an accordion shape. Try to make the “step” of the accordion the same for all rectangles.
Step 4 Fold each accordion in half and, starting from the largest to the smallest, glue the postcards inside at the place of the fold from the bottom up.
Step 5 To top it off, snowflakes, sparkles and so on. You can write several if you wish. warm words or a nice phrase with congratulations.
New Year's card "Christmas trees from felt"

To make a postcard from felt, you will need:
- felt sheets of different colors;
- glue;
- scissors;
- colored cardboard or colored thick paper.
Step 1. Cut out strips, trapeziums or triangles of different colors and sizes from the felt (following the order of increase or decrease in size).
Step 2 Now you can glue all the details and, if desired, add sparkles or write congratulations on the New Year and Christmas holidays.

To make a postcard with buttons you will need:
- a sheet of thick paper or cardboard;
- buttons of different sizes;
- multi-colored glossy paper;
- glue;
- scissors;
- decorations.
Step 1. Glue the buttons onto a sheet of cardboard in such a way that you get the outline of a Christmas tree.
Step 2 Cut out squares from colored paper. different sizes- these will be gifts that need to be glued under the button Christmas tree.
Step 3 It remains only to decorate the card to your taste and you can give it!
Sunday, November 30, 2014 1:32 pm + to quote pad|
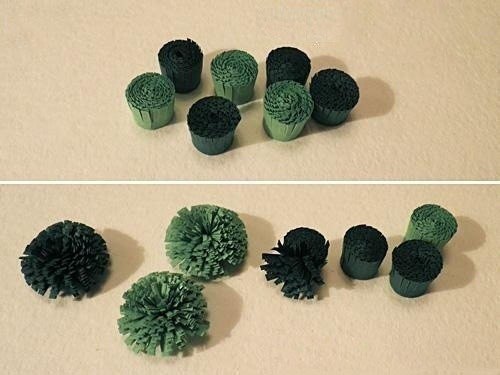
1. Basically you will need green paper (you can choose several shades of green), nail scissors, a couple of toothpicks and PVA glue. The paper should be cut into long strips 7-10 mm wide. In art shops there are sets of paper for quilling. The paper in them is already cut and, as a rule, in a wide range of colors. 2. Cut the fringe along the entire length on one side of the strips. To speed up the process, you can take 3-5 strips, tightly attach to each other and cut at a time.
3. We tightly wind the fringed strips onto the toothpick. With PVA glue we fix the ends of the strip to its own wall. Do not squeeze out a lot of glue to glue the tips, the less glue, the faster it will fix.
4. When all the green buds are ready, we turn them into fluffy elements of our Christmas tree with your own hands. With our fingers we help the buds to bloom, spreading the fringe in different directions. 5. We glue all the fluffy elements on a cardboard base in the form of a pyramid, leaning tightly against each other.
6. From a piece of toothpick we make a small trunk of a Christmas tree and put it on fluffy snow, which can be made using corrugated paper. We scatter golden beads all over the Christmas tree, and decorate the top with a golden bow.
|


|
Outwardly, this is an absolutely ordinary New Year's card:
But in fact, the postcard is not at all simple, but with secrets.
We untie the red ribbon, open a small postcard, read congratulations and wishes, which I will soon write by hand.
We untie the bow, and inside the Christmas tree, composed of three acute triangles, we find surprise and a secret message - a wish (so far, of course, I won’t show it either):
Here's what boot- the pendant is inside the Christmas tree, hanging on a ribbon:
Photo boot - surprise from my New Year's card a little closer:
So it turns out that in this one New Year's card, in fact, two, or even as many as three, are hidden ...
My favorite holiday is coming New Year and I decided to make gifts to my loved ones.
And I decided to start with postcards.
It's not hard at all and it's fast. But the result is cute and unique postcards in which the warmth of your hands and soul is preserved.
We will need:
In principle, I did not use anything complicated and hard to find that cannot be bought in ordinary stores. All this is a must have for any sewing lover. This:
- sequins,
- braid,
- pieces fabrics(I used felt)
- pruning beautiful wallpaper,
- paper,
- glue,
- scotch.
I note that we need adhesive tape bilateral and it is advisable to take paper not ordinary for drawing, but for watercolor. It has a beautiful texture.
Better yet, use designer cardboard.
I have this watercolor paper. It's great if you have the opportunity to buy color. But I only had white.
So we take the paper, fold it in half and determine the size. The easiest option, of course, is to take a standard A4 and fold it in half, in which case you don’t have to cut anything.
Here is mine blank postcard.
New Year's card with a star
Let's start with a simpler option. This is an option postcards with braid and star.
Have to take braid which one you have at home. I had a green, herringbone color, maybe you will have a gold one. In general, I associate the New Year with these colors, the color of spruce and the color of champagne.
We take braid, gently bend its edges, grease with glue and glue to the workpiece. I took the Master-Universal glue, because I was afraid that the PVA would soak the paper and lead it, so to speak (the workpiece would become uneven and bumpy). We glue the braid carefully so that the glue is not visible.
Now we need to do star. For this, I used trimmings of gold-colored wallpaper.
Cut out a small square and on the back side just draw a star. What do you know how.
Cut out. It turns out like this Golden Star.
For my star, I need to cut out two more small squares from other wallpaper.
Glue everything together.
To somehow decorate a postcard I decided to use sequins. For this we need double-sided tape. We just cut the tape into small pieces so that they do not go beyond the boundaries of the sequins and glue them in a chaotic manner.
Everything, this postcard is ready.
Let's move on to the second option.
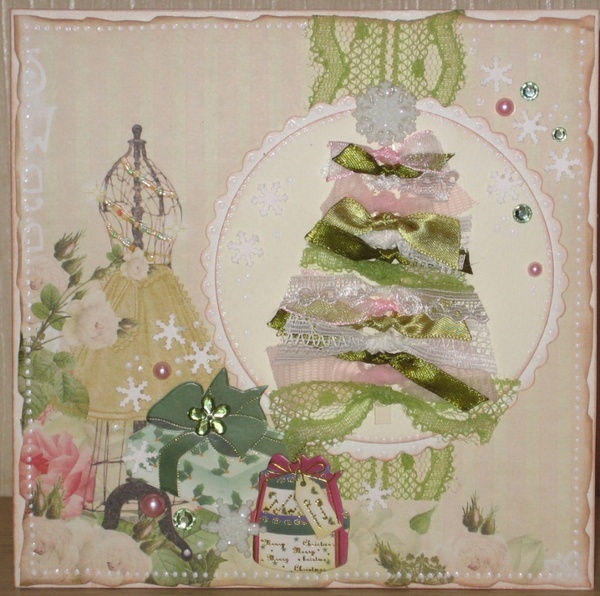
Christmas card with a Christmas tree made of felt
We take another paper blank postcard. For her, we need a piece of green felt. Why Felt? Of course, because its edges do not crumble during operation, it can be cut as you like, and it will look neat. In general, fleece, felt, felt - all these are very grateful materials for working in any field of needlework.
So, from a piece of felt we cut out a right-angled triangle. Its size, of course, depends on the size of your postcard.
Cut out. Turn it over and draw on the reverse side curls. Just like a hand will take. We draw with chalk or a marker, or, as cutters have done since time immemorial, with a piece of soap.
Take nail scissors and carefully cut these whorls. You can also use a paper knife or a special craft scalpel.
We glue our unusual herringbone to paper stock postcards self made
. We use the same glue as in the previous version. For the same reason, so that the paper does not lead.
Next, we again need sequins and double sided tape for gluing them. I have found very funny stars.
Double-sided tape can be different: very thin and thicker, which has a layer between the adhesive layers. It is convenient to use a thin double-sided adhesive tape for gluing paper elements, unlike glue, it will not crawl out of the borders, it turns out very neatly. A thick adhesive tape is needed in cases where you need to glue an element and create an effect volumetric figure. It looks like the figure is "hanging" in the air.
In this case, I used thick tape. I generally bought it in a hardware store and is intended for repair work.
I am sure that all these things: adhesive tape, various design paper, decorative elements can be bought in scrapbooking departments, but I always try to use materials in my work that can be bought almost everywhere. After all, there are shops, in this case with goods for scrapbooking, not in every town in our country.
Let's continue.
Glue stars tape.
The photo shows what I said above, that the stars seem to hang in the air, casting a shadow.
Now our Christmas tree needs star. To do this, we again need trimmings of golden wallpaper, as in the previous version of the handmade postcard. We measure what size we need a star, draw and cut it out.
Because herringbone we have half, then star will also need to be cut. We glued it in the same way, with thick adhesive tape, for the effect of volume.
To make even more star accent and to make it more voluminous, I used eye shadow. Just cotton swab applied green shadows with gold sparkles along the contour of the star
Well, in order to finalize the borders of the postcard, I used golden corners. I just drew them helium pen with the "golden" paste, which can be found in the school pencil case of almost any girl.
That's all. Both of our postcards are ready. Now it remains only to sign them, and you can give them.
|


|
The main thing is to put your soul into postcards and then everything will definitely work out.
First, you can just randomly draw different Christmas trees, decorate with pencils and the card is ready. This is the easiest way, although very funny.
If you are a bad artist, you can simply print the pictures you like and redraw them on your postcard. It remains only to decorate with sparkles or a satin ribbon.
You can decorate a fabric Christmas tree on your postcard regular buttons. Pick the color and size you like and stick. If you want the buttons to be sewn on, do it in advance before sticking the Christmas tree. The edges of the postcard can be decorated with a satin ribbon or simply decorated with gouache.
Use fabric for your postcards. There are fabrics on sale already with mi, you just have to cut them out and stick them on paper. Or take a green fabric and create your own Christmas tree. It may be of a non-standard form.
If you are planning to make an application postcard, then here your imagination seems to have unlimited scope. For decoration, you can use plain colored paper, foil, velvet paper. Just cut out any figures with the children: Christmas trees, snowmen, snowflakes, animals, then glue them onto the postcard template with glue. Small parts can be glued with a toothpick so as not to smear the entire postcard with glue, or you can use double-sided tape for gluing. You can cut a Christmas tree out of cardboard and stick it on a postcard using double-sided tape. The postcard will appear larger.

Well, the little ones will like to stick cut-out figures from adhesive colored paper, or you can use ready-made stickers. To decorate your postcards, use sparkles, sequins, shiny colored ribbon. To make a snow effect on a pasted Christmas tree, smear its edges thickly with glue and sprinkle with a thick layer of semolina, turn the card over, lightly tap its edge on the table and shake off the remnants.

Postcards made using woolen threads are very beautiful. Draw any drawing on the template, for example, a snowman. Cut colored woolen threads into small pieces. Thickly smear small sections of the card with glue and put threads on top: make your face white, hat and scarf red or blue. Well, already glue paper or cut-out details on top of the finished picture: nose, eyes, mouth. Sprinkle glitter around the pattern or glue snowflakes. Now in stores, among the many children's toys, hole punchers with special patterns are sold: snowflakes, stars, flowers; they are very convenient to use when making homemade postcards.
Postcards with folding chains inside look very nice. To create them, you need to fold a sheet of paper in half, and then each half in half again. On the resulting folded accordion, draw and cut out any pattern: again, a Christmas tree, a snowman, Santa Claus, a Snow Maiden. We must be careful not to cut the points of contact between the drawings. Then expand the resulting chain and decorate it. Decorate the inside of the finished cardboard template and sign it. Attach the finished chain to the postcard template so that the folds match, glue the extreme patterns. When you bend the card, bend the middle fold of the chain towards you so that when you open the card, the figures stand in a chain.

Children are very fond of postcards with windows. They are pretty easy to make. On the already prepared cardboard template, cut out several square windows. And on the inside, glue various patterns on New Year theme so that they can be seen through the windows when the card is closed. Moreover, the drawings can be with a surprise, such that only part of the picture will be visible in the window, and when opened, the whole will appear along with the wishes.
You can also create postcards with prints. To do this, cut out a Christmas tree blank from a foam rubber sponge, prepare green paint, dip the foam rubber in it and print the pattern on the finished cardboard template. Moreover, the force of pressing on the foam rubber can be different, thereby you will achieve the effect of uneven coverage. Well, decorate again to your taste.
Well, if you want to make a riddle card so that your loved ones work a little before reading it, make it in the form of a puzzle. Draw a picture on thick cardboard, write a congratulation, and then cut such a card into several parts and fold the details into a beautifully designed envelope. Before reading the card, your family will have to collect it, and this will further increase their interest.

Fantasize, use any materials when creating postcards, even the most unexpected ones. Develop the skills of your children, come up with drawings and decorations for cards together. And do not demand from your children the perfect design of postcards, the paper will be glued unevenly somewhere, there will be extra glue or too many sparkles. All this will fade before the joy brought to the family, and they will not pay attention to the flaws of the young masters.
After all, the main value of such a postcard is the warmth and love invested in its manufacture. Bring joy to your family and friends in new year's eve, give homemade postcards made with the kids, and with them a piece of yourself.
Herringbone
For manufacturing you will need:
Green velvet paper, green cardboard, blue cardboard, ny sheet, colored paper, scissors, glue, hole punch.
How to make a postcard:
- Draw a triangular Christmas tree template on white paper, cut it into 5 identical strips.
- Using the resulting trapezoidal patterns, transfer them to colored green cardboard and green velvet paper.
- For the finished elements of the Christmas tree, make uneven edges (wavy).
- Using a hole punch, make several holes in the Christmas tree and glue multi-colored pieces of colored paper on the back side - these will be balls.
- Place all the elements on the blue cardboard (background) New Year's applications and glue.

New Year's card

- Cut out the Christmas tree with curly scissors from green felt with sparkles. Tree height - 12cm, maximum width - 8cm.
- Stick a green felt Christmas tree on the inside of the card on the right.
- Cut out from a sheet of paper Green colour rectangle 9 cm wide, 14 cm long.
- Stick the resulting rectangle on the inside of the postcard on the left.
- Randomly stick rhinestones of different colors and sizes on a green felt Christmas tree.
- Stick 5 snowflakes on a green felt Christmas tree between rhinestones. Glue 4 snowflakes onto the green rectangle on the inside of the card on the left. Glue 4 snowflakes around the rectangular hole on the outside of the card.
- Glue 3 stars between the snowflakes around the rectangular hole on the outside of the card. Stick 2 stars on the green rectangle on the inside of the postcard on the left.
- Glue the ball and small stars onto the green felt Christmas tree. Stick the gift on the green rectangle on the inside of the postcard on the left.
- Write the inscription "HAPPY NEW YEAR!" on the outside of the card above the rectangular hole and "2007" below the rectangular hole using a tube of "Paper Effects" with gold-colored paint.
The postcard is ready. Now it remains only to write a congratulation on a green sheet of paper inside the card and give it as a gift!
Postcard "In silver"
Materials: watercolor paper, design paper, corrugated cardboard, paper with fibers; plastic snowflakes, plastic beads; glitter gel.
Insert - rice paper

Postcard "Snow-covered distances"
Materials: base for a postcard; cotton wool, "snowflake" confetti, printed pictures on bulky double-sided tape; glitter gel.
Insert - rice paper

Postcard "New Year's"
Materials: watercolor paper, corrugated cardboard, paper with fibers; mesh for decorating, plastic snowflakes, glitter gel.
Insert - rice paper

Postcard "Snowman"


Many examples of handmade postcards:


|
|
cute postcard to New Year's holiday which can be done by both adults and children.
2. We cut out sprigs of spruce from dark green velvet paper, you can first draw them with a pencil. It is necessary to cut two large branches, and two smaller ones. After that, we cut out three small branches from light green paper, glue everything to the base (light green branches on top of green ones).
3. It is necessary to make a gift: for this, we cut out a square from cardboard and glue it with wrapping paper, then we tie it with a white ribbon and make a loop.
4. We glue the decor on the branches: a gift, berries, a Christmas tree. From a white ribbon we make a bow in the form of a figure eight, and fasten it to a branch, and glue a gold bead on top.
5. It remains to make a congratulatory inscription: stick the printed one, or use a sticker, or do it by hand. Postcard is ready :) |


|
small and original postcard Suitable for congratulating friends, colleagues and relatives.
2. Take satin ribbon, glue along the bottom edge of the postcard on adhesive tape, bending the edges of the tape.
3. We take a telegram, stick it on adhesive tape on green paper and cut off the edges of the paper so that only the edge remains visible (about 3 mm). Then take the red paper and do the same. We take a New Year's drawing (or cut out a fragment of a drawing from New Year's napkins) and glue it on double-sided tape to the telegram. Next, we make congratulatory inscriptions on the telegram in block letters (you can write it by hand, you can also print it).
4. We glue the finished telegram onto the adhesive tape in the center of the postcard a little obliquely. We decorate the card with a twine bow, for this we fold it several times with a figure eight and tie it in the middle. We hide the knot under the red bead. In the lower right corner of the card, we attach the Christmas tree to the glue. |


Master class (with step by step photo) for the manufacture of New Year's cards "Christmas tree from felt"
Description: this master class designed for children 5-7 years old, teachers additional education, educators and parents.Purpose: A handmade card is a wonderful gift for the New Year holiday.
Target: introduce the elements of scrapbooking.
Tasks:
1. learn to create an image of a Christmas tree by making an appliqué from felt;
2. to consolidate the skills and abilities of working with the template;
3. to fix the techniques of working with scissors;
4. develop in children fine motor skills hands;
5. to form the ability to do crafts with your own hands;
6. to form creative independence;
7. cultivate diligence and accuracy in work.
Materials needed for work:
1. felt (4 pieces)
2. button
3. white cardboard
4. cardboard with a picture (funny cardboard)
5. braid
6. PVA glue
7. scissors
8. sequins

Who has prickly paws
needles bristled,
Who paints green
Needles both in winter and in summer?
What will decorate to the top
In the New Year, lights, toys?
This is a tree, this is a tree
This is our tree!
Tree in green prickly
Little needles!
We decorate it ourselves
Multicolored balls.
Irina Aseeva
Stages of the craft:
1. Bend A4 white cardboard in half in width. Cut a rectangle out of patterned cardboard that is smaller than the size of the card stock. Glue a fun piece of cardboard to the front of the card.

2. Prepare pieces of ribbon equal to the length of the sides of the fun cardboard rectangle. Glue the braid around the perimeter of the decorative rectangle with PVA glue.

3. Transfer 25 identical parts to green felt - patterns of spruce paws resembling a pear in shape. Cut out these parts.


4. Begin to form the lower tier of spruce legs. To do this, take 10 parts and arrange them evenly in the form of a fan. Check the location of the parts, find the best option and only after that fix the parts with glue.

5. From the following 7 details, make the second tier of the Christmas tree.

6. Each subsequent tier should be smaller than the previous one. Therefore, in the next tier, use only 5 parts. Distribute them evenly and symmetrically about the central axis.

7. Glue the last 3 pieces to form the top tier.

8. Glue a button to the top of the Christmas tree instead of the traditional decoration.

9. Glue sequins to the paws. Here and on our fir-tree there were multi-colored balls.

It remains to hand the postcard to the addressee.
Thank you for your attention!
On the eve of the upcoming holidays, there is a great opportunity to make Greeting Cards with your own hands. Such cards are pleasant both to give and receive.
Surprise your family and friends with a handmade New Year's card. It's not hard at all to create it. And the material for the realization of creative ideas can be found in every home.
For the New Year's card "Herringbone" we need the following materials:

- Cardboard - A4 sheet
- felt - a rectangle measuring 10 * 7 cm
- PVA glue or glue gun (hot glue)
- brush for glue
- scissors
- beads
- satin ribbons - remnants
- ready-made inscriptions "Happy New Year"
- sewing thread
- decor element - a piece of golden mesh
Let's start by making the base of the card.
Take good thick paper - whatman paper or cardboard. If the sheet is thin, it will not be possible to glue decorative elements to it.
Fold a sheet of cardboard in half.

Fold the felt sheet in half and cut out a triangle. This will be the base for the felt Christmas tree.


Glue the satin ribbons to the bottom of the card with PVA glue. Apply glue to the back of the tape and spread it well over the surface.


Glue a satin ribbon horizontally to the top of the card.

We let the ribbons dry a little and we will decorate the Christmas tree.
Let's take our workpiece - a triangle. Sew on the beads using thread and a needle. Small parts can be glued with hot glue, but it will be more reliable to just sew on.

In the course of sewing on the beads, insert a decorative mesh into several rows.


Sew on bright yellow beads over the entire surface of the felt tree.

On the wrong side, apply PVA glue to the felt and glue it to the paper base.

We make an inscription. To do this, print the inscription "Happy New Year" on the printer. Cut out.

From the rest of the felt, cut out a rectangle a little larger than the paper inscription. Give the edges of the part a rounded look.
Glue the felt to the card.
Stick a paper inscription on the felt.


