Weaving animals from newspaper tubes. Weaving from newspaper tubes
Some experts condescendingly state that needlework is something that borders on art. Looking at the masterpieces of our craftswomen, we can say with confidence that such things have the right place in an art gallery and this is what real creativity is. Here is a flight of fancy, exquisite taste and the most complex technique of execution. Today we will look at step by step weaving from newspaper tubes. New ideas for beginner needlewomen, the basics of technology and helpful tips- in this material.

In the finished work, it will be difficult to paint over all the weaves with high quality.
Do not use watercolor for painting. It gives a dull color. Gouache or acrylic paint is more suitable. It is worth considering that acrylic cracks after drying, so if you decide to paint with acrylic, process the finished product. To give color to the work, some craftsmen use spray paint, water-based composition and food coloring.
For shine, the finished work is covered with several layers of varnish. In addition to the decorative task, the varnish also performs the task of a strengthener.

Weaving methods
It is enough for a novice master to master several basic methods of weaving. All other options are based on them and will be easy to deal with.
- Spiral weave. A simple option that even a child can master. The tubes are successively built up and threaded through the base in a continuous manner.
- Layered weaving. Two tubes in series go around the posts so that one passes in front of it, and the other behind it. This principle is used on cotton fabrics.
- Rope technique. The strips are intertwined with the uprights on the product and with each other.
Mastering these basic techniques will lay the foundation for further experiments.
For more information about weaving techniques from newspaper tubes, see the video at the end of the article.
Related article:
In the article, we will consider in detail the technology of making flowers from paper with a photograph of each step, as well as others. original crafts that even a beginner can do.
Weaving from newspaper tubes for beginners step by step: different products
After mastering the basic techniques, you can take on the first job. It is better if it is a basket. This simple option will help you master the technology, and the finished product will certainly come in handy in the household.
How to make a basket of newspaper tubes step by step
To make a basket you will need:
- newspaper tubes;
- base - pot or jar;
- for the bottom;
- acrylic paint;
The sequence of weaving baskets from newspaper tubes photo:


- Two circles are cut out of cardboard. Newspaper tubes for racks are glued to one of them at an equal distance. From above, the structure closes with a second circle. Tubes - racks are bent up. A form is inserted inside the frame. The top of the racks can be fixed with a wide elastic band. The frame is ready.
- We weave walls. To do this, we take a tube, fix its edge at the base of one of the racks and begin to twist its circle of racks. When the length of the tube does not allow you to continue weaving, you need to build up a newspaper vine. To do this, the tips must be inserted into each other, after dropping glue on the junction.
Important! When twisting the tubes, one end is narrower than the other. Accordingly, when connected, the narrow tip is inserted into a wide hole.
- To decorate the edges of the basket, the racks are sequentially intertwined with the main vine and fixed on the inside with glue.
- The last stage of work is decorating the product. To do this, the basket is completely covered acrylic paint and two coats of acrylic lacquer. After that, you can decorate the basket with ribbons, beads, braid and other accessories.
Advice! The basis of the basket can be made not from cardboard, but from tubes. For this, a flat base is woven, the axes of which become racks.
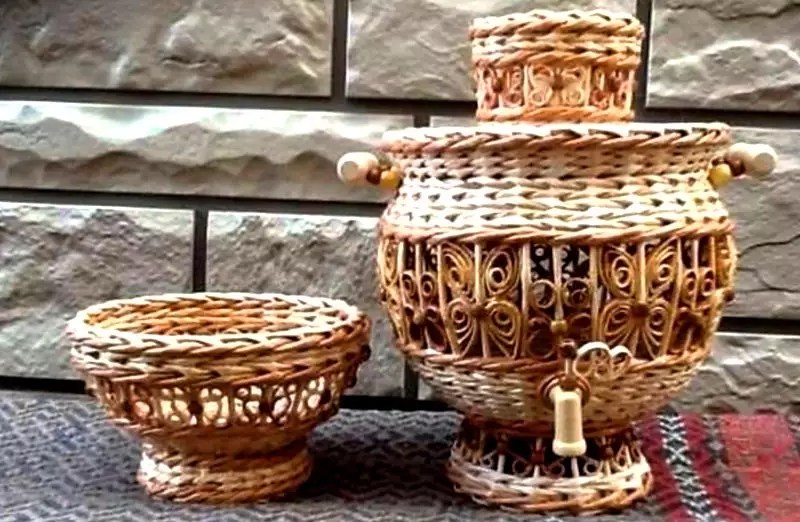
In the same sequence, you can make a vase from newspaper tubes:
Secrets of weaving a rooster from newspaper tubes
The rooster is not only a symbol of the year, but also a talisman for the home. In Russian culture, the symbol of the rooster denotes wealth and prosperity in the family.
To weave a talisman, you only need newspaper tubes painted in bright colors.
- It is necessary to lay the foundation. For strength, you can thread a wire inside the newspaper tube.
- The cockerel's body, head, beak and beard are successively braided with colored tubes.
- Lastly, the tail and paws are done. If the weave is tight enough, the cockerel can be put on its feet. For additional strength, it is better to varnish the product.
Photo cockerel step by step (crafts from newspaper tubes for beginners).
I think that everyone has a stack of unnecessary newspapers or magazines - they don’t raise their hand to throw it away, but it takes up a lot of space. It is from this waste paper that we will make our Goat. Let's use the currently popular technique - weaving from a vine. With one difference - we will not take a natural vine, but we will make it ourselves using a material that is no less flexible, but more durable - newspapers.
Materials and tools
For weaving we need:
- newspapers or magazines;
- PVA glue;
- thin knitting needle 1.5-2.5 mm or skewer;
- water-based stain;
- brush for painting;
- tray (optional)
- scissors or stationery knife;
- acrylic varnish (you can do without it);
- ruler.
Making vines from newspapers
First we need to make a paper vine. I’ll make a reservation right away that for the manufacture of tubes, you can use not only newspapers and magazines, but also writing, fax paper and even a check tape. Writing paper is the most pliable basis for weaving, magazine paper is very capricious and difficult for beginners. We will take middle option- newsprint.
We fold the newspaper in half, then cut along the fold line with scissors or a clerical knife. We fold the resulting halves again, cut again. As a result, from one newspaper sheet you should get 4 strips about 10-11 cm wide. I will open one little trick: to get light tubes without letters, use only the extreme strips of newspaper with a white edge.

We put the knitting needle on the very edge of the newspaper strip at an angle of 30-40º, then we begin to wind the newspaper knitting needle as tightly as possible. Having screwed it to the end, apply glue to the corner and slightly scroll between the fingers. Then carefully pull the needle out of the tube.
Please note that the diameter of the upper edge of the tube should be approximately 2-3 mm wider than the lower one. This is necessary for the possibility of building up our vines in the process of weaving. We will connect the tubes by inserting a narrow tip into a wide one.
Painting and storage paper vine
Since our goat is blue-green, we will paint the resulting newspaper vine. For painting, you can use any water-based stain. The most suitable in this case will be the color "walnut". For clothes and decor, you can paint part of the vine from newspapers in a different tone, such as mahogany.
Let the newspaper vine dry a little. But don't overdo it! Wet tubes are more pliable, it is much easier to weave them. Too dry tubes from newspapers will be brittle and inflexible.
If you are not going to weave right away, wrap the vine in cling film. For long-term storage, it is recommended to use a vacuum bag with a valve. If the tubes are still dry, shortly before weaving, moisten them with water from a spray bottle and let them lie down for a while.


Weaving
So, we go directly to the weaving of our goat:
- To begin with, let's make blanks. Cut one tube in half. So that the vine does not unwind, we glue the place of the cut.
- We tie knots on one of the resulting halves. We get improvised paws with hooves. Fold the other half in half and cut the ends diagonally. These will be the horns for our Goat.
- We take two tubes and combine them into one large one. This will be the main frame of our goat. Folding our tube base into a figure eight, we form the ears. Please note that the hanging ends (racks) should be approximately the same in length.
- We bend the racks up, skip between the ears, wrap it back - a muzzle is formed.
- We glue the blank for the horns to the muzzle. We also glue an additional tube to the head, and it is necessary to glue it with a wider end. We coat the upper part of the muzzle with glue and begin to wrap it in a circle. But not from the very end, but stepping back a little - we get a nose and lips.
- So we wrap it to the very top. Then we wind the tube back and make two turns - we get a neck.
- To form a dress, we attach a tube of a different color.
- We part our base a little and weave the torso with a figure eight - three turns around each rack. We put the paws, braiding them in a circle.
- Then again weave with a figure eight, make 5-6 turns, narrowing it a little towards the end of the weaving. The body is formed. We put the end of the tube behind the rack and carefully glue it.
- And finally, we tie hoof knots on the legs. We coat each hoof well with glue. We leave to dry.
- If desired, you can additionally cover the craft acrylic varnish. The goat will gain shine, but will slightly lose its flexibility.

Depending on who you want to make - a goat or a goat, you can "dress" the figure in a dress, skirt or pants. You can tie a tie, add accessories to the kit - for example, a handbag, or put it on a sofa. With the help of a magnetic sticker it is possible to make a goat fridge magnet. It all depends on your imagination.

If you have children, include them in the weaving process. After all, the joint occupation of needlework is one of the most effective methods education, promotes the establishment of a trusting relationship between parents and children. In addition, weaving from newspaper vines remarkably develops fine motor skills hands, and is also a good incentive to develop the creative potential of the child.
Dare, create, experiment! Wicker Goat will surely bring you and your family good luck and prosperity.
We invite you to try your hand at an ancient and ever-relevant craft - weaving. However, the material in this case is not a traditional vine, but newsprint, in a special way twisted into long thin tubes, in many ways reminiscent of a vine and just as suitable (and maybe even better) for weaving of varying degrees of complexity - from the simplest, on which you have to “get your hand on it”, to future masterpieces.
Perhaps, in childhood, among many, you studied with interest how your grandmother's basket works and once dreamed of learning how to do something similar. However, the need to find and harvest a suitable vine, the lack of a mentor or available information even in rural areas, not to mention urban conditions, forced them to give up on interesting and useful needlework, which could become a wonderful hobby. Today, a unique opportunity has arisen, and we present it to you.


From paper tubes you can realize a lot of ideas, in fact, everything is the same as from an ordinary vine - baskets, caskets, decorative panels, figurines of animals and dolls, bags, photo frames, hanging interior decorations and much more that your imagination and growing from the product will tell you to the workmanship. From dense tubes, you can even weave some pieces of furniture!


Material preparation is an important step
The material for making straws can be very different - from ordinary newspapers for more flexible "twigs" and openwork crafts to dense glossy magazine pages, the straws from which are not so flexible, but are great for more experienced craftsmen who create durable household items. It is clear that we, as beginners, are more interested in newspapers and other similar grades of paper.
Twisting the tube-twig is quite simple. To do this, you need a knitting needle and strips of paper about 7-10 cm wide. Put the strip in front of you, attach a knitting needle to its lower left corner at an acute angle and, starting from the tip, wrap the paper tightly on the knitting needle, rotating right hand and helping the left along the entire length. The fact that the length of the needle is limited should not worry you: keep winding, rotating by the spoke. When a small corner of the paper remains at the end, apply a drop of PVA glue (prepare in advance) and wind it to the end, the glued corner will firmly hold the entire structure. The tube is ready! You will see that it is not difficult at all and after a little practice it will only take a few seconds.
Needlework can be called a craft that borders on art. It manifests itself in different types creativity. Exists a large number of materials used by lovers of applied art. Thanks to new opportunities and technologies, there are unusual techniques, new directions in creativity.
Weaving from a vine is a fairly ancient type of needlework. While the use of newspaper tubes as a weaving material has only been around for a very short time, the technology itself has been proven for centuries. Newspapers are a simple and affordable material, if you have the desire and patience, you can learn how to weave interior items that are useful in the household.
History of the craft
Weaving from plant stems was already used in Neolithic times. Archaeologists find household items made in this way both in Africa and throughout Eurasia. It is assumed that for weaving people used thin tree roots and a flexible vine.
Much later, the interlacing of long rods began to be used in construction. In the nineteenth century, many roofs were made using this technology. Simple people they made fences around their houses, the rich could boast of wicker furniture.
Today, decorative wicker souvenirs can often be found at handicraft exhibitions. However, it is not necessary to dwell only on history. Using the interlacing technique, using newspaper tubes, real design objects are created.

Preparing the paper vine
The longest stage when working with newspaper tubes is preparatory. The preparation of identical paper rods takes more than a third of the entire time of manufacture of the product. Collecting a sufficient number of newspapers will not be difficult. Daily at Mailbox we receive various leaflets, advertising booklets.
First of all, you should decide on the type of product and the method of weaving. It depends on the type of paper. So, for example, dense glossy covers are used for large items (furniture, boxes, coasters). Thick paper does not have plasticity, but is very durable. Elegant interior products are made of thin paper that can bend in the right direction. Especially good for these purposes is newsprint or unnecessary office sheets for the printer.
Preparation is divided into several stages:
- Collection of the required amount of material;
- Page marking on the same stripes (4-10 cm);
- Cutting identical blanks (a clerical knife may come in handy);
- tubule formation;
- Collection of the required number of tubes.

It is best to immediately make the number of tubes with a margin, so that later you will not be distracted by this process, but will be engaged directly in weaving.
The process of forming newspaper tubes has several secrets. A strip of paper is wrapped around a thin metal object. It could very well be a needle. The paper should be placed at an angle relative to the needle. The flexibility of the paper twig depends on the angle. This option is suitable for fine work. If the object requires a strong material, the angle of inclination should be made as small as possible. Remember that such tubes are most often short. They are perfect for creating a product frame. While long thin twigs are needed for weaving.
Secret! The beginning of each tube is made slightly thinner than the end. This makes it possible to connect several twigs into one and continue weaving without interruption.
Types of weaving
You can bind paper blanks different ways. The nature of the weave depends on the functionality of the manufactured item, the aesthetic image, and the place of operation. For a children's room, it is worth choosing a more durable weaving so that the product can withstand active children's games. If you plan to manufacture a decorative element that will stand on a shelf, you can apply openwork patterns. All methods are easy to perform, but require some skill and patience.
So, weaving is distinguished:
- simple;
- spiral twist;
- tissue (layered);
- rope;
- pigtail;
- openwork.
To begin with, it is worth mastering the basic methods of working with a paper vine. You can make a small basket for practice. Simple weaving is the formation of a frame and braiding it with flexible twigs. There are options for working with one or two tubes. You can go around each element of the frame or through one.
By spiral twisting is meant a way to work with a vine, as in children's crafts from electrical tape. A thin object is wrapped around with two twigs, twisting is done in each row with a slight offset. This creates a spiral effect.
Layered weaving from newspaper tubes resembles the structure of the fabric. Its other name is fabric weaving. It is used to create round shapes. To work with this type of weaving, you need to alternately go around the frame bases either in front or behind. To speed up the work, weaving with two paper twists at once is possible. When working with round shapes, you need to carefully monitor the beginning of a new row so as not to lose the density of the binding.

There is a spiral weave around the frame bars. To work diagonally, the first row is not made at right angles to the base, but at an angle of 45 degrees. After building up the body of the product, you should finish the unfinished section at the bottom of the basket with an additional tape. Here you can also work simultaneously with two or more lanes.

Weaving with a rope and a pigtail, with newspaper tubes, strengthens the frame. Can be used for additional bottom or edge sealing. Work in this technique is the decoration of the object. When the base is ready, additional paper tapes are introduced into the edge, intertwined with each other, capturing the body of the base. Decoration is acceptable at the bottom at the bottom, at the top at the edge and as a border. The pigtail can be edging and consignment note.

The most complex technique can be called openwork. With its help, one obtains different patterns and drawings. Often it performs a decorative function, decorating only an element of the product. There are many variety of options openwork weaving. The essence of this work is to create a pattern using areas free from weaving. It can be a chessboard, various vertical braids, plaits, twists, arcs. When combining several patterns, an original, unique item is created.

Some of the types of work with paper vines are available even to children, to master the rest you need to practice extra.
How to weave the bottom of the product
Since the bottom can be represented by any geometric figure, then this factor is the main one when choosing a weaving technique. The bottom can be solid or openwork. However, all methods are based on the formation of a framework. For him, beams from several blanks intersect.
With a solid bottom, six tubes are taken perpendicularly, crossed 3 through 3 in a checkerboard pattern. The middle should be tight. The success of the entire structure depends on this. The resulting 3 * 3 square is the center around which the bottom begins to grow.
Further weaving is done with two twigs at once. The bends of the losin are made in the corners of the central figure. The tubes can “dive” both from above and below the bundle of three frame rods, and can go around each twig separately. In the process of weaving, the shape of the bottom is formed. All lozina should fit snugly against each other.

The second option for the formation of the bottom is based not on three twigs, but on six. At the same time, they are braided in pairs. To seal the bottom, you can use not only the perpendicular intersection of the bases of the base, but also add diagonal paper tubes to the main figure.
It is possible to build the bottom without a frame. In this case, the bottom is made of two pieces of thick cardboard. Future racks of the object are attached to one of them, and the resulting structure is covered with the second part. First you need to mark the places of the racks on the cardboard, distributing them evenly. The wicker bottom looks more impressive, especially on small items (box, vase).
Further weaving continues according to the chosen technique. The only thing you need to remember to take care of is that the length of the racks must correspond to the length of the finished product. Building thick cardboard is very problematic and not always possible. Therefore, it is better to pre-prepare the appropriate twigs.
The technique of weaving is that the entire product is woven at the same time. It "grows" in height. If you make each detail separately, and then glue the structure together, then elegance will be lost, the joints will look messy.
Extension of tubules and weaving
When a high product is planned, then you can not do without building up a paper vine. If you adhere to the technology of harvesting paper tubes, make one of the edges thinner, then building up is not difficult. Two twigs are connected with glue, work continues. If, after assembly, the product is covered with paint, then the joints are completely invisible.
Often, during weaving, an object is required that performs the function of a base, the shape of which must be repeated. This method helps to maintain the correct proportions. For rectangular shape box can be used. With dense weaving, a product made of thin tubes can even repeat the shape of a bottle.
The product can be painted at the final stage, or you can use pre-painted tubes. At the same time, you can make color accents, bring fantasy patterns to life. At the last stage, the product must be varnished.
What can be woven from newspaper tubes
Wicker decor is increasingly common in interiors. It could be something as small as a photo frame. Such a modest element can be applied in almost any interior style (with the exception of high-tech style).
Items from newspapers look especially good in country house. It creates a unique rustic atmosphere. Various vases, caskets, chests will be appropriate here. It should be noted that all these items can be used on the farm. As a result of weaving, a very durable product is obtained.
In a modern apartment, there is also a place for such gizmos. In the nursery, you can use baskets for toys. Laundry baskets are perfect for the bathroom. By the way, varnished, they are not afraid of moisture.
Sometimes you can even find accessories made in this technique. For example, an elegant woven clutch will be a great addition to the look.
Newspaper weaving is great way at the same time get rid of the accumulated waste paper and create a unique design object. The result is a beautiful and durable thing that can be used in life. Handmade interior items fill the room with comfort and warmth. In addition, all hand-made products are unique and original. There is a guarantee that no one else will have exactly such a box.
96 photos of products woven from newspaper tubes


