Do-it-yourself tinsel topiary. DIY New Year's Topiary: ideas for home decoration for the holiday
Though New Year it hasn't come yet, but we all already want a holiday, we decorate our houses, prepare New Year's souvenirs, etc. And what will create a New Year's mood better than a Christmas tree? Recently, instead of the usual New Year's beauty, topiaries - interior trees - are gaining more and more popularity. Such a small tree can be put on a festive table or decorate an office with it. Besides, New Year's topiary will be a great souvenir!
In this tutorial, I'll show you how to quickly create do-it-yourself New Year's topiary from tinsel. Such a beautiful and original interior tree will be an excellent gift for colleagues, family members and friends.
For tinsel topiary, decorated with cones and New Year's toys, You will need:
- tinsel,
- a foam ball with a diameter of 10-12 cm (can be replaced with a dense lump of newspaper),
- double sided tape,
- small planter pot or any suitable jar,
- building gypsum (alabaster),
- any new Year decoration: cones, small balls, toys, etc.,
- wooden skewers (topiary stem),
- satin ribbon,
- scissors,
- hot glue gun.
We connect wooden skewers together with hot glue. We dilute building gypsum with cool water to the consistency of thick sour cream, put it in a pre-prepared pot or jar. We evenly set the skewers in the center - the trunk of our topiary, hold until the gypsum hardens.
An ordinary thick branch or a cardboard base on which a cling film is wound is suitable as a trunk. To make the tree look elegant, we wrap the trunk with a satin ribbon.

We fix the foam ball and paste over it with several turns of double-sided tape.


Starting from the bottom, wrap the ball with tinsel.

It remains only to decorate. All decorations are fixed with hot glue.


like this New Year's topiary from tinsel got me!


Everything is very fast and accessible. In just an hour you can create an original New Year's souvenir do it yourself. Super simple and super original. And so beautiful!
I was glad to help!
Topiary will help decorate the room for the New Year. These amazing trees New Year theme it is better to do it in the form of a Christmas tree, the height and dimensions of which you can adjust yourself. Materials for the manufacture of wood can be used in a variety of ways, depending on the interior of your apartment or house, as well as your personal preferences. We offer you four clear and step-by-step master classes on how to make a New Year's topiary with your own hands. The trees will turn out different, and each of you can choose the one that he personally likes.
Master class number 1: New Year's topiary from Christmas balls
From Christmas balls are very bright, holiday crafts. Topiary in this case is no exception. To create a tree, it is better to take multi-colored, small-sized balls. Even better if they are made of glass, not plastic. The fact is that plastic products have a characteristic convex line that can spoil the festive look of the topiary.
materials
To make a New Year's topiary from Christmas balls, prepare:
- large candlestick;
- foam cone;
- identical in size, but small Christmas balls;
- wide ribbon;
- hot glue.

Step 1. Apply hot glue to the top of the candle holder. Press the foam cone with the base against the surface smeared with glue. Hold it until the glue sets, then leave the workpiece until the glue dries completely.
Step 2. In the meantime, you can prepare for further work Christmas balls. Carefully remove the metal fasteners from their upper part. They won't be needed.

Step 3. After the cone is glued to the candlestick, you can start decorating it. To do this, grease the top of the ball with hot glue and gently press it into the cone so that it grabs better. For convenience, you can squeeze hot glue into an unnecessary frying pan. Then you do not have to take a gun and each time gently grease the edges of the balls with glue, you can simply dip the ball a little into the adhesive mass and then work with it. So your work will go much faster.


Step 4. Fill the entire surface of the cone with balls, let the glue dry thoroughly and you can decorate the base of the candlestick wide ribbon, tying it in the form of a bow.


Be careful while working. If you apply too much pressure, the glass ball may burst and injure you. For protection, you can wear thick rubber gloves on your hands.
Master class number 2: snow-white New Year's topiary made of stones and rhinestones

A very delicate and at the same time spectacular addition to the New Year's interior can be a miniature tree made of irregularly shaped beads. You can find these at any jewelry store. Complementing it with transparent crystalline details, you will make the topiary fabulously delicate and beautiful in winter.
materials
To make a snow-white New Year's topiary from stones and rhinestones, you will need:
- foam base;
- hot glue sticks;
- thermal gun;
- beads of white beads of irregular shape;
- transparent glass cube;
- rhinestones.

Step 1. Disassemble the beads by pulling out a thread from them, and pour all the beads onto paper or a plate to make it easier to work with them.
Step 2. With hot glue, start gluing the beads to the foam base, carefully filling the entire surface with them. Start gluing the beads from the bottom. Try not to leave empty spaces.
Step 3. Let the prepared topiary base dry and you can start decorating. Gently apply glue to the rhinestones and insert them into the gaps between the beads. Strongly rhinestones do not part.
Step 4. You can leave the topiary as it is. It will look great, but a transparent glass cube will help make it even more spectacular. To do this, simply place the topiary itself on it and glue the two parts with hot glue.
Your snow-white topiary is ready!
Master class number 3: do-it-yourself New Year's yarn topiary

You can get a very cozy and beautiful topiary from the remnants of yarn. To make this is a couple of trifles. Even children can do this, since there is no need to use hot glue and, in general, the process of making a New Year's topiary from yarn with your own hands is very simple.
materials
To make a craft, prepare:
- foam cone,
- a skein of green yarn, preferably embossed and non-uniform in color;
- sewing needles;
- small Christmas balls;
- floral wire;
- decorative berries in the form of hairpins;
- round nose pliers;
- scissors.

Step 1. The first step is to decorate the surface of the panoplast base of the topiary. To do this, take a skein of yarn. Fasten its end with sewing needles at the base of the foam cone.

Step 2. Start winding the cone with yarn, making the coils tight enough that there is no empty space between them. In the course of work, you can fasten the threads in their place using all the same sewing needles.

Step 3. Having reached the top of the cone, cut the thread, and fasten the end with sewing pins.

Step 4. Start decorating your New Year's topiary. As such, you can use small Christmas balls or decorative berries on a hairpin. The balls need to be hooked to the turns of yarn, and the decorative berries are simply inserted with sharp pins into the foam base.


Step 5. The final chord of decorating the New Year's topiary will be a Christmas star. You can make it from textured floral wire. Starting at the end of the wire, use the round nose pliers to bend it to form a star.

Cut off this part. At its base, carefully fasten a small piece of wire in the form of a hairpin. Stick the resulting star into the top of the topiary.

A simple DIY yarn topiary is now ready for further use as a decor.
Master class number 4: do-it-yourself New Year's twine topiary

Surprisingly light, airy and, at the same time, textured twine topiary is obtained. Making this tree is not difficult at all and you will need quite a bit of time to make such a craft.
materials
Before you make a New Year's topiary from twine with your own hands, prepare:
- a skein of twine;
- parchment paper;
- green floral thread;
- glue;
- empty plastic container;
- stapler;
- scissors;
- berries for decoration;
- artificial decorative flowers;
- spray paint.

Step 1. Make a cone from a sheet of parchment paper, cut it off from the bottom so that it stands firmly on the table. To keep the cone in shape, fasten its sides with a stapler.
Step 2. Pour the glue into the bowl. Dip the twine in it and start wrapping the workpiece with it. Do not fill its surface completely, there should be an empty space between the turns. Make the base of the cone a little denser so that it then stands steadily on the surface.

Step 3. Leave the workpiece until the glue dries completely, then remove the paper base. Take green floral thread. Also soak it in glue and wrap it around the base of the twine tree in random order. This will help give your New Year's craft an interesting texture. You can take a thread of any color or paint it with spray paint. So you get a topiary of a different shade and a slightly different texture. After your tree is completely dry, decorate it with berries by planting them with glue or artificial flowers.


Using this technique, you can make a topiary of a slightly different shape. For example, you can get such a New Year's tree by wrapping a cone with twine in dense, even turns.

How to make a New Year's topiary with your own hands is a question that interests everyone who wants to prepare an excellent gift for relatives and friends. In addition, such a thing can serve as a wonderful decorative element that decorates the house and gives the New Year mood.
How to make a New Year's topiary with your own hands is a question that interests everyone who wants to prepare an excellent gift for relatives and friends.
There are many materials from which such excellent crafts for the New Year are made. The most popular is coffee topiary. This is due to the fact that coffee beans are relatively inexpensive, they can be bought at any grocery store, and the alluring aroma of this peculiar material will not leave anyone indifferent. To create such exquisite New Year's crafts, you will need:
- foam ball;
- wire;
- coffee beans;
- pot;
- latex orchid flowers;
- pine branches (artificial);
- decorative elements (beads or ribbons);
- PVA glue;
- hot glue;
- gouache Brown;
- gypsum.
The creation of such a topiary begins with the construction of a frame, for which you need to take a foam ball, wrap it with thin textile napkins and secure with thread. After that, the frame must be painted with brown gouache and wait until it dries a little. Then you should start gluing the grains on the surface of the base; hot glue is used for this process. It is very important that the grains are as close as possible to each other. In addition, a free space is left on the ball where the barrel will be attached.
Then, a second layer of beans should be attached on top of the coffee, and the beans should be placed in the gaps of the bottom row. The barrel for the coffee bean topiary will need to be made of aluminum wire, which must be decorated with twine threads. After that, the barrel must be installed inside the ball and glued with hot glue to the junction. Then the wire should be beautifully bent, and a hook should be made at the bottom to help fix the craft in the pot. The next step is to decorate the crown of the product. To do this, you need to randomly attach plastic pine paws, beads, ribbons and an orchid. To connect the crown and trunk in the same style, you will need to wrap the trunk in a golden ribbon.
 There are many materials from which such excellent crafts for the New Year are made. The most popular is coffee topiary.
 Now we need to create a pot so that the New Year's topiary is a complete gift. This can be done from any container, for example, from under a jar of yogurt. It is necessary to cut off the upper part and decorate with golden crepe. You should carefully wrap the yogurt container with crepe: close the top edge of the pot and the bottom. For additional decor, a golden metallic ribbon is used.
At the final stage, you will need to fix the topiary in a pot. To do this, mix cement with gypsum in a ratio of 2: 1, dilute the mixture with water and put it in a pot. After that, you need to install the topiary in a pot and fix it with a building mixture. Cement should be covered with PVA glue and gouache, and then covered with coffee beans, which will stick even to brown glue. The final touch will be a small bow tied under the crown of the product.
New Year's topiary (video)
Craft from Christmas balls
Sometimes Christmas tree- not the only decoration of the holiday. Very often, to decorate the house, they use a festive ball topiary. To make such a Christmas craft, you will need:
- small Christmas balls;
- base ball;
- stick for the trunk;
- flower pot;
- glue gun.
 Sometimes the Christmas tree is not the only decoration of the holiday. Very often, to decorate a house, they use a festive ball topiary.
 Step-by-step instruction creations:
- First you need to bring the pot closer to the New Year. To do this, it needs to be decorated with fabric and tinsel.
- After that, you need to take a base ball and glue it with balls. It is best to use those colors of balls that are harmoniously combined with each other. For example, red balls with blue, yellow with green or white with golden balls look original.
- Then you need to fix the trunk at the base of the structure, and it can be given any shape.
- At the last stage, the product is installed in a pot, for which a gypsum mixture is used.
If the topiary is made for a gift, then it can be supplemented with a beautiful decorative bow, which is attached to the trunk.
New Year's crafts from cones
original topiary for the New Year can be made from cones. To do this, you need to prepare gypsum plaster, unnecessary newspapers, flower pots, a plastic tube, PVA glue, pine cones, white and golden paint, synthetic winterizer, small beads, scissors and a brush. Step-by-step instruction:
- Creating a gypsum mix that requires water and gypsum plaster. A flower pot is filled with this substance and a trunk is installed there. It is necessary to ensure that the tube is in the center of the pot and is level.
- Barrel painted in golden color.
- The construction of a newspaper ball. To do this, use unnecessary newspapers, from which they make a lump and wrap it with threads. A hole is made in the ball, PVA glue is applied and the tube is installed in the ball. After that, the base is covered with padding polyester and tied tightly at the base.
 The original topiary for the New Year can be made from cones
 After all these processes, you can proceed to the most pleasant - decorating. To do this, paint the cones in White color and leave to dry. After they dry, you need to give them a shine with golden paint. Make a hole near the bases of the cones, apply PVA glue and pierce them with a toothpick. Then the toothpick must be soaked in glue and attached to the ball. Pearl beads can be attached on top of the cones using superglue. The placement technology is chaotic, but the beads should smoothly adorn the bumps. To give a homemade tree a New Year's mood, you can decorate it with tinsel.
Christmas tree topiary (video)
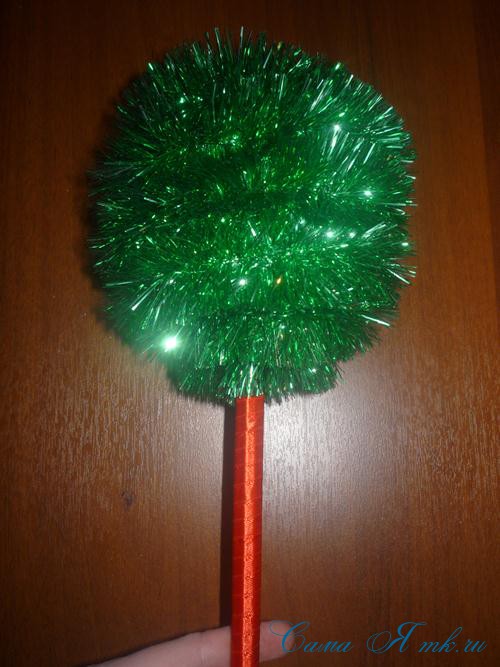
Christmas tinsel decoration
Incredibly exquisite DIY New Year's topiary can be created from tinsel. To make them, you need to take a foam ball base, a wooden stick, a glass, a small disk, a glass, gypsum, green and silver rain, golden bows and small beads. From other materials and tools, you will need a glue gun, transparent Moment glue, double-sided tape and scissors.
Festive topiary, master class of the creative process:
- The glass is filled with plaster, in the center of which a wooden stick is placed. Then you should glue a small disc to the glass and leave to dry.
- A wooden stick is wrapped with a thin rain, securing it from above and below with double-sided tape. After that, you need to wrap it with beads and fix it with a glue gun. At the bottom, the stick should be decorated with wide silver tinsel, and glued with adhesive tape.
- A base ball is glued to the stick, which is decorated with green rain and decorated with small beads.
 Incredibly exquisite DIY New Year's topiary can be created from tinsel
 The glass can be additionally decorated with tinsel, cut into pieces different sizes. Golden bows are also glued to the surface.
Topiary for the New Year is a great opportunity to create original decoration for home or to make a wonderful surprise for relatives.
Attention, only TODAY!
New Year holidays are a great occasion to take a break from current affairs, meet with loved ones and have a great time. Of course, the holiday cannot be complete without gifts, so we spare no effort and time to find the most unusual gifts and make jewelry that fills houses with an atmosphere of fairy tale and magic. An excellent gift option or decorating a house can be the main symbol of prosperity and well-being.
Yes, we are talking about the New Year's topiary, also known as the "tree of happiness"! Initially, the art of topiary haircut was a concept of landscape design, and the first mention of it has been preserved in sources dating back to the heyday of the Roman Empire. Topiary (from the Latin "topiarius") was then called a special craftsman who gave trees and shrubs a verified decorative shape - a square, ball, triangle, various animals, birds or fantasy characters.
New Year's classics - topiary from cones, Christmas tree decorations or felt
Gradually, the baton was picked up by the inhabitants of European countries, and today topiaries have firmly settled in interior design and began to look like small trees from a wide variety of components - dried or artificial flowers, beads, cones, grains, ribbons, parchment, buttons and much more. They are able to revive any interior and give it a twist.
Moreover, topiaries are great gift for those who are not too fond of caring for indoor plants. This tree does not need watering, but the dust from it is easily blown away by a cold stream of air from a hair dryer. The main thing is to keep the topiary out of direct sunlight so that it does not fade over time. Let's look at a few master classes on creating the most unusual topiary, which you can make and present to colleagues, friends or family for the New Year 2018.
Idea number 1: Classic New Year's Topiary
 This topiary is a Christmas classic for traditionalists.
 The classic Christmas topiary is an unusual alternative to a Christmas tree made from twigs, cones, balls and beads! Put such a decoration on the table in the office - and you will immediately feel the atmosphere of the holiday, set it at home - and every time you look at the mini-Christmas tree, you will get the feeling that the most long-awaited night of the year is just around the corner. Making a topiary is not at all difficult if you have prepared in advance:
- decorative acrylic paints white and brown;
- glitter for applying contour patterns on fabric, ceramics, metal and wood;
- mother-of-pearl gold-colored acrylic paint;
- artificial spruce branches;
- beads;
- Christmas balls of small diameter;
- candlestick made of plastic or wood;
- wrapping paper;
- roll of adhesive tape;
- glue gun;
- a piece of household sponge;
- spruce or pine cones;
- sandpaper;
- brushes;
- spatula-palette knife;
- a coil of rope;
- scissors.
 To make a topiary you will need a basic hand-made set
 Step 1. Create a trunk. First you need to carefully go over the candlestick with sandpaper so that acrylic paints adhere well to its surface. Using a sponge, apply a layer of brown acrylic and let it dry thoroughly. If the paint lay unevenly, repeat the operation again. After that, pick up some gold acrylic on the brush and apply careless strokes to the protruding elements of the candlestick. After that, apply strokes of white acrylic in the same way.
 Creation basic elements- “trunk” and “crown” of topiary
 Step 2: Making the crown. For the crown, you will need several sheets of wrapping paper. It must be crushed in the shape of a ball and fixed with masking tape. After that, a rope is wound around the ball. You should not make a tight ball - the ball should turn out to be voluminous and have gaps between the threads.
 Christmas decorations for crafts it is worth decorating with glue with glitter
 Step 3. Decorate decorations. We decorate one part of the balls with snow, and the other with glitter. To simulate snow Christmas balls a little white paint is applied to the surface. It is better to do this with a foam rubber sponge. Then take any chopstick (for example, a Chinese chopstick), string the balls and hang them to dry, placing the ends of the chopstick on glasses or the sides of a cardboard box. To cover with glitter, the balls need to be randomly wrapped with masking tape, and then apply glitter in the remaining gaps. Pine cones and beads are covered with a layer of white acrylic. This should be done by lightly patting the sponge on the surface.
 Topiary crown decoration with decorative elements
 Step 4. We collect the topiary. With help glue gun fasten balls and pine cones on the crown of the topiary. Decorate the remaining gaps with spruce branches. Thinking through the decor, try to keep the original shape of the ball. Now divide the beads into separate balls and glue them on the spruce branches, imitating berries covered with frost.
 Fixing the basic elements and the final assembly of the topiary
 Step 5 We fasten the trunk to the crown. Apply a layer of mass from the glue gun to the crown and top of the candlestick and lightly press the elements together. Your craft is ready! If desired, the trunk can be additionally decorated with a bright ribbon and attach a label with wishes and the name of the person to whom the present is intended.
Idea #2: Blue Cord and Candy Topiary
 Topiary crown assembly from cord and foam base
 The New Year is associated not only with tangerines and Christmas trees, but also with sweets, so such a gift will definitely create the “sweetest” mood in the person being presented. Of course, sweets in such a tree have an exclusively aesthetic function, but it looks really unusual and festive, and blue and white tones are the best suited for winter decor. To make a topiary you will need:
- sweets in a beautiful blue or blue wrapper;
- a piece of cable;
- blue lace;
- a piece of foam;
- glue;
- scissors;
- stationery knife;
- corrugated paper;
- glue gun;
- cup;
- beads;
- awl;
- decorative braid or ribbon;
- sequins;
- a small silver bell;
- wire.
 Step-by-step instructions for assembling candy topiary
 The process of making a topiary consists of the following steps:
- Step 1. Lubricate the flexible electrical cable with glue and decorate with satin or paper tape by winding it in a spiral.
- Step 2 Attach a bell to a piece of wire by making a loop at the tip. Decorate the junction with a ribbon, coat the wire with glue and wrap it with tape.
- Step 3 Using a clerical knife, give a piece of foam the shape of a cone. At the bottom of the cone, put a dot with a glue gun, fix the end of the cord and wind it, pressing each new skein tightly. Periodically apply a mass of glue gun to the cone so that the lace holds firmly on the cone.
- Step 4 Make a hole in the top of the cone with an awl, insert the wire with a bell, wind the cord to the end and secure with a glue gun.
- Step 5 Insert the cable, decorated with tape, into the bottom of the cone. Decorate the unfilled part of the foam with sweets.
- Step 6 For the stand, you can use a small glass that needs to be pasted over corrugated paper, attach decorative tape, rhinestones, beads and sequins. For greater stability of the topiary, place a piece of foam in the glass, make a hole in it and glue the wire leg.
Idea #3: Shell Topiary
 Making and decorating the crown of shell topiary
 Such a decorative topiary will certainly create a roast mood. summer day, recalling the upcoming vacation and evoking dreams of warm sea waters, the sound of waves, yellow sand and juicy tropical fruits. To work on the craft, you will need the following items:
- newspaper or wrapping paper;
- shells;
- pieces of coral;
- small stones;
- beads;
- glue;
- plastic glass;
- a small glass cup or vase;
- Styrofoam;
- Chinese chopstick;
- rope;
- gypsum.
 Making the stand and final assembly of the “marine” topiary
 - Step 1. We make the trunk. To do this, you need a Chinese stick or just a twig from a tree. You need to apply a layer of glue on the stick or smear it with a mass from a glue gun and wind the twine in a spiral.
- Step 2. Decorate the crown. From a piece of foam, cut out a ball, which then needs to be pasted over with pieces of coral and shells. Next, cut the twine into small pieces, tie them with bows and fill in the voids so as to close the foam. Bows can be decorated with rhinestones or mother-of-pearl beads that look like pearls. In the lower part of the crown, it is necessary to make a hole, smear it with glue and put the crown on the prepared stick.
- Step 3. Making the base. For the base, you will need to dilute the gypsum with a small amount of water, fill it with a mass a plastic cup and insert a tree trunk into it. Place a glass of plaster in a glass vase, after filling the bottom with an even layer of pebbles. Decorate the remaining voids on the sides and the top of the cup with shells, pebbles and beads. Your marine topiary is ready!
Idea #4: Coin Topiary
 crown assembly money tree from coins of the same denomination
 Coins of small denominations are less and less used in circulation, because inflation leads to the fact that we almost always use paper banknotes for payments. Coins received for change in a store or public transport gradually settle in the side pockets and at the bottom of bags, in the pockets of coats, jackets and jackets, and then simply spill into some box or vase, where they lie, no one needs.
However, they can be used as a decorative element in the manufacture of topiary. Moreover, a topiary made from coins is a real money talisman, because it will definitely attract prosperity to your home and direct a constant financial flow ”To make crafts, you will need to stock up on the following materials and tools:
- small coins. It is advisable to have money of the same denomination, so the topiary will look seasoned and stylish;
- foam ball;
- Styrofoam;
- thick wire;
- golden satin ribbons;
- PVC glue;
- scissors, a roll of adhesive tape;
- rhinestones;
- glue gun;
- cup;
- golden acrylic paint;
- plastic sheets.
 Assembling and decorating the New Year's topiary from coins
 When making crafts, follow these instructions:
- Step 1. We prepare the crown. Cover the foam ball tightly with masking tape. Attach the coins by applying mass from the glue gun to the ball. It is better to start from above, placing coins in the manner of fish scales, that is, so that the next one goes a little on the previous one. At the bottom of the ball, leave a small piece of empty space - the trunk of the money topiary will be attached here.
- Step 2. Making the trunk. Take a piece of thick wire and wrap it with golden tape, fixing it with a glue gun.
- Step 3. We connect the elements. With a sharp awl, make a hole in the ball, expand it to the diameter of the wire-barrel. Coat with glue and attach the trunk to the crown of the tree.
- Step 4. Decorate the crown. Glue gold rhinestones on some coins. For this, it is best to use PVC glue.
- Step 5 Install the tree. Take a plastic cup and fill it with a piece of Styrofoam (gypsum can be used for more stability). The glass can be decorated with layers satin ribbon gold color and decorate with petals or paste over with several bills, covering them with a layer of glitter with sparkles. Attach a couple of petals to a tree trunk.
- Step 6. Decorate the crown. Cut the satin or organza ribbon into small pieces and fold them into loops. Attach to the bottom of the topiary crown. Ribbons and leaves can be additionally decorated with small beads. Your home amulet to attract wealth is ready!
Idea #5: Walnut Topiary
 Materials needed to make the stand and barrel
 An unusually refined composition that looks like a truly designer thing, but is created from the simplest and most inexpensive materials. Such a topiary will be happy to receive any esthete as a gift, so get creative by preparing the following items:
- foam ball;
- glue gun;
- white acrylic paint;
- twigs;
- foam sponge;
- artificial moss;
- flower pot or small vase;
- flat wooden stick;
- gypsum;
- walnuts;
- a few thin hair ties.
 Stylish walnut topiary painted with white acrylic
 Step by step instructions for making topiary:
- Step 1. Decorate the nuts. Using a foam sponge smeared with paint, paint the nuts white. You need to press the sponge lightly to give the composition a slightly sloppy look.
- Step 2. We prepare the crown. Apply a glue gun to the foam ball and glue a thin layer of artificial moss. After that, attach the painted nuts to the ball, trying to arrange them as tightly as possible. A small place should be left only at the bottom of the ball.
- Step 3. Making the trunk. Attach several branches to a flat wooden stick, fixing them with hair ties.
- Step 4. We collect the topiary. Make a small hole in the lower part of the crown, apply a mass from the glue gun and insert the tree trunk there. Dilute the gypsum with a little water, place the gypsum in a pot and lower the lower part of the trunk into it. Leave to dry. In order to hide the layer of gypsum in the pot, glue some artificial moss on it, decorate it with white ribbons, add rhinestones or beads.
Idea #6: Vintage Topiary
 Step-by-step instructions for making a stylish vintage Christmas tree
 If you have a friend who loves boho style or is crazy about vintage things, then this master class will be a direct guide to making a gift. Gilded lace and unusual decorations will help you create an unusual and stylish New Year's topiary, which can easily replace a festive Christmas tree. For crafts you will need:
- cardboard cone;
- glue or glue gun;
- can of gold paint;
- textured lace;
- wooden stick;
- decorative lace;
- beads, buttons, unusual accessories;
- small pot;
- scissors;
- golden organza ribbons;
- gypsum.
 Making a vintage topiary with lace and accessories
 Making a topiary does not take much time. Follow the instructions:
- Step 1. Making a crown. For the crown of the topiary, use a cardboard cone. On its top you need to apply a little glue, and then wind the lace in a spiral, tightly fixing each layer. Make sure there are no gaps between the rows. When the crown is ready, apply a little gold spray paint to the lace - in our case, dense coloring is not needed, even if the topiary has a somewhat careless look.
- Step 2. We prepare the decor. Lay out the accessories on a sheet of paper and paint well with gold paint. Set aside to dry completely. Cut the organza ribbon into pieces and tie a few bows. Stick decorative elements in a chaotic manner on the cone. Add some beads or beads.
- Step 3. We make the trunk. As a topiary trunk, use a wooden stick on which you need to wind a decorative cord. Don't forget to fix it with glue. Apply glue to the inside of the cone where the top is and attach the stem to the crown.
- Step 4. We fix the craft. Dilute the gypsum with water and place the mass in a flowerpot, insert the stem of the topiary and let the gypsum dry. Decorate the flowerpot with a layer of lace, sprinkle a little with gold paint and glue a few decorative elements. Gypsum can be covered with a layer of wood shavings or small beads. Vintage topiary is ready!
Idea number 7: Cone Topiary
 Pine cone scale Christmas topiary
 Spruce and pine cones look great as a decorative element when decorating a house for the New Year. We offer to make one of the most non-standard New Year's topiary from them, which will instantly bring a festive mood to your home. For crafts you will need:
- cardboard cone;
- glue or glue gun;
- a can of gold or silver paint;
- glitter or sequins;
- scissors;
- bumps.
 Step by step instructions for making decorative Christmas tree


