Topiary for a woman's birthday. DIY decorative trees: master class
Surely many people want to have a tree of happiness at home. In the master classes we will tell you how to make a topiary from napkins, coffee beans and corrugated paper.
It is believed that the topiary is a tree of happiness. Such a gift would be appropriate for any holiday. By the New Year, you can make a tree and decorate it with tinsel and garlands. It would be nice to give your soulmate a topiary on Valentine's Day, on which hearts and valentines “grow”. The tree presented below will never wither, and such a gift will delight the one to whom you present it for a long time or will become another attribute of the comfort of your home.

To create such a delicate graceful tree, you will need the following materials:
- corrugated paper in pink and green;
- foam ball;
- PVA glue;
- wooden stick;
- scissors;
- paint can;
- satin ribbon;
- decorative moss;
- floral sponge;
- flower pot or pots.

To make crepe paper roses, cut it into strips 24 cm long and 3–4 cm wide.

Value paper tapes there may be another. It all depends on what size you plan to make the composition and flowers.
Now fold over the big edge paper strip about a third of its width.

Starting from the small side, twist the workpiece, as shown in the photo.

At the same time, twist the lower edge of the tape more tightly, and the upper, bent, slightly weaker. Then it will be seen that the rose petals are blooming.

Glue the flower with PVA to the top of the ball. In the same way, you need to make other roses from corrugated paper and attach them to the base.

Try to glue flowers as much as possible closer friend to friend. Decorate the entire foam sphere in this way.
If you don't have a styrofoam ball, replace it with a plastic one. You can twist the paper, tie it with a rope to achieve a round shape and use such a base.

This is what you should have after all the flowers are glued on. If you want the pink color to be set off by the leaves, make them from green crepe paper, but the strips should be shorter and slightly narrower than rose ribbons.
We continue to create corrugated paper topiary. Having cut the floral sponge to the size of the diameter of the pots, we put it inside the pot.

Pre-paint the wooden stick, let it dry. Stick this blank with one side into the ball, and the other into the sponge, fix it in these places with glue so that the structure holds better.

Hide the sponge under a small layer of decorative moss, tie a satin bow to the strip, and then you will get a beautiful corrugated paper topiary.

Such a tree can be made by a child under the strict guidance of the father and presented on March 8 to mother, grandmother. This creation will decorate festive table. If you make several of these trees, they will perfectly fit into the interior of the room where a wedding is celebrated or a fun party is taking place.
To make roses in harmony with the surroundings, you can make them from corrugated paper in another suitable color.
How to make crepe paper roses?
In order to decorate our tree in this way, we will twist the roses for it with a knitting needle. Right now you will learn how to make such flowers with your own hands and decorate the topiary with them.
For needlework, you must have:
- paper napkins;
- knitting needle;
- scissors;
- spool of thread;
- glue gun or glue "Titan";
- wand;
- corrugated paper.

Buy the cheapest and simplest single napkins. And you can not only save money, but also make flowers, the blanks for which are beautifully draped.
Put the first square on the table, and on one of its sides, which is closer to you, a knitting needle. Moving away from you, start winding a napkin on it, not reaching the edge opposite 3-4 cm.

Slide the opposite ends of the resulting roller towards each other, and then carefully remove the napkin from the knitting needle.

Now, starting from one edge, twist this workpiece into a roller. In this case, the roller should be at the top, and the free, not wound side, at the bottom. Attach exactly the same second blank to this one and continue to twist the corrugated paper rose in a spiral.
Depending on how splendor you plan to make a flower, you will need 3-5 blanks, from which you will make one rose.

This is how beautiful the paper flower turned out.

From below, tie it with a thread, and cut off its “tail”.

To make leaves for the topiary, place 2 green napkins one on top of the other obliquely, as shown in the photo.

Crush them in the form of a bag, tie a thread at the bottom.

We create a lush tree from flowers
Now we need to assemble the topiary from blanks and other materials. This can be done, as in the case of a corrugated paper tree. Wrapping paper is quite suitable for the basis of this. It must be crumpled in the form of a ball, tied with twine. All sorts of office drafts, unnecessary papers will do. The main thing is to give the workpiece a round shape, aligning it. Then glue the napkins on top and let the ball dry.

Now stick the leaves and flowers on the resulting blank.
Well, how to attach a stick to an already decorated ball, put it in a pot, you read above.
A floral or ordinary sponge can be draped not only with decorative moss, but also with such bags made of green napkins. To do this, they are folded obliquely and the corner is fastened with a stapler.
This is what a wonderful result of creativity is obtained at the end of the work.

Other variants of corrugated paper roses
If you want flowers to be more fluffy, check out another way to create a topiary from napkins.
For this process, you need the following equipment and materials:
- napkins of the desired color;
- scissors;
- a small sheet of cardboard;
- stapler;
- glue.
Crumple the top layer of the napkin at the base. Then, the second and subsequent layers.
If you want to finish this work as soon as possible, then crumple 2 layers at once. If you have a ball with a diameter of 20 cm, then you need to make 48 blanks from napkins to cover it all with flowers.

If you don't have a tree trunk stick, then you can make a paper topiary without one. In this case, simply place the round blank-ball in a flower pot or a basket made of newspapers.

Now, using a heat gun or glue, attach hand-made flowers to the ball. Start with the first bottom row, gradually moving up. If you alternate roses like this, creating a do-it-yourself topiary (next step by step photo demonstrates the process), then you will get an amazing flowering tree.

Basket or pot can be decorated satin ribbons, and here is such an amazing result you will get.

DIY gift - a heart made of grains
Here is another example of how you can make a topiary with your own hands. The master class will explain each step of the needlework process.

Such a topiary can be made and presented not only to your soulmate on Valentine's Day, but also to present to a dear person, relative on February 23, birthday, girlfriend - March 8.
To create such a fragrant coffee topiary, you will need:
- twine;
- brown satin ribbon;
- coffee beans;
- glue;
- cup and saucer;
- brown paint;
- alabaster or plaster;
- thick brown threads;
- anise stars.

Glue 2 rows of grains on the sides of the heart, while they need to be placed flat side down. After that, fill in the middle in the same way.

In order for the workpiece to be voluminous, the base does not shine through, glue the second layer of grains on one side and the other already up with slots. The final touch of this step is gluing anise in the center of the star.

And then he tells how to make a do-it-yourself topiary master class. Take a piece of wire, wind its base around the leg of a table or chair. Bend as shown in the photo and wrap with twine, gluing each section of the rope to the wire.
Bend the end of the wire with larger coils, attach a heart of coffee beans here, putting it on a loop.

In a container that you don’t mind throwing away later, pour alabaster or gypsum, add water to get the consistency of sour cream. Install the lower part of the wire into the cup, fill it with the resulting mass, leave to harden completely, leveling the surface. When this happens, glue 2 layers of grains on top.

How to make a coffee tree with your own hands?
If you like to create from such interesting material, create another coffee bean topiary. It is performed almost according to the same principle as the previous one, but a ball is taken as the basis.
Here's what you need to prepare before starting work:
- evenly shaped coffee beans;
- a ball with a diameter of 8 cm;
- flower pot or other suitable container;
- glue gun;
- a plastic tube 25 long and 1.2 cm in diameter (if there is none, use a piece of plastic pipe or a wooden stick;
- alabaster;
- nylon and satin ribbon;
- Double-sided tape;
- scissors;
- a container for mixing the solution.

You can leave the balloon like this, but it is better to glue the second row of grains to it, placing them already up in strips. Then a coffee tree, made with your own hands, will look more attractive and aesthetically pleasing. Here is what you should have at this stage.

Now wrap double-sided tape on a stick or tube, not reaching both ends by 3 cm, and on top of it - a tape.

To measure how much water is needed for the solution, pour it into the container in which the coffee topiary will be located. Then pour it into a bowl for mixing the solution, add alabaster and stir well. The consistency of the solution will resemble thick sour cream.
Immediately transfer the resulting mass to a pot, put a tree of coffee beans in the center of it. When the solution hardens, stick on its surface first one and then the second row of grains, in the same way as we did above - first with a strip down, and then, the second row - with a strip up.

Apply glue to the top of the stem and put the hole of the round blank on it.

It remains to decorate the crown with anise stars, tie a bow, and a magnificent coffee tree is ready.

If you liked the tutorials on making topiary, you want to see visually how to make a coffee tree with your own hands with a crown in the shape of a heart or a ball, watch two videos. And the third will give inspiration, suggesting a lot of ideas to create a topiary from napkins:
You can easily update the interior of the room, bring notes of dreaminess and tenderness into it - by making a do-it-yourself topiary for beginners from natural or decorative materials. You will have to work a little on the tree of happiness, but the result is definitely worth it. The craft will perfectly decorate any room, will become a good gift for a holiday for a friend or relative. For newlyweds, you can make a Bird's Nest topiary - a real tree of happiness, symbolizing a cozy family nest. It is not necessary to act on a grand scale and make a large topiary - small topiaries look no less decorative, and will fit on any shelf or desktop.
You can easily update the interior of the room, add notes of dreaminess and tenderness to it - by making a do-it-yourself topiary
Initially, figuratively trimmed trees and green shrubs in the yards of wealthy people were called topiaries. Over time, this art has changed. Now everyone can decorate their home with such cute decor. The size of a tree often does not exceed half a meter, and the variety of its shapes, colors and materials used to make it is almost limitless - at home they are made step by step from fabric and banknotes, coins and coffee beans, autumn leaves and dried flowers, even sweets and chocolates - everything do not list. See examples of topiary in the gallery below.
To create this craft, modern needlewomen use almost everything.
Here is just a small list of the most popular items for decoration:
- Artificial flowers from foamiram, satin and rapeseed ribbons, salt dough, plastic, napkins, organza and so on.
- Decorative berries, twigs, leaves.
- Large and small beads, beads, buttons.
- Coins of various denominations.
- Souvenir paper money.
- Old gears, bolts, scissors and other small tools.
- Thread pom-poms.
- Balls for decorating Christmas trees.
- Paper squares and more.
Synthetic little things, of course, allow you to make topiaries of delightful beauty that do not lose their color for a long time. appearance, retaining its attractiveness for many years. But no less interesting are products made from natural, natural materials, such as:
- Cones, chestnuts, nuts, pistachio shells, acorns.
- Sea pebbles, shells, sand.
- Dried slices of citrus fruits, roses made from their peels.
- Rowan berries, physalis inflorescences, yellow leaves of any trees.
- Coffee beans, cinnamon sticks, star anise, cloves and other herbs.
The choice remains only with the needlewoman and her imagination. In each craft, no matter what it is made of, there is a special sincerity and warmth that fills the interior with harmony.
Gallery: do-it-yourself topiary (25 photos)


Classic tree of happiness: master class (video)
How to make the easiest do-it-yourself bead topiary: instructions
Of the many options, the wish tree made of beads or imitation pearls is undoubtedly the easiest to execute. Consider detailed wizard class to create it.

It turns out very nice
What you need to have:
- Foam base ball.
- A bunch of beads, pearls of one or more colors. In needlework stores, you can buy several low beads at once, so as not to glue them one by one.
- Two pieces of strong steel wire of the desired length, to which the depth of the pot and half the diameter of the ball are added, since the stem of the tree will enter the base by half, and into the pot - to the very bottom.
- Satin ribbons, preferably thin, matching the main colors.
- Satin roses, a little felt to decorate the bottom of the pot.
- Corrugated paper, organza, satin or rapeseed ribbon of medium thickness.
- Quick dry glue or glue gun.
- Stones for filling the pot, gypsum for pouring.
- Paint and pebbles for decorating the ground.
- Plastic pot.
Let's start making the simplest wish tree
- We start by making holes in the ball for attaching steel wires, trying them on. We wrap the flight wire so that at the top it is close to the ball, and at the bottom - 5 cm below the expected ground height. Put aside.
- Then we take a low bead and carefully, starting from the very top exactly above the holes for the trunk, fasten the first bead. Then we apply transparent glue in stages and immediately fix the beads without removing them from the thread. When only a couple of three turns remain before the holes, we insert the wires for the barrel, preliminarily lubricating them with plenty of glue, and finish the winding, tightly closing the entire ball.
- Let's start working on the pot. We wrap it with corrugated paper, cover it with organza on top and grab it with tape. We glue the joints. At the bottom we glue a circle of felt.
- Now planting a tree. First, put the stem in the pot. We fall asleep pebbles and immediately fill it with prepared gypsum. Please note that gypsum expands when it dries, so do not fill it to the very top, leave some space. It will dry out within a few minutes.
- It remains only to decorate at your own discretion the ball itself, its bottom and the surface of the gypsum in the pot. It's so simple, beauty is created with your own hands.

Options may vary
Tip for a beginner: when making, it is most convenient to use a heat gun. The glue in it is always transparent, dries very quickly and holds securely.
Topiary from natural materials: a step-by-step master class
Beginning needlewomen can also easily cope with working on a tree made of cones, acorns, chestnuts, walnuts or hazelnuts. This great idea for classes with a child, allowing you to teach the baby to see the beauty even in the most ordinary and simple things. In addition, many children love to collect such things while walking on the street. For the stem, you can even take an ordinary twig, which will give even more naturalness, environmental friendliness.

Beginning needlewomen can also easily cope with working on a tree of cones, acorns, chestnuts, walnuts or hazelnuts.
What you need:
- Styrofoam ball for the base.
- Cones, chestnuts or other nuts.
- Wire or strong twig for the trunk.
- A container in which we will plant a tree.
- Stones and plaster.
- Glue gun or dragon type glue.
- Acrylic colorless varnish, available in hardware stores.
- Decorations on request.
How to make a topiary from cones
As in the previous MK, first of all we pierce a hole under the barrel, try it on and decorate it. If you took a simple branch, then you can leave it unchanged.
- We take the base and glue the selected nuts or cones on it, tightly attaching them next to each other.
- Shortly before the end of the work, we insert the barrel into the hole and finish the ball. If you cover pine cones with artificial snow, then a wonderful New Year's option will come out.
- Chestnuts and acorns complement perfectly autumn leaves. And walnuts and hazelnuts look better if they are combined together and decorated with bright rowan berries.
- The last step is planting a tree in a prepared container, for example, a brown flower pot would be very appropriate here.
Newbie Tip: Finished walnut craft should be coated for durability acrylic varnish or paint. Best suited gold and silver colors.
Memories of the sea or what to do with shells brought from vacation
The craft made of shells and burlap with elements of twine looks very aesthetically pleasing. She will embody the dreams of a new trip to the endless sea. Reminds me of a good time. And the collected gifts of the deep sea will not lie idle.
For marine topiary you need:
- Foam base: balloon or heart.
- Porcelain white or transparent cup, vase, glass.
- Steel wire.
- Thermal gun.
- Shells, sea pebbles.
- Pearls are artificial.
- Burlap, twine.
- Gypsum or pebbles to fill the container.

A craft made of shells and burlap with twine elements looks very aesthetically pleasing.
Detailed instructions for creating a simple and straightforward:
- We determine the center of the base and make the usual hole for the trunk. We try on the wire, decorate it with twine, put it aside for a while.
- We carefully and accurately glue the foam base with shells, pebbles and pearls in random order. We make flowers, simple or lush bows from twine. We cling them between the main details. We insert the finished trunk into place and draw up the bottom of the base.
- We place the craft in a cup or a vase, fill it with plaster. We sprinkle the gypsum that has not yet hardened with sea or decorative sand. We decorate the container with several turns of twine. Another option is to wrap it completely with burlap and fasten it with a satin ribbon in pastel, light colors.
- If there is no desire to use gypsum, and the topiary itself is small in size and weight, it is preferable to plant it in a transparent glass or cup, filling it with the remaining pebbles and shells. Thus, a delicate decorative element is obtained, which at any time will remind you of summer holiday, charged with positive and energy.
The great Roman Empire left to humanity not only the aqueduct and baths as a legacy. Great aesthetes and masters of landscape design, the Hellenes were proud of their decorative places - topia, topiary, or skillfully cut tree and shrub compositions.
The modern topiary is a miniature that imitates a neatly trimmed tree. Compositions decorate the interior, formed in absolutely any style. They create a miniature topiary with their own hands from paper, fresh flowers, bird feathers, beads, rhinestones, coins, and even coffee beans.
The meaning of the European floristic tree of happiness, as the topiary is called, is not only a decorative load. The miniature symbolizes wealth, fertility and a strong spirit, pouring out the energy of happiness. A small tree tends to enhance the energy potential of the whole house, in whichever of the rooms it is installed.
Manufacturing technique
In European countries, it is customary to give topiary for any occasion - for a wedding and name day, housewarming and under New Year. They give friends a miniature tree and for no reason at all, but from the bottom of their hearts, making another visit. Moreover, all crafts are made by hand.

Topiaries are quite easy to make. Mini-trees consist of three parts - a crown and a trunk, fastened together and installed in a container. Pots, coasters or baskets of various shapes are used as a base.
The crown can be round, oval, heart-shaped, letters or numbers. But most often they make a topiary with a spherical crown.
The trunk is a strong thick wire or branch wrapped in twine, bright floral ribbons or colored plastic. In some cases, a thicker bough is used in the form of a trunk. The bark is removed from it, etched with stain and varnished.
Thematic decor
Topiary ideas can be varied and fantastically beautiful, reflecting all kinds of artistic ideas of the author, and most importantly, handmade. For example, paper mini-trees decorated with sweets, fresh flowers or fruits are used in the festive table setting. Thematic topiary is made on the New Year's table. Their crown consists of cones, organza, satin ribbons, artificial flowers.
Contrasting shades of blue, green and red in the decorative elements of the topiary will perfectly emphasize the silver and gold threads. And flowers or figurines in pastel colors will wonderfully shade the shiny elements in the crown of the topiary.
It is important to come up with a theme and choose beautiful material. The miniature should reflect its purpose and express the idea that prompted its creation. Shells, feathers, threads of beads and small coins allow you to create delicate, love-filled mini topiaries. Coffee and cereal grains, artificial flowers, lace and organza are suitable for creating compositions designed to decorate the kitchen space.
For classical, designed in gray tones of the interior of the house, a topiary created from satin ribbons of blue or blue cold shades is perfect. For rooms decorated with sunny tones, compositions are made in dark colors.
Details and elements
The trunk of a mini-tree is assigned not only a bearing role. IN general plan the composition of the trunk should be kept in the same spirit, both with the base and emphasize the magnificence of the crown. Therefore, the trunk should be given appropriate attention - the material for its decoration is carefully selected. If a bough is chosen, then the tone of the stain is selected, with which it will be impregnated and matte or glossy varnish. The coverage depends entirely on the type of composition.
The base can be of various shapes and created from any material - a small ceramic flowerpot or a fancy-shaped glass cup. In some cases, topiaries are placed in baskets, such as decorations for the Easter table.
All parts are firmly attached to each other. The crown is glued, and the trunk is fixed in the vessel with pieces of foam and filled with alabaster for strength. It should be remembered that alabaster hardens very quickly. Therefore, the consistency of the gypsum solution should resemble liquid sour cream. Then the material will be easier to work with.
The crown is fixed on the trunk only after the gypsum mortar is completely dry. During this time, the crown is made. To form the crown, hot glue is used to secure the flowers, pins and skewers. After that, the topiary is finally assembled.
Festive topiary
Topiaries are made for the holiday and as a decorative decoration for the interior of rooms. For example, interesting ideas for decorating a children's room for a child's birthday. Sweet large topiary in the form of a candy tree with funny souvenirs. In addition to the pleasure received, each kid will be able to take with him a small gift:

The autumn holiday of Halloween indulges in abundant harvests. The symbol of the holiday is the pumpkin. A pumpkin imitation topiary made from pumpkin seeds, leaves, candies and ribbons, set in a tea tin, will be a great decoration of the kitchen space on holidays. The lower part is decorated with canvas, and the witch figurine is located in the upper part of the topiary, recalling the mysticism of the holiday:

Christmas topiary is made from cones, holly berries, organza, pine needles and silk ribbons. They decorate mantelpieces and coffee tables in the living rooms, as well as bedside tables in the bedrooms:

On Valentine's Day, lovers prepare gifts for each other. Topiary in the form of a quivering white-pink heart, decorated with valentines, feathers and satin ribbons, will bring a touch of romance to your relationship:

In anticipation of the Easter week, you can create an Easter tree decorated with colored eggs, artificial flowers and satin ribbons. It can become the main decoration of the Easter table. And miniature topiary, fortified in pots in the form of eggshells, will be wonderful gifts for guests invited to the holiday:

Topiary in the interior
Fragrant coffee topiary decorated with straw, pieces of canvas and thick twine will find its place in the kitchen. A mini tree made from napkins is also great for the kitchen:

Topiaries, unusual in their beauty, made up of fresh flowers, will decorate the festive table in the living room. Elegant miniatures in bright colors, made in accordance with the style theme of the room, will help to create a unique style of the guest room:

For the bedroom they form gentle, like feelings, original decorative compositions from ribbons and beads, lace and organza in light pastel colors, reminiscent of a spring mist. The basis for the composition is usually transparent small containers of unusual shapes:

In the girl's bedroom, you can install a fabulous mini-tree created from corrugated paper. It will be a pleasure for a boy, a football fan, to see in his room a topiary photo from a nursery, where a mini-tree is made in the form of a large soccer ball. For decorative decoration of the topiary, butterflies, colored and mother-of-pearl beads, decorative bugs and ladybugs are used. The base, as a rule, is covered with a floristic mesh or artificial colored fabric:

For new settlers, a tree collected from hazelnuts and walnuts, large pumpkin seeds, beans and peas, symbolizing prosperity, will be a pleasant gift. Such a topiary is decorated with twine, pieces of canvas, buttons:

For a gift close friend form a composition of delicate real roses. Decorate with satin ribbons to match the inflorescences, silk fabric, corrugated paper:

Wedding topiaries are real works of art. Traditionally created from large pearl beads, decorated with satin ribbons, lace and sisal, fabulous compositions keep memories of the most important day in life for a long time:

A popular craft, which is diverse among other types of topiary, is the flower tree of happiness.


They make crafts from any fresh flowers that are bought in stores or are in the house:
- tulips;
- chamomile;
- orchids;
- lilies;
- peonies;
- poppies;
- lilies of the valley;
- roses;
- peonies;
- asters.


But living plants are not the limit. Artificial flowers from various materials are also suitable for topiary:
- paper: corrugated, colored, foamiran, napkins;
- fabrics: satin, organza, tulle, burlap, mesh;
- knitted from yarn.


Important! Crafts from fresh flowers are performed mainly in spring-summer period. They are a good alternative to a vase of water. In the fall, you can make crafts from dried flowers. For winter, use fabric or paper homemade flowers to decorate your home.


To add splendor to the crown, use sisal or bast. To decorate the trunk, satin or floral ribbons, threads, twine are suitable. It is also allowed to use real plants, such as moss, to decorate the pot.
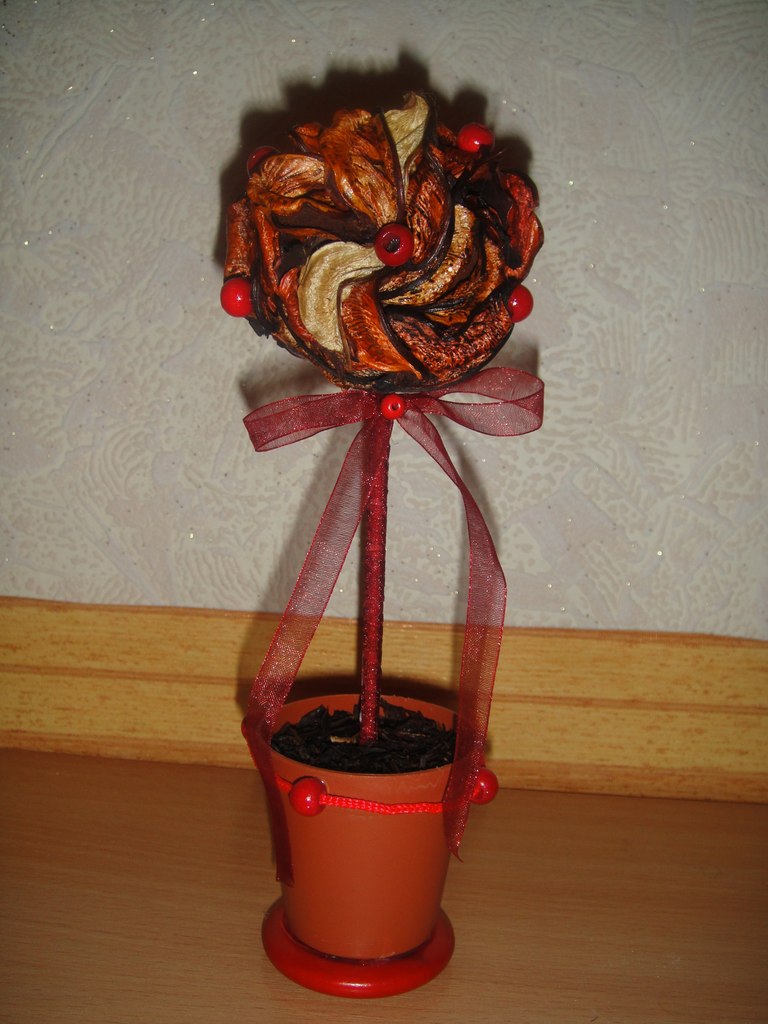
A popular version of the topiary is a craft made from real or dried fruits. Decorate the product with small berries in combination with fresh flowers. Flower and fruit topiary will be a decoration for any occasion: birthday, wedding, anniversary.


A useful master class for those who want to make a tree from fresh flowers is presented in the video:
How to make artificial flower topiary
The simplest is a tree of ready-made artificial daisies, asters, roses, peonies. We offer you a small and easy master class on how to make a tree of happiness with your own hands at home.


To work, you will need 1 hour of free time and skills in working with a glue gun. Be sure to prepare materials:
- thermal gun;
- glue;
- a foam ball of the required diameter;
- a branch from a tree for the trunk;
- ready-made artificial bouquets;
- toothpick;
- scissors;
- a stand in the form of a cup, glass, pot or homemade container;
- gypsum.

Advice! As an alternative foam ball- Foam base. The stand is chosen in such a diameter that it does not exceed the size of the decorated crown.
Important! There are no restrictions on the dimensions of the topiary. If you have a spacious room, make an outdoor flower tree that is 50 cm high.


To create your own masterpiece, follow the instructions step by step:
- cut the flowers from the stems with scissors. Leave the tail length at about 5 mm. Do not throw away the cut stems and leaves, they will come in handy for decorating crafts;
- make a hole in the base to a depth of 2 cm, where you insert the trunk;
- decorate the ball. Make small holes around the perimeter with a knitting needle or a toothpick. Spread glue on the stems on the flowers and quickly insert into the base. Distribute all the elements correctly so that there is no chaos. Fasten the flowers so that the base is not visible;
- insert the trunk in the form of a branch from a tree into a pre-prepared hole with glue;
- close the transition from the base to the trunk with cut leaves;
- decorate the branch with stems from artificial flowers;
- dilute the gypsum mortar and pour into the pot. Insert the trunk with the finished crown and wait a few minutes until the plaster hardens;
- decorate the top layer of the hardened solution with artificial grass or sisal, which are sold in any florist's shop.


An interesting option for flower tree is the basis in the form of a bicycle. It is prepared from cut cardboard or a thick sheet of foam. The wheels are decorated with artificial flowers. It looks creative, suitable for a gift to a female colleague or on March 8th.


A detailed lesson on creating an artificial flower crafts in video:
Topiary of artificial roses
Popular flowers for decorating the crown of the tree of happiness are small and large artificial roses of different shades. Materials for manufacturing are:
- foamiran;
- corrugated paper;
- paper napkins;
- satin ribbons;
- crepe paper;
- organza;
- latex;
- felt.


If the interior in the room is decorated in a vintage style, an craft from a combination of white dry roses with homemade flowers from a music notebook will fit into it. Such a topiary can be decorated with satin ribbons and beads in pastel and light colors. Dried rose buds are allowed.


Master class on making round voluminous pink roses for the crown, see the video
Topiary in the form of a sunflower
You will fill your home with sunshine if you make a sunflower topiary. You can use one flower instead of a crown, decorate the base with a few small sunflowers. Both options look advantageous.


To make a solar sunflower, use:
- yellow napkins;
- corrugated paper;
- satin ribbons.
Flowers from ribbons using the kanzashi technique look believable. How to make a sunflower with your own hands, see the master class:
Below you can see original topiary with a sunflower in kanzashi technique.

Make your own flower topiary
When making a tree of good luck from living plants, an important role is played by a basket of flowers. It is important that the plants do not wither, therefore, how to make such a basket for a flower tree of happiness, look in the master class:
How to make DIY flowers for a topiary
There are many lessons on the Internet on how to make crafts from daisies, roses, asters, sunflowers, using corrugated paper, paper napkins or satin ribbons.

DIY ribbons

For example, how to make roses from napkins with your own hands, see the detailed MK:
Easy to make crepe paper roses for topiary. To do this, stock up on the necessary color of corrugated paper. The chamomile crown looks unusual and creative, which has ear sticks instead of petals.


Advice! To save your time, purchase ready-made cold porcelain flowers for crown decoration. So you just have to fix them on the base and not waste time on manufacturing.
For the base, it is practiced to use not only a spherical base, but, for example, a house, the Eiffel Tower, a bicycle with flowers. Decorate the base not only with flowers, but also with fruits. To do this, make dummies of suitable fruits or dry real ones.


For lovers classical style a topiary made of flowers using the kanzashi technique is suitable.
Creative housewives will love the topiary - a cup with flowers. It looks like a floating mug in the air with flowers pouring from the mug in the saucer. How to make it, see the video:

flower cup
By the way, instead of a saucer, you can use a basket of flowers.
It is customary to additionally decorate a tree with flowers with coffee beans, pebbles, beads, ribbons. A wedding topiary with beads and flowers to match the style of the event looks profitable and beautiful.

No wonder they say: "Every man should raise a son, build a house and plant a tree." But whether he can, one can only guess. But the fair sex can. She can even make a tree of happiness herself, with her own hands!
Topiary- direction of landscape design. The history of art has been known since ancient times. Today, the topiary is known as a clipped shrub, an elegantly decorated tree that will serve as a real decoration of the interior. Many are sure that the topiary attracts positive emotions and happiness, and if the tree is decorated with various banknotes or coins, then well-being in the house. This is where the name “tree of happiness” comes from.
As an element of decor, the topiary has gained worldwide popularity, and now every housewife dreams of seeing such a tree at home.
To create a topiary, you do not need to run around the shops in search of suitable materials, but use the materials at hand. Crowns can be decorated with paper flowers, ribbons or organza, multi-colored stones and pebbles, beads, sweets, etc., it all depends on your facts.
An interesting fact: Topiary, as an art, originated in antiquity. First time, quirky and geometric shapes trees, began to attach in Daytime Egypt and Greece. A well-known example of that time that can still be observed is the Hanging Gardens of Babylon.
feng shui talisman
Topiary is a kind of talisman that can attract love and happiness, health and good luck. Topiaries sold in stores mainly look like flowering trees with stones. According to Feng Shui, talismans have Qi energy. In addition, the Chinese are convinced that the precious and semiprecious stone endowed with a certain charge, therefore, the tree of happiness can strengthen health, bring good luck or make a wish come true. However, the influence of the topiary on a person will be felt only if the tree is located in the correct part of the room.

Many are sure that a talisman made with their own hands has a huge advantage. So the tree of happiness, made by hand, carries energy.
"Tree of happiness" do-it-yourself, manufacturing steps
Topiary (tree of happiness) is decorative. And it will depend only on your imagination how and from what materials you will form it.
Topiary includes three components:
- Crown
- Trunk
- Stand or Pot
Crown
A common form of the crown is a ball, however, fantasizing, you can choose any: in the form of geometric shapes, hearts, stars, etc. Popular base materials:
- Mounting foam. Such a crown can be of any shape and size. Foam is poured into an ordinary bag. After a little time, after complete drying, get rid of the polyethylene and give the crown the shape necessary for the composition. It is very convenient to work with such a crown.

Tip: When working with mounting foam be sure to use gloves.
- Newspaper. It will take a lot of newspapers. From the material it is necessary to make a semblance of a ball of the required diameter and density. You can fix the base with a sock, stocking or other fabric. Additionally, cling film, threads and PVA glue will help form the base.
- Styrofoam. The desired shape of the foam can be given with a clerical knife. Styrofoam, as well as the base of polyurethane foam, is very easy to work with.
- Papier mache. Thanks to this technique, you can create the perfect shape for the crown in the form of a ball. Inflated balloon glued layer by layer with pieces of paper. After complete drying, burst the ball with a needle and pull it out of the base. The form is ready.
- Any material. To work on the manufacture of a tree crown, you can use any material you like: a ball, a ball, spherical toys, etc.
Tree trunk
To create a tree trunk, you can take branches, a pencil, a stick, wire, or another similar element. The workpiece can be decoratively decorated with colored threads and paper, paints and ribbons, or any other material. To emphasize the structure of the tree, it is desirable that the trunk be longer. For a larger trunk, it is attached to the pot and to the crown. You can beat the composition by painting the trunk with different colors.
Tip: To make the tree of happiness look more sprawling, it is better to take a real shrub as the basis for the trunk.

pot base
The main element of the decor of the whole composition is a pot. It is he who is able to give the topiary a finished look. As a pot for a tree, not only a flower pot can act, but also a self-made pot, decorated with your own hands.
For example, if the talisman is made in the form of a bonsai, it is better to choose rectangular shape pot, and if the topiary is high, round shape pot. For the stability of the crown and base, the bottom of the pot must be weighted. This can be done with a solution of cement or gypsum, gravel, polyurethane foam and other materials. To prevent cracks in the pot when pouring the solution, pieces of foam rubber, neatly laid on the bottom, will help. To decorate the base of the tree, various pebbles, sand, glass, beads, moss are suitable.
Tip: When choosing a pot for a tree, remember that it should be larger than the crown of the tree.
The crown looks more interesting and profitable from several materials that are designed in the same style. But remember that the combination of elements must be in harmony with each other, otherwise the topiary will look complicated and sloppy.

How to assemble and how to decorate?
When collecting topiary, the first step is to fill the pot halfway with filler. Next - insert a decorated trunk with a crown into the middle of the pot, firmly fixing it in the base of the pot with glue. After that, you can do the decor of the tree itself. To decorate the topiary, it is best to use a special glue gun or PVA glue. The final stage - the pot is completely covered with filler and decorated with various elements.
decor ideas
The most elegant and fragrant decor are coffee beans. An interesting option using pebbles, shells, stars and other symbols of the marine theme. original idea topiary from nuts: hazelnuts, walnuts, almonds and others. And the most popular decor today is coins and banknotes.
Tip: Dream up, turn on your imagination, and the topiary can become a real decoration for your home or an ideal souvenir!
Popular compositions
When starting to work on a topiary, consider your train of thought and the materials used. There are many ideas, as well as compositions. Here are some DIY ideas.

Corrugated Paper Tree of Happiness
The simplest decor. For registration you will need:
- Pot
- colored paper
- Spherical crown
- Barrel from any material
- colored beads
- Acrylic paint.
The pot is covered with paint, thick thread, better with twine, wrap the trunk around and fix it with glue in the center of the pot. AND last step- this is the fastening of the crown to the trunk.

Decor. For an oasis, plastic or cardboard is suitable. The size of the oasis depends on the diameter of the pot. To fix the stem in the pot, a small hole must be made in the oasis. To decorate the tree, corrugated flowers of various shapes and structures will appear. Each flower is glued to a spherical base with PVA glue or super glue. The top of the pot can be decorated with a border, and the oasis with beads.
Tip: Flowers can be glued with hot glue, or you can use skewers or wire.
Tree of happiness decorated with ribbons
An elegant version of the tree of happiness. For decor:
- Pencils
- Ribbons
- pot
- Invisibles
Rings are formed from the tape and glued to the base in turn, closing all the voids. After decorating, the crown is put on the trunk and attached to the bottom of the pot. The pot must first be weighted.
Tree of happiness from coffee beans
For decoration you will need:
- Coffee beans
- plastic glass
- tassel
- Ball
- 2 rubber bands
- Threads
- Rope
- Wand
The brush must be disassembled into individual hairs. Lubricate the stick for the barrel with glue and fasten the resulting hairs with rubber bands. We make a hole in the ball for the crown in order to put it on the trunk in the future. The base can be painted in coffee color, this will help hide minor defects in the composition. Using glue, glue the ball with coffee beans. It is better to alternate the grains with sinuous lines to give a more elegant look. Small flowers or cinnamon sticks look great with grains. The finished crown is covered with paint or varnish, but at the same time the grains lose their aroma.

For a pot, we use a glass, after weighing it with gravel, sand or other material. We glue the finished trunk with a crown to the bottom of the base of the glass. To decorate the cup, a prepared rope is suitable, which is tied around the entire diameter. You can complete the composition ladybug or a plastic butterfly that can be attached to the top of a tree.
An interesting fact: you can give the composition a spectacular look, nobility and relief due to the double coffee layer.
Tree of happiness from beads
Beaded topiary deserves special attention. Decorating such a tree can take a lot of time and effort, but it's worth it. Any product made of beads is painstaking work. To decorate a topiary, you can immediately buy a ready-made set of beads, and a jar of coffee or cream is also suitable for a pot.

Now each of you has an idea of what a topiary is and how to make it yourself. After all, it is much more pleasant to make a thing with your own hands, and if you try, you will definitely get a chic little thing for decor in the form of a fancy fantasy ball on a leg!
45 photos of happiness tree (topiary) ideas:


