A flower from a St. George's ribbon with your own hands: how to make a holiday symbol yourself. Brooch "Spikelet of tricolor" from St. George's ribbon How to make brooches from St. George's ribbons
Very often, on the holidays of the Great Victory, in honor of the memory of minute events, people put on decorations from St. George ribbons to pay tribute to people who have made an invaluable contribution to history. The ribbon can simply be tied on the handle of the bag or fastened in the buttonhole. And can you do stylish accessory which will be appropriate in the annual celebration of this Great Day. About some simple and interesting ways making a brooch from bright St. George's ribbon quickly and simply with your own hands and will be discussed below.
We learn to make brooches from the St. George ribbon with our own hands for the holiday
Options for fixing the tape are shown in the photo:

Let's take a closer look at some of these and other methods.
The most common way to wear a St. George ribbon is, of course, a loop.
You will need:
- St. George Ribbon;
- needle, thread or glue;
- scissors;
- candle or lighter.
For manufacturing, it is necessary to cut off about 20 centimeters of tape. One of its ends is overlapped on the other to form a loop. The junction is sewn or secured with glue to prevent the elements from moving.
The brooch is ready.

For the next type of brooch, you will need three pieces of St. George's ribbon. Two elements are cut with a length twice as large as the size of the desired bow, the third is of a small length. As in the previous version, also prepare a needle, thread, scissors, glue, a lighter or a candle.
- At the first long tape, the corners are cut off on all sides. Sections are processed over fire, using a lighter or candle.
- The ends of the second tape are bent to the center with an overlap, fixed with glue and stitched.
- A short piece of the bent workpiece is wrapped in the center to mask the seams. Attached from the inside.
- The first ribbon with cut corners is bent in the form of the letter "L" and fixed on the reverse side.
- All three tapes are neatly sewn together, not allowing the seam to capture the front side.
To make such a brooch, you need a sufficient amount of ribbon. Consider the manufacturing process in more detail.
- First you need to measure 40 centimeters of tape and carefully lay them on the surface.
- We continue to lay in the opposite direction the second layer about 25 centimeters long.
- The subsequent layers are laid out in the opposite direction, reducing the length of the tape by 5 centimeters.
- It is necessary to leave a length of at least 20 centimeters.
- We fasten the blank of the bow in the center with a thread.
- Throwing the remaining ribbon in the center at a slight angle, fix it with glue.
- Cut out the ends, fixing the cuts over the fire.
For such a brooch, you need two ribbons about 45 centimeters long and two short ones.
- One of the long ribbons is folded to form a ring. Its sides are compressed to form a figure eight and secured with a pin.
- The workpiece is compressed horizontally towards the center to make a double bow. The pin is removed, and the resulting design is stitched.
- We decorate the center of the bow with a short ribbon and fasten it from the inside.
- A loop is formed from the second ribbon, which is attached to the center from the inside.
Consider detailed wizard class making a brooch from St. George's ribbon in the form of an exquisite bow.

- tape 57 cm long and 3.5 cm wide;
- needle, thread, scissors;
- button with military or Soviet symbols;
- pin or clasp for a brooch;
- candle or lighter.
- From the tape you need to get four pieces with the following lengths: 7, 10, 15 and 25 centimeters.
- First of all, we make the basis of the brooch. To do this, the largest ribbon 25 centimeters long must be folded in the form of a loop and secured with a pin.
- We leave the base and proceed to the manufacture of the bow. Now you need medium ribbons with lengths of 10 and 15 centimeters.
- The ends of each ribbon are bent inward with an overlap and secured with pins.
- The ribbons are superimposed one on one, sewn in the center, the pins are removed.
- The remaining short ribbon of 7 centimeters wraps around the blank for the bow, masking the seam. The ends are brought to the wrong side and sewn on.
- Now you need to fasten the base and the bow together in the center.
- For decoration, you can use a small button with the appropriate symbols. Try not to use catchy details, because the St. George ribbon brooch should be modest and concise. The selected part is carefully attached from the wrong side.
- A pin or base for a brooch is attached from the inside, which will later allow you to attach the accessory to clothing.
The size of the brooches can be adjusted depending on the length of the ribbon used and desired result. The main thing is not to forget that the general concept of the accessory should correspond to the theme of the holiday, and the decor has no right to be flashy and defiant.
Video on the topic of the article
Video on the topic of making brooches:
One of the most famous symbols of Russian patriotism is the St. George Ribbon. Jewelry with the symbol is proudly worn on holidays. The color distinctions of the award of Catherine II have passed through the layer of time and serve to express patriotic convictions to the current generation of people.
Make kanzashi from the St. George ribbon with your own hands with us. Detailed instructions will allow you to quickly and accurately make an attractive brooch. The decoration made will be appropriate for decorating a gift for veterans and loved ones.
If you couldn’t buy a ready-made ribbon in the store, there is an easy way to make a St. George ribbon with your own hands. This will require:
Brown or orange ribbon;
a strip of cardboard, the width of which is 4 cm more than the tape;
spray paint, brown for orange or orange for brown ribbon;
scissors;
scotch.
We cut out a stencil in cardboard in accordance with the color pattern of the St. George ribbon. We have a brown ribbon, a stencil for it. For orange, you need to cut out the inverse version.
We fix the stencil on both sides and fix it with tape if necessary. We apply paint from a can. Don't forget to color the edges of the ribbon.

After the paint dries, repeat everything in the same way for the reverse side. As a result, we get the St. George ribbon.

Beautiful beaded decoration

Do-it-yourself St. George ribbon from beads in the form of a bracelet - great idea for those who want to emphasize their individuality.
For weaving we need:
Beads. Black and orange glossy, metallic silver. Bead size 10/0.
Needle for work with beads.
A thread.
Scissors.
Clasp for bracelet. 

Agree, weaving with beads is a good meditation. At the very beginning, we fix the silver bead by passing the thread several times with a needle through the hole. We leave 10 cm of thread.

We string 9 more beads of the same color.

We pass a needle with a bead into the 9th bead of the formed first row. The thread needs to be tightened.


Repeat steps for 7 and 5 beads of the first row. The thread needs to be tightened each time.


Weave to the end of the row. If you do not tighten the thread, the beads will hang out and break. geometric shapes products. We tighten the thread every time.


We take the next silver part and repeat the steps for the 3rd row.


Weave the fourth row with colored beads according to the scheme. Black, orange, then repeat the alternation again and finish with a black bead at the end.


Weave the fifth row like the previous one.


Weave repeating the sequence of beads similarly to the previous rows. For a bracelet, the number of rows must match the size of the hand. For example, if the wrist diameter is 15 cm, then weave five fragments (between the white stripes), plus the beginning and end of the bracelet. The length of one fragment is about 2.5 cm.

We fasten the fastener by hiding the ends of the threads.

In order for the bracelet to become wavy, we pass the thread along the diagonals as shown in the diagram.


We get such a beautiful St. George ribbon, made by ourselves.
Making a brooch with a St. George ribbon with your own hands
A kanzashi brooch from a St. George ribbon always attracts attention. A strict symbol of victory, love for the motherland is worthy of any sane person.

To make this decoration from the St. George ribbon, you need to prepare materials and tools:
St. George's satin ribbon 60 cm;
decorative beads or rhinestones;
clasp for brooch;
centimeter;
scissors;
tweezers;
a candle, a small gas burner or a lighter;
glue, you can use a hot glue gun.

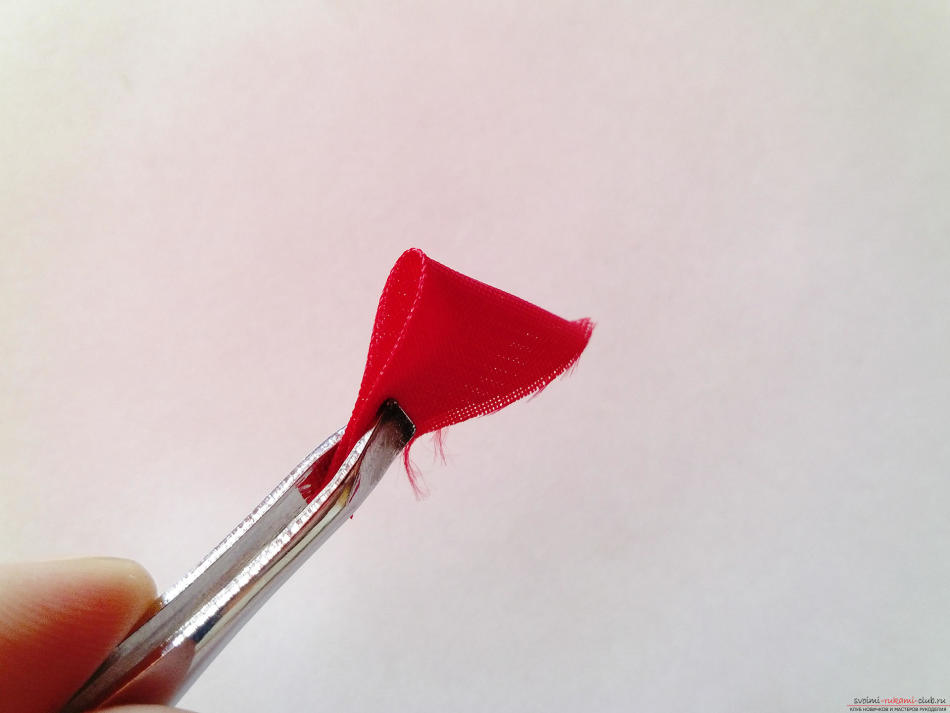
At the first step, we will make segments of 7 cm from the St. George ribbon.

We take one segment and form a right angle from it.

We fold this element so that the right side of the tape is formed on the left and align the bottom edges.

We wrap the resulting fragment as shown in the photo inward twice.

We bend the lower side so that the edge is aligned with the upper border of the element.

Trim the flat edge. In order to prevent the cut edge from blooming, we melt it with a lighter or a small gas burner. When melting, we press the layers. They stick together. As a result, we get an element of a brooch, the front and back sides of which are shown in the photographs.


In total, five such petals are needed.


We fold the St. George ribbon with our own hands as shown in the photo and fix it with glue.

From the wrong side we sew a fastener for the brooch. We glue the threads with glue.

At the next stage, we fix five petals on the front side of the tape with glue. In the center we glue the prepared decorative decoration - beads or rhinestones.

If you want to make brooch tips different lengths, take a tape measuring 25 cm.


After spending about 15 minutes of time, we made with our own hands a magnificent decoration from a St. George ribbon for any official holiday.
How to decorate a St. George ribbon with a beautiful spikelet of kanzashi
Kanzashi technique came to us from Japan. Petals made of silk were carefully folded and a unique miracle arose. Let's make a small work of art together with our own hands to decorate the St. George ribbon.
We will need:
St. George Ribbon;
satin ribbons in black and orange, matching in tone to the St. George ribbon;
tweezers;
black beads for decoration;
glue, you can use a hot glue gun;
scissors;
lighter, candle or small gas burner.

Cut the satin ribbons into squares with a side of 5 cm. In total, you need to make 7 black elements and fourteen of the orange ribbon. We process the edges on a flame so that they do not bloom.
 Take an orange square, fold it diagonally.

We fold the resulting triangle again, forming a petal of a sharp shape. We fix the element with tweezers.

We cut the edge with scissors and process it with a flame. The edges will stick together.
We take the workpiece with tweezers along. Trim the underside with scissors. The cut edges are melted with a flame.


Similarly to the first, we make the rest of the orange petals from all the prepared squares.
In the next step, we take a black square. Fold diagonally. Then, take the orange petal and wrap it in a black triangle. On top of the black element, we impose another orange petal. We get a detail consisting of three layers of satin ribbons.


We cut off the lower part and process the cut with a flame so that all the edges are securely connected to each other.

By repeating the steps, we get seven sharp petals, each of which contains black and orange.
Next, we collect the elements in beautiful spikelet. Fasten the petals to each other with hot glue. We form the central line from prepared decorative black beads.


In the next step, we make a loop from the St. George ribbon. We glue a spikelet on top of it.

If you attach a fastener from the wrong side, you get original brooch. A do-it-yourself St. George ribbon can be used to decorate a gift close person. The decoration will favorably emphasize the character of the owner at the celebrations of the Victory Day, on other patriotic holidays.
How to decorate a St. George ribbon with tulips

Let's make tulips of three colors with our own hands to decorate the St. George ribbon. It won't take long thanks detailed instructions. WITH beautiful tulips made using the kanzashi technique, the St. George ribbon will acquire new shade and connection with the flag of Russia.
To create a product, we need:
Satin ribbon in three colors, white, red, blue;
St. George Ribbon;
emerald ribbon;
ribbon for making bows;
glue and thermal gun;
small gas burner or candle;
pin.
We take red white and blue satin ribbons and make three squares with a side of five centimeters.

Fold the square diagonally.

The resulting triangle is folded in half.

We cut the edges and melt them with fire so that they are connected to each other. We repeat the operations for all prepared squares.

Turning elements out.

We form a tulip bud. To do this, we connect three petals of the same color with glue.

Next step. We take an emerald-colored satin ribbon 10 cm long. We fold it, as shown in the photo. We process the edges with a flame so that they do not bloom. The ends are pressed and glued. We make three elements in total.

We place the buds in the resulting elements and fix with glue. We collect all parts in a beautiful bouquet. We form a butterfly from a ribbon for bows and decorate our bouquet. We fasten the tulips to the folded St. George ribbon with glue.
Now we have a St. George ribbon with the colors of the Russian flag. The made symbol of victory and courage can be proudly worn by yourself or presented to a close friend.
A detailed video on how to make a St. George ribbon with kanzashi with your own hands.
Good day! Or as they say, okay Google))). Tell me, my friend, how to make something out of a St. George ribbon? Admit it, you often talk like that, ah-ha-ha.
In general, today we have to get acquainted with such a funny and very beautiful attribute that we always attach to our clothes and even hang on a car. Like it or not, but now it has become very fashionable in Lately. We even began to sell such handicrafts near large supermarkets, and I see that in May days they are snapped up by young needlewomen with a bang.
Well, what, after all, it really looks very attractive, and most importantly, it symbolizes this significant day in the history of our beloved country, Russia. Do you know the history of this attribute? Write your guesses and assumptions at the bottom of this note.
I just want to remind you that in addition to such decorations and badges of honor, veterans should be presented with flowers on this day, read to them and, of course, present some surprise in the form or
How to properly and beautifully tie a St. George ribbon on clothes? (diagram inside)
It has long been known that such a ribbon denotes two states, these are death and resurrection, or rather these two colors, orange and black.
There are several ways to tie such an attribute; it originates from the era of the reign of Catherine II. It was then that soldiers and wars were awarded such a present, and that's how you could tie this detail on your attire.

I think that you will now be surprised when you see this picture, but at the same time you will know, and maybe practice at home in advance.
Here are the most popular methods, you can do it using the most easy way, also tie a tick, in the form of a tie and even a scarf. Yes, this picture shows everything perfectly.

But that's not all, it's not enough to be able to fold the tape like that, you still need to know where and in what places it can be placed.

There are such forbidden areas of the body where, according to new recommendations, this attribute should not be applied. Look at the picture and remember.

Well, of course, you can not just take and tie such beauty, but somehow decorate and decorate it in a cool way so that it attracts attention. We will talk about this further.

Do-it-yourself St. George ribbon from ribbons using the kanzashi technique
Undoubtedly, for the holiday this badge of honor of clothes can be fixed somehow in a special and more effective way. If you are also a creative person, then I ask you to pay attention to such a product. It can be completed in 1 hour, it is within the power of a child, but only an adult, or it is possible to perform younger children, but only under the supervision of elders. Because some details are melted here.
Get a cool brooch in the form volumetric star, I saw this last year, but I didn’t think that it could be done so easily and quickly at home. Class! MK is taken from the Country of Mothers.

You will need:
- tape length (width 35 mm) - 60 cm
- basis for a brooch — 1 pc.
- pin - 1 pc.
- rhinestones, beads, etc.
- ruler
- scissors
- tweezers
- candle or lighter
- glue gun

Stages of work:
1. Take an orange-black ribbon and cut rectangular parts out of it, the length of each figure should be 7 cm.

2. Now, to make it convenient, you have to take tweezers. You can do without it, take eyebrow tweezers, and that's what we do, we bend the base so that the corner comes out, as you can see, it's straight.

3. After that, doubt again, from right to left, and level the lower part so that it comes out evenly.

4. Fold in half again.

5. What does it look like? I think it's on a petal. Pick up the edges of the product.

6. And you have to set them on fire

7. Such beauty will turn out. This is what the back side looks like.

8. To create a star, you will need to make 5 of these patterns, the main thing is that they are almost the same so that it looks perfect.

9. The rest of the tape, its length should be about 20 cm, cut the ends in the form of a sign more and less on both sides. In other words, you should fold it in half and cut it at a 45 degree angle.


11. On the reverse side, glue or sew, depending on what kind of base you have for the brooch. Pass the pin.

12. Turn the workpiece over and well, now glue the star or maybe it will remind you of a flower with a glue gun, and decorate the middle with any decor.
Such a charm can be used as a pendant in a car, then you need to glue a satin ribbon instead of the base for the brooch. Get like a keychain.

By the way, the middle can still be done in this way, cheat, decorate it with inscriptions that you can find on the Internet or download right now.

You can print on photo paper, it will look brighter, and also more beautiful.

Unusually and very worthy it will look at the holiday!

Here are a few more ideas that you can bring to life.


Such waves, or lambs, I don’t even know what to call such a craft, I was also impressed. Like?

Or something similar, as they did in the first version.

Only here the fabric is not so bent, see for yourself.

You can do without glue, and sew with a regular needle and thread. Some people are just afraid of a glue gun, or maybe they don't have one yet. So, it's okay, then consider this option.


Another amazing design idea. Here, of course, more accurate measurements are needed.

How magical it all looks.

We decorate easily and simply the St. George ribbon 2020
Now I propose step by step instructions, with the help of it you can teach children to tie this little thing like this. After all, sometimes you want to kindergarten or for example in primary school show the kids something unusual. So, just this case and take this idea as a basis.
Lay the strip of fabric horizontally in front of you.

With your hands on each side, bring the ends to the center. But, before that, you still need to determine the middle.

This can be done by eye or with a regular ruler.

I think this will make a bow.

Yes, of course it is. Secure it with a pin or gently drip glue. You can also sew, depending on what age group kids gathered.

Or primitively tie with a thread or satin ribbon.

The next option is more difficult, and it is already for high school students or for those who are engaged in needlework and love this skill. Make the petals first. A piece of fabric should be about 11 cm.

Tweezers must be very strongly clamped and presented to the candles, slightly melted.

Be careful with fire, it is better to place a candle in a bowl or place it on a special stand.

Do exactly five such things.

Glue them with a glue gun to make a flower.

Reminds me more of an icon in the form of a five-pointed star.

It remains only to complete any decorative ornament. For example, a strazik or a button.


And on the reverse side, glue the clasp from the brooch.

The result was a souvenir in the form of the Order of Victory.

Step-by-step master class for Victory Day
You know, while I was preparing for this article, I found so many awesome crafts that I simply could not put them all here. But, among the wide variety, I really liked this masterpiece. In general, I decided to dedicate two notes on this topic this year. So, if you are interested, wait for another note coming soon.
If you do not like to watch, or the Internet is buggy and hangs, then read this. This option is similar to the previous ones, but it is still different, but you will see for yourself that it is new.
We will need:

Stages of work:
Take the width of the tape 2.5 cm. And determine the length yourself, bend it with an angle, as shown in the picture below.

Such blanks need to cut out 5 pieces.

Remember that you need to work with a glue gun very carefully and carefully so as not to burn your hands.

We repeat step by step.

Also keep an eye on your workspace.

Instead of a lighter, you can use a candle.


And now the most interesting thing, this decor will make this craft even more beautiful.


You can take any color and silver and gold.

It turns out amazing.


By the way, you can make such an icon in the style of the tricolor of our Russian flag. This video from the YouTube channel will help.
How to make a St. George ribbon out of paper?
Amazed? Surprised? But there is also such an option. Paper is a material that is in every home, it is not difficult to work with it, and most importantly, it is always available.
We read this manual and repeat all the necessary steps.


Two-color ribbon decorated with flowers
Spring has come and brought with it good mood and of course singing birds and blooming flowers. On Victory Day, it is nice to give carnations and tulips to veterans. Therefore, I propose to make such creations this time.
In fact, you can make not only these flowers, I saw that such brooches are decorated with forget-me-nots, roses and a sprig of lilac or apple blossom. Of course, this is a well-known kanzashi technique. Take a look at this collection of stories.
I think they will be useful to many who are doing this wonderful creation for the first time.
Let's get to work, make a brooch with tulips, recommendations were given by Olga Ivanova.
Take this time a wide satin ribbon, its width should be 5 cm. Using a ruler and a pencil, make segments equal to 4 cm, cut the fabric into 9 parts. Cut each template in half.

The ends should be made in a semicircle, these will be the petals of the future flower.

Now you need to set fire to the edges so that they do not fluff.

Gently form two folds at the bottom of the base with your fingers, as if making a small accordion and fix with fire. Use tweezers. You will need to make 18 such petals to make three tulips, 6 blanks will go for each bud.

Interesting! You can also wrap green threads, in general, turn on your ingenuity and imagination.

And in this rounding, put on small stamens (6-7 pieces) made of wire.

Now let's start the assembly, complete the first row and decorate it with three petals. Glue them to each other in a circle.


Now we make the sepals, for this, bend a piece of square green fabric 5 cm x 5 cm in such a way as if you are working with a sheet of paper and fold it in half diagonally twice, and then again. These actions resemble the process of folding a snowflake.

Next, cut and round and open the product, then heat the needle (hold it for 14 seconds over the flame) and pierce the workpiece. But, before that, do not forget, when your sepal is folded, process the edges with a candle.


We dress the resulting green charm on the stem to the flower and glue it with a gun.

This is how we make all the other samples, and then connect everything with another sepal, and process the stem with corrugated paper.

Now you need from thin tape(12 mm) fold an elegant bow. Take a fork and thread the end of the strip like this. With the end that you do not work, take it to the right side, and thread the worker into the center.

After a little push and thread the working ribbon again through the middle of the fork.

Tie a tight knot with your hands.

It remains now to remove.

And cut the ends at an angle of 45 degrees, and then melt each one so as not to fringe.

Do the same with the St. George ribbon itself, cut and melt the ends.

Roll into a figure eight and glue together with the bouquet.

At the back, also glue the base of the brooch, that is, thread at least a small pin.

And finally, a stunning spring masterpiece with blooming tulips.

Brooch for May 9 in the style of kanzashi (MK + photo illustrations)
Since you have landed on this page, I can assume that you are looking for exactly this information. Is not it? How do you like such diverse ideas in general, I tried to find as many things as possible so that you could find the best and most beautiful option for yourself.
Write your feedback or wish at the bottom of the article, I will be very grateful for the response.
Well, we are looking at the next victory icon on the monitor screen, only it differs from all the previous ones, it still has two elegant ribbons dangling at the bottom. It looks like an honorary medal for services to the Fatherland.

We will need:

Stages of work:
1. Take a St. George ribbon 3.5 cm wide and 25 cm long. From satin ribbon black and orange (strip width 5 cm), make squares of 10 pieces of each color.
For decoration, you will need a ribbon 2.5 cm wide, cut out 6 squares 2.5 cm by 2.5 cm from it.

2. Take a blank of black tape and fold the square diagonally.

3. Do the same with the yellow-orange square.

4. Then close it one more time.

5. And again, to make a small petal, mark the lines like this. And then unfold, the third time you do not need to fold.

6. Now put the black triangle like this with an angle down, and the orange blank with the base down.

7. Begin to fold over the ends of the black fabric.

8. Do this on each side. As shown in this picture.

9. Repeat the job one more time.

10. Then flatten with your hands, you can shift the work to tweezers.

11. Set fire and singe the ends.

12. Cut off the excess.

12. And again, treat with a lighter.


14. They are also performed in the same way. Glue such blanks onto the glue gun on a 6 mm tape.

15. From those first blanks, also collect a flower. Coat each side of the petal with glue.


17. Thus we come to the final part. Fold the two-color ribbon into a figure eight and glue.

18. Decorate with the rest of the details. On the reverse side, it is preferable to make the basis for the brooch. So that you can pin it on clothes or on some other object.

Original and simple suspension in the car
In general, you can take absolutely any type of work as a basis, just instead of a pin, which is done at the back, make a ribbon and then such a symbol of victory can be hung in a car.
I suggest you do this time in the style of a tricolor, you can use this for Russia Day.
Since I have already given many recommendations in this article on how to make kanzashi petals, I think I will not repeat myself here, you can scroll above and read the information.
I will just say that you will need 6 squares of each color (blue, red and white) ribbons 5 cm x 5 cm, tricolor 2 cm, and a satin ribbon in the style of the three colors of the flag.

From squares different colors make the petals, in any way you like, which was described above.

Remember to singe the edges so they don't fray.

From the ribbon in the style of three colors, also make petals.

Then start collecting the product, insert one into one petals, as if making a spikelet.

Make two such blanks.

From other multi-colored petals, build a star with glue.


Then connect everything and insert another decorative satin ribbon in the form of a loop.
You can decorate in different ways. To your taste and discretion.

Many are satisfied with another option so that they can be fixed somewhere. Yes, if you don't have a brooch base, you can use a regular pin and a piece of felt instead, take a look.

The main attribute of the holiday from satin ribbons and beads
Among the wide variety of jewelry, one more souvenir decorated with beads is very immaculately impressive.
In fact, if you are fond of beading, then just stick the necessary attribute on the St. George ribbon. For example, in one of our previous articles we did, it can be used here as well.
And now I propose to read this story.
Or this tutorial.


Making a few more symbols for May 9
Well, friends have come to the very last question. I recommend that you look at more such crafts that can also personify this holiday.
From St. George's ribbon you can fold a bow.

You can also decorate from such material as foamiran, you can see about such a flower and its master class

You can lay out the number 9 and glue the pattern in the form of a spikelet.

For children, you can offer such a sketch in the form of a butterfly. Just put it on the ribbon.

Here are some more ideas for inspiration and creativity.


This is where I decided to end this post. All the best and positive! Come visit more often, join the group in contact and write your feedback and wishes, right below the article. Bye everyone!
Sincerely, Ekaterina Mantsurova
St. George's Ribbon is an integral part of Victory Day celebrations. Regardless of age, status and political persuasion, every sane person seeks to express his love and gratitude to the Motherland, decorating his image with a symbol of victory.
How to make and beautifully decorate the St. George ribbon with your own hands: photo

 St. George ribbon decorated with a handmade brooch
 St. George ribbon decorated with a handmade brooch
 St. George ribbon decorated with spikelet made by hand
  St. George ribbon decorated with a handmade brooch

 St. George ribbon decorated with a handmade brooch
 St. George ribbon decorated with a handmade brooch
 St. George ribbon decorated with a handmade brooch
 St. George ribbon decorated with a handmade brooch
 St. George ribbon decorated with a handmade brooch
 St. George ribbon decorated with a handmade brooch
  St. George's ribbon made of beads, made by hand
 St. George's ribbon in the form of a bow, made by hand
  St. George's ribbon do-it-yourself tricolor
St. George's ribbon with a tricolor do-it-yourself
For work you will need:
- blue, red and white ribbons
- matches
- scissors
- tweezers
- pin
- for decorating brooches - accessories
We cut three squares from the ribbon of each color.


Fold the square diagonally to make a triangle.

We bend in half.

With tweezers we clamp, for the third time the folded triangle. We process the edges with a flame. We then make sure that the bottom of the tips sticks together.


The first petal is ready.

Thus, we make subsequent preparations. Three of each color.
Remove uneven edges with scissors.

We form the first branch of the tricolor. We attach the petals to each other with glue, so that each subsequent one is slightly higher than the previous one.


We fix blue between the first and second white petal.


And the third - in the center.

In the same sequence, we glue the red petals between the blue ones.


The first branch has been formed.


We duplicate the production of the second branch in the same way.
- We get the St. George ribbon. Put it in a loop. Glue in the center
- Attach a small pin to the back.
- On both sides of the tapes we glue the resulting blanks of tricolor twigs

- In the center we add additionally made petals from a red ribbon. From which we form a flower


St. George's ribbon with a tricolor flower is ready!
Do-it-yourself St. George ribbon for kindergarten
It will be very interesting for children to make a simple fake for the Victory Day with their own hands.
- Preparing blank sheets of white, black and orange paper
- On a white sheet, measure strips 1 cm wide
- We line black and orange sheets with strips of the same width
- Depending on the age of the children: either we give scissors and they cut them out on their own, or the teacher cuts out strips of orange and black paper himself
- On the drawn strips on white paper, glue alternately cut strips, alternating colors
St. George's ribbon do-it-yourself crochet

Crocheted crocheted ribbon is very original.
- Take cotton bobbin thread
- Recruiting a row air loops, Brown according to the selected length of the tape
- Each row starts with three air loops up
- We make 6-9 rows with single crochets or semi-columns
- Then we knit 6-9 rows with an orange thread
- Then again a brown stripe, orange
- We finish brown
- When changing colors, do not break the thread, stretch along the edge
- If desired, you can tie the edges
Spectacular tape, which from afar is indistinguishable from the factory
St. George's ribbon with their own hands from ribbons


- We take a satin brown or orange ribbon
- Cut out two identical strips from cardboard. Wider than tape
- On cardboard stencils, we make cuts with a knife, according to the width of the desired strip
- We put the tape between the stencils. Hold it tightly so that it does not move out
- Applied with brown ribbon spray paint in orange. If the tape is orange, then the paint is brown
- Painted in the same way on the other side
Beautiful do-it-yourself St. George ribbon made of beads

For work you will need:
- any number of beads, but not less than 40 grams, brown and orange
- Iris orange thread
- thread Camtex Dandy brown;
- hook No. 1-1.2;
- wire for beading.
Knitting:
- We start knitting according to the chosen length
- In the 1st row: we tie the dialed chain of air loops with orange threads with connecting loops.
- From the next row we knit with beads with single crochets, alternately stripes of black and orange.
- We seal the edge of the ribbon with single crochets, orange thread with beads, adding wire for beading. In this way, we will avoid folding the tape, when operating
- We pass around the tape with closing loops of orange color
Ideal decoration option for both clothes and handbags
Video: Knitting with beads. Master class "St. George's Ribbon"
The original St. George's ribbon do it yourself

Prepares materials and tools:
- St. George Ribbon
- Satin ribbons in black and orange
- Tweezers
- Scissors
- pin
- Matches or lighter
Getting Started:
- We cut seven black and fourteen squares from a satin ribbon of five centimeters
- We burn the edging with a flame
- With tweezers, fold the square into a triangle, which folds again.
- To get a petal, bend the triangle again
- Irregularities cut off
- We process the edges with a flame
- Cut off the excess tail
- Cut-off by flame
- We fold the black square twice diagonally
- Attaches to the orange tape
- We get three petals, in which black in the center, orange along the edges
- Cut off the extra corners of the petal
- We burn with a flame for processing and connecting the ends
- We make seven three-layer petals
- Connected blanks in the form of an ear
- In the center we attach black or white beads in a row
- We fold the guards tape in the form of a loop
- Fixes with glue
- Glue the resulting spikelet on top
- We fix the brooch with a pin
Video: Kanzashi rose by May 9
How to make a St. George ribbon with your own hands from paper?

 St. George ribbon made of paper A very quick and easy way
We buy quilling paper:
- Black and orange 5 mm wide
- Orange 1.5 mm wide
1 way
- We take A4 paper size
- Adhesive applied to the strips
- We glue starting from the center of the sheet, in turn: orange-1.5 mm, black-5 mm, orange-5 mm, black-5 mm, orange-5 mm, black-5 mm, orange-1.5 mm
- We stick in this way the required number of finished products
- Cut out the ribbons
2 way
- Take a wide tape
- Stick to surface with sticky side up.
- We hang tape down from the surface
- We glue the pre-prepared strips in the same sequence as in the first method.
- cut off
- Spreads on the table, smooth the surface, removing all irregularities
3 option
- Take orange double-sided paper
- Draw black stripes in Word
- We print
- Cut out
How to make a kanzashi ribbon with your own hands?
Required materials and tools:
- 60 cm tape
- some beads or rhinestones
- fastening pin
- centimeter
- scissors and tweezers
- lighter
- glue gun


Cut out squares 7 cm long.


Fold a square with tweezers, as in the photo

Glue the prepared petals in the form of a flower. Decorate with rhinestones or beads.


Ribbon in home environment Even a small child can do it.
If you want some special option, a little effort, and your tape will be the only copy.
Video: Kanzashi carnation. Brooch for May 9
Kanzashi craftswomen can make a wonderful decoration for any holiday. And their addressees creative imagination There are not only girls and women, but also men. By February 23 or May 9, it is customary to congratulate men and veterans, and you can give them hand-made brooches of a suitable theme. The master class contains a lesson on creating such an ornament that can be made for Defender of the Fatherland Day or the great and revered Victory Day by all of us. Brooch from St. George's ribbon do-it-yourself kanzashi consists of a simple bouquet of white flowers tied with a red ribbon, and the basis is a loop of St. George's ribbon, which is relevant for the May day. To make the same or a similar gift, for example with flowers of a different color, study and repeat all the steps.
Materials for making a do-it-yourself St. George kanzashi brooch:
For the central bouquet we need:
- 9 pieces of atlas white color- width 2.5 cm and length 3 cm;
- 5 pieces of green satin - 2.5 cm wide and 10 cm long (in the process of work, these strips, folded in half, are cut diagonally with a soldering iron. To model the sepals, only cups will be needed);
- 3 pieces of golden brocade - width 0.5 cm and length 10 cm;
- 1 piece of green satin - 0.5 cm wide and 5 cm long (for a droplet leaf);
- 2 pieces of red satin - width 1 cm and length 6 cm;
- 2 pieces of red satin - width 1 cm and length 5 cm;
- 2 pieces of gold-colored brocade - width 0.5 cm and length 5 cm;
- 9 bilateral yellow stamens;
- a golden hug and a red half-bead;
- 1 piece of green felt - 3 cm wide and 1.5 cm long (under the basis for the composition).
Brooch from St. George's ribbon do-it-yourself kanzashi step by step:
Green stripes are designed to fill the sepals of white delicate flowers. For this, a tape 2.5 cm wide is used. Bend the strips across clearly in the center, perfectly align both sides. Next, heat up the soldering iron and swipe diagonally across the two-layer rectangle. A hot, sharp knife is also suitable (just put the blade along the line of interest and press hard). The hot metal is designed to clearly cut two-layer rectangles into two parts and simultaneously solder the tape at the cut point. You can't do this with scissors. A little tip: at the time of work, place an old towel under the pieces of fittings so as not to spoil the surface of the table.

Of the five green strips cut lengthwise, take only the part that is a pointed bag. Prepare 9 pieces of white ribbon (3 pieces for each flower). The strips on one side must be rounded with scissors and singeed (but carried out with a flame as quickly as possible and once). At the lower even edge, the petals are collected and soldered. Stamens with yellow heads will also look beautiful on a white background. Get them ready for work.

Modeling a flower, glue three white petals, open the sepal-sepal, gather together three double-sided stamens, bend them and glue them. Glue the middle to the white petals, twist the flower, glue it, insert it into the green bag.

Make 3 identical flowers.

Since initially 5 green sepals were prepared, and only 3 were used for modeling flowers, there will still be 2 parts left. They will be needed for additional decoration of the bouquet. From golden brocade 0.5 cm wide and 10 cm long, make loops.

Prepare red stripes: 2 pieces 1 cm wide and 6 cm long, 2 pieces 1 cm wide and 5 cm long; brocade ribbon- 2 stripes 0.5 cm wide and 5 cm long, as well as a shiny red half-bead.

Make a bow with double red-gold loops and a shiny center - a half-bead inserted into the hug.

You can also make from ribbons:
Glue the bouquet. Gather the flowers together, glue the two remaining sepals, three golden loops to the bottom, and glue the bow in front in the center.

Stick a composition on the St. George part or use any other tape, for example, red.

A do-it-yourself kanzashi ribbon brooch for a man is ready. The accessory can be presented separately or pinned to a gift box - it will be a great decoration. Using such a wonderful brooch as an example, you can learn how to create delicate kanzashi bouquets that will come in handy for further creative lessons.


