Crafts from a small pumpkin for kindergarten. DIY pumpkin crafts for kindergarten and school
Do you know how easy it is to make home decorations and crafts from pumpkins? kindergarten and to school? Thanks to our step-by-step master classes learn to sew pumpkin pillows.
How to easily make home decorations out of pumpkins?

Here are some elegant decorative items you will get. To make your pumpkin so irresistible, you will need:
- dye;
- artificial flowers;
- wire;
- pliers;
- scissors;
- primer;
- shine;
- brush;
- pumpkins.
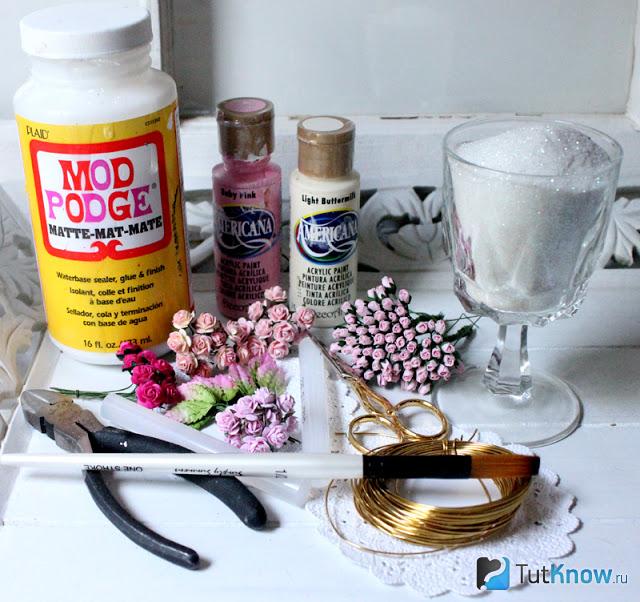
It’s better to buy a small vegetable; now they sell portioned varieties. Having purchased these pumpkins, you will need to paint them with a primer and let them dry.

Wrap the wire around a pencil or branch and cut off the excess with pliers. Screw artificial flowers to the opposite end, which can even be cut out of paper. Fix this decorative element on the tail of the vegetable, cover the peel with glitter.
Decorate several fruits like this and place them in beautiful flowerpots.

Such pumpkins will be an excellent gift, an unusual present. You can give it to friends on Halloween, when this vegetable is the center of attention.
This is how easy it is to make an elegant souvenir from a pumpkin. This - great gift for Halloween or any other holiday.
Decorative pumpkin pillows for the sofa

To create this piece of furniture you will need:
- textile;
- scissors;
- threads;
- filler;
- a thread.

Cut a rectangle from the prepared fabric, the length of which is 2 times the width. Fold it right sides together and sew the sides on the wrong side.
Turn the resulting bag right side out and fill it with filling. Make sure that the internal contents are uniform. Sew along the edge with a basting stitch using strong thread. Tighten it and secure it in the center of the product.

Take a needle with a large eye and insert a thread into it. To sew the pumpkin-shaped pillow further, pierce the needle from the bottom to the top, giving it a flattened shape. Then, using the same thread, divide the resulting workpiece into 6 or 8 segments.

Secure the thread well by tying it in 2 knots. Make a cutting for this vegetable. To do this, you need to cut two identical oval-shaped pieces from the fabric and fold them with their right sides facing each other.
Trim the bottom edge of these blanks, it should be straight. Sew these two elements together, leaving the straight edge free for now. Fill the shape with filler through it and sew it to the pumpkin.

These are the beautiful ones you can make for your sofa.

You can make amazing items from this vegetable.
Pumpkin crafts - master class

To make one like this beautiful house for a toy mouse, you will need:
- spacious pumpkin;
- newspapers;
- spoon;
- marker.

Now fill the pumpkin with newspapers, they will absorb excess moisture and allow the vegetable to dry out faster. When this paper becomes damp, remove it and add other crumpled sheets. You need to do this until the pumpkin inside dries out.

Put the dried lid back in place. Glue a porch made of thick cardboard where the entrance is located. All you have to do is sew a funny mouse or other animal like this, and you can send the craft to a competition or decorate your room with it.

If you want the fairy house to look like a real one, then place a candle inside. But the flame should not be left unattended.

See what other pumpkin crafts you can make.

In the top left photo you can see the figures, each made from two pumpkins of different sizes. Using pieces of wooden skewers, the small pumpkin is attached on top to the large one. It turned out to be a whole family. For dad you need to make a hat out of cardboard, for mom you need to make hair out of straw or yarn, and for your daughter you need to make a bow that is tied to the tail of a pumpkin.
All characters need to draw eyes and a smiling mouth, color their clothes or glue decorative stickers to these places.
No less cheerful characters are located in the top right photo. Some people need to put on a hat or glasses, glue on a mustache and attach a long carrot nose.
For pumpkin crafts (bottom left photo) you will need:
- straw;
- old hats;
- pumpkins;
- acrylic paints and brushes.
For the next DIY pumpkin craft (photo below right), you will need several of these vegetables of different sizes. From one you will make a head, from the other - a body.
- Transform small pumpkins or zucchini into bear paws. His eyes, ears and nose can be made from pumpkin scraps or squash. All this is secured with toothpicks or wooden skewers.
- A barrel of honey is also made from this vegetable. It is better to create an inscription on the surface so that it is clear what is inside. To do this, you first need to write the word “honey” on the pumpkin with a marker in block letters, then cut out the peel at this place using a stationery knife.
- Cut off the top of the pumpkin and scoop out the flesh. Dry the pumpkin using newspapers, you will get an excellent craft, and a container for storing honey.
Pumpkin for Halloween
If you need a decoration for this holiday, be sure to use this traditional autumn vegetable. For pumpkin crafts (top left photo) you will need these vegetables. The lid of each is removed, the pulp is removed, and the top edge is cut into wavy lines.
You can also cut it into squares, like for a pumpkin craft - photo top right.

To make your house look cozy in the evening, place a candle inside the vegetable and light it. If you liked carving pumpkins, then you will definitely love carving vegetables and fruits. Armed with special knives and practice, you will be able to cut on it Maple leaves or such amazing chrysanthemums.

And here funny cat can be done even without experience. The main thing is that you have two pumpkins of different sizes. Attach the small one to the large one as a head. To make Matroskin the cat, you need to remove the skin from the pumpkin in strips. Also use a sharp knife to cut out his eyes and smiling mouth. The pupils will become raisins or buttons, and the cocktail straws will turn into his mustache. Cut out the ears from pieces of pumpkins and attach them to the head with toothpicks.

Here is a list of what was needed for the job:
- two pumpkins of different sizes;
- sharp knife;
- buttons or raisins;
- cocktail straws;
- toothpicks.
All parts are dried and then coated with black varnish. When all this is dry, the ears are attached to the head with toothpicks. On the upper part of the body, metal rods with threads or screws are attached in a circle. A bowl of candles is placed between it.
When the lamp needs to provide light, it is lit and a cat's head is placed on top.

You can make such beautiful lamps with your own hands, or you can simply cut out a mask from a pumpkin and hang such a decoration on the wall.

This vegetable can also be used when you make crafts on the theme of autumn. Nowadays this is very relevant, since kindergartens and schools are asked to bring such handmade works.
If growing pumpkin personal plot has become your usual thing, then there will be no problems with the source material. But for residents of the metropolis, getting a pumpkin is not difficult, since these vegetables are sold in stores and markets.
Pumpkin box

According to the idea, a toy mouse will live in it, but at the same time you can store all sorts of little things in this vegetable. For this DIY pumpkin craft, you need to prepare:
- pumpkin;
- cardboard;
- paints;
- tassels;
- wire;
- a twig or wooden skewer;
- thick green fabric;
- scissors;
- glue gun
To help the pumpkin dry better when you remove the top, immediately make holes for the door and windows.
- Cut a leaf from thick green fabric big size, and the second one is small. Glue a small one on the side of the vegetable, and a large one on its lid.
- To make a canopy over the porch, cut a strip of cardboard and fold it like an accordion. Now straighten it a little, you will have a wonderful roof, to which you need to glue the decorative elements of the sidewall.
- Cut out porch decorations from cardboard. If the material is thin, then glue together several sheets of cardboard. In the same way, make a door and a handle for it.
- You can make steps using a base of this shape. The cardboard is wetted in a mixture of water and PVA, taken in equal proportions. Now this soft pliable material is placed on the mold. When it's dry, peel it off and cover it with brown paint. When it dries, coat the steps with varnish.
- Paint the other elements of the porch in the same way and bend the wire into a railing. Stick it one side into both sides of the step.
- Make a lantern out of cardboard and attach a wire to it on one side. Make shutters, cut out tulle for curtains.
- Wrap the wire around a wooden stick or skewer, remove it and paint it yellow. Attach these tendrils to a large pumpkin leaf.
- While you have made the elements, the inside of the vegetable has dried, you can start decorating it. Attach the steps by inserting the second ends of the wire railing into the pumpkin. Attach the flashlight to the side in the same way.
- With help glue gun glue the shutters to the windows, attach the tulle here.

If you want, place a ladder at the back. For the steps, you can use wooden skewers or twigs, cut them into equal lengths. Tie them on one and the other side with a rope, and also paint them with brown paint and varnish.

But this is a pumpkin box, you can put various objects in it. To add strength to it, a well-dried vegetable needs to be painted with varnish and allowed to dry. To make the pumpkin shine better, coat the outside with the same clear varnish. The lid will fit better if you fold a strip of cardboard in half and glue it inside the lid, placing it on the end.

Like these ones wonderful crafts You can make it from pumpkin. If you want to quickly create a masterpiece, then make a vase from these vegetables. To do this, you just need to cut off the top and remove the pulp, dry the inside of the vegetable, and coat it with varnish. When it dries, pour water here and place flowers.

And the pulp is used in cooking. Take out the seeds, wash them, dry them and you will have a delicious, healthy treat.
Look what original gift It can be done if you use your imagination a little. Then the pumpkin will turn into a clock.

Also prepare its shell, coat the inside with varnish. Place the clock mechanism here and attach the hands to the outside. Place artificial flowers in the upper hole of the round-sided beauty, and an extraordinary present is ready.
After such inspiring work, it's time to have a tasty snack. Make pumpkin puree soup. It is done very simply.
- Remove the seeds from the pumpkin along with the adjacent fibers. They need to be thrown away, and the seeds should be washed and dried. Carefully remove the pulp from the pumpkin and cut it into cubes. Place in boiling meat broth or regular boiling water.
- Cook for 20-30 minutes - the pumpkin should become soft. Then turn off the heat, wait until the soup has cooled and puree it using a blender, add salt. To prevent it from being too liquid, it is better to remove excess liquid in advance.
- Heat the cream soup. Pour it into the pumpkin. Place a piece of butter in the center or pour in a little milk. Decorate with greens.

After such a delicious snack, you will want to make other crafts.

You can carve flowers on the surface of this queen of beds or decorate it by taking:
- pumpkin;
- bush chrysanthemums;
- toothpicks;
It's quite easy to make a flower basket out of a pumpkin. You need to cut the vegetable as in the photo, remove the pulp, and dry the pumpkin. Now flowers are placed inside the basket, and if you wish, fruits.

How easy is it to make a pumpkin carriage?
If Cinderella knew what kind of carriage could be made from a pumpkin, she would probably want to ride in such a carriage.

Take:
- pumpkin;
- marker;
- spoon;
- gold paint;
- wire;
- foil.
- On the pumpkin, draw the outlines of the doors of the future carriage, cut along these markings with a knife. Use a spoon and knife to remove the pulp.
- When the pumpkin is dry, paint the monograms with gold paint.
- Twist wheels from wire and wrap foil around them. Pierce the pumpkin with a metal rod and secure these connecting elements to the wheels using wire. This is how you need to make the front and back pair.
If you have metal parts in your workshop, make wheels from round ones. Turn others into doors, windows and other elements of the carriage.

Here are some wonderful pumpkin crafts you can make. The main thing is desire and imagination. And to inspire you even more, we have prepared useful master classes on this topic in video format:
Here's a video on how to make an autumn pumpkin vase:
Every autumn in kindergartens and primary school schools come to thematic exhibitions under the general title “Gifts of Autumn”. And the main characters in them are crafts made from vegetables and fruits.
From zucchini, pumpkins, cucumbers, tomatoes, potatoes, melons, watermelons, apples, grapes and more natural material from branches and beds you can make:
- Figures of animals, birds, cartoon characters, people
- Constructions - appliances, houses, household items, dishes
- Flat paintings and panels with different subjects
- Flowers and animals using carving technique (not to be confused with)

Artistic carving of vegetables and fruits
Another technique for making crafts from vegetables or fruits with your own hands is Carving(cutting out). This is when everything unnecessary is cut off from the original form and a new figure is obtained, similar to something or someone.


Banana, eggplant and broccoli dog


Watermelon turtle

Watermelon dinosaur head

Zucchini shoes

Pig salad bowl with watermelon, berries and melon

Watermelon submarine

Bell pepper frogs
You can also cut flowers from vegetables and fruits. A sharp knife and our master class will help.
Master class “Bouquet of pepper tulips”
The flowers turn out to be very authentic, especially after 12 hours - the wilted petals close, closing around the centers. But this does not spoil the view.


Photo after 12 hours
To work you will need:
- fleshy bell pepper - yellow and red
- cherry tomatoes - small and even
- barbecue sticks
- squash (for base)
- vase - ours is woven from paper tubes
- mug
- red cabbage leaves, green hot peppers and viburnum sprigs - for decoration
- tapeplant
Using a sharp, short knife, we cut out the peaks on the pepper, trying to ensure that both halves are neat and go into use. We wash one part, where the testes are, in water, removing the seeds and core. This can be done by hand.

Now we place the flowers on a skewer, leaving 2 cm in the middle for attaching tomatoes. We tape the stem.
The side without the base of the pepper is very soft and can quickly slide down the stem. We make a support at the bottom - we reinforce the top with electrical tape, and then on top of it - green tape.


We put a small squash into the mug - this is the basis for the bouquet. You can also use a small pumpkin or green zucchini for the vase.

We set up the bouquet. We decorate it with cabbage leaves, viburnum branches, and green hot peppers.

Crafts with added decorative elements
You can add decor from other materials to vegetables and fruits: plasticine, foamiran, feathers, material, as well as beads, buttons, berries.
This is how potato piglets appear:


Pumpkin fashionista:

Watermelons and pumpkins make wonderful samovars, teapots, flower vases, clocks and funny masks for Halloween.


And “Cross” offers you another master class.
Master class “The Wise Turtle”
Tortilla doesn't need any introduction. This is a famous character from the work “The Golden Key”, whom all readers love. The turtle is a symbol of wisdom, so we will make a fairy-tale hero.

We will need:
- half a head of cabbage
- large dark green cucumbers (without pimples)
- wooden toothpicks and 3 skewers
- base - flat plate and greens
- floral wire
- fabric for a cap, braid, needle and thread
- scissors for cutting toothpicks
- eyes

Let's start with the shell. Cut the cucumbers into slices of equal thickness. Divide the toothpicks in half with scissors or a knife.
If you break the toothpicks with your hands, you will get uneven, furry edges, and they will ruin the overall picture of the shell.
We attach each circle to the cabbage base with 3 wooden “nails”. This is enough to hold the cucumber.

For the head, cut the end of the cucumber to the required length. We select it so that the head and neck are similar - round shape, smooth.
For the beauty of the craft, we decorate the place where the neck is attached to the body with a cucumber “washer”: we make a circle of cucumber, remove the middle and put the neck on the blank.
In the body we will provide a place for the neck and select some leaves from the cabbage.

When the entire shell is ready, we will attach the turtle’s head and neck here with skewers.

We make eyes, roll the wire in the form of glasses. We make a cap from a circle of fabric.


We make legs from four columns of cucumber and attach them to toothpicks. Place the turtle on a flat plate. For beauty, we cover it with red cabbage leaves. You can use any greens.

For the surroundings - tagetes flowers, and the image of the wise and sometimes even flirtatious turtle Tortilla is completed!
An excellent and long-lasting version of turtle is made from green zucchini squash.

Secrets and subtleties of creating crafts
- Before starting work, all vegetables must be washed, dried, and then used as material for creativity.
- Wooden toothpicks, skewers, and floral wire will help.
- It is imperative to take into account that crafts made from vegetables or fruits have a short shelf life. Soft tomatoes and juicy cucumbers, for example, quickly “leak”, and this must be taken into account when composing compositions.
- It is better to use “long-term” vegetables and root vegetables: potatoes, pumpkin, zucchini, cabbage, onions.
- Ideally, crafts should be prepared immediately before the exhibition, if time permits.
- It is best to place each craft on a base/stand. Otherwise, the composition will not have a logical conclusion.
YOU WILL NEED IT
Take advantage of our tips and master classes on creating a wide variety of! It's interesting, fun and useful hobby for children and adults!

Schools always try to raise children to be creative individuals. Autumn-themed pumpkin crafts are often done in primary and secondary schools. You can find 1000 pictures of such works on the Internet. You can make children's pumpkin products for school with your own hands not only from decorative, but also from natural pumpkins. So why not do it right now?
You can make children's pumpkin products for school with your own hands not only from decorative, but also from natural pumpkins
Decorative work with vegetables and fruits always develops a child's Creative skills. So what can you make from pumpkin?
There are a lot of ideas, here are just a few of them:
- Owl.
- Pumpkin currants.
- Snail.
- Pumpkin tower.
- Matryoshka.
- Hare.
- Bear.
- House.
Such works have different levels of complexity, for example, to make a tower from a given vegetable, you need to put in more effort than if you make an owl.
For kids different ages Teachers in schools select handicraft work that matches their level. You should not ask your child to do work that is too difficult for him, as this may completely discourage him from doing it later.
Gallery: pumpkin crafts on the theme “Autumn” (25 photos)


The simplest DIY pumpkin crafts (video)
Making an owl from a pumpkin with your own hands
- For this work you need to prepare muffin tins, colored paper, seeds (sunflower and pumpkin).
- When all the elements are collected, you can start working. There will be no carving on the vegetable itself, so before you start making the owl, you need to wash it and dry it.
- You need to make owl wings from cupcake molds. To do this, each mold should be cut in half. The two halves are glued to the pumpkin symmetrically.
- Then the owl's eyes are made. Take another muffin pan and cut it in half. Half of the shape will be the bird's eyelashes. Next, a circle cut out of colored paper is glued to the “face” of the owl. If the pumpkin is bright yellow, then the paper should not be the same color, otherwise the eyes will not be visible.
- A baking pan is glued to the top of the white circle. You can make the pupil of the eye by gluing a small black circle in the center of the paper circle.
- Several triangles cut out of black colored paper will complement the composition. They are glued below the eyes.
Pumpkin basket: how to make?
First you need to see if there is any damage or stains on the vegetable. It is best to make a basket from a medium-sized pumpkin, the color of which would be uniform.
- The vegetable must be washed and dried.
- Then you need to make a handle template. The template is pierced into the pumpkin along a pre-designated contour. Beginners are not recommended to make overly complex templates.
- Then, using a spoon, you need to very carefully remove all the pulp from the vegetable. The base should not be damaged, otherwise it will not be possible to make a good basket. The pumpkin handle is cut out using a sharp knife. They must not damage the walls!
- Now the workpiece needs to be dried. You can use plain paper for this. It will absorb moisture and the workpiece will dry. Place paper on the bottom of the vegetable and near its walls. Check the dryness with your hand; if moisture is felt, then you need to replace the paper with a new one and continue drying.

It is best to make a basket from a medium-sized pumpkin
To give the basket an unusual look, you should use a pocket knife and cut patterns on the sides with it.
Pumpkin snail
To make a beautiful snail, you will need two pumpkins: one oblong and the other round. A snail shell is made from a round vegetable. To do this, you need to cut off about ¼ of it. The side where the cut was made will place the sink on the ground.
- Also, the shell needs to be trimmed on the right to give the snail a realistic look.
- The narrow part of an oblong pumpkin is cut out and attached to the shell on the right side. This is the basis of the work. Now you need to “revive” the snail.
- Use a pocket knife to make a spiral cut on the sink. Snails have a twisted shell, so the same thing needs to be done here.
- Next, booties or pieces of multi-colored paper are glued to the shell. This will brighten up the work.
- Now you can start creating the snail horns. They can be made from fishing line twisted several times. Put on a fishing line large beads along its entire length. The edges of the fishing line are inserted into the snail's head. There should be two antennae.
- Snail eyes are made from buttons or cut out colored or cardboard paper. You should also not forget about the snail’s mouth and nose. They are made from the same materials.

To make a beautiful snail, you will need two pumpkins.
A bow will complement the composition.
How to make Kopatych from a pumpkin?
Who doesn’t know this wonderful character from “Smeshariki”? Kopatych is one of the main characters of this children's animated series. It's pretty easy to make from pumpkin.
The work includes the following stages:
- The vegetable itself should become the basis of the work. Therefore, it should be washed well and then dried. It is advisable not to use too large a fruit. If you wish, you can coat the pumpkin with varnish, so the craft will look more presentable.
- Kopatych's arms and legs should be made of plasticine. You can use other materials, but plasticine is quite easy and quick to work with. The limbs are glued to the fetus symmetrically.
- What should Kopatych’s nose be made of? There are several options: you can use potatoes, or you can use plasticine. If you choose the first option, then the potatoes should be medium in size and attached to the pumpkin with toothpicks.
- Kopatych's eyes are cut out of white paper. You need to draw a pupil in the center of the paper.

The most important thing in pumpkin Kopatych is to convey facial expressions
At the end, you should draw Kopatych’s facial expressions. To do this you need to use a black marker. The stripes should not be too wide, as the work should look natural.
Pumpkin matryoshka: how to make?
This is one of the easiest pumpkin jobs. In order to make a matryoshka doll, you need to choose an oblong-shaped vegetable.
So, the work plan:
- The fruit is washed and dried. Its color does not matter, since the matryoshka will be colored watercolor paints or gouache.
- The top tail of the pumpkin is cut off.
- The drawing of the “face” of the nesting doll begins. On top of the fruit, that is, where it is as narrow as possible, the facial features of the matryoshka are drawn, namely, the eyes, nose and mouth.
- The matryoshka must smile, because if you draw it sad, the work will not look beautiful.
- Next, the drawing is performed as the master wishes. You can draw the details so that the work looks as much like a real matryoshka doll as possible.

Pumpkin is a versatile vegetable that is difficult to spoil. Pumpkin crafts are incredibly durable and can be stored for a long time. The size of the vegetable gives even the little ones plenty of creative options.
The Halloween holiday came from the USA, first celebrating the end of the harvest. Unpretentious pumpkins were grown in large quantities for feeding livestock, so there was an abundance of them. Even after being used at the festival, it was fed to animals.

Let's take a step-by-step master class on pumpkin crafts for beginners. You can choose the simplest one from all the options so that your child can complete the craft (toy).

First you need to collect pumpkins of different sizes, preferably with a tail. The normal stalk is considered to be approximately 6-10 cm. It is better to cut it with a knife (scissors). The easiest ones to make are pumpkin men.


Funny people
Dried pumpkin can be easily decorated with huge eyes. You can buy them or draw them separately and glue them. Cut a mouth out of red paper in a semicircle and glue it on.

Knit or find a small hat (knitted or made of straw or paper), put it on the vegetable, or wrap the person in a scarf. Buttons, a strap, ribbons, straws, bows will do - everything will be useful for creativity.

If you draw the mouth a little to the side, the face will be funnier, and the mustache will give it the age of a grandfather. You can draw large teeth or just 1 tooth for the entire jaw, etc.

Naughty family
People can be created from 2 pumpkins: 1 large (torso), 2 smaller (head). On the head: tie straw in a bun, put on a hat or a bow for a little girl. This will make a fun family. Draw eyes and mouth with a felt-tip pen, as in the picture. Some have a belt, others have a ribbon with buttons.

bear
If several pumpkins different sizes combine, you can create a real red bear.

Two large pumpkins - head and torso, 4 small ones - 2 arms/2 legs. Cut very small vegetables in half - 2 ears, 2 eyes, a little larger - a nose. Tie a colored scarf around your neck and the toy is ready.

Turtle
If you glue 4 cucumbers to the bottom of a pumpkin half, you get legs. The body will have to be slightly adjusted to fit the cucumbers. Make a hole for the head (with eyes) a little higher.
Animals
If you use a little imagination, you can create funny gnomes, bears, owls, etc. Without even cutting the vegetable, you can glue ordinary sunflower seeds in circles in 2 rows - these are eyes. You can make holes inside for the mouth and eyes.


Caterpillar
You can paint pumpkins in different colors, arrange them by height: from largest to smallest. Make the tails black. The result is a caterpillar, the body can be multi-colored or with an unusual pattern. It can become a spectacular fencing for paths or flower beds.

Halloween flashlight
Let's consider step by step instructions for making pumpkin crafts. You can quickly dry a pumpkin:
- Wash it thoroughly with regular soap.
- Carefully cut off the top of the vegetable with a knife; for a lantern or box, it is better to cut the flesh at an angle (with the tip of the knife inward).
- Carefully add the pulp so as not to damage the peel. It is better to leave at least 1.5-2 cm for the vessel.
- You can sand the inside of the pumpkin, then wipe it with alcohol.
- The vessel should dry for several hours in the fresh air.
- Place newspaper (paper) under the vegetable, change it periodically, it will absorb moisture.


You can attach a small candle inside. Light will be visible through the cut holes. You can make a stencil of a funny or scary creature on paper in advance.

Casket
A painted dried pumpkin can serve as an excellent jewelry box. What is important is the correct shape of the vegetable so that the lid is beautiful and the fruit stands firmly on the bedside table or table.

Garden crafts
You can easily tell if a pumpkin is dry by its sound. The seeds inside “ring.” Dried small pumpkins can be used to make bird houses, nesting dolls, pears and other decorative crafts for the garden. They were painted to suit their taste.


Turkey
It’s easy to make a funny turkey, chicken, or other bird from a small pumpkin. To do this, you need to attach a bird's head to a whole pumpkin. You can glue a cardboard head to the cutting of a vegetable.

The bird's yellow (red) nose will be in the form of a droplet. The eyes are sold or you can make them yourself 2 small black circles on white ones, a little bigger size paper circles.

Maple leaves are perfect for a bushy ponytail. They need to be glued: the largest leaf in the center on the other side of the pumpkin, several others to the sides.

To make a sitting turkey, glue large legs in front of the head. The bird is ready.

Vase
A homemade vase for fresh flowers from the garden looks interesting. She will become beautiful decoration at the autumn festival.


The pumpkin needs to be quite large in size, 2 times larger than the selected glass jar (0.5-0.7 l). The inside of the pumpkin should be carefully cut out.

We make a wide neck to place a jar of water inside the vegetable for wildflowers. There are always a lot of asters, cornflowers, daisies and other flowers in the garden.


The combination of a red pumpkin with branches of lilac, dark burgundy asters and tall branches with dill seeds will be especially impressive. These shades go well together; you can create a background below – wide green leaves. This vase is a real table decoration.

We present to your attention original photos pumpkin crafts.

Photos of pumpkin crafts


