Homemade organza roses and a bouquet of artificial flowers with your own hands. Organza hair clips "Morning dew" Organza hair clips
Every mother dreams of making fluffy bows for her princess, but not everyone knows how to sew them. This article will certainly help you, read it to the end, and you will learn how to make chic bows with your own hands. One of the best and most suitable materials for making bows is organza..
This fabric is very light, bows of any shape are obtained from it. And do not even worry that after washing the bow will not be the same shape, nothing will happen to it.
More big bow can be tied from tulle, beautiful big bows are also obtained from a narrow tape, if assembled correctly.
Consider several options for making lush bows: instructions for making below in the article, in the gallery - photos of examples of finished work, and you can easily find a training video on the Internet.
To make this bow you will need:
- Cardboard.
- Organza ribbon (width five centimeters).
- Clamp.
- Glue gun.
- Needle.
- Scissors.
- Thread.
- Scrunchy.
- Candle.
- Satin ribbon in the same color as the organza.
Manufacturing stages.
- Cut the ribbon into 18 pieces. Each piece should be 15 centimeters long.
- Making kanzashi petals: Fold each piece in half. Make a crease in the middle. Secure the petal with a candle. In the same way, make the rest of the kanzashi petals.
- Make a base. Cut out a circle from cardboard. Its diameter should be 2.5 centimeters. Wrap it with a satin ribbon and glue the elastic with a glue gun.
- Now assemble the bow. First, glue six petals with a slight overlap on each other. This will be the first row. The second row will already consist of five petals. Subsequent rows will be one petal less.
- The bow for the princess is ready!
Gallery: organza bows (25 photos)


Volumetric bow from a solid ribbon (master class)
How to make a voluminous bow? Yes, very easy! To make this bow you will need:

Manufacturing steps.
- Scorch both edges of the ribbon with a candle or lighter.
- Fold the ribbon in half. From the fold line, make a simple seam. This will be the fold.
- Pull the thread. The ribbon will begin to gather. Pull the thread as tight as you can, then cut off the excess thread and fasten off.
- Roll the ribbon into a roll. Each layer must be fixed with a glue gun. Should be a flower.
- Make a base. Cut out a circle from cardboard. Its diameter should be such that it covers the glued middle. Attach the circle to a dense fabric, circle it, and then cut it out.
- Glue the bow to the base.
- Use a glue gun to glue the hair band.
- Fluff up the bow.
- The bow with your own hands is ready!
Flower-shaped bow (master class)
This variant of the bow is incredibly beautiful. It can be safely worn on the first of September. It differs from other bow options in that plain chiffon is used for its manufacture.
To make such a bow you need:
- Chiffon white.
- Beads or beads.
- White organza ribbon.
- Pin.
- Thread and needle.
- Glue gun.
- Scissors.
- Cardboard.
- Pencil.
Manufacturing steps.
- Draw a circle on the cardboard. Its diameter should be six centimeters. Attach the circle to the organza fabric, circle it and cut it out.
- Make petals. Fold the circle of fabric in half, sew along the edge, then pull it off. On the same thread, put on four more folded circles. Get petals from organza. This is the first row.
- The second row will be of five chiffon petals. Make them the same way.
- Make another flower with seven organza petals and nine chiffon petals.
- Connect the flowers with a glue gun: chiffon petals - organza petals and so on.
- Make a base. Cut out a circle from thick fabric. Its diameter should be such that it hides the middle. Glue the same circle of chiffon on it.
- The middle of the bow can be decorated with beads or beads.
- The bow is ready!
Hairpin in the form of an organza bow (master class)
For the manufacture of hairpins you will need:

Manufacturing steps.
- Measure and cut four squares of tulle. The size of the square should be eight centimeters.
- Now you need to cut four pieces of organza. The first four segments should be seven by fourteen centimeters in size. Four second segments - seven centimeters.
- Make kanzashi petals. Fold the fabric (seven by fourteen) in half. Get a square. Fold it diagonally again, wrapping the edges towards the center. Pinch the bottom with tweezers.
- Wrap the resulting rhombus in the opposite direction. Cut the bottom evenly and burn it with a candle or lighter. Should be a petal. Make four of these petals.
- Now make a petal from organza and tulle. Lay the organza square over the tulle square.
- Fold them in half to make a triangle.
- Bend the corners to the center, hold the bottom with tweezers and burn with a candle. Another petal is also ready. They also need to make four pieces.
- Cut out two circles from the red ribbon. Their diameter should be such as to cover the middle.
- Burn the edges of each circle.
- Glue the flower from the petals with a glue gun.
- Glue the resulting flower onto a circle.
- Glue the metal hair clip to the circle.
- You can glue a bead in the middle of the bow.
- Lush bows-hairpins are ready! If desired, you can make several pairs of these hairpins.
Now you know how to make a DIY organza and chiffon bow. Choose any option and get to work. Success in creative work!
1. METHODS OF MANUFACTURING ARTIFICIAL FLOWERS FROM ORGANZA. BEAUTIFUL CRAFTS FOR DECORATION OF INTERIOR OBJECTS AND FOR JEWELRY.
IN Lately jewelry with handmade artificial flowers is back in fashion . Graceful small flowers and large flower arrangements decorate fashionable women's hats, stylish knitted or leather handbags, beautiful modern evening and wedding dresses , pendants and tiebacks for curtains or curtains. Needlewomen create their own original flowers from different types of fabric, satin ribbons , leather shreds and plastic . In previous articles, we have shown you how to roses , chrysanthemums, lotuses satin fabric , wedding bouquets in the form of balloons from corrugated paper, decorative ornaments from tapes in technology kanzashi for hairpins and headbands , topiary (pictured).
In this material you will find step by step wizard classes and video lessons handmade roses and other types of organza flowers. Organza crafts you can decorate handbags , decorate the topiary, hair ornaments , hats and other women's accessories. Homemade flowers look great on greeting cards self made, photo album covers, photo frame , gift boxes, boxes for small jewelry.
Organza can be used to make very beautiful wedding flowers and bridal bouquets. for girlfriends. For male wedding suit Can make a small boutonniere with your own hands from this thin translucent fabric.
Why is organza so popular with needlewomen, along with satin and rapeseed fabric, for making artificial flowers and other crafts? 
This fabric is made by twisting two fibers. Previously, organza was made from silk, but now you can often find this transparent, rigid, thin fabric made of polyester or viscose. -
By appearance and some properties there are differences among the varieties of organza. For making roses , carnation, many big flowers and bouquets we advise you to choose organza - "rainbow" or "chameleon".
Organza "rainbow" can be recognized by the characteristic vertical stripe, passing from one color to another. And the "chameleon" is distinguished by the so-called "shanzhan" effect, thanks to which a home-made flower from this fabric changes color depending on the angle from which you look at it.
Exist different techniques making artificial flowers from organza:
hand twisting technique (as with kanzashi-style satin ribbon);
Classic technique (silk floristry);
Ganutel (to give the flower petals the desired shape, threads, fishing line, wire are used);
Heat treatment (for example, using a candle flame) of organza blanks to give the desired shape to the craft part.
Most often, classic and hot (heat treatment) techniques are used to make organza flowers.
IN classical technique fabric blanks are processed as follows: first, the flower petals are starched, keeping in gelatin or polyvinyl alcohol. After this, they take a special tool - bulbs, and with its help they give the desired shape to the petals (which are usually cut out from cardboard according to a template). A special floristic pad is placed under the workpiece, and the bulb is heated. Since the fabric was starched, the edges of the workpiece are not frayed during processing.
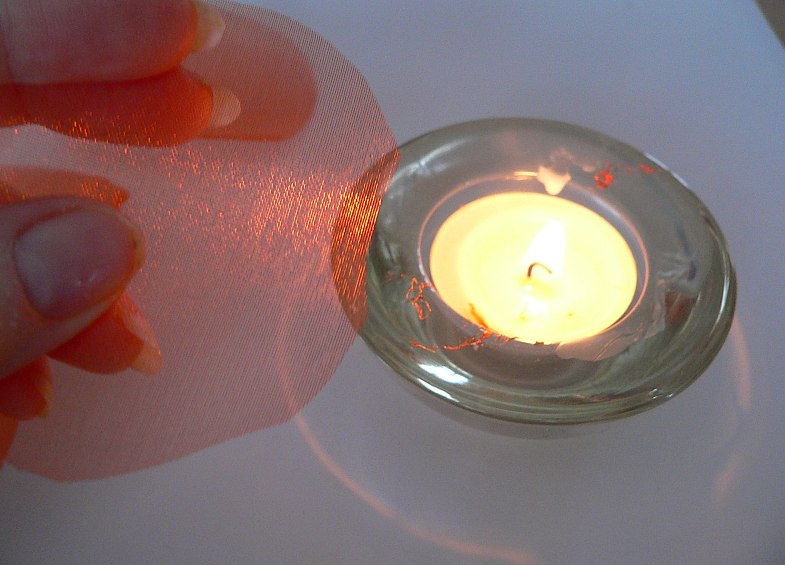
The heat treatment of organza blanks with the help of a candle flame became possible after this fabric was made from polyester and viscose. As you know, synthetic material does not burn, but melts over fire. Therefore, you can easily change the shape of an organza petal by melting the edges over the fire.
2. INSTRUCTIONS FOR BEGINNERS. TWO SIMPLE WAYS TO MAKE FLOWERS FROM ORGANZA WITH YOUR HANDS
# Option 1:
How to quickly do big rose from organza to decorate clothes:
# Option 2:
Learning to make a flower synthetic fabric in 20 minutes:
Materials and tools for work: polyester organza, long tweezers, scissors, needle and thread, beads, brooch attachment, candle.
Stages of work:
Cut out 4-5 circles with scissors different sizes from organza to make the flower lush
Pick up a round blank with tweezers and bring it to the candle flame. Turn the tweezers with your hand, melting the edges of the organza blank. In this way, you can easily give the petal a beautifully curved shape.
We fold the organza petals one into the other so that the flower looks as realistic as possible. Petals can be sewn together with a thread (or glued with glue using a heat gun).
We decorate the middle of the flower with beads, sewing the beads with a thread
To do it yourself beautiful brooch or a hair clip, cut out a circle from felt and glue it on the back of the flower. We glue a fastening base (automatic hairpin or brooch) to the felt.
3. MASTER CLASSES FOR MANUFACTURING ROSES, CHRYSANTEMUMS AND OTHER FLOWERS FROM ORGANZA WITH YOUR HANDS
Master class number 1:
HOW TO QUICKLY MAKE FLOWERS FROM ORGANZA WITH YOUR HANDS. WE HOLD THE CIRCLES CUT FROM SYNTHETIC FABRIC OVER THE BURNING CANDLE AND GIVE THE NEEDED SHAPE TO THE PETALS. STEP-BY-STEP PHOTO MK.
Master class number 2:
HOW TO MAKE A BEAUTIFUL CRAFTS IN THE FORM OF A LOTUS. BEAUTIFULLY CUT PETALS FROM ORGANZA AND GIVE THEM A SHAPE WITH A SPECIAL SOLDERING IRON FOR BURNING ON THE FABRIC, WE FORM A BROOCH FROM A FOLDED FLOWER.
Master class number 3:
HOW TO MAKE A BIG FLOWER FROM ORGANZA FOR DECORATION OF A GREETING CARD. ELEGANT HANDMADE ARTICLE IN THE FORM OF A RED POPPY - A STEP-BY-STEP DESCRIPTION OF THE STAGES OF WORK AND PHOTO.
Master class number 4:
WE MAKE A POPPY FROM ORGANZA FOR DECORATION OF A WOMEN'S HAT WITH A WIDE BRIM. FOR WORK, PREPARE PINK SYNTHETIC FABRIC, SCISSORS, NEEDLE AND THREAD, CANDLE AND SAFETY PIN.
Master class number 5:
HOW TO MAKE A COMPOSITION OF ROSES FOR DECORATION OF ACCESSORIES ON CURTAINS WITH YOUR HANDS. WE MAKE FLOWERS FROM ORGANZA WITH WHICH YOU CAN BEAUTIFULLY DECORATE TIEBACK AND PENDANTS (FOR CURTAINS OR CURTAIN).
Master class number 6:
FROM SUCH A THIN, TRANSPARENT AND DELICATE FABRIC, AS AN ORGANZ, YOU CAN MAKE GRACEFUL FLOWERS FOR DECORATION OF PILLOWS. PHOTO WITH STEP DESCRIPTION.
Master class number 7:
A GORGEOUS LARGE FLOWER FROM ORGANZA IN THE FORM OF A ROSE WITH YOUR HANDS. THE CUT-OUT CIRCLES FROM THE FABRIC WILL BE PROCESSED WITH THE HELP OF A TEA CANDLE, SO THAT THE EDGES OF THE PETALS ARE ACCURATE.
Master class number 8:
A special place in the image of each beauty is occupied by a hairstyle. creating it, great attention given to accessories: ribbons, bows, hairpins. The main condition is that the hair decoration must be of high quality, tastefully selected and the owner should like it.
It often happens that finished products that are sold in stores do not fit the chosen image. Then there is only one way out - to make a hairpin yourself.
It is always nice to wear jewelry made by yourself. They are different from those purchased in the store, because. the craftswoman puts her imagination into them. A woman of any age can complement her image with an original accessory.
In addition, self-made jewelry can become a good gift for a loved one.
Ribbon hair clips for beginners
Let's figure out how easy it is to make hairpins from ribbons, and how it will help us detailed wizard class for this work. We propose to discuss this in this useful lesson. Let's try together to build and glue bright, cute and beautiful jewelry for ponytails of little fashionistas.
Many useful things can be made from satin and high-quality rep ribbons, but they are most often used for making elastic bands or hairpins. The point is just that this material for creativity is easy to work with, practical and, what is no less important, available to craftswomen in any color and quantity.
Picking up bright ribbons and beads of delicate flowers we get an original couple of useful things for a girl. Such hairpins can become stylish gift for a holiday or birthday.

Let's start making hairpins from combined ribbons and figure out how simple the master class is.
To make hairpins (elastic bands) from satin ribbons with your own hands, you need the following material:
- 1. Tape reps width 2.5 cm - 62 cm,
- 2. Organza ribbon width 2.5 cm - 60 cm,
- 3. Satin ribbon thin width 0.5 cm - 32 cm orange and 16 cm yellow,
- 4. White bobbin thread and a sewing needle with a small eye,
- 5. Silicone hot glue,
- 6. White plastic center - 2 pcs.,
- 7. Scissors,
- 8. Fastening - clips 2 pcs.,
- 9. Matches or a candle.

A strong base for making hairpins will be two reps ribbons. They need to be cut into two cuts for each hairpin, 8 cm long, as shown in the photo.

To make the ribbon more attractive and beautiful, we cut its edges with a triangle obliquely. To do this, the ribbon with the edge must be folded with the front side inward and cut off on both sides.

Rep ribbon, like satin ribbon, tends to crumble at the edges and unravel. To avoid this, it is enough for us to take matches or a candle, with the help of which the cut edges need to be slightly singeed.

To combine two tapes, you need to apply glue to the bottom in its center and cover with a second tape.

For the central middle of the hairpins from ribbons, we will prepare cuts of rep and organza. The edges of the organza are also scorched, but very quickly and carefully. This material burns easily.

We fold the rep cut of the tape for the middle in half and sew it with a simple seam.


Since the thread is not torn off, then with its help we tighten the part from the rep, fixing the thread to the knot.

We also tighten the organza ribbon scorched along the edges with a thread and a needle.

Pulling the thread through the center of the bows, they need to be fastened together.

We fasten.

We also sew the second organza bow to the ribbons. All three bows are stitched well again and tightened to fix in the center.

For two handmade hair clips, we will make two blanks.

We will cut a thin orange satin ribbon into cuts of the length indicated in the photo.
We need only 4 such blanks.

Lightly grease the central part of the reps with glue and attach thin satin ribbons. Before attaching these additional ribbons, their edges also need to be cut and singeed.

We will prepare a thin yellow satin ribbon in the form of segments of 7.5 cm, the edges of which are cut off and singeed.

We fasten these segments in the center of the hairpin.

The ribbons gathered together - the middle ones, which we made from three bows (rep and organza) on the wrong side, are abundantly filled with hot glue and combined with the main rep part to create hairpins.

To hide the threads in the middle of the hairpin, you can sew on a decorative element (button) or place a half-bead or a plastic round center there to your taste. It is attached with hot glue or super glue. It is best to use hot glue, as super glue has a specific smell.

To securely fasten the hair clip to the hair, you can use a metal clip. It is attached to the base of the hairpins with glue. The finished hairpins are allowed to dry, and they are completely ready.

Here are such hairpins from ribbons and a master class for them, we proposed to do in this lesson with our own hands. Successful needlework and creative success.


Kanzashi hairpins
Kanzashi is a technique for making flowers from ribbons and fabric. It is a traditional art form of Japan and China. There, kanzashi jewelry is quite popular. They are worn by brides, decorated with traditional kimonos.
Kanzashi technique came to our country not so long ago. Rapidly gaining popularity among women different ages. But especially liked by schoolgirls.
Similar decorations in the form of hairpins, elastic bands, hairpins can be found in stores specializing in hand-made products or made independently.


Hairpin bow for a schoolgirl
Every mom wants her schoolgirl to look beautiful. A large selection of ready-made hairpins in the store does not guarantee that it will look original and unique. And the advantage of a self-made accessory is that it is made with love and only in a single copy.
To make bows, you do not need to have special skills and abilities. All work will take no more than 10-15 minutes.


Rep ribbon hairpins
Hairpins made from several types of ribbons can be an excellent addition to the dress of little fashionistas. Ribbons of reps and satin are well combined with each other.
Rep tape is made from polyester thread. It is a narrow strip with characteristic transverse scars. It is easy to work with, it is highly rigid, retains its shape well.
Satin ribbons are a widely used material for needlework. They are made from viscose or acetate silk.
You can decorate a hairpin made of ribbons with various decorative elements that will serve as the center of the flower.
If it is not possible to purchase a ribbon, you can make a similar hairpin from small remnants of fabric.
The process of creating jewelry is quite fascinating, it does not require great skill. It is easy to make an accessory, just follow the instructions.


Read more about how to make hairpins with mushrooms in the master class ""
Elastic band "Ladybug"
Ladybugs are considered the most adored insects in children. Therefore, hair accessories that contain the image of the "sun" look funny, cause tenderness, and most importantly, children like it.
These decorations are quite easy to make yourself. And you can connect a child to the manufacturing process, then the accessory will be even more beloved and expensive for him.


The uniqueness of the image does not depend on the cost of the outfit, but on the exquisite little things that make it perfect. Purchased or hand-made organza flowers will be an ideal addition not only to wedding or evening dresses, but also to children's dresses.
They can be used as curtain decorations, decorations for postcards and for many other little things. The use of these cute compositions is only limited by your imagination. To make flowers, you should understand how the fabric will lie in the finished product. First, let's look at the properties of fabric and types of organza.
Organza - fabric description
Organza used to be made from silk, then from viscose. Modern manufacturers use polyester thread - the fabric is transparent and weightless, but at the same time rigid and keeps its shape perfectly.
This is ensured by tightly twisting two threads together, and depending on their thickness and color, different kinds fabrics:
- matte or shiny
- gradient or chameleon,
- plain or rainbow
- sprayed with different colors
- jacquard or embroidered;
- ribbon of various widths.
For the manufacture of colors will suit not every fabric. For example, embroidered organza is used for sewing curtains or dresses. The most popular among needlewomen is matte and shiny plain fabric.


Shiny organza is a favorite material for flowers on bows,
hair accessories and brooches
Spectacular flowers for bright outfits are obtained from sprayed organza.

Sprayed organza looks festive, and flowers from this fabric will be appropriate in the bride's outfit
For romantic images, fantasy flowers from organza gradient, chameleon or patterned fabrics are suitable.

Gradient organza is great for fantasy looks

Organza chameleon - for complex, iridescent colors

Gradient-colored ribbon makes charming flowers that can be used to create bouquets, including embroidered ones.

A cute summer look will be complemented by an organza flower with a pattern.
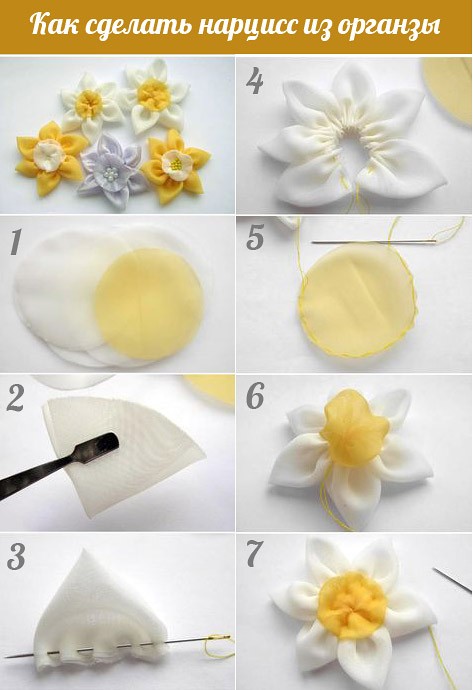
Making organza flowers with your own hands is easy - the main thing is to know basic techniques. For this, "Cross" has prepared an overview of simple master classes.
Basic principles for creating flowers from organza
The creation of any, even the most exquisite, flower or complex composition begins with the preparation of parts and their connection in a certain sequence. The needlewomen came up with several techniques with which flower masterpieces are born:
- classic with bulbs,
- with heat treatment
- kanzashi,
- from tapes.
It is easier for beginners to master the technique using heat treatment of petals, and experienced craftswomen create their masterpieces using several techniques.
Classic floristry

This technique is called silk floristry or Japanese technique. The ancient art of making silk flowers comes from Japan. However, it also applies to other fabrics: viscose, cambric, organza. To make flowers, you will need a soldering iron and a set of special brass tools on the handle. It includes round balls of various diameters - bulbs, as well as trowels, knives, heels, hooks, dies and special tools for chrysanthemums, lilies of the valley and fantasy flowers.

The petals are cut out according to the pattern, starched or aged in gelatin and dried - due to this, the edges will not fray, and the petal will keep its shape.
YOU WILL USE
An archive with will come in handy when creating them. Download is free!
To give natural curves, the petal-blank is placed on a special pad and passed over it with a hot tool. Then a flower is assembled from the finished petals on a thread.
MK for making flowers in Japanese technology:
Plain flowers with heat treated edges
The preparation of the petals is similar to the classic method: it is necessary to cut the blanks exactly according to the template.

So that the edges do not crumble and are not disheveled, they must be processed. This will require a candle. Since organza is made of synthetic fabric, it does not burn, but melts. This is simplicity and complexity at the same time: the petal easily acquires the necessary shape, but it must be carefully melted, otherwise you can ruin the workpiece by melting the excess. A feature of the melted edge of organza is a rounded edge of a darker shade. Thanks to her, the petals look especially charming.
A flower is assembled on a thread, and the core is decorated with beads, beads, sequins.
The flower will look more organic if the petals are not connected directly in the middle, but each one is slightly shifted.

Kanzashi
This technique is universal, as it allows you to make flowers both from blanks cut from fabric and use organza ribbons. The bottom line is that each petal is a repeatedly folded fabric. You can fix individual elements on a thread or melt the edge over the flame, thus gluing them together.

The technique is most suitable for creating small flowers intended for decoration, photo frames, postcards, decoration gift boxes and for the realization of countless creative ideas.
MK for making an organza flower using the Kanzashi technique:
Ribbon flowers
This technique is the first step in and a great option for beginner craftswomen. The organza ribbon has a hem so the petals look neat and only the edge needs to be fired. The width and length of the ribbon depends on the intended size of the flower. Creating flowers in this technique is a great option for co-creation with children.
Exquisite organza flowers for special occasions
In the techniques discussed above, the edges of the petals are only heat treated. You can add chic with a special finish instead of melting or on top of it. Such a flower will become an exquisite decoration. wedding bouquet or delicate decor of clothes. Let's learn how to create elegant organza flowers, and the master class will help us with this.
For the manufacture of this type of flowers, organza is an ideal option, since it is quite rigid and can withstand the load of glitter or small beads glued onto the petals.

To make flowers we need:
- organza,
- transparent glue for fabric,
- white or silver glitter
- scissors and pins,
- sewing needle and thread to match the fabric.
First step. Cut out the petals according to the pattern. The required quantity and size depends on your idea. Two petals are enough for a gentle coaster under a cup.

Second step. Gently grease the edges of the petals with transparent glue, sprinkle them with glitter and dry.
If you are creating a flower to decorate clothes, then it is still better to melt the edges over the candle - this will prevent the threads from shedding, and then decorate with glitter.
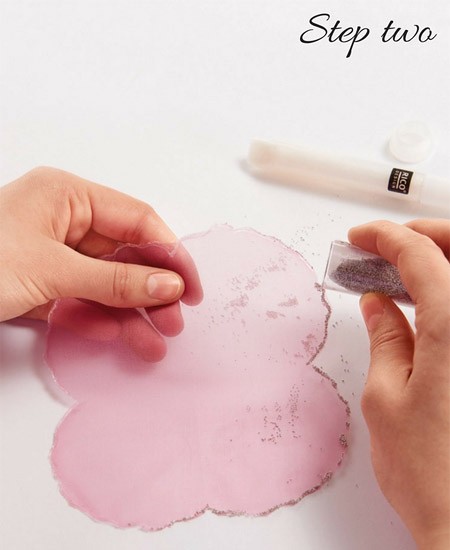
Third step. With a thread to match the fabric, sew the middle of the petal with large stitches. When tightening, folds are formed, which must be secured with additional stitches. If you are making a napkin for a cup, you just need to pull the folds slightly and then straighten them, giving the flower airiness.
If you are new to flower making, first practice on scraps to find the right amount of folds.

Fourth step. Connect the finished petals into a flower with a needle and thread. The middle can also be decorated with glitter or beads. The finished flower head is glued to a wire or a wooden stick, which, if desired, is decorated with floral tape.

Here you will find the original of this master class, from which you can download part templates!
Flowers more refined and interesting are made more difficult, but careful following step by step instructions help you get the job done!
Master class on creating a dahlia from organza:

Master class on creating a lily from organza:

Original examples of using organza flowers
As a rule, fabric flowers serve as decoration for wedding and evening dresses, hats, clutches, romantic or in the form of. But mini-compositions have a special charm.
It is used to decorate the groom's suit, and individual small flowers will make an excellent decor or photo frame.

An accordion is assembled from a strip of organza on a thread with a needle. Then a crown is cut out of felt.

With the help of transparent glue (or threads), the crown is fastened into a ring and sits in the center of an organza skirt.
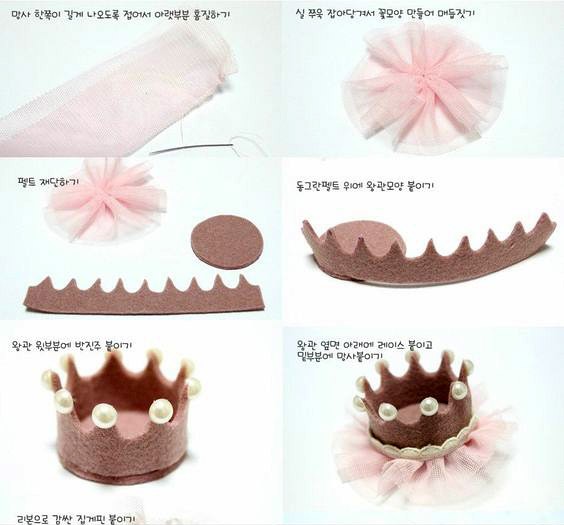
Final decor - optional: beads, lace, sequins, pendants. The crown can be attached both to and to a hairpin-clip. Your little one will be delighted!
Decoration wedding dresses- a limitless field for imagination. Can be done with large beads and a narrow crochet organza ribbon to tie a necklace or bracelet.

Organza is a grateful material for creating delicate, elegant or chic and catchy flowers. A variety of techniques will allow even novice craftswomen to create masterpieces.
Craft hairpin from organza with decorative flower handmade will freshen up your hairstyle. Such a flower will also look original as an item of a festive wardrobe, giving a feeling of freshness and originality to all your things.
Hairpin
This DIY organza hair clip will freshen up your hairstyle. Such a flower will also look original as an item of a festive wardrobe, giving a feeling of freshness and originality to all your things.
This decorative hairpin with an original organza flower is a beautiful and stylish hair ornament. You can make such an ornament quickly and easily, while spending a minimum of free time. So let's get to work.
To do this, we need a piece of white organza and a piece of white dense fabric, such as calico or cotton, a beautiful pearl bead, a sewing needle and white thread, small glue gun, a candle and medical tweezers, a small piece of plastic from plastic bottle, glitter hairspray, a hair clip with a pad, like this one:
Cut out small circles from organza, but do not forget that they should be of different diameters.

Using tweezers, take one circle at a time and gently melt it in the outer circle, holding this circle over a lit candle.

This is the most difficult and responsible stage of work. Organza is a very thin and fragile fabric, and with any careless movement, it can completely burn out. To prevent this from happening, the petal must be kept at a certain distance from the candle.
Remember, you only need to lightly scorch the edges of the petal. When exposed to an external heat source, the fabric will slightly decrease in size, that is, the outer contour of the circle will decrease. So we get a pretty petal in the shape of a cup.

Now take a thick white fabric and cut out a small circle from it. First, let's start sewing on the largest petals as shown in the figure below:

For the first row, sew seven organza petals.

For the second row, sew three petals.

The third row will consist of seven medium-sized petals.

And the fourth row will consist of the three smallest petals.

Then, in the middle of our organza crafts, we sew a beautiful bead.
In order to mask the ugly seams on the wrong side of the flower and to give the flower structure a certain rigidity, we glue our flower onto a circle of plastic with a glue gun. This plastic can be cut from a yogurt jar, any plastic bottle, etc.

Using the same glue gun, we will glue the flower onto the prepared hair clip.

Let's sprinkle finished flower glitter hairspray and our barrette will take on a festive look.


