Creative project on the technology of a soft toy cat. Creative project on technology Soft toy - "Dog with a surprise
Department of Education Administration Krasnokutsky municipal district MOU SOSH with. Dyakovka

The project was completed
11th grade student
MOU SOSH with. Dyakovka
Homeland Ulyana
Project Manager
technology teacher
MOU SOSH with. Dyakovka
Diakova Nadezhda Georgievna
2013-2014 academic year Soft toys-
the present fun for kids and adults. best gift, how soft
toy, cannot be imagined. It will be pleasant for both a child and a woman of any age, and such a gift will pleasantly amuse a man.
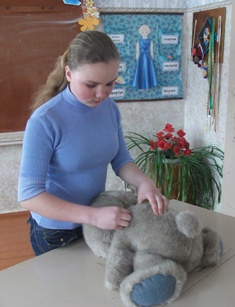
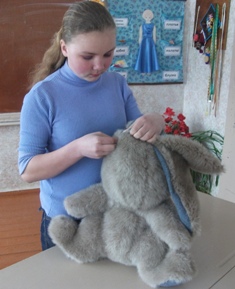
I go to classes in the soft toy circle and decided to sew some kind of toy. Nadezhda Georgievna showed me a book where you can choose a toy and sew it. This book describes all the points of cutting and sewing toys. There were many different toys but I chosebunny ! I liked how this bunny looked in the picture, and I really wanted to sew the same one.
stood in front of me problem : where to find material for a toy, how to stuff it?
Of course, it would be possible to buy material and padding polyester in the store, but all this cost money. I started asking relatives and friends if they had any old fur coat and unnecessary cotton. In the end, I found all the materials and started working on the chosen topic.

Make a soft toy with your own hands.
1. Decide on a toy.
2. Select material for manufacturing toys.
3. Prepare patterns.
4. Sew a toy.
5. Protect the project.
Choose yours soft friend. It can be put on the floor or on a chair, because a large soft toy- a wonderful element of the interior, making the room warmer and more comfortable.
From the history of soft toys The first soft toys appeared at the beginning of the 20th century in Germany. The first toy bears that became famous all over the world were Teddy bear (Teddy toy bear) from the German company Steif. The toy bear has become an inseparable companion for most children.The most important advantage of a soft toy is to give tenderness and comfort to babies. In moments of sadness, the baby holds them in his arms, gently hugging him, clings to them when he feels bad.Fashion for soft toys The most popular soft toys are bears and dogs in natural, pastel colors.Caring for soft toys It is recommended to clean soft toys from dust at least once a week! The toy can be vacuumed, wiped with a damp cloth or simply brushed with a clothes brush. If your beloved bear is heavily soiled, light dry cleaning is acceptable - but chemicals must be applied very carefully. But washing or using chlorine for cleaning is prohibited. Another important rule- drying soft toys. If it gets wet, hang to dry. You can't iron plush animals!soft toys for different ages- for children from three years old: small, light, pastel colors; for older children: bright toys; for adults: large interior (naturalized) toys. This is interesting!!!
Now any soft toy can speak with your voice!


 DIY soft toy
Making a soft toy with your own hands
- a very exciting activity that both adults and children can do.
Soft toys can be sewn from the most different materials: scraps of fabric, leather, fur, oilcloth, trimming of ribbons and lace, individual beads, buttons, buttons will come in handy. In addition, to create soft toys with your own hands, you can use old felt hats, terry towels, knitted T-shirts, etc.Old things will get new life
, and there will be less trash in the house.
Handmade soft toygreat gift for
adult and for baby
, the main thing is to think carefully about what, to whom and for what reason it will suit. Bears, of course, are beyond competition: they are good anytime, anywhere.
Sewing soft toys with your own hands is a very useful activity for children. It trains fine motor skills, attention, perseverance
and tactile sensitivity, develops Creative skills, and also teaches to follow the rules and instructions. Experts say that soft toys with different surface textures must be in every child over three years old.
An original, high-quality soft toy, or a collection, or a composition of soft toys, decorate the interior
Houses.
With constant consumer demand, making a soft toy with your own hands, for example, as souvenirs for tourists, can become a real home business.


![]()
1.
Torso - 2 days.2.
Cheeks - 2 days3.
Forehead - 1 day. 4.
Belly - 1 day.5.
Ear - 4 days 6.
The inside of the paws - 2 d.7.
Head - 2 d.8.
Feet - 2 days9.
Lips - 1 day 10.
Tail -1 d.
We start sewing from the body.
Let's take 2 parts - the inside of the legs and the stomach and connect them with a fur seam on the wrong side, after connecting the control points. Then we connect the details of the torso with the inside of the legs, fold them in pairs with the front side inward, connect the control points, sew them up with a fur seam. Then we sew the feet. We sew the back.
Leave the neck section unsewn. Through it we twist and stuff the body. Then we collect the hole on the thread.
Head tailoring. We fit the cheeks and sew them to the head with a fur seam on the wrong side, having previously connected the control points. Then we sew a wedge - the forehead on the wrong side and connect the cheeks p .
We sew lips between the cheeks. Then we turn the head through the hole, stuff it and collect it on a thread with a seam over the edge, tighten it, fasten it.
We begin to sew the ears by closing the tuck with a fur seam on the wrong side. Then fold the details of the ears in pairs with the front side inward, connect the control points and sew .
We do not sew the ear along the bottom line, turn it inside out and sew it with a seam over the edge. Sew the ear with a hidden seam to the head.
We make out the body by sewing on the tail. We collect the part with a rare seam over the edge, tighten, fasten and sew with a hidden seam in a circle.
We connect the finished head with the finished body with hidden stitches in a circle, repeat 2 times, tightening the stitches well.
We start the design of the head by gluing the eyes, then the nose - buttons on the leg. Glue to the head, eyebrows, eyelashes, mustache.


Now everything is ready.
You can brag
with his work.
 When I started sewing a toy, I really liked this activity. Everything went well. I sewed the body and started sewing the head. This is where I ran into trouble. According to the patterns, the head should have turned out normal, but when I sewed it, then I only noticed that it was larger than the torso. Even my brother laughed at such a head! I had to reduce it, and only then it turned out to be more suitable for this toy. I sewed this toy with love, a piece of my soul will remain in this toy. When I sewed my hare, everyone really liked it. Everyone praised me. I decided to give this toy to the school, and sew the same one for myself, even better! This toy is not very difficult to sew. If you try, then any person will get the same beautiful, hand-made toy! Having sewn such a toy, you can give it to someone for a holiday, as well as to your brother. He will be very pleased. I think I got a beautiful and good bunny!
For my project, I used book by I.S. Kuznetsova "Soft toy"
Municipal educational institution
« high school No. 3"
by technology
"Soft toy"
Completed by: a student of the 8th "b" class
MOU "Secondary school No. 3"
Voroshnina Victoria
Supervisor: Tishaninova LN, technology teacher
Kargopol
Justification of the problem
At school, at the lessons of technology, my skills in arts and crafts improved. At the technology lessons, we were engaged in needlework: cross-stitched, knitted and crocheted, made various compositions from fabric. It was necessary to choose topics for a creative project, and I decided to make a soft toy, since I went to a soft toy circle, and I really liked it, I decided not to abandon my favorite thing. After reviewing several books on needlework, many of them attracted me to toys - dolls, flowers, fairy-tale characters. However, I decided to make a penguin. I wanted to learn the history of the development of the toy and show my skills.
The purpose of my work: make a soft toy with your own hands.
Tasks:
I want my toy to be interesting, pleasing to the eye and uplifting.
Explore the development of toy days.
The finished toy must match the size of the pattern.
Self-fulfillment when doing work with your own hands.
Toy Development History
The art of making toys is one of the most ancient forms of folk art. artistic creativity. Everyone loves toys: children and adults. For children, it is a fun game; adults are happy to look at the beautiful, funny toys which bring them true joy, transfer them to the world of childhood, cause a kind smile.
The toy has always accompanied man. Various kinds of toys were found in the burials of Egypt, Greece, the Roman Empire. In distant times. When there were no special workshops producing toys, they were created by craftsmen - handicraftsmen who worked alone or by family members. These were the first folk toy artists who passed on their skills from generation to generation. The originality of the manufacture of toys is determined by the conditions of life and work, the customs of the people, the national character, climatic conditions and the material used. So, in areas rich in forests, toys, as a rule, were made of wood, in places rich in clay deposits - from clay. Wooden and clay toys have been known in Rus' since ancient times. The oldest toys found on the territory of our country date back to the 2nd millennium BC. e. These are miniature hunting tools - bows, arrows, hatchets, household items, rattles.
Various toys found in the burials of ancient Egypt, Greece, China. These are dolls made of wood and fabric, leather balls, animal figurines carved from soft stone, mammoth tusks. From time immemorial came to us the tradition of a sewing toy - a doll sewn from shreds of fabric, fur.
Sometimes the toy was given magical meaning. For example, various whistles, rattles, according to the pagan beliefs of the ancient Slavs, drove away evil spirits with their whistle and noise. For the same reasons, the image of the face of the doll was forbidden, therefore, for home-made rag dolls different peoples instead of the image of the face, you can see a pattern in the form of a cross, rhombus, square.
The earliest toys of Ancient Rus', found on the territory of ancient Russian cities - Kyiv, Novgorod, Moscow, Kolomna, Radonezh - date back to approximately the 10th-15th centuries. Scientists established handicraft production of toys in Kyiv and Novgorod as early as the 10th-13th centuries. On the high skill of Moscow toy potters of the XIV-XVII centuries. Findings in Zaryadye, on the territory of the former Goncharnaya Sloboda, testify. Plots of toys of this time: horses, bears, birds - whistles, as well as funny figures of horsemen, buffoons-horns.
The traditions of true art continue to live and develop today.
Development various options
Before sewing my toy, I looked through many books and magazines on making soft toys. The world of toys is huge and diverse. I liked many models of toys.
Model #1 Model #2
Model #3 Model #4


Identification of the main requirements for the product
My toy should be:
Nicely and well made;
Small size;
Made from soft fabric
natural color;
Safe for the child;
Made from environmentally friendly materials;
With low cost.
Idea analysis and selection the best option
Model No. 1. Difficult to make, but quite beautiful.
Model number 2. Easily lifts the mood, but quite easy to perform.
Model number 3. Pretty easy to do.
Model number 4. Beautiful and not exactly difficult to perform.
I settled on model number 4.
Materials and tools
Fabric brown, white (30x30cm), red, sintepon (25x20cm)
Needles with heads
Needle for handmade
Threads: white, red, black - 3 spools
Product technology
We select the material and prepare it for work (washing, steaming the fabric).
We make a pattern from cardboard, since solid patterns fit more tightly to the material, they are easier to circle, they are more durable.
We spread the resulting pattern on the wrong side of the material, press it tightly and outline it with chalk.
We sew a toy.
We attach the beak, eyes.
Economic justification
I spent __ rubles on work. I sewed a toy in 3 hours.
The toy is not environmentally hazardous.
Sketches of toy details

Self-esteem
I really like my toy. She complements my small collection of soft toys and the interior of the house with her beauty.
Municipal budgetary educational institution
« Secondary school №5 »
urban district of the city of Manturovo
creative project
technologies
Soft toy -
"Doggy Surprise"
Completed: 8th grade student -
Rumyantseva Anna
Head: Rumyantseva S. A. -
technology teacher
Manturovo 2012
Justification of the problem
During my studies at school, at the lessons of technology, my skills and abilities in arts and crafts improved. At the technology lessons, we were engaged in needlework: we embroidered with threads of various thicknesses, with braid, we made souvenirs and gifts in various techniques, mastered the technique of knitting and crocheting, sewed soft toys on a mug.
The topic of the technology project was determined in advance, it was the production of a soft toy. This type of needlework has been familiar to me for a long time, as my friend and I have done it more than once. creative work this direction for an exhibition at New Year"Snowman" and exhibitions of handicrafts for the technology office "Tiger cub" toy.
After reviewing several books, magazines and encyclopedias on needlework, I was attracted by bright soft toys - a pillow, the sun, flowers, fairy-tale characters. However, I decided to make a toy - an animal, in honor of my four-legged friend - the dog Zhulka and give it to my younger friend Allochka for her birthday. And not just a soft toy, but a handbag where you can put sweet gift- surprise.
I wanted to learn the history of the development of the toy and show my skills in work.
The purpose of my work: to make a soft toy with my own hands.

Task Formulation
I want my toy to be interesting, pleasing to the eye and uplifting.
Tasks:
1. Study the development of the toy.
2. The finished toy must match the size of the pattern.
3. Self-realization when doing work with your own hands.

Toy Development History
The art of making toys is one of the oldest types of folk art.
Various kinds of toys were found in the burials of Egypt, Greece, the Roman Empire. In ancient times, when there were no special workshops producing toys, they were created by craftsmen - handicraftsmen who worked alone or by family members. These were the first folk toy artists who passed on their skills from generation to generation. The originality of the manufacture of toys is determined by the conditions of life and work, the customs of the people, the national character, climatic conditions and the material used. So in areas rich in forests, toys, as a rule, were made of wood, in places rich in clay deposits - from clay.

Toy Development History
Toys of the past: horses, bears, birds - whistles, rag dolls.

Development of various options
Before sewing my toy, I looked through many books and
magazines for the manufacture of soft toys. The world of toys is huge and diverse. I liked many models of toys:
little mouse
lion cub
Hare
Picture 1
Figure 2 Figure 3
But I decided to choose the option - a dog. It is this option that will allow me to fantasize and develop my imagination in complicating the work. And I also want to make a gift to my girlfriend for her birthday, because she really likes my four-legged friend - the dog Zhulka, but she does not have the opportunity to have a dog at home.

Identification of the main requirements for the product
My toy should be:
- beautifully and qualitatively made;
- big size;
- from soft tissue or soft yarn;
- natural color close to the natural color of the animal;
- safe for the child;
- made of environmentally friendly materials;
- with low cost.
Analysis of ideas and selection of the best option
A cute charming lion cub (Fig. 1) will bring joy to anyone who picks it up.
A small, modest, but very cute hare (Fig. 2) will give warmth and comfort.
A cute little mouse with a long mustache (Fig. 3) will improve everyone's mood.
Having considered all the options for toys that I liked, I decided that
I will make a puppy, as a dog is my favorite four-legged friend.

Materials and tools
To complete the work, the following materials are required,
tools and fixtures:
- Hand needles
- Spokes No. 3,4
- Scissors
- Measuring tape and ruler
- Iron
- Sewing machine
- Templates
- Yarn
- Cotton wool, filler, soft fabric scraps
- Threads
- Pencil
- Pattern paper - cardboard
- Sintepon or white fabric
- Zipper, buttons

Yarn. Yarn was needed to make the details of the toy gray color"Grass", fluffy with pile and soft to the touch.
Knitting needles No. 3
Threads. For sewing toys, bobbin threads No. 30, 40 gray are needed.
Cardboard. Necessary for the manufacture of patterns-patterns.
Sintepon or fabric according to the color of the product, they are sewn into the inside of the body to give shape and a secret pocket with a zipper.
Textile. To complete the details of the muzzle of the dog, a smooth fabric was needed white color- flock.
Scissors, needles, thimbles. To cut a synthetic winterizer or fabric, you need large scissors with straight blades. need needles different sizes. The thimble should match the thickness of the middle finger.
hand sewing machine . For sewing an inner pocket and sewing in a zipper.

Design part
Knitted details
(2 parts)
Torso (1 piece)
Occipital part
(1 item)
Paw
(4 parts)

Fabric details
muzzle
(1 item)
Frontal part
(1 item)
Chin
(1 item)

Product technology
To make a do-it-yourself puppy soft toy, there is a drawing, drawing, sketch, pattern patterns and a manufacturing sequence. You can make a toy using knitting, hand stitching and use sewing machine.

The sequence of making a soft toy:
1. Prepare patterns of the torso, front of the head, chin, front and back legs, ear, tail. The parts are combined in size, so it is more convenient to cut and connect their individual parts at the same time.
2. According to the pattern of the body and tail, tie one one-piece piece. We collect 40 loops on the knitting needles and knit 25 cm with a “stocking” pattern (1 row - front loops, 2 row - purl, etc. along the entire length). On both sides we close 10 loops and knit another 20 cm, to shape the body from behind and the tail. The part is one piece.
3. According to the pattern of the occipital and parietal parts of the head, knit one piece.

4. Cut out the forehead and chin from light fabric. Sew the chin between the two parts of the body from the end of the nose to the neck. Sew the parts in the head area, then the forehead from the bridge of the nose to the back of the head. You can use the seam "line".
5. Sew the details of the ears connected in pairs here. To knit the ears, we collect 20 loops on the knitting needles and knit 20 rows with a stocking pattern. We turn the resulting rectangle in half along the length and sew it on both sides. The resulting blanks are filled with filler. Important point- sewing ears into the head. The seam "forward needle" is used. Sew the ears into the seams connecting the front and frontal parts of the head.
6. Unscrew the head blank through the left hole - in this case, the ears will already be sewn into place. Fill the head blank with stuffing material.

7. To the details of the body, sew the details of the legs in pairs of the same (front and back) filled with stuffing material. Cast on 20 sts for legs and work 14 rows in stocking stitch, then work 5 sts. Further, through one loop, we make crochets, for expansion - for 10 loops, we knit the remaining 5 loops with facial ones without crochets. We knit 5 cm an increased number of loops with the same pattern. We close. We sew. We fill. Sew to the body.

8. Through the hole on the back, place a 18cm x 20cm pocket in the middle of a padding polyester or fabric and sew a zipper into the raw edge.
9. The nose can be made from a sewn "pouch", eyes - from beads or buttons and attached to the front of the head.
10. Sew on the tongue.
11. Sew on carrying handles.
11. Decorate the toy with a bow or scarf around the neck.

Economic justification
It can be seen from the table that the cost of the toy,
made by hand is 5 times less than the cost of a toy bought on the market or in a store from materials of poorer quality.
Name
Yarn "Grass"
Price, rub.)
White fabric (chintz)
material
80 rub.
Consumption,
(meter)
25 rub.
1 skein
Eyes, nose
Cost, rub.)
Threads
(buttons)
3 rub.
expenses
80 rub.
5 rub.
8 rub.
Real
3 pieces
80 rubles
Electro-
Was in stock.
2.92 rub.
energy
9 rub.
8 rub.
Total:
10 kWh
Were available.
29 rub.
were available in
availability.
80 rubles
29 rub.
109 rub.

Environmental rationale
The problem of ecology is now of great importance. For reference healthy lifestyle life, it is very important that the objects that surround a person, which a person uses in Everyday life were environmentally friendly and safe.
The manufacture of the toy did not cause any damage to the environment. All the materials that I used to create the toy are environmentally friendly. Leftover yarn and filler are stored in a designated area and can be used to make other items.

Self-esteem
As a result of working on the project, I can proudly say that I coped with the task set before me. The toy turned out exactly the way I wanted it to be. My girlfriend will be delighted. Thanks to the project, I learned in more detail how the toy appeared, and now I have an idea about its creation and evolution. After the work I have done, I can confidently say that a soft toy can not only be sewn, but also knitted. Do-it-yourself work is pleasing to the eye, uplifting and cost-effective and safe.

Used Books
1 .N. V. Vinogradov. Soft toy with your own hands. S-P. “ Bosom ” 1995.
2. A. Kochetova « DIY soft toy with beads and ribbons »
3. Inga Siletskaya « Ideas for a fairy tale performance. Heroes of your favorite fairy tales » .
4. « Patterns, schemes, drawings » .
5. Magazine « Skillful hands » . Moscow. 2000.
6. V.I. Petukhov « Gifts for little ones and big ones.
7. « Polar bears - crochet and knitting » . Moscow. 1993.
Rabadanova Hidayat
Examination work of a 9th grade student (correctional). Includes an explanatory note and a presentation.
Download:
Preview:
Municipal State Educational Institution
"Secondary School No. 10"
Levokumsky district of the Stavropol Territory
Creative project by
technologies
"Soft toy"
Made by 9th grade student
Rabadanova Hidayat
Head: Didenko Elena Geinrikhovna
technology teacher
S.Vladimirovka, 2012
I. Organizational and preparatory stage.
Basic thought pattern.
1. Justification of the problem that has arisen………………………………………………4
2. Formulation of tasks……………………………………………………………..4
3. Historical reference(research)……………………………………….5
4. Development of various options……………………………….……………..6
5. Identification of the main requirements for the product……………………………… 7
6. Analysis of ideas and selection of the best option…………………………………… 7
II. Technological stage.
7.Materials and tools………………………………………………………..8
8.Design part…………………………………………………………….9
9.Organization of the workplace, safety at work…………………………………10
10.Technology of product execution……………………………………………..11
11. Economic justification………………………………………………….12
12.Environmental justification……………………………………………………………………………………………………………………………………………………………………………………………………………………………………………………………………………………………………………………………………………………………………………………………………………………………………………………………………………………………………………………………………………………………………………………………………………………………………………………………………………………………………………………….
III. Evaluation stage.
13.Self-assessment………………………………………………………………………14
14. Used literature………………………………………..………...15
Basic thinking scheme.
Problem.
Traditions, fashion.
Cost price.
Safety
Soft toy
Shape and size
Manufacturing technology
Story.
Construction
Equipment and materials.
Justification of the problem
During my studies at school, at the lessons of technology, my skills and abilities in arts and crafts improved. At the technology lessons, we were engaged in needlework: we embroidered with woolen threads, beads, made souvenirs and gifts, and sewed soft toys.
It was necessary to choose the topic of the examination paper, and I decided to make a soft toy, since we met this type of needlework recently, and it interested me the most.
Having reviewed several handicraft encyclopedias, in many of them I was attracted by toys - dolls, flowers, fairy-tale characters. However, I decided to make a toy - an animal in honor of my friend - a Sailor puppy and give it to my niece for her birthday. I wanted to learn the history of the development of the toy and show my skills in a new job for me.
The purpose of my work: to make a soft toy with my own hands.
Task Formulation
I want my toy to be interesting, pleasing to the eye and
Lifted my spirits.
Tasks:
1. Explore the development of the toy days.
2. The finished toy must match the size
Patterns.
3. Self-realization when doing work with your own hands.
Toy Development History
The art of making toys is one of the oldest types of folk art. Everyone loves the toy: children and adults. For children, it is fun, a game: adults are happy to look at beautiful, funny toys that bring them true joy, transfer them to the world of childhood, cause a kind smile.
The toy has always accompanied man. Various kinds of toys were found in the burials of Egypt, Greece, the Roman Empire. In ancient times, when there were no special workshops producing toys, they were created by craftsmen - handicraftsmen who worked alone or as family members. These were the first folk artists - toys, who passed on their skills from generation to generation. The originality of the manufacture of toys is determined by the conditions of life and work, the customs of the people, the national character, climatic conditions and the material used. So in areas rich in forests, toys,
as a rule, they were made of wood, in places rich in clay deposits - from clay.
Wooden and clay toys have been known in Rus' since ancient times. The oldest toys found on the territory of our country date back to the 2nd millennium BC. e. These are miniature hunting tools - bows, arrows, hatchets, household items, rattles.
Various toys were found in the burials of Ancient Egypt, Greece, China. These are dolls made of wood and fabric, leather balls, animal figures carved from soft stone, mammoth tusks. From time immemorial, the traditions of sewing toys have come to us - dolls sewn from scraps of fabric, fur.
Sometimes toys were given a magical meaning. For example, various whistles, rattles, according to the pagan beliefs of the ancient Slavs, drove away evil spirits with their whistle and noise. For the same reasons, the image of the face of the doll was forbidden, therefore, in home-made rag dolls of different nations, instead of the image of the face, you can see a pattern in the form of a cross, rhombus, square.
The earliest toys of Ancient Rus', found on the territory of ancient Russian cities - Kyiv, Novgorod, Moscow, Kolomna, Radonezh - date back to approximately the 10th-15th centuries. Scientists established handicraft production of toys in Kyiv and Novgorod as early as the 10th-13th centuries. about the high skill of Moscow toy potters of the XIV-XVII centuries. Evidence of finds in Zaryadye, on the territory of the former Goncharnaya Sloboda. Plots of toys of this time: horses, bears, birds - whistles, as well as funny figures of horsemen, buffoons - hooters.
The traditions of true art continue to live and develop today.
Development of various options
Before sewing my toy, I looked through many books and
magazines for the manufacture of soft toys. The world of toys is huge and
diverse. I liked many models of toys:
Donkey Ladybug
Picture 1
Bear cub Figure 2
Puppy
Figure 3 Figure 4
But I decided to go for the black and white version. It is he who will allow me to fantasize and is able to develop the imagination. And I also want to make a birthday present for my niece, because she really likes my friend Matros.
Identification of the main requirements for the product
My toy should be:
Nicely and well made;
Small size;
From soft fabric;
natural color;
safe for kidsё nk;
Made from environmentally friendly materials;
With low cost.
Analysis of ideas and selection of the best option
A cute charming donkey (Fig. 1) will bring joy to anyone,
who will take them in hand.
Charming ladybug(Fig. 2) will easily improve your mood.
A small, modest, but very cute bear cub (Fig. 3) will give warmth and comfort.
Cute cozy puppy Sailor with soft hanging paws
(Fig. 4), which will improve the mood of everyone who getsѐ t in his
embrace.
Having considered all the options for toys that I liked, I decided that
I will sew a puppy, because a puppy is my favorite friend.
Materials and tools
To complete the work, the following materials are required,
tools and fixtures:
- Hand needles
- Scissors
- Measuring tape and ruler
- Iron
- Templates
- Fur, fabric
- Threads
- Tailor's pins
- Chalk, pencil
- Pattern paper-cardboard
- Sintepon
- Colored ribbons, beads
Fabrics, fur. It is desirable to select fabrics of various colors, textures, types. Plain and printed chintz, velveteen, flannelette, jersey, flannel and other materials are suitable for sewing souvenirs and various costumes for toys, as well as for decoration. Drape, cloth, felt and other dense fabrics are suitable for making decorative wall toys and objects.ѐ many combined.
To perform theѐ Many stuffed toys recommend the use of short-haired synthetic fur, which is easy to process and retains the shape of the toy well, as well as plush.
Long pile synthetic and natural fur more suitable for finishing toys and combining with short pile fur, with any kind of fabric and non-woven materials.
Threads. For sewing toys, bobbin threads No. 30, 40 are needed different colors. When making decorative seams on the front side of toys, floss, iris, darning, woolen yarn are used.
Colored ribbons, beads.These materials are needed to design the product.
Cardboard. Necessary for the manufacture of patterns-patterns.
Sintepon. Sewn forms of toys are stuffed with synthetic winterizer.
Scissors, needles, napѐ rstki. For cutting fur, small scissors with sharp closed ends are most convenient, and for cutting fabrics, large ones with straight blades. Needles are needed in different sizes. Napѐ Rstok should correspond to the thickness of the middle finger.
Chalk, glue, pencils.Chalk is used to draw patterns on fabric, fur. PVA glue is used to glue parts.
Before starting work, it is necessary to put on overalls - an apron
or work robe to protect clothing from contamination
fur pile, glue, paints. The apron must be neat
view.
Design part
Workplace organization
For manual operations, a work table is required, on which only workpieces, tools and fixtures should be located. During manual work, you need to monitor the correct fit. Incorrect position of the body (torso) causes fatigue, reduces efficiency, and also leads to stoop, curvature of the spine, and impairs vision.
The workplace for performing machine work is a table on which a sewing machine is installed and laid out necessary tools, fixtures.
While working on the sewing machine, the workplace should be well lit. When using the sewing machine, it is very important to sit with your body tilted slightly and head forward
TB at work
Safety regulations for manual work:
Be attentive;
Put on a coat rstock on the middle finger right hand not to
Prick him;
Stick needles and pins only in the needle bar,
Do not sew with a bent needle;
Do not stick needles into clothing;
Put the scissors to your right with closed blades;
Pass scissors only with closed blades and rings
Forward
Safety rules for sewing work:
Do not lean close to the moving parts of the sewing machine;
Do not keep your fingers near the driving needle;
Do not place any foreign objects on the platform.
Safety regulations when performing wet-thermal
works:
Do not leave the iron on;
Set the thermostat dial in accordance with the selected
Cloth;
Put the iron on a special stand;
Make sure that the cord does not touch the soleplate of the iron; Turn the iron on and off with dry hands, while taking
The body of the plug, not for the cord;
WTO products or parts to perform from the wrong side on
The direction of the shared thread.
Product technology
To make a do-it-yourself puppy soft toy, there is a drawing, a drawing, a sketch, pattern patterns and a manufacturing sequence. You can make a toy using hand seams or use a sewing machine. I chose the first option.
The sequence of making a soft toy:
1. Prepare patterns for the torso, front of the head, chin, upper and lower paws, ear, nose and tail. The details are combined from fur of different colors, so it is more convenient to cut and connect their individual parts at the same time.
2. According to the pattern of the torso and abdomen, cut out two parts of the torso and abdomen from
main fur.
3. Cut out the forehead and chin from light fabric. Sew the chin between the two parts of the body from the end of the nose to the neck. Sew the parts in the head area, then the forehead from the bridge of the nose to the back of the head.You can use the seam "line".
4. Sew the details of the ears sewn in pairs here. An important point is the sewing of the ears into the head. The seam "forward needle" is used. Sew the ears into the seams connecting the front and frontal parts of the head. Put the ears on the front side of the front of the head, placing them with the fabric side down with unsewn cuts.
5. Unscrew the head blank through the left hole - in this case, the ears will already be sewn into place. Fill the head blank with stuffing material.
6. Sew the details of the tummy to the details of the torso, then, before the back line is sewn up, sew the parts of the abdomen together from the inside.
7. Through the hole on the back, place cotton wool in the middle and sew up the hole.
8. We make a nose from a sewn "pouch", eyes - from beads and attach them to the front of the head.
9. Sew on the tongue and dots on the muzzle. Fold the tail at the base in half
and sew.
10. Sew on a spout. To do this, use the prepared pattern, stuff it tightly with a synthetic winterizer, gather along the edge of the circle with a seam on a strong thread. With the same thread that they worked on, make a constriction in the middle of the cocoon, wrapping it with several turns - the “pouch” turned into a spout. Fasten the thread, but do not cut it. Then sew the finished nose onto the muzzle with the same thread.
11. Decorate the toy with a bow around the neck.
Economic justification
Name material | Price, rub.) | Consumption, expenses | Cost, rub.) | Real |
Fabric brown (meter) | 245 rub. | 0.4 m | 98 rub. | 98 rubles |
Fabric beige (meter) | 175 rub. | 0.2m | 35 rub. | 35 rub. |
Sintepon (meter) | 30 rub. | 0.2 m | 6 rub. | Available in availability. |
Eyes | 10 rub. | Pair of eyes | 10 rub. | 10 rub. |
Threads | 5 rub. | 1 PC. | 5 rub. | Available in availability. |
Total: | 154 rub. | 143 rub. |
It can be seen from the table that the cost of the toy,
handmade is less than the cost of a toy bought on the market or in a store from similar materials.
Environmental rationale
The problem of ecology is now of great importance. For a healthy lifestyle, it is very important that the objects that surround a person, which a person uses in everyday life, are environmentally friendly and safe.
The manufacture of the toy did not cause any damage to the environment. All the materials that I used to create the toy are environmentally friendly. The rest of the fabric and finishes are stored in a certainѐ this place and can be used to make other things.
Self-esteem
As a result of working on the project, I can proudly say that I coped with the task set before me. The toy turned out exactly the way I wanted it.ѐ see. My niece will be delighted. Thanks to the project, I learned how the toy appeared, and now I have an idea about it.ѐ creation and evolution. After theѐ I can say with confidence that a toy made by myself is pleasing to the eye, uplifting and
economically advantageous.
Used Books.
1M. Ventana. Technology textbook. M. "Count" 2005.
2.N. V. Vinogradov. Soft toy with your own hands. S-P. "Nedra" 1995.
3. Material Andreevskaya O. N. Volzhsky, 2008.
Municipal Educational Institution "Secondary
General education school with in-depth study of individual Subjects No. 24.


