How to make a snowflake out of paper for the new year. Do-it-yourself voluminous paper snowflakes: templates, stencils, master classes, video
Everyone wants to create an atmosphere of joy and magic before the New Year in their home. Christmas tree and the garlands became essential attributes holiday, as well as do-it-yourself snowflakes cut out of paper. It is not only beautiful, but also interesting, not only children, but also adults can be involved in this activity, so that everyone contributes to creating a New Year's mood.
There is nothing difficult in cutting a snowflake out of paper with your own hands, even small children can learn. Even if you have never cut paper snowflakes before, our article will help you cope with this task. We have prepared everything for beginners so that you can correctly cut flat and voluminous paper snowflakes step by step, there are diagrams, instructions and training videos. First, try to cut the lightest one.
Tools and materials for making beautiful paper snowflakes can be found in every home.
We will need:
- Paper.
- Scissors.
- Round plate.
- Colored paper (optional).
- Pencils (simple and colored).
Snowflake cutting
There are several simple step by step ways cut Christmas decoration from paper. Let's start with The easiest way.
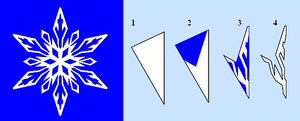
 You need to take a sheet of white or colored paper, put a round plate on top of it and circle it with a simple pencil. Carefully cut out the circle along the outline. Then the resulting circle must be folded in half, then in half again. There is a preparation. Now it's time for the scissors. From the finished template you need to cut off everything superfluous. You can first draw a conceived drawing on paper or fantasize already in the process. We unfold the finished snowflake and hang it wherever our heart desires or insert it into a beautiful frame.
paper decorations windows can be glued, and a mirror and a glass door, but only without the use of glue! To make it easy to peel off snowflakes from windows after the holidays, you can prepare soapy water. To do this, in warm water you need to grate a little toilet or laundry soap and dissolve. We quickly lower the snowflake into this solution and glue it to the glass. After drying, the decoration will hold securely on the window.
Gallery: paper snowflakes (25 photos)


Hexagonal and octagonal paper snowflakes
To create snowflakes in this way, you only need scissors, paper and, if necessary, simple pencil.
Step by step we cut out the decoration:

Thus, we got octagonal snowflake.
In order to end up hexagon snowflake you also need to prepare a square. We fold a triangle out of it and unfold it with the base towards us. We make marks on paper with a pencil: we need to mark 3 equal acute angles at the base of the triangle. Once marked, fold the paper along the resulting lines to the center. We also cut out patterns from the resulting base. After we unfold the paper, we get a regular hexagon.
To create simple non-voluminous paper decorations You can use web templates. Now lovers spend great amount master classes on creating home decorations with your own hands, and learning this quickly and easily is not difficult.
Paper snowflakes: photo


Cut out paper snowflakes
If you are already bored with cutting flat products every year and want something new and interesting, then you can start creating volumetric snowflakes. Cutting them out is just as easy as bulky ones. Let's see how to do it step by step.
For this you will need: paper, glue, scissors, pencil and stapler.
 You need to take A4 sheets and make blanks in the form of squares, as shown in the previous examples. We need 6 such blanks for one product. We fold each resulting square diagonally to make a triangle. We unfold the triangle with the base towards us and make 3 cuts on it with scissors to the center symmetrically from both sides. You need to cut carefully so as not to cut through the middle, leaving about a couple of centimeters in the middle.
 We unfold the resulting workpiece in such a way that it lies towards us with an edge turned horizontally. We turn two corners in the middle into a tube, connecting them. We turn over the paper. Take the next two corners and connect in the same way. You need to fix them with glue. We do the same with all the corners to the edge.
Beautiful paper snowflakes will become good decoration home for the new year. They will create an atmosphere of a snow-white, winter fairy tale in the apartment. And just cutting paper snowflakes of various shapes can be fun, because this is an exciting activity and they should also captivate their children. If you don’t know how to cut snowflakes out of paper, or if you forgot how to do it, then this is not a problem. Next, you will see that everything is very simple. Even a child can handle it. For the New Year holiday, we suggest you make a lot of snowflakes and, moreover, of different shapes.
How to cut a snowflake out of paper?
It is surprisingly easy to create a beautiful snowflake from a regular sheet of paper. To do this, you just need to use - scissors, paper, pencil, beautiful schemes, your inspiration and some free time.
We first fold the snowflake blank from a square sheet of paper, as shown in the picture below. Using various beautiful schemes, it is possible to cut hundreds, and sometimes thousands, of snowflakes of various, beautiful and unpredictable shapes from the created triangular base.

Using a simple pencil, we transfer the drawings that are shown in the diagrams to the base, and then cut out the snowflakes.

At the end of the article you can find other patterns for cutting paper snowflakes.
How to make a volumetric snowflake out of paper?
 A three-dimensional snowflake looks much more spectacular than a regular snowflake, and it is also easy to create (a little more difficult). Similar fabulous 3D snowflakes can be hung around the rooms, as well as on the Christmas tree itself to create an atmosphere new year holiday. You will need: 6 square sheets of paper, glue, scissors, a stapler, some inspiration and free time (15 minutes is enough). A three-dimensional snowflake, if desired, can be made multi-colored, using it to create its individual elements colored paper. But before you learn how to create volumetric snowflakes without instructions, it is better to use plain white paper (first practice on it). And the snow-white voluminous snowflake will always be in fashion.
1. First we make 6 such square blanks for the future snowflake. You can download these blanks for or snowfields, and then print them out on a printer. If you are creating a large snowflake, then it is better to use high-density paper - this is necessary so that the snowflake can hold its shape. Fold each square in half diagonally and make cuts with scissors, heading from the fold to the center line.

2. We open the square with cuts, which was folded diagonally, and place it in front of us as shown in the picture. We twist the first row of strips with a tube and fasten them with glue.

3. We turn the snowflake over to the other side and start working with the next two strips: we also connect them and fasten them with glue. We continue to work in the same spirit: we turn the snowflake over and fasten the remaining strips. As a result of the actions taken, we should have such a twisted bizarre element.

4. We have created one of the rays for our three-dimensional snowflake, and we need to make six of these! Therefore, we do the same with the other 5 blanks. We connect in the middle three rays of snowflakes with a stapler. Similarly, we connect the remaining three rays of the snowflake. Next, we connect these two large parts together.

5. Our beautiful volumetric snowflake is almost ready! It is only necessary with the help of glue to connect the snowflake in those places where the rays touch each other. This is necessary in order for the snowflake to keep its shape properly.

So we made a voluminous snowflake out of paper! What good fellows we are! Now you can color it too!

How to make a three-dimensional origami snowflake?
It will not be so easy here, and it is possible that you will spend at least one hour creating your first origami snowflake. Well, in the future, when you understand the algorithm for creating such snowflakes, things will go much faster. One caveat - the thinner the paper, the more elegant the snowflakes will turn out. Translucent translucent snowflakes will look great on the window. Well, at first you can train on office plain paper.

Before creating an origami snowflake, you need to turn a rectangular or square sheet of paper into a hexagon. This is one of the most important points, which will then affect whether our venture will be successful.

1. We fold the paper twice in half so that they are visible sharp lines fold.

2. Fold one corner with the top towards the center. We bend the top flap to the edge. Now we have 2 more fold lines.

3. We bend the paper in half again as shown in the picture on the left. To make the figure from the right picture come out, use two X marks as a reference point and bend flap A along the dotted line.

4. Combining the blue and red lines, bend the valve. As a result of these actions, you should get a shape that looks like a heart.

5. Focusing on the X points, cut off a part of the workpiece along the blue line with scissors. In the future, we only need a hexagon - part A.

If you have any difficulties with the hexagon, then you can find tips and answers in the video:
6. We bend one of the sides of the hexagon to the center to form a fold line. We do the same with all 6 sides. Now we have many lines within our hexagon that form small triangles.

7. Again, bend the edge of the hexagon to the center. Using the fold lines made in the previous step, we bend flap A to B, as shown in the left picture. We fold the other two sides of the hexagon in the same way until we create a figure that resembles a pinwheel in shape. The last valve can easily cause difficulty, since it will be hidden under the fold. It needs to be pulled out so that we have six valves sticking out, as shown in the picture on the right.

8. Lightly press the fold of each pocket with your finger to form something similar to the picture in the center. It does not matter which of the valves will be on top.

9. We bend on each unfolded pocket two blue corners to the central part of the dotted line. This must be done to prepare the fold line for the next step. The resulting figure should be externally similar to the image on the right.

10. Carefully unfold the folds made in step 8 to open the fold lines. In each pocket we combine the blue and red dots X. The fold lines obtained in step 9 will help us with this. When we do this operation with all 6 pockets, our figure will look like the image on the right.

11. We turn the workpiece over and bend each corner of the hexagon to the center. A small flap should form each adjacent fold. Do not hide the small valve under the fold. Let him stay on top. You did everything right if you got a blank that looks like the picture on the right.

12. For all small flaps, press the fold line to get new fold lines that will be needed in the next step.

13. We turn out the folds made in the previous step, hiding the valves from below.

14. We turn the figure over, turn each corner from the center as far as possible and bend it. We should have 12 valves - 6 large and 6 small.

15. We turn the workpiece over. Between the two large valves you see small valves. We push each small valve forward. Now we have six diamonds.

16. For each half of the rhombus, we pull the blue edge to the center of the rhombus and press the fold to the edge. As a result, we have a figure, as in the image on the right. It remains to repeat this action 12 times and the origami snowflake will be ready!


How to fold an origami snowflake (video tutorial):
How to make a paper kirigami snowflake?
Kirigami is a type of origami in which it is allowed to use scissors in the process of making a figure and cut paper with them. The method of cutting out kirigami snowflakes does not differ very much from making simple paper snowflakes, but the result is much more interesting and creative.

First, you create such a template, using which anyone, even a child, can make a six-ray kirigami snowflake. On a sheet of paper for this we build an angle of 60 degrees. In building a corner, a protractor will come to our aid.

We fold a square sheet of paper in half diagonally, put the blank on the template as follows:

We bend the corners of the triangle as shown in the picture:


You can apply lines of future cuts to the workpiece with a simple pencil, and then erase these lines with an eraser, or attach a pre-printed and prepared template to the workpiece and cut it out. If at this stage the workpiece is folded in half again, then it will be possible to use not a clerical knife, but simple nail scissors to cut the snowflake. In this case, even a child can entrust the work of cutting a snowflake.

Schemes for creating kirigami snowflakes:

To make the snowflakes created using the origami technique even more wonderful, colorful and original, you can decorate them with sparkles, cute pom-poms, rhinestones, woolen balls, paint them with felt-tip pens, pencils.

Here are our paper snowflakes ready! Unlike ordinary snowflakes, they will not melt, but will decorate our houses and Christmas trees for a long time!
Schemes for paper snowflakes
In nature, identical snowflakes do not exist. In order for our New Year's snowflakes not to be all twins, you need to use different schemes (templates) when creating them. Try to apply as much as possible more schemes. Experiment! Maybe even come up with your own scheme. You can use the following options for cutting paper snowflakes:


 . Well, or you can go to YouTube yourself and type in the search: “How to make a snowflake” or “How to cut a snowflake”.
Successful paper snowflake crafts!
I will explain everything in order. I really wanted to exclusively, not like everyone else, decorate the house for the New Year! And I decided to cut snowflakes out of paper with my own hands, arrange a real snowfall from light and fluffy beauties! I've been doing this for a long time, of course I forgot the basics. Ruined more than one piece of paper. But the excitement increased literally with each copy! The fluffs became more and more beautiful and delicate. It's so breathtaking that it's hard to put into words!
Join now! It doesn't matter if you forgot how to do it. We will re-learn the science of how to make a snowflake out of paper. Do you agree? Then let's involve the household in the creative process and organize a family contract for the manufacture of holiday decorations.
How to cut a beautiful paper snowflake with four rays with your own hands?

While you are preparing the workplace, I will explain why I remembered about snowflakes. It's simple: it's almost impossible to cut two identical ones. Therefore, the decoration will be original. Thanks to our imagination, the New Year's decoration of the house will become truly unique and original.
One has only to imagine what a festive mood a beautiful and carved snowflake will give, as hands themselves will reach for paper and scissors. Represented? Then it's time to start.
Here's what you think main secret do-it-yourself paper cut snowflakes Quite right, in the correct folding of the paper. In addition, the number of rays of the New Year's decoration depends on this. Let's start from the very simple option- from a beauty with four rays.
Let's prepare simple accessories for work:

- paper. I had an ordinary writing bag, A 4 format. You can prepare any other, even color. If only the leaves were not very dense.
- simple pencil
- Scissors. You can even use thin manicure. And there, see for yourself, if only it would be convenient for you to cut.
A couple of tips from personal experience
- Crystal may not work the first time, some practice is needed here. So practice on drafts at the beginning, so as not to spoil the paper.
- At the beginning of work, I advise you to apply the pattern with a pencil. You can do without this assistant a little later, when you get your hands on it.
- If you use a pencil, prepare an eraser right away. It will be needed in the case when the drawing needs to be corrected.
Step by step process

How beautiful she turned out! We have much to be proud of. It is possible to draw the first conclusions. Having cut out one or two, you will understand that the more ornate patterns you cut, the more tender the work of handmade art will turn out.

Fluffs with 4 rays will look great if you stick beads or sparkles on them. They are glued to a snowflake, pre-lubricated with glue.
It's not a sin to decorate with such a masterpiece new Year costume and even a hairstyle using a beaded snowflake in the form of a crown.
Openwork paper snowflake with eight rays

Getting Started

Our snowflake came out light and tender. A real piece of soft and fluffy snow. Well, isn't it?
How to make a paper snowflake with five rays

Have you noticed that we are gradually complicating the task? Moving from simple to more complex? And now we will remember how to make paper snowflakes with five rays. We should have a paper square at hand.

Now you can enjoy the fruits of your labor. We are great!
DIY paper snowflake with six rays

Snow crystals with 6 rays are also unusually beautiful. Now we are going to cut them out.

The winter beauty already pleases us, makes us admire ourselves. What an exciting event we have started! And one more thing is worth noting. Have you noticed that craftsmanship grows with each cut fluff? Exactly. This is called experience. It's only the beginning!
Terry paper snowflake

Terry snowflakes are light and fluffy. It's not hard at all to make them. Moreover, we already have the skills. More interesting, they are obtained by the method of cutting snowflakes with 8 rays.
Getting Started

Here we have such a terry miracle. Such fluffs will look gorgeous on snowflakes - paper ballerinas. Let's make such a decoration for the New Year.
Snowflake - do-it-yourself paper ballerina

Friends, imagine how a miniature ballerina in a snow-white snowflake skirt will be circling in the New Year's decoration at home. How lovely! Let's bring joy to ourselves and our loved ones. And whatever you surf the Internet, I offer the refined ballerinas that I liked.
We prepare the necessary materials
- The cardboard is white. From it you will need to cut a figure of a dancer
- Soaring ballerina patterns
- White paper for snowflakes
- Scissors, simple pencil
- Line or thread
- Tape or button.
Let's get creative

Snowflakes - ballerinas will start their charming dance at the slightest movement of air, and will break the applause of family members and guests. Bravo to the dancers! Bravo to the craftsmen - needleworkers who created such magnificence!
Fluffy paper snowflake

Looking at a white and fluffy snowball, you, like me, will want to cut out the same snowflake - tender and airy. What's stopping us? Now we will learn how to cut fluffy snowflakes out of paper with our own hands.
Step by step process

Listen, you can't take your eyes off the fluffy crystal! And although we still need to grow and grow to perfection, it still turned out beautiful and unusual! They can be made from multi-colored paper. Decorations will be very impressive.
So we cut paper snowflakes with you. Agree that it turned out very well. And how the mood has risen! It makes me want to brag about my work. Let's share our joy with classmates on social networks. I am sure that they will be carried away by the New Year's idea. And to make it easier for them to navigate, we advise them to subscribe to this wonderful blog. Then they will be aware of all the most interesting. In the trend, as it is now fashionable to say.
In the meantime, goodbye and thanks for the company! We'll meet Again. After all, our hands are not for boredom, and we will certainly come up with some other exciting and useful activity. See you at the desktop!
(7
ratings, average: 5,00
out of 5)
Being engaged in winter creativity, we must not forget about paper snowflakes. You will need a lot of these crafts. Elegant, as if fluttering, beauties look great on walls and windows, immediately set a festive mood. How to cut paper snowflakes? You will find the answer to this question in this lesson. It shows how to fold paper and some simple but interesting winter snowflake patterns.
It's getting colder outside, which means it's time to create some winter crafts. It must be remembered that the New Year is just around the corner. At this time, you need to work hard to cut out a lot of snowflakes from paper. Such crafts will be needed to decorate the house, assembly hall at school or in kindergarten.


How to make DIY paper snowflakes

Snowflake cutting patterns
How beautiful crafts from colored paper look. They can be hung on walls, windows and furniture, or attached to the silhouettes of ballerinas in the form of fluffy skirts. It is always interesting to needlework, anticipating the onset of the most desired holiday.
Need to prepare:
- pencil, ruler and scissors;
- sheets of colored paper in blue or any other color.
How to cut snowflakes
Blue is a great alternative to white traditional crafts. Therefore, such paper was used here. No need to take too thick sheets.

Prepare a square for each model. The larger the square, the larger the craft.

Follow the procedures below to fold the blanks correctly. Bend the squares in half diagonally.

Find the center of the hypotenuse in the resulting triangle. At this point, make a fold with a bird so that an angle of 60 ° remains between the stripes.

Thus, you get a triangular bird module, which can be bent in half again. That's all the preparation.

Draw lines with a pencil, cutting out which, you get interesting models. For example, the first option is in the form of a skeleton.

Carefully cut out the first snowflake with small scissors. All layers must be combined to get a beautiful and even result. Only sharp scissors are suitable for work.

The second method is similar to the previous one, only you can cut the segments one-sidedly, leaving a continuous strip on one side. Move forward with scissors, leaving a trail in the form of a half-arc.

Cut out the second one.

The option with rays in the form of a Christmas tree will look beautiful. Draw a sketch of half a tree on one side of the triangular blank.
Remember that the bottom cannot be cut off, otherwise the paper will fall apart in your hands.

Cut out the outlines of the Christmas tree along the lines. This option is the most painstaking and complex.

And finally - an interesting graphic drawing. Apply a zigzag line, gradually narrowing the course of the strip, synchronously with the sharpened corner of the triangular blank.

Cut a very thin workpiece along clear lines.

Now unfold the paper. You will get one craft in the form of a Christmas tree with six rays.

Or an interesting cobweb is another model.

Carved flower - another fantasy.

And also a Christmas star - a must on New Year's Eve.

All received options are unique, interesting in their own way. We assure you that two identical snowflakes will not work, because everyone will use paper of a different color, draw lines on blanks that differ from those shown here.

Think about how many bright snowflakes you might need, involve all family members in exciting work and make original ones.

Three-layer blue-pink craft
This tutorial shows how to create layered snowflakes. This is just an idea, you can use the familiar symmetrical cutting technique, but make several layers of different sizes, glue them together into a lush winter craft.
We bet that each member of the family will get their own unusual version of paper snowflakes. And you don’t need to repeat crafts, they can be completely different and elegant, multi-colored, large and small.

What you will need to complete a similar New Year's craft:
- any bright paper- blue, pink, yellow or some other color, one- or two-sided, thin (transparent) or dense;
- ruler and scissors for cutting squares;
- simple pencil;
- pebble - 1 or more for decoration;
- glue.
Each layer of crafts needs to be decorated in a special way and glue the prepared parts. But first, these layers need to be cut out. Use a ruler and scissors. Make as many squares different size how many layers you want to model. Gradually reduce the size of the details, as the finished snowflake should look harmonious, like a lush flower.

Fold the resulting squares twice along the diagonals or along the heights. You need to make folded triangles, prepare paper fragments for cutting.

You can cut layers with an ornament in 2 additions. Or bend the resulting four-layer triangles again in height. Draw a thin cut line with a pencil. This will make the job much easier than cutting blindly.

Cut along the drawn line of the workpiece. You can draw the same pattern or come up with a different version for each layer. Unfold the paper, do this very carefully so as not to tear the thin paper crafts.
The ornament of the details obtained will directly depend on the line drawn on the folded workpiece.

Make thin blanks from all the squares. The smallest square can be considered not a layer, but a self-made middle.

Cut out a circle from blue paper - the basis for attaching layers. It is paper of a different color that will add expressiveness to the product, since the blue part will look through the holes of the pink layers.

Lubricate the edges of the circle with glue, press the first largest workpiece in the center. This is the bottom layer of the craft.

Next, add the second, third layers and a small center. As you unfold each part to achieve the most lush effect, collect the Christmas decoration and think about whether a pebble will fit here. Most likely, it will not be superfluous.

You can unobtrusively stick a stone in the center to complete the job.

New Year's paper snowflake - bright and multi-layered - is ready. It can even be hung on a Christmas tree if you attach a thin thread to the ray.


In preparation for the New Year, almost everyone seeks to decorate their home, using not only purchased decorative items, but also self-made crafts. Of all the Christmas decorations, perhaps the most commonly used are snowflakes. They can be made from the most various materials. We propose to make the following option from openwork napkins. Creation of such New Year's decor shown in our master class.

To make one snowflake, we must prepare:
- openwork napkins (3 pcs.);
- glue;
- scissors.

Our openwork snowflake will consist of separate elements, which are based on a quarter of a napkin. Therefore, we first prepare the required number of such elements. To do this, first cut the napkin in half.

After that, we divide it again into 2 parts. As a result, we got the desired shape, from which we will make craft elements.

We must twist each quarter of the openwork napkin into a bag, gluing the edge.

For one craft, we need 12 of these bags.

Now we will connect these elements together with glue.

This is how 2 modules of the future snowflake look, glued together.

We continue to attach the following elements.

For our craft, we must glue 12 pre-prepared modules. After that, carefully cut off the tip of our workpiece with scissors. This will allow you to more evenly connect the future snowflake into a circle.

We apply glue to the opposite ends of our workpiece, after which we close it in a circle. Our snowflake from openwork napkins is ready!

They can be hung on thin strings, decorating the room with them. They will also look interesting as a window decoration.

Elegant snowflake from paper modules
Making snowflakes with your own hands is an opportunity to give children joy and a fairy tale long before the New Year. Perhaps, every parent in October-November hears the question: “How many days are left until the New Year?” And this is not surprising, in late autumn it gets dark early, it gets colder, snow often breaks. And the children immediately remember their favorite holiday.
Since they are not yet completely oriented in the calendar, they ask about the date of the parents. As soon as such a question comes, do not delay interesting creativity on the back burner, offer children a great way to brighten up the expectation of the holiday - New Year's needlework. They will definitely be interested in snowflakes.
This lesson provides interesting option snowflakes, which is perfect for decorating the interior before a fabulous night. To complete it, you will have to model individual modules using the origami technique, then glue them together into a single figure. The white-purple version looks interesting, but with the same success color scheme can be replaced by any other combinations.

Materials for execution:
- a piece of paper is purple on one side and white on the other;
- ruler (gon);
- scissors;
- glue;
- rhinestones on Velcro.
How to model a craft step by step
Choose a thin sheet of colored paper, because in the future you will have to fold the squares many times to get modules - the rays of a snowflake. Color copy or change.

Usually snowflakes are depicted with 6 rays, but we will have to arrange them in a circle, the shape of the details will be diamond-shaped. To fill a circle without gaps, you will have to prepare 8 modules. Thus, cut out 6 squares of the same size from a sheet of paper.

In each module, you need to highlight the cruciform middle. Fold the squares diagonally, unfold, then fold along the second diagonal.

Direct two adjacent sides to one of the selected diagonals, perfectly combining them in the center. Now we have a quadrilateral from a square with one very sharp corner.

Turn the paper over on the other side, make the same central fold, but on the other two sides, they will be folded in the opposite direction with respect to the previous sides. Now you have a diamond-shaped module, the front side of which is two-colored.

Prepare 8 diamond modules. The main blanks-rays for crafts are ready.

Cut out a circle from the same purple paper. Lubricate the white side with glue and begin to fasten, perfectly docking all the rays.

Fill the circle with rays.

And to make the craft more elegant, decorate with rhinestones. Glue the red stone to the center.

Add crystals to each ray. Or come up with some of your own decoration, today there are many decor options on sale.

New Year's product is ready.

On the reverse side, the fantasy also looks interesting, it can be considered two-sided. Stones on the reverse side can not be glued. And if the child again asks something about the New Year, then come up with a new interesting craft.

Snowflake from white and pink paper modules
This lesson shows a bright white and pink snowflake that will not get lost against the general festive background, sparkling with tinsel and garlands. Individual rectangular or square sheets of paper can be folded different ways to receive unusual holiday crafts. Each individual module is made according to a clear scheme, and then the individual parts are combined into a single product.
The master class describes how to model a bright craft from one-sided paper. The front side of each leaf is pink and the back is white, so the result is interesting two-tone crafts.

To create a beautiful paper snowflake, prepare:
- a sheet (or several sheets) of bright single-sided or two-color paper;
- ruler or square;
- pencil;
- scissors;
- glue;
- rhinestones.
Depending on the size of the snowflake you want to make, take one or more sheets of colored paper. Since they all have 6 identical rays, you need to prepare 6 rectangular paper blanks of the same size.

Measure on the prepared sheet 6 identical rectangles measuring 6 cm by 2 cm or select your parameters. Cut out the rectangles. The corners must be perfectly straight in order to obtain symmetrical modules in the future by simply folding the rectangles.

Fold each rectangle in half lengthwise, leaving the white side inside or vice versa (depending on this, you will select white or pink as the main color). Unfold the paper again. Turn the rectangles with the white side facing you (or vice versa). Bend two adjacent corners on one side of the rectangles to get the houses.

Turn the back towards you. Bend the two beveled sides at the top again to get a sharp two-tone corner. The top tip of the corner will be pink (if you fold the paper in this example). Bring out the triangular ponytails.

Fold the bottom side also, but in the opposite direction. Bevel adjacent corners first. Then make an even deeper fold and bring out the triangles.

Prepare 6 identical rays. They are assembled using the origami technique.

Cut out an additional circle from your used or thicker paper. Lubricate the surface of the base with glue. Start attaching the rays, joining the points of the base with the center of the circle.

Glue all the rays evenly around the circumference. We used 6 items.

On the reverse side, the product also looks beautiful, so choose the part that you like best, and it should be done on the front.

Stick randomly small rhinestones - in the center and on the rays. Use pebbles different colors so that the resulting decoration looks rich. New Year's craft paper is ready!


Similar decorations are suitable for Christmas tree, for windows and mirrors, wall decoration in halls and lobbies. Using the method of creating snowflakes from individual modules, you can get large enough objects that will be useful in kindergartens or schools.
Video lessons
How easy it is to make a VOLUME snowflake out of paper
3D decoration for the New Year
In this tutorial, I present the most interesting, beautiful and original templates how to cut paper snowflakes with your own hands with patterns and unique step by step photos. On the eve of the New Year holidays, everyone wants that the house was extraordinarily beautiful, cozy and fabulous. good option decorating the house before the New Year holidays will be window decoration paper snowflakes, unusual drawings, festive motifs that will bring pre-holiday mood and a New Year's fairy tale to the usual decor of the room.
The easiest thing you can do with your own hands is to cut and attach to different places paper snowflakes. Everyone remembers how, as a child, they cut them out before the holidays in kindergarten or at home. Today, having become parents, you can spend time with your child with benefit and pleasure, cutting out beautiful snow-white snowflakes with your own hands from paper. Kids are always happy to take part in such events.
Paper snowflakes made with your own hands and with joint efforts with children are not only a way to decorate your home, but also bring the New Year spirit, a sense of celebration and family comfort and unity into it.
Teaching a child to cut a snowflake yourself is not at all difficult. For this you need to prepare essential tool and paper. As a basis, you can take napkins, colored paper or just a white sheet from the album.
The thickness of the sheet does not really matter. But you need to know that the most delicate and airy snowflakes are obtained from thin sheets. And too thick paper will be difficult to cut.
You will also need a pencil and sharp scissors. After the pattern for the future snowflake is selected, the paper is folded, as shown in the photo. If you have a sheet of A4 paper, then cut off the excess to get a square.

Fold diagonally.

The more additions you make, the more interesting and openwork the snowflake will turn out.


The size of the future decoration depends on how large sizes sheet is initially selected. In this case, only the desire to have a large or small snowflake influences the choice.

When the drawing is applied to paper, we proceed to cutting. This process requires special care and accuracy. In no case should you cut off the edges of the paper at the folds, as the snowflake may simply fall apart.

Children really like this process. After all, in the end you will get beauty with your own hands, which is so nice to decorate a Christmas tree, windows or walls in a room.
It should be noted that, it would seem, such a simple activity as cutting snowflakes out of paper with your own hands is a great opportunity to develop a child’s imagination, a sense of beauty and artistic taste.
Ready-made snowflake templates for download


It so happened that the snowflake has become an attribute of any New Year's holiday. Often on New Year's parties The first role for girls is a snowflake. We can safely say that a snowflake is the main attribute of the celebration of the New Year.
Paper quilling snowflake
Quilling snowflakes look elegant, especially if they are complemented with sparkling rhinestones and small foil elements or in the form of small patches. Optional to buy special paper for creating Christmas snowflakes, you can cut ordinary office sheets into thin strips, and use a toothpick instead of a split stick. You can wind the strips according to a simple technique, pressing the paper to the stick with two fingers, scrolling in your hands.

What to prepare for snowflake modeling:
- a sheet of office white paper;
- scissors;
- any glue with a brush or a special thin nose;
- stick or toothpick;
- snowflake created with a hole punch or patch blue color;
- blue half beads.
How to model a quilling snowflake
Take either special paper or cut the sheet into strips of the same width. Use scissors or a stationery knife, a ruler and a special thick rug. It will take a lot of strips to create individual parts.

Roll each strip individually onto a stick. Paper easily remembers a forced bend, but in order for the parts not to unwind, to take a certain shape, it is necessary to glue the ends together.

For the center, prepare 1 large round. Make also droplets to fill the body of the snowflake. Only 12 pieces. Make sure they are the same size.

Stick 6 drops around the circumference, adding a drop of glue to the side wall.

If there are sufficiently large gaps between the details of the first layer, you can fill them with small rolls. Twist 6 small circles.

Glue small circles into the gaps of the first layer.

Stick the second layer of droplets. Spread glue on small parts and press down the droplets with the back (wide) part.

The paper quilling snowflake model is assembled. Now you have to decorate it with blue decor. Glue a snowflake and a half-bead in the center. Add 6 blue crystals to each ray.
Blue sparkle will add a festive touch. New Year's craft is ready. It can be hung on a green branch or on a window.

In this master class, I propose to make an unusual paper snowflake card on a stand. She will be an excellent gift for mom or grandmother, and she will have no equal at the school exhibition. And by doing this craft, the child will learn how to fold paper, carefully cut it out and use glue. And of course, fantasize! After all, the creation of snowflakes is a real art!

Materials needed for the postcard:
- colored paper of delicate shades;
- cardboard for the base or stand;
- glue;
- scissors;
- sequins for decoration.

Consider snowflakes with children, tell how snow is formed, what types of snowflakes are and how they differ. Usually snowflakes are six-pointed, but we will have an eight-pointed snowflake, since it is made in the origami technique. In order to make one snowflake, you need to fold a sheet of colored paper in half and cut out two identical squares.

Now fold each square in half different directions. You should get two folds that divide the sheet into four squares. Make marks on the back with a pencil. They are in the middle of the side of the small square.

Carefully cut the paper to the marks.


Such blanks are obtained. For one snowflake, you need two things.

Using glue, attach the corners to the rays.

Now you need to put the workpieces on top of each other with an offset. It turns out such a snowflake!

It's time to decorate the snowflake. To do this, you can take rhinestones, beads or sequins. They need to be glued so as to close the joints of the corners.

It remains to make the base - stand. To do this, you need to fold a wide strip of cardboard inward so that you get three equal parts. Then round off the corners with scissors.

Inside the base, you can write a congratulation. It remains to glue the snowflake on the edge of the workpiece. We placed a small snowflake cut out of foil in the center.

These snowflakes are obtained in half an hour - bright, airy, sparkling! And most importantly, they keep the warmth of children's hands.
How to do simple snowflake from paper step by step video lesson
Blue origami mosaic paper snowflake
The origami mosaic technique allows you to create beautiful relief paintings from paper. They look unusual and very attractive. Those who have not yet mastered this needlework technique and are only going to try it should immediately tune in to painstaking work that requires maximum concentration and perseverance. Even the simplest image in an origami mosaic will take a lot of time, because you need not only to choose a clear scheme, but also to make a lot of miniature square blanks.
In this master class, I will show you how to make a three-dimensional blue paper snowflake using the origami mosaic technique.

To create such a New Year's panel you will need different materials and tools:
- scissors;
- black lead pencil (simple);
- wide tape;
- ruler;
- 2 sheets of white cardboard;
- 6 sheets of white paper;
- 2 sheets of blue double-sided colored paper;
- tube of PVA glue.
First, on white and blue paper, you need to draw squares 3x3 cm in size.

Now cut the blanks into individual elements.

And proceed to the formation of squares, from which a panel in the form of a blue snowflake on a white background will be assembled.
How to make a paper square using the origami mosaic technique?
Take one square.

Gently fold it in half.

Fold this blank in half again to end up with a square half the size of the original.

Unfold all sides to their original position.

Now bend each corner of the square towards its center.

It turns out here is such a preparation.

Flip it over to the wrong side.

And again, begin to bend the corners of the square to the center.


The result should be a very small square measuring 1.5x1.5 cm.

In total, you need to make 136 blue squares and 225 white ones. This number was calculated according to the scheme, which is attached below.

Now take a simple pencil, a school ruler and draw a grid of squares with sides equal to 1.5 cm on two sheets of white cardboard.

Using tape, glue two sheets together and cut out a square, each side of which holds exactly 19 squares.


Now we move on to pasting the base with small squares. First, mark the center of the craft and glue a white square on it.

Now apply a drop of PVA glue to each shaded cell and fill them with blue blanks. Glue the center stripes.

Then place the squares diagonally.

Form a pattern according to the scheme.

The blue paper snowflake mosaic is almost ready!

It remains only to glue white squares on empty cells.

When the work is completed, you will receive original panel in the form of a blue snowflake on a white background. She looks like this! See how the texture of the craft is unusually visible, volume and relief are created.

In this technique, you can make many other snowflakes that will differ in image scheme or color.

This panel looks great on the wall and creates a festive atmosphere. Also, it can be used as original postcard for one of my friends.
How to make a paper 3-D snowflake with your own hands
Modern technology has also reached such a seemingly simple task as creating a snowflake. As the name implies, 3-D snowflakes are a more complex, but very effective technique, due to which the made decor is distinguished by a special elegance of lines and rather unusual shapes.
What may be needed to make a snowflake with a 3D effect?
Prepare a square piece of paper desired color, pencil and ruler, scissors or sharp paper knife, glue. The work of making 3-D snowflakes is very painstaking and requires a lot of patience.
The first step is to draw a sheet of paper into squares. We need 6 identical squares. Then such a scheme is applied. It can be printed. 
Fold the square in half diagonally, transfer the diagram as shown in the figure. Fold in half again.

The next step is to cut parallel lines. The incisions must be made in such a way that they are directed towards each other, but do not converge to the end.


We connect and glue the corners of the first small square.


Then turn over and glue the corners of the next square.

And so on in order, until all the corners are glued together.

To make the snowflake voluminous, you need to very carefully glue the corners of all the squares. As a result, six snowflakes are obtained, which, gluing together, form a three-dimensional 3-D figure.

We connect the corners of all the blanks to each other.


In order for the figure to keep its shape and not fall apart, you need to additionally glue the sides of the snowflake.

That's all, our 3-D paper snowflake is ready!

coming up with various patterns By painting the figure with paints and even decorating with beads, you can not only create a very beautiful New Year's decoration, but also help develop your child's imagination and sense of style.
Snowflakes - paper kirigami instruction
Snowflakes - kirigami is a fairly simple way to quickly and effortlessly make a lot of beautiful jewelry. The highlight of this type of snowflake is the selection of paper. For snowflakes - kirigami you need bright colored paper.

It can be colored on one side only, but you can choose paper with rich colors on both sides. We take an A4 sheet and fold it as shown in the photo.

Cut out a square, fold in half diagonally.

We fold two more times.


Then we print and transfer just such a scheme to the finished workpiece.


The next step is to cut patterns on the workpiece using nail scissors.


Carefully cut out the snowflake and unfold it.


Bend the resulting corners, as in the photo.


A snowflake can be decorated with stasas, beads, Christmas tinsel, and then it will become the central decoration of your New Year's home.
2 more do-it-yourself kirigami snowflake options:


The light, airy figure of a ballerina is very beautiful. If you combine two types of a beautiful snowflake and a ballerina figurine together, the effect can exceed all expectations.
It takes a lot of time to make this type of jewelry. But the work of cutting it out is quite simple, even a child can handle it. Not single figures look very impressive, but a whole garland of graceful ballerinas.
What you need to prepare for work:
- dancing ballerina figure template;
- thin white paper for a ballerina's tutu. Paper multilayer napkins are very well suited;
- thin white cardboard;
- scissors.

Choose a ballerina figurine template. On the Internet you can find a large number of options. Simply copy the selected template into a text document, format and print. But it is much more interesting to draw a sketch yourself. Transfer the template to cardboard and cut it out.
It is very important that the cardboard is white on both sides, since the snowflake is voluminous and is clearly visible from any side. The size of the figurine is optional. There are no restrictions in this matter.
Watch the video - how to make a snowflake ballerina with your own hands
A very beautiful pack is obtained from a white multilayer napkin. We make a snowflake in the usual way. We put the pattern you like on paper and cut it out with sharp scissors.
The only caveat to consider is that the paper snowflake should have a fairly large central hole. In this case, she will easily and simply sit on a cardboard figure of a ballerina.
Paper heart with a snowflake in the form of a handbag
In this master class, we will make such a heart with a snowflake. It can be used as a small gift bag or just as a Christmas tree toy with your own hands.

First you need to print this diagram.


We transfer the scheme to paper and cut it out.


The result is two identical blanks.


To fasten together, we make cuts - on one side from the top to half of the snowflake, on the other - from the bottom to half of the snowflake.

We collect the finished volumetric snowflake, threading each other.

Attach the handle.


Do-it-yourself voluminous paper heart-shaped snowflake is ready!

Master class - beautiful voluminous snowflake video
No need to think that all home decorations can only be purchased in a store, while spending a fairly impressive amount of money. It would be much better, having united with the whole family, to make a variety of decorations for the house and the Christmas tree on their own. For such an activity, you can allocate a certain day, for example, when it is planned to install a New Year's beautiful spruce.
Do not deprive yourself of the pleasure of making decorations for the New Year holiday with your own hands. A variety of methods for making snowflakes allows everyone to choose the most suitable one for themselves. And it doesn't have to be spending a lot of money. It will take a minimum of costs, imagination, patience, accuracy and a great desire to do something beautiful with your own hands.
How to make a fluffy snowflake


