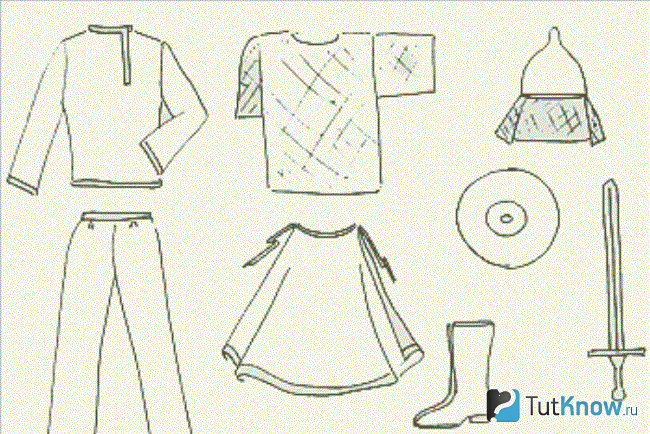
Do-it-yourself hero costume for a boy. Bogatyr costume - in haste! To make a sword you will need
Heroes and defenders. A universal costume for a boy, which is perfect for any age. Especially if you dress up the weather brothers in this way. But how to make a hero costume?
You will need:
Shirt and pants
You should pick up a sword and shield in a carnival costume store or choose the right option among the toys that the baby has - most young representatives of the stronger sex will definitely have something like that.
But it’s better to buy a helmet ready-made, since creating it with your own hands is not an easy task.
Stage 1: shirt
How to make a hero costume with your own hands? To do this, choose natural fabric light color, matching the style of the braid (to create a Russian folk costume), an elastic band, a wide braid (it is needed to make a belt). The pattern of a Russian shirt is more than simple - it consists of several rectangles of various sizes.

The result was 2 large products - the front and back, and 2 small ones - sleeves. It remains only to cut the desired size, and then outline a place for the neckline - for the convenience of putting on a suit, you can attach a small clasp.
Stage 2: tailoring
Looking for an answer to the question of how to make a hero costume at home, it is important to take care of carefully combining all the details into one product.

For this purpose, the pattern created in the previous step is used. After that, it remains only to process the seams - ordinary braid is best suited for this purpose.

On hero costume You can also hem the sections manually, but it is best to use a sewing machine for this. It makes sense to sew an elastic band into the sleeves, so that the suit will be as comfortable as possible for its owner.

The braid is also used to process the incision located on the chest, as well as the neck. Slices "hide" inside. In this case, it is very important to complete the task as accurately as possible - if the fold of the seam around the neck is too large, then the product will look sloppy.

On both sides of the cut are convenient fasteners. You can buy them at any fabric store, or you can weave them yourself from dense threads. On the other hand, hooks or buttons are sewn on.

Stage 3: belt
Making a belt for a hero costume is quite simple. It will be successfully replaced by a regular piece of fabric or a cord of suitable width. You can weave several multi-colored elements or create a belt from braid.

Stage 4: Cloak
To make a cloak of a hero, you will need a scarlet red fabric. An oblique trim or braid will help decorate the perimeter of the product. You can fix it on your back with a regular tight rope. For the same purpose, a brooch or a large button is suitable.
The corners at the bottom of the product are carefully cut so that the cloak forms a semicircle. This somewhat complicates the process of processing the perimeter with a sewing machine, so it is so important to be as careful as possible.

To make the seams neat, the cut is tucked in by about 0.5 centimeters. An elastic band is sewn into the upper part of the product - its length should correspond to the size of the shoulders of the future owner of the suit.

The cloak can be put on with a button and loop - depending on what type of fastener was chosen for the shirt. But it is best to simply connect the ends of the product - you can put on an outfit over your head, but it will not interfere with active pastime at the holiday.

After all the manipulations, it remains only to wash and smooth the raincoat. Only a couple of details remain - and the image of the hero is completely ready.
Stage 5: Pants
To draw a pattern on a piece of cotton fabric, it is worth attaching to it any pants that are suitable in size, given that the product intended for a suit should be much wider than a regular outfit. Or you can even choose the appropriate option from the ones already available - there will surely be such a thing in the wardrobe.
Stage 6: boots
Suitable shoes will help to become a real hero. It is quite difficult to find boots in the right style, but it is better to use high socks from natural materials or special liners rubber boots- it remains only to decorate them with red fabric. All you have to do is buy the right one. carnival weapon set corresponding to the image.

How to make chain mail for a hero's costume, what is needed to create an outfit, and how to turn a child into a brave warrior? All elements of the image are created at home, without any special financial and time costs.
First, let's decide what the attire consists of, this:
- shirt;
- trousers;
- chain mail;
- cloak;
- boots;
- helmet;
Let's start with the shirt. To sew it, you need to cook:
- gray, white cotton or linen fabric;
- braid;
- threads;
- scissors;
- lace;
- buttons.
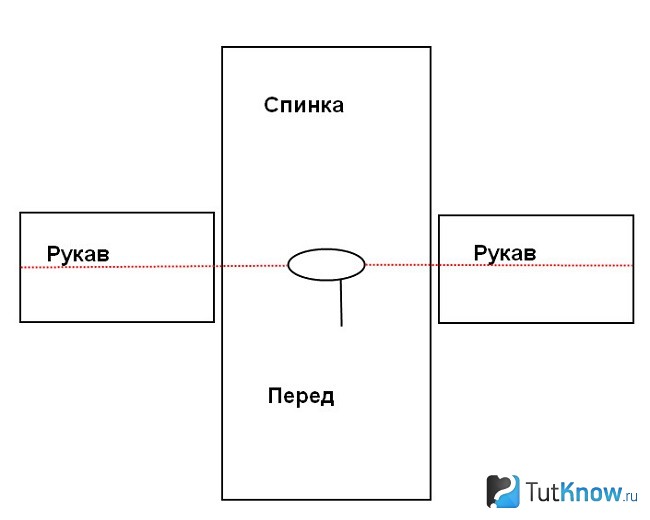
As you can see, you will need a single part of the back and front, draw an oval on their border, which will become the neck. On the shelf just to the left of the center, make a slot so that the child can wear this shirt. The sleeves are also rectangles.
Attach the first piece of the sleeve to the part of the front and back, aligning their center with the neck. To do this, focus on the dotted line drawn on the pattern. Sew first the first, then the second sleeve with the main part.
Now fold the shirt in half, sew the side seams of the front and back, as well as the sleeves. Use an overlock to process seams.

Trim the bottom of the shirt with braid, wrapping its edges.

Sleeves can be shaped in two ways. For the first, first tuck them in to form a drawstring, sew the braid here, then insert the elastic into the drawstring. For the second method, you must first turn up the sleeves, stitch, thread an elastic band here, and then sew a braid on your hands. But then you need to make the sleeves a little wider in this place so that the elastic does not squeeze the hands.

With the same braid, process the neckline and neckline.
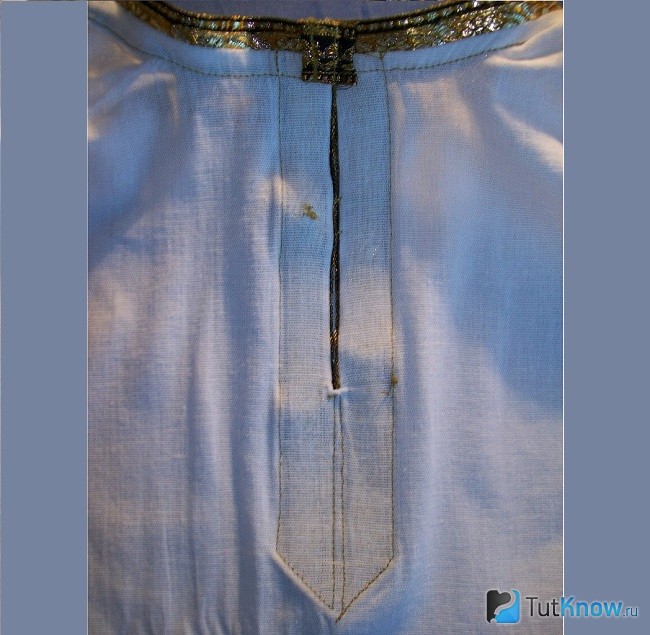
As you can see, the lower part of the braid on the cut needs to be bent to get two symmetrical corners. When attaching the braid, fold the main fabric so that it does not fray.
Sew a button and a thin cord near the neck, bending it in the form of a loop.

To make a belt, weave a braid of three laces. They can be the same or different colors.

You can sew pants without a pattern. To do this, attach the front and back panel of the boy's trousers to the fabric, cut out with allowances for the seams. Next, the legs are sewn in the center on the sides. When cutting, add a little more so that the boy can freely take off and put on his trousers. To keep them well at the waist, make a lapel here, stitch it, thread the elastic. Hem the bottom of the trousers, after which they can be put on the child.
How to make a heroic cape?
First prepare:
- scarlet fabric;
- golden slanting inlay;
- big button;
- linen gum.
To sew a raincoat cape, you just need to turn the product around the perimeter on three sides with an oblique trim.

Tuck the fabric at the neckline, stitch it in this position, insert the elastic here. From the same edging braid, make a loop, sew it to the top of the raincoat, attach a button on the other side.

Here's how to sew a raincoat. To make boots, you can pull out the inner warm liners from rubber boots, edging them with braid to make heroic shoes. If you do not have such a detail, then sew suede soles to red wool socks. Also get boots.
You can limit the creation of the image to this or continue to make the hero's costume for the boy. With your own hands, you need to make the next piece of clothing.
How to make a hero's chain mail - 3 ways
Let's consider three options. To implement the first idea, we will knit it, the second method will show how to weave chain mail from wire. The third idea will reveal the secret of creating a hero's protective clothing from coins.
- To knit chain mail, type an odd number of loops on the knitting needles. Remove the first loop, then knit this row with facial ones.
- Also remove the first loop of the second row, tie the second loop with the front one, remove the third loop so that the thread is at work. Perform the fourth loop with the front one, remove the next one, knit using this technology to the end of the row.
- The next, third row, consists of facial loops. 4 row repeats the knitting of the second. The fifth row is identical to the first and third.
- Using the same technology, continue to knit further. Here is the drawing you will get.

Always end rows by purling the last stitch. By turning the fabric over, you will remove this loop at the beginning of the next row.
You can knit chain mail in the form of a vest or sweater. In the second case, you will need to create sleeves.
Now see how to make chain mail using coins. Often such a trifle as 10 or 50 kopecks. lying around as useless at home or simply thrown away, although they can be used.
Take:
- identical coins of low denomination;
- drill with a thin drill;
- steel engraving washers;
- pliers.

The next method is more painstaking, but it will be useful to those who do not yet know how to make chain mail with their own hands, and they need this piece of clothing for a costume ball or playing a theatrical performance with the participation of heroes.
For such chain mail you will need serious tools, these are:
- vise;
- pliers;
- device on which you will wind the wire;
- side cutters, which are used as a hacksaw or scissors for metal;
- gloves.
The main material is wire. Aluminum will not fit categorically, as it is too soft. You need to take steel or copper.
Steel wire is the easiest to buy or get, and copper is harder. See how to make a wire winding tool. Below is its diagram.

Insert the tip of the wire into the hole of the tool, wind it around the rod. Then - “bite off” with pliers and stretch so that there is a small distance between each turn. Cut this spring into rings. Make a lot of these blanks.
Now each of them needs to be aligned with pliers, then squeeze with the same tool to connect the ends of each ring.

Choose a weaving method from the presented ones, use it to connect the rings into a canvas. Here's how to make chain mail using the "elementary cell" weaving pattern. To do this, take 4 rings, thread one ring that has not yet been closed into them. Connect its ends, straighten it to make a blank of 5 rings.

How the hero's chain mail is made using the "rope" method is also clearly explained by the diagram. As you can see, the rings of subsequent rows are passed through the rings of the previous ones. There are others interesting methods weaving, for example, "dragon scales".

Using any of these weaves, you need to make a few details:
- front;
- back;
- two sleeves;
- 2 straps.

There is still a little bit left for the hero's costume to be completely ready. See how to make his weapons, but for kids.
How to make a hero's sword from a ball or cardboard?
You can create it using the most unexpected materials. See how to make a balloon sword. Creation of various figurines, objects from balloons called twisting. If you are making a hero costume for a child, a sword from hot air balloon would be a great solution. Such weapons are completely safe, children can organize tournaments using them.
So let's get started. Inflate long balloon using a special pump, tie it, bend it as shown in the photo.

Make another identical turn.

Find the center of this figure, twist it with the remaining free long end of the ball.

You have the handle of the sword, and on the other hand - its safe blade.

Now you can start fun game by arranging a competition of heroes or.
How to make a hero's sword out of paper and luminous?

For paper, you will need the following materials:
- a sheet of colored paper;
- scissors;
- scotch.

Lay the small piece on top of the larger one crosswise. Secure these two pieces with tape. Sharpen the lower part, for this you need to press here on one side and on the other, fix it with tape.

Here's how to make a paper sword quickly. Consider the second method of its manufacture from other materials. With such weapons, you can imagine yourself as a fantasy hero, and not just a hero.

Here's what you need to implement your plan:
- cardboard or thick paper;
- polycarbonate;
- transparent sealant;
- strip of skin;
- luminous paint;
- glue gun;
- foam board;
- scissors;
- pen.
Attach this template to a piece of colorless polycarbonate from which you want to cut two identical blanks.

Lubricate the edges of one part with a small amount of transparent sealant, place the second on top of it, press to connect both blanks. Cut out two identical parts for one and for the back of the handle, glue them in place.

Let the adhesive sealant dry. After that, rewind the sword hilt with a strip of leather. Just below it, on the top of the blade, make a small hole with a drill. This is where you stretch the nozzle of the syringe or tube with paint. Fill the sword with this glowing solution.

It looks especially impressive in the dark. If you decide to celebrate the birthday of a boy on the theme of animated films about heroes, then dim the lights, and the child will come out in the appropriate attire, holding a sword in his hands. The spectacle will be mesmerizing.
The fairy tale "Three heroes" - a script for a boy's birthday

How to make a hero costume, you already know. For this event, you will need 3 of them. The heroes can be a birthday man and his two friends, or three adults. You will also need a Baba Yaga costume, making it is quite easy. To do this, you need a wide skirt, jacket, apron. A scarf is tied around the head, makeup must be applied to the face.
So the birthday begins. When everyone has gathered, the adults say that now three heroes will come to the birthday man. But suddenly the Baba Yaga runs in and loudly complains that the heroes do not give her life. She tries to mischief, but they always interfere with her. Therefore, the old woman decided to teach them a lesson and bewitched them. With these words, Baba Yaga takes out a picture depicting heroes. She says that now they will not interfere, as they have turned into painted ones.

But the guys can disenchant them if they cope with difficult tests. Adults ask if the guys are ready for them? The kids certainly agree. Then Baba Yaga announces the first birthday contest.
Competition: "Find gems"
She says she needs gems to be found. For this competition, you need to prepare in advance:
- cereals;
- 2-3 bowls;
- 20-30 aquarium stones;
- sweets or voluminous stickers to be awarded to participants.
The next competition should be calm so that they rest. Prepare in advance the riddles that Baba Yaga will ask the guys. Of course they will guess them.
Competition "Tug of war"
On the one hand, Baba Yaga is trying to pull the rope, on the other hand, children are doing it. Of course they win.
The harmful old woman has no choice but to say that the guys have proven that they are kind, smart, have a heroic power. Now we have to return the heroes. Baba Yaga leaves, they appear. It will fit here happy song on this topic.
The heroes say that they came with cheerful songs with heroic games. The next contest is great when you are designing a birthday script for a boy who is 10 years old or so.
Fun competitive game "Don't drop the egg"

Let each team line up in a chain, give the first participant a spoon in which he will put a boiled egg. Everyone in turn needs to run to the far point, then go back to pass this trophy to the second team members, then the next.
It is better to take not a real egg, but a plastic ball similar to this object or a wooden one so that children do not break it.
If someone has a trophy, you need to put it back in the spoon and continue moving on.
2 bowling contests

Skittles will be needed for the next competition. They need to be arranged in a chain, run around in a zigzag manner and return back in the same way or in a straight line. Skittles can be seen as plastic water bottles or. filled with sand.
When developing a script for a boy's birthday, which you plan to spend in the country, in the yard or in nature, be sure to include another fun mobile contest. To do this, you need to prepare or bring with you:
- skittles;
- hoop;
- a ball or newspaper crumpled in the form of a ball;
- chalk or basket.
And here interesting competition, which must certainly be at the heroic birthday.
Game-competition "Cart"
Each hero will take a child from his team by the legs, he must run in his arms along a certain path. But here you need to make sure that there are no stones and sharp objects on the road. The one who completes this task the fastest is the winner.
If you are thinking about how to develop a script for a boy's birthday at home with contests, there will also be no problem. If you have a large room with little furniture, then the cart game you just read about will work just fine, as will the next one.
Competition "Russian Spit"
For it you will need:
- combs;
- brushes;
- hair bands.
The next power competition, which can also be held at home. You will only need two items:
- towel;
- water.
In conclusion, you need to turn the brightest participants into them. For this contest you will need:
- large durable garbage bags;
- scissors;
- belts;
- small balls with a diameter of about 5 cm.
- In the center of each package, you need to cut a hole for the head, and a little lower for both hands, put these blanks on the guys.
- Tie them with belts at the waist so that the packages above it are not tight, but loose.
- Make a larger cut on the neck and armholes, because it is here, on command, that the children will begin to fold the balls, turning the boys into muscular heroes.
If you still have any questions regarding how to make a hero costume, you can find the answers to them in the following videos on this topic.
The latter will teach you how to make a helmet with your own hands. It will complement the heroic attire.

Many guys like the image of the Russian hero. If you want to please your boy, you can make this costume for a matinee with your own hands. The main attributes of the costume are a helmet, sword, boots.
We offer you step-by-step instructions on how to create a Russian warrior costume with your own hands.
Costume base
First you need to study the photos and illustrations with the characters, as well as look into the wardrobe. Maybe there are things that can be suitable for creating a fancy dress. The main elements of the outfit are a loose-fitting shirt and pants.
Shirt
For this we you will need a shirt with a stand-up collar or an ordinary shirt itself, from which you need to cut off the collar.

After that sews a border along the edge of the collar and armholes. You can buy it at any craft store. We sew the cuffs on the sleeves with the same braid.
Trousers
Pants for a fairy-tale character must be plain. So you can not sew special trousers, but use those that already exist.
REFERENCE. A suitable option for costume pants for a hero can even be trousers made of school uniform.
Cape (cloak)
To make a cape you will need a rectangular piece of red material. An excellent option for a cape would be satin or silk.

You can decorate the raincoat with a silver ribbon, which must be sewn over the entire surface of the product.
On one side, the cape is going to elastic, you guessed it, it will be the top. We make two ties on both sides so that the child can tie a raincoat.
You can also depict the emblem of a fairy-tale character on the back - embroider with threads or draw with paints.
IMPORTANT! The first option will take more time. If you need the costume urgently, paint the emblem with acrylic paints.
Important details of the heroic image
Having prepared the basis, we move on to the details that will help create a “heroic” image.
Helmet
Our fairy-tale hero cannot do without a helmet. You can build it from improvised material.

For this we need:
- plastic bottle;
- large plastic glass;
- silver paint;
- scotch;
- scissors.
To start cutting out a base from a plastic bottle.
A cone is made from a glass. The bottom is cut off, and the workpiece is cut along a vertical line. We form a cone from it and attach it to our bubble blank. To do this, we need double-sided tape.
So the helmet is ready, let's move on to creating the remaining attributes for the hero.
Boots
First you need to take a measurement from the baby's legs and make a pattern. We transfer the drawing to the material.
IMPORTANT! Please note that a seam allowance of at least 1 cm must be made.
The sole can be made from a carpet or a piece of linoleum.
- Cut out all the details of the boots and iron. After that, we add a sealant to each element of the boot, for example, a synthetic winterizer, so that the shoes keep their shape.
- We fold the details with the right side and stitch all the seams. After that, we try on the child's leg.
- Next, we pin the fabric base to the sole with pins. I'll start sewing on the sole with my hands, because sewing machine will not stitch such a dense material as linoleum.
Boots for our hero are ready.
 Sword or spear
If you already have a ready-made sword and spear for a child, then you can safely take it for a matinee. But if this is not the case, then it can simply be made from cardboard and paper.
ATTENTION! The sword and spear must first of all be safe for the baby and his environment.
It is necessary to print a sketch of the workpiece, transfer it to cardboard. It is advisable to make several blanks that stick together. This is necessary for the product to be stronger.
We repaint the finished blanks in silver color. The handle of the sword can be decorated with foil or wrapped with strong threads. In addition, you can apply a pattern to the finished product.
Shield 
Make a shield in the shape of a circle. Repaint also in a silver shade and decorate with foil. You can also apply the coat of arms of a fairy-tale character. Sew an elastic band on the inside so that the baby can hold the sword in his hands.
In the manufacture carnival costume give free rein to your imagination and ingenuity. You can literally make an outfit from ordinary things that, it would seem, are not at all intended for this. But remember that you should not use a lot of accessories. Stick to a strictly masculine image when creating an outfit for a hero.
I made such a knight's costume, sometimes I have to help my brother. He plays in the theater. This is not my first costume, but one of the simplest.
Making such a costume is not difficult. You will need - here is a gray fabric as in the photo, an ax (either buy in children's toys or cut out of wood), a black T-shirt big size and coat of arms.
I had to make the costume myself. I bought such a fabric, made a markup, cut it out as it should and sewed it. It turned out such a combo. There was a hatchet. I printed the coat of arms in the copy center and simply glued it on the T-shirt.
Here is the costume.
On New Year the boy can sew very original suit hero or knight.
For the first option, you need to sew a linen shirt and linen pants. Then, from yarn of silvery metallic color, knit chain mail, as well as a protective net for a helmet. Be sure not to forget to sew a red raincoat and red boots (can be from satin, can be from lining fabric). For the helmet, make a cardboard pattern and cover it with gold wrapping paper. To decorate the costume and give the hero a courageous look, a purchased set of a sword and shield is suitable.
Second option. For such a New Year's costume, a canvas shirt and trousers are also selected or sewn. And the chain mail is made of thick silvery cardboard (we used tetra packs from under the juice - they are cut in the form of strips, one side is straight, the other in the form of half rings and the whole chain mail is assembled in this way). The helmet is also made of a solid silvery tetra-packet and fastened together with a wide adhesive tape.
And of course, a red cloak and red boots are required, as well as a sword!
Happy New Year!

I knitted a hero's costume and sewed a scarlet cloak. With knitting threads, I got a little confused. I could not find steel-colored threads with lurex. I bought a silver fabric that does not fray, cut it into thin strips, cut it, as it were, in a circle, so that it would come out continuously without knots. I also had to get confused with silver threads. Somehow it turned out too expensive, because they are sold mainly in small coils. Again, I bought a silver fabric that can be dissolved, so it turned out cheaper and a weighty skein. Further, in two threads, she knitted an elongated sleeveless jacket with a pattern of chain mail needles; She crocheted the helmet like a simple hat, but in front, where she wears it, she made a small triangle. And at the top, on top of her head, she made a pike. I sewed a sun from a silvery fabric (which I unraveled for threads), embroidered rays. The top was painted with glitter nail polish. For a raincoat I bought a braid, communicated, inserted it into a buckle. I sewed bugs to the cloak and sleeveless jacket so that the cloak was stationary and did not hang back and forth on the neck. I am attaching a photo of what happened)

Sew new Year costume a hero on a boy with his own hands is not so difficult if you know how to sew. But the hero's costume contains enough small details. Firstly, it is a helmet, sword, chain mail. The most difficult thing is to choose the material for chain mail. In the version that I want to offer you, chain mail and a helmet are sewn from one simple fabric with round sequins. You will also need a golden cloth and a golden mesh. Look at how beautiful and complex the hero's costume is, but if you divide it into parts, everything is simple and elementary:

The hat is sewn according to this pattern or similar. She needs a golden fabric, a sequined fabric and a lining for a hat, you can use a thin synthetic winterizer.

The next stage is the Russian folk shirt - a kosovorotka. There are many diagrams on the internet. The main thing is that it should contain a red braid and be stylized as Rus'.

Chain mail is sewn in a rectangle. The edges are a braid of gold fabric and sequined fabric that you have prepared in advance.
Pants and leggings are also not difficult to sew, there would be a desire. Well, of course you have to buy a sword.
The costume looks very cool and will not leave anyone indifferent. Creative success to you.

As a rule, the costume of a Russian hero consists of a folk shirt, cloak, pants and boots. Costumes can be supplemented with accessories: a sword or shield, a mace.


The shirt can be cut using the simplest pattern:

Make the neck loose, stitch it and the sleeves with braid, add a belt to the shirt.
For the cloak, take a patch of contrasting fabric, stitch it along the edges with an oblique trim, add a brooch to secure the cloak on the shoulders.
As for pants and boots, you can not specially sew them, but use any available ones that match in color.
One or two evenings, and the costume of the Russian folk hero is ready!
If you make a suit soft, it is quite simple, basic sewing skills will suffice.
You need straight pants and a long-sleeve T-shirt, as it is called there. From some plain fabric. Sewing them is very easy.
Then go to a do-it-yourself store and buy sheet foil isolon there. See the thickness for yourself, 0.5 will be too easy to bend, 1 cm can be uncomfortable, especially for a baby, but it will definitely create the impression of armor. Find an isolon - you have to go to a tourist and hunting one and take a metallized karemat (tourist rug) there, but it's more expensive. Cut large plates from isolon. The pants will go bdra, lower legs (close from the inside), you can make separate knees. On the top - the chest, back (you can generally do one piece with a neck, it's even better), plus floors on the sides that cover the upper third of the hips, plus forearms, shoulders and elbows. You can still armpit rondels. You just sew it on.
Additionally, you can take gloves and also sheathe. Small plates on the phalanx from above (too much on the sides - you have to walk with your fingers in a hurry, but you definitely don’t need to sheathe inside), on the next, and finally on the back of the hand. To make it very beautiful, each next row hangs a little over the previous one.

Like here on the fingers a whole scale. Enough and one plate per phalanx. And above the palm, let it be whole. Kraga (bell) - very good. If the material is still left - do it.
From the same isolon you can make a helmet. Here you will definitely have to take 1 cm thick.

This thing is called a bascinet. It even has a rib, so making it from two halves, we will remain close to the truth. The visor can not be done. The only thing I would advise is to connect the two halves from the front to the bottom so that they do not bulge and the helmet keeps its shape.
The end result should be something like this:

You can not fool around, but make a knight of the 12th century. Sew a shirt, pants and a hood from knitwear, picking up the colors for chain mail. Or sew some mesh on top. Put on a bright cott-d-arm from above - it's simply a rectangular one with a slot for the head and a couple of cuts, stitched on the sides (for beauty, we draw some coat of arms on nm with acrylic). The helmet is a round bottom, we sew a rectangle and a mask to it - the same isolon.

A hero costume can be made using improvised items.

As a basis, use for example, for example, a white or black turtleneck and black or blue wide knitted trousers gathered at the bottom or gathered.
You can take a shiny silver fabric and sew it on the principle of a cape, i.e. in a rectangle in the center, make a slit for the head, and sew on the sides, leaving slits for the hands.

Of course, you can’t do without a raincoat and boots.
We cut out a rectangle from red or blue fabric and make ties on one side for putting on a raincoat. Boots can be taken ready-made (if any) or sewn from the same fabric as the raincoat.
Well, the image completes - a helmet.
The helmet can be made from cardboard and colored paper or sewn from bright fabric.

An interesting option for making chain mail from a T-shirt and foil.

Costume options:


To sew a costume of a knight or a Russian epic hero with our own hands, we need different fabrics. From which we will cut a tunic, the dimensions of which correspond to the growth of the child. In this costume, she comes to the knight's knees.

We fold the fabric in half, make a slit for the head at the fold, and cut the hem curly. We bend and overcast the sections of the sides and neck.
Let's make a cross on the chest in a contrasting color from satin fabric or ribbons. Attach two ribbons to the sides.

Now let's make the shield. Ideally, a shiny base from a cake box will do. If there is none, then we cut the circle ourselves, primed with white acrylic in two layers and paint with metallic paint.
Almost every boy in childhood wanted to be a hero. So why not make your dream come true? After all, you can make a cool costume for the main character, and make a hero’s helmet on your head with your own hands.


Working with paper
The process of forming a helmet out of paper can be traced on the example of a master class.
For needlework you will need: a balloon, plasticine, a centimeter, paper, PVA, petroleum jelly, silver and black paint, a sponge.

Inflate a balloon approximately the same size as the circumference of the child's head (this can be measured in advance with a centimeter). Lubricate the ball with petroleum jelly, then draw a sketch of the future helmet on it. Now let's take the paper, cut it into small pieces, start pasting the ball using the papier-mâché technique. First, glue the first layer, then wait until it dries, and only then glue the second. Using this technique, the helmet will be stronger.
When we stick the right amount of paper, gently blow off the ball, cut it off, and then sand the uneven edges. With plasticine we make a point on the top of the head. Again we paste a couple of layers of paper and wait until the structure is completely dry. Then we cover the workpiece with a couple of layers of PVA. You can mix it with white paint.

Now you need to paint the helmet. We apply the first layer of silver color paint neatly and evenly, and then, after complete drying, the second layer. Before the paint dries, take a sponge, dip it in black paint and gently nail it to the workpiece. This technique should create the effect that the helmet is old. From the inside, paint the helmet with black (acrylic only) paint. Mesh fabric can be glued to the back, if desired.

You can use the same technique if you want to make a foil helmet. To make a helmet, instead of silver paint, take ordinary kitchen foil and smooth it over the surface of the headgear. You can stick the foil on PVA glue. And at the end, you can decorate the headdress as you wish.
A simple lesson
And now we will give you one more item, how to make a helmet with your own hands from improvised materials.
To do this, you will need a 5 liter plastic bottle, a large plastic cup, a laundry bag, silver paint, scissors, and double-sided tape.

On the top of the bottle, draw a helmet and cut it out.


We attach the cone to the bottle with tape.

Cut out a rectangle from a laundry bag and paint it silver.

We paint the workpiece itself with the same paint. You may need to coat the helmet two or three coats for a more intense metallic finish.

We try on the grid, mark the places where we fasten it with a marker.

Using double-sided tape, we attach the mesh to the inside of the bottle.

And the plastic bottle helmet is ready.
Video on the topic of the article
Watch a selection of video tutorials on how to make a hero's helmet with your own hands.
I’ll clarify in the first line that everyone is aware that the civil one is in the registry office and it’s wrong to call cohabitation this term. Here, let's do it, my topic is not really about that.
I lived with my husband before marriage for almost 7 years, given that we were separated. And if I told anyone, then many tried to instill in me that, they say, they would give up and leave. I say: "what's the point? I'm not financially dependent, I live with him (I don't ask for his parents' train station, where he is registered, we don't have children yet, we're going to take a mortgage 50/50 (in the end, we took it already in marriage), on money wedding No, but I DON'T WANT to paint it just like that. But they stubbornly told me that if you don’t get married, he will dump, he doesn’t consider me his wife, etc.
When we got married, these same people gave me something like: "I achieved my goal, bent the man" (and it was straight with respect, I went nuts).
Here. In general, we have been together for 18 years (both married and before), I hope that it will continue to be so)
I'm interested in the opinion of those who do not recognize the same cohabitation and consider it frivolous. Why exactly do you hold such an idea?)
Happy holiday everyone!
Katerina
The husband works very hard. Very straight. On weekdays, he does not return before 10, he leaves at 7. In fact, he only spends the night at home. A couple of times a week daily. Weekends are not very often, and he spends them in a horizontal position - he sleeps off in a week. That is, in fact, we also do not spend much time together. At the same time, the salary is not millions, he works, so to speak, in the name and for the sake of interest (all his life he dreamed of exactly the job where he works now).
I am on maternity leave with a baby, my grandparents are not around, my girlfriends and friends do not live nearby either. I go crazy alone all day with a child. Not physically, but mentally very tired. The child's teeth are hard to cut, he is capricious, constantly crying. I understand that soon the cuckoo will go from all this. Today I’m crying all day, because everyone is having fun, relaxing, and I’m sitting with the child while my husband is at work.
There is a clear feeling that I do not live my own life - I did not dream of such a life, 100% straight. I dreamed of traveling together, spending time in the country, hugging in the evenings. But in the end, I fall asleep with the child on the couch before the husband arrives (since the child very often wakes up at night, and he is afraid to fall on the bed if he sleeps together, and the husband needs to get enough sleep).
What to do with all this? I understand that this job is the dream of his life. But she doesn't suit me. He won't change it, that's for sure. Yes, most likely it will soon become easier and he will work less. But periods will still be such an impenetrable hell with days, late arrivals, etc. But I don't want to live someone else's life, do I? Divorce is the only way out? I don't want a divorce, but I can't live like that either. I always dreamed of two children, but in fact I can’t cope with one alone, and I won’t decide on the second with this state of affairs.
I would like to hear advice, learn about your experience. Maybe someone has been in a similar situation. I feel disgusting.
Today is March 8th. Already on the forum great topic about female emancipation, and how women got the opportunity to do "male" work. And so I decided to tell and show what it is like for a man to perform "female".
After parents in Sweden hear the happy news about the addition to the family, they somehow think about how the parental leave will be planned. Maternity leave is 480 days (16 months), but there are several features of this vacation.
Immediately after the birth of the child, both parents have the right to 10 days to care for and get to know the newborn. This is especially important for moms, some of whom may be after caesarean section and need the help of the father of the child. This right is enshrined in law and the employer cannot refuse the newly-made dad in these 10 days (even if the plan is on fire and there is no one to replace it!).
Next, the parents decide among themselves how they will distribute the 480 days of "vacation". Both father and mother are entitled to half of the decree, i.e. 240 days. But parents may decide that one of them will spend a longer time on parental leave. One of the parents can transfer to the other the 1 to 150 days guaranteed to him/her by law.
The Swedish decree has one very important "BUT"! That dad, that mom must sit with the child for 90 days. These days are assigned to each of the parents and cannot be transferred to the spouse. If, for example, the father cannot or does not want (which happens extremely rarely with the Swedes) to be on maternity leave, then he cannot pass on his mother's days, they will remain with him. In the future, until the child reaches the age of 8 (or the end of the first grade at school), the father can use them to go on vacation with the child, stay with the grown child on vacation, or simply help with studies. If dad (or mom) did not use these 90 days, then they “burn out”.
By the way, only 60 days were previously fixed by law for each of the parents, and the “bar” was raised to 90 days only quite recently (60 days apply to children born before January 1, 2016).
Photographer Johan Bävman spent 9 months on parental leave. This unforgettable experience inspired him to create a series of photographs about the strong and successful men in decree. The series is called "Swedish Dads" (Swedish dads).

The image of the old Russian warrior is liked by all the boys without exception. A caring mother can please the boy with a real hero costume, which is made by hand. It consists of a helmet, chain mail, armor and boots. How to turn simple things into a heroic entourage? Step-by-step instruction And detailed master class help with this.
What to make a helmet for a hero
The costume of a hero without a headdress does not look at all, so a little warrior will need a beautiful helmet. It can be made from simple and affordable materials.
What you need for work:
Five-liter plastic bottle;
Plastic glass 500 ml;
Laundry bag or mesh cut;
Silver or gold paint in a spray can;
Mounting double-sided tape;
Scissors and glue.
Progress
1. Cut out the base of the helmet from the top of the bottle. To do this, draw a wide frontal part with a marker, leave the sides even. We cut off everything superfluous.
2. From a plastic cup we make the conical top of the helmet. To do this, cut the bottom of the glass, cut it vertically. From the resulting plastic sheet we cut out a cone, fasten it with double-sided tape.
4. Let's start making chain mail for the helmet. We make it from a laundry bag. This mesh is quite strong and inexpensive. You can use a mosquito net or leftover tulle, but this material is thin and stretches a lot.
5. We paint the grid with spray paint in silver or gold.
7. Cut the mesh and try on the helmet. In the places of fastening we apply double-sided tape, to which we attach chain mail-mesh.


We try on a ready-made heroic helmet for a baby. We proceed to the manufacture of other parts of the costume.
Do-it-yourself chain mail and shirt for a hero
An indispensable attribute of a heroic costume is a shirt with a Slavic pattern and chain mail. To sew a Bogatyr costume for a boy with your own hands, you need to stock up on the following materials:
White loose shirt;
Border cut with Slavic pattern;
Foil substrate under the laminate;
Glue, scissors, double-sided tape.
Progress
Step #1 Shirt of the hero
You can turn a simple shirt into a heroic shirt white shirt or nightgown. To do this, it is enough to sew a beautiful border with a pattern along the bottom of the product. Now on sale you can find almost any border. The shirt for the hero is ready.
Step #2 Mail
Chain mail can be made in several ways.
1. From the old knitted sweater a vest is cut out, which is painted with spray paint. To do this, the vest is pulled over the back of the chair. Such chain mail is quite light, but the smell of paint remains.
2. You can make scaly chain mail-shell. For its manufacture, you will need rectangles of the same size, which are fastened in a checkerboard pattern. You need to start work from the bottom row of chain mail. In addition, the rectangles must be painted on both sides. The dried parts are sewn onto a tight sleeveless jacket.

Important! You can make a chain mail-shell from a foil substrate for a laminate, cardboard, a plastic folder or other materials.
How to make boots and pants for a hero boy costume with your own hands
Ancient Russian heroes wore Wellingtons with curved toes and figured tops. You won’t find these on sale, but making them is quite simple from improvised materials.
What you need for work:
Thick fabric for boots;
Dublerin;
Dense linoleum or leather for the sole;
Thick threads for decorative work;
Awl, scissors.
Step #1 Pattern of boots
We take the necessary measurements from the child’s leg and draw such a pattern.

We transfer the details of the side and front of the boots to the fabric, not forgetting the seam allowances. We cut out the sole from dense linoleum or leather.
Step #2 Assemble the boots
We iron out all the details. We additionally seal the front of the bootleg with doubler so that the boots keep their shape.
We make holes on the sole with an awl through which the shaft will be sewn.
We fold the details of the fabric boots with the right sides inward and sew on a typewriter. We twist and try on the sole. We distribute the fabric along the side of the sole, pinning with pins. The sole must be sewn by hand, with even and neat stitches.
Boots for the hero costume are ready!
The trousers of the ancient Russian hero are made of plain fabric. For their cutting, a pattern of any sports pants or bloomers is suitable. We transfer the pattern to the fabric and sew the pants along the side and crotch seams, not forgetting to tuck the bottom of the legs and insert the elastic into the belt.
You can use ready-made sweatpants from knitted fabric dim colors.
Shield and sword for a hero from improvised materials
The weapon makes the outfit more spectacular. As a rule, a do-it-yourself hero costume for a boy is complemented with a shield and a sword.
To make a sword you will need:
Thick cardboard;
Paint in a can;
metal and plastic jewelry;
Glue, scissors.
On thick cardboard we draw a sketch of the future sword. We cut out several parts that we glue together. This will give additional strength to the finished product.

We cover the dried blank of the sword with several layers of spray paint to get a smooth and beautiful colour. When the paint is dry, proceed to decorate the sword.
To decorate the handle, you can take beads, multi-colored plastic or metal rhinestones, colored foil, and more. Decorations are glued in random order on the handle of a cardboard sword.
A shield for a warrior is made light. In Slavic culture, the shape of the shield was simple, more like a circle or an oval. The shield for the hero consists of several parts:
The main part is 2 circles of cardboard. We calculate the diameter of the circle as follows: we measure the length of the arm from the tip of the middle finger to the elbow of the child;
Borders - a cardboard hoop about 3-5 cm wide. The inside of the hoop can be made figured;
Central circle with decoration: dragon head, sun or monogram.
The elements of the cardboard shield for the main part are glued together, then painted and allowed to dry. The border is painted separately, after which it is applied to the main part and glued. Do the same with the central part of the shield. When the shield is ready, an elastic band is glued to it from the inside, which will fix it in the hand.

Working on a hero's costume for a boy, you can give ordinary things a new purpose with your own hands. By connecting fantasy and ingenuity, you can accurately copy all the details from ancient legends. It is important not to overdo it with decorations, because the hero is a rather strict and formidable image.
There are few instructions on how to make a do-it-yourself hero costume. As a guide, you can use the book "Children's Party Costumes" by Olga Kontareva. More "advanced" home masters act without other people's instructions, based on their own ideas about the image. Make a New Year's outfit according to own project very exciting and can be great entertainment for the parents themselves.
As a sketch of a fancy dress, any detailed illustration from a children's book, a picture or even a screen from "Three Heroes" can be accepted. The costume consists of the following elements:
- Pointed helmet with nose protection.
- Mail or scaly shell.
- Shirt with an embroidered border and a high collar.
- Boots with pointed toes.
- Sword and round shield.
Each of these items can be made by hand, without any special financial costs.
Heroic helmet
The headdress of the ancient Russian warrior has a pointed shape, thanks to which the hero's costume begins to claim historical originality. For its manufacture you will need:
- Cardboard.
- Thin braid or cord.
- PVA glue.
- Paint with aluminum powder or "silver" in a spray can.
It is necessary to stock up on tools in the form of sharp scissors or a paper knife, a brush, a stapler and napkins for hands.

The very process of making a heroic helmet is as follows:
- Parts of the future heroic headdress are cut out of cardboard. The parts are glued together according to the allowances on the folds, which, for reliability, should be stapled on the inside.
- In places of "seams", that is, the places where the cardboard joins, it is necessary to start up the braid, laying it out in a neat pattern in the form of a Christmas tree or a wave. The decor will cover the joints.
- Then it is evenly covered with silver paint. For more elegance, the edge of the dress can be painted in gold or black. Metallic sheen to the product will give a transparent nail polish.
Mail and shirt
A New Year's costume of a hero is impossible without chain mail up to the middle of the thigh. You can do it in any of the following ways:
- Any plain knit sweater can be turned into armor. To do this, you need to pull it on the legs of a stool or another shape and cover it with a "silver" from an aerosol can. The resulting chain mail will be light and comfortable, but wearing it can be unpleasant due to the smell.
- A scaly shell can decorate a hero's costume, turning an ordinary warrior into a governor. To create it, cut out the details in the form of a rectangle measuring 1x2 cm with one rounded side. As a material, you can use very thick foil, thin linoleum, the cover of a plastic folder.

The complexity of making chain mail "dragon scales" is that each detail must be dyed, both from the front and from the wrong side. After drying, they are carefully sewn onto a sleeveless jacket made of dense fabric. Rows of scales begin to lead from below in a checkerboard pattern and each next row is laid with an overlap of half the length.
Another bright element is a shirt protruding from under the chain mail skirt by 10-12 cm and decorated with a similar decor.
Boots and pants
A hero costume for a boy is impossible without boots with curved toes or figured tops. You won’t find these in shoe stores, and custom tailoring is very expensive. But from improvised means, you can easily make fabric covers that are worn over ordinary boots or even sneakers. Their production consists of the following steps:
- From a dense fabric, elements of fake boots are cut out according to measurements taken over the shoes. Cutting should be carried out with an allowance of 1 cm.
- Details are sewn on the inside. A piece of cardboard is inserted into the bootleg to preserve the figured edge and fixed with an adhesive cloth.
- The fabric cover is attached to the boot from the inside using clothes hooks or double-sided tape.

The pants of the ancient Russian warrior have a cut of "training pants" and a monochromatic coloring, without patterns and decorations. So you can not pick up a separate thing in the hero’s suit, but get by with ordinary trousers. You can even use part of a school uniform, after smoothing the arrows.
Sword and shield
Fake weapons and equipment will make an outfit for New Year's party more effective. In addition, they can be set aside at any time to participate in active games. As a rule, the hero's costume is supplemented with the following items:
Straight sword in sheath. This item is cut out of a sheet of boxboard and pasted over with paper, after which it is painted. To decorate the handle, you can use rhinestones, beads or pieces of colored plastic.

Light shield. Complex shapes are intended for European knights, and circles and ovals are associated with Slavic warriors. Decorative shield consists of several parts:
- The base is a circle of 2 layers of cardboard. Its diameter is equal to the length from the tip of the middle finger to the elbow of the boy's hand.
- The border is in the form of a hoop 2-3 cm wide. Its inner edge can be figuratively cut.
- The central figure is in the form of a silhouette of the sun, a three-headed dragon or a monogram.
The elements of the shield are pasted over with paper, painted, and only after that they are combined into one whole.
When making a hero's costume with your own hands, you need to give free rein to your imagination and worldly ingenuity, which allows you to give ordinary things a new purpose. And at the same time, it is important not to overdo it with decorations and details. It is important to remember that the hero is a strict male image.
Last year, for the New Year's holiday, I dressed my boys in hero costumes. I didn’t have time to thoroughly create costumes, so the hero’s costume was made “in haste”.
However, in my opinion, it turned out quite well :). And on the New Year Tree, two brothers - heroes looked very interesting. After all, it is not at all necessary to reproduce the entire costume exactly, you can just hint at the image.
Components of the hero's costume:
- Russian folk shirt
- Cloak
- Trousers
- Boots
Shirt
For the shirt you will need:
White or gray cotton fabric (or linen), ribbon for decoration, elastic band, cord or ribbon for a belt, buttons. Cutting a Russian folk shirt is very simple, since the cut details are rectangles of different sizes.I simplified the shirt for this costume as much as possible, because, as I said, there was little time.
Cut details: central part shirts (back + front), and sleeves (2 parts).
In the middle of the central part, you need to cut an oval - the neck, and make a small cut for the fastener.
How to sew:
First you need to combine the middle of the sleeves and the line of the shoulders on the central part (in the figure above - the red dotted line). Sew sleeves to center piece. Then, in one step, sew the side seams (that is, the back with a shelf) and the seams of the sleeves.
Now it remains to process all the slices. Sheathe the bottom of the shirt with braid, tucking the cut of the shirt under the braid.

Bend the bottom of the sleeves twice and topstitch. Insert an elastic band into the hem to pull off the sleeve. And right on top of the hem with an elastic band, I sewed a braid (usually, of course, this is not done, but for a suit that will be worn once or twice, I think it is possible :)). A few centimeters can be left above the seam of the sleeve without braid.

The neck and incision are also sheathed with braid. The cut is bent inward, under the braid.

But, since the cut of the neck is round, you need to bend only 0.5 cm, otherwise the neck will be very tight.

Along the cut, the braid is adjusted 5-10 cm longer than the cut itself, and the bottom of the braid is folded in with a corner.

For fastening - on the one hand, you can weave hinged loops from the threads, on the other hand, sew on buttons.
Belt
For a belt, the simplest thing is to take a cord that matches the color, tie the ends in knots, fluff a little. You can take 3 laces different colors and braid. You can also take a suitable braid.
Cloak
For a raincoat, you will need a piece of scarlet fabric, a golden slanting trim for edging, an elastic band, a large button, a brooch, or the like. - for fastening on the shoulders. Cut the two lower corners of the fabric flap in a semicircle. Fold the bias tape in half and iron along the entire length. Trim the side and bottom side of the cloak with an oblique trim. To do this, we put a piece of fabric inside the oblique inlay, and sew it. In the lower corners, on the rounds, the bias trim needs to be slightly adjusted so that it does not pull the fabric together.
We bend the upper cut twice and adjust. Hem Width = Rib Width + 0.5 cm free. Measure the length of the elastic band according to the child so that the raincoat lies well on the shoulders. Insert the elastic into the hem, and fasten at the ends by hand, or sew on a typewriter.

For a fastener, you can weave a loop from threads on one side of the cloak, and sew on a button on the other. Or immediately, lay one edge on the other and sew, and sew a button or brooch right on top, and simply put it on over your head. We, for example, did just that, it turned out to be more convenient.

It remains only to iron the cloak.
Trousers
Especially without further ado, I just picked the most suitable ones from the available ones. If desired, can be sewn from cotton fabric of a suitable color.Boots
You can also complete the look with boots. To do this, you can take woolen socks or liners from rubber boots. Sheathe them with a matching red cloth. Sew soles from leather or leatherette. Here is the hero's costume! 🙂 One or two evenings - and you're done!


