Thread drawing technique. Nitkography is an unusual painting technique (photo)
Thread printing is a technique that is also called thread drawing. It is based on the sequential filling of the contours of the selected images with the help of laces or thick threads. The history of this type of art originated during the existence of the ancient Indian people Huichol, living in the west and in the center of Mexico. Their main occupations were weaving, embroidery, patterned weaving, beaded needlework. Widespread interesting pictures which were made on the basis of wool yarn. These were round or square planks in the middle of which there was a hole. On both sides of such a base, glue was applied, based on beeswax and pine resin, on top of which wool threads were glued in different color combinations.

Modern paintings created using this method are distinguished by soft, voluminous forms. Nitkography is often used as a developmental activity in kindergarten for children and preschoolers, which allows them to develop their imagination, soothes and attracts them to interesting world arts and crafts.
 This master class will tell you about creating a colorful picture using the nitkography method, which depicts a cat. Based on this tutorial, you can pick up your own schemes and create your own original work, since such drawing with a thread is quite easy to master. Especially this needlework will captivate beginners and children, both at home and in kindergarten.
Necessary materials for work:
- thick cardboard (to create a picture, you can also use a sheet of fiberboard);
- scheme;
- threads of suitable shades (for children it is better to choose bright colors);
- glue;
- scissors;
- toothpick.
We start the master class by transferring the scheme to cardboard or a sheet of fiberboard. Pay special attention to the selection colors threads. In the process of creating such a picture using the nitkography method, any materials can be used in the form of leftover yarn from knitting, colorful acrylic threads, as well as floss, which, in this case, will need to be folded several times beforehand. The main condition is their equal thickness.
Tip for beginners: do not use material that has a non-smooth structure in the initial stages of filamentography. Threads with shaggy or curly components, although they give interesting effect as a result, but they are quite laborious in work.
You can use the construction adhesive used to glue the foam baseboard.


If you decide to involve children in such an activity, study the instructions for the selected glue regarding the ventilation of the premises.
So, using glue, you need to smear the line on the sheet. This can be done with a toothpick or a thin stick. It is much more convenient to do this with these objects than with a brush. So it is much more convenient to coat the glue in hard-to-reach places among the glued threads. Next, on the uncured adhesive base, we begin to carefully glue the thread, step by step, gently pressing it with your fingers. Thus, it is gradually necessary to decompose the material according to the template. The tip of the thread is cut off at the moment when you have reached the moment of making a sharp impossible turn of the thread, or when you need to enter the next shade.


We continue the lesson on studying the technique of nitkography. At the beginning of the process, the contour of a large template is glued, after which it is necessary to proceed to filling the entire space in the middle of the product. Small elements, on the contrary, are initially filled in the inner part and then the outlines are formed.
Try to glue the threads close to one another, without the formation of unnecessary gaps. Only in this way you can get a neat and high-quality product at the output.
In the process of work, there may be such a moment when it will be necessary to replace one color of the material with another. Thanks to a multilayer thick base in the form of cardboard or fiberboard, this will be quite easy to do.
In this master class on the technique of nitkography, we will look at an example of changing one color to another using the example of a cat's tongue. We take a paper knife and cut the desired contour of the surface where you decide to change the shade of the threads. This piece comes off together with the paper layer. On the resulting empty surface we glue the material of the shade you need. These actions can be carried out repeatedly, but carefully, taking into account the remaining layers of cardboard.
When creating the edges of a picture using thread printing, do not trim each of the fibers individually. This operation will not help you save on material. Try to bring the threads beyond the boundaries of the product, and then cut everything with one line. The pile remaining at the edges can be easily hidden in the frame under the baguette.


At the end of the work, try steaming the finished product with an iron through a damp cloth. Such an action will help the threads to cling to one another, and the picture itself using the nitkography technique will look even and beautiful. Here is such a wonderful bright cat, as in the photo, you will get as a result of a simple scheme of actions.
Threadwriting
Another interesting needlework to which children can be attached is thread painting. In this tutorial, we'll show you how to do original craft with your own hands, using an interesting technique in drawing.
The thread-writing technique uses threads of medium thickness. The presented master class will demonstrate the manufacture of colorful flowers, which can later be decorated, showing all your creative qualities.
In order to make a product using the thread-writing technique, prepare the following set of materials and tools:
- album sheets;
- ink or liquid gouache;
- containers where paint can be poured;
- threads;
- cloth and paper napkins.
In the beginning, you need to pour paints of various shades into prepared containers. The next step is to lower the thread into them and, using a spoon, squeeze it out. The second tip is held in the hand. Further, a peculiar pattern of thread is laid out on paper, as in the photo. The second tip should be free. We repeat these steps as many times as necessary, depending on how many flowers you want to make. We do this process at a fast enough pace so that the paint does not have time to dry.
Master class on drawing with gouache-dyed thread step by step photos for children from 6 to 10 years old.
Matveeva Svetlana Nikolaevna, teacher of fine arts, MBOU secondary school No. 9 of the city of Ulyanovsk.
Description: This master class is included in the cycle “Drawing with gouache in an unusual way” and is intended for children from 6 to 10 years old, as well as for teachers, parents and all creative people.
Purpose: interior decoration, handmade gift.
Target: development creativity through the use of non-traditional drawing techniques.
Tasks:
- introduce children to a new drawing technique;
- teach children to draw with gouache;
- learn how to work step by step
- develop fine motor skills of the hands, eye;
- develop creative thinking, imagination and initiative;
- develop a sense of composition;
- to cultivate accuracy in the performance of work;
- educate interest in artistic creativity;
- cause an emotional response to a new way of drawing.
Good afternoon I propose to answer a few questions.
1. What new pictorial and graphic form did Henri Matisse invent? (Decoupage).
2. What is the name of the part of the world in the northern hemisphere of the Earth, where gouache appeared only in the XII century? (Europe).
3. The main tool for applying colorants to canvas, paper or other substrate in painting and graphics, as well as in calligraphy. (Brush).
4. What is the name of a genuine work of art, as opposed to a fake, copy or reproduction in the field of fine arts? (Original).
5. The image on the plane, as well as the type of graphics and the basis of all types of fine art?
(Drawing).
We connect the first letters of the riddles and get the word – DECOR.

Flowers unfading bouquet
Staring out the window from the wall decor
And he reasoned: "I will live a hundred years.
The flowers in the garden will die pretty soon.
Rain and wind are not related to them at all,
And the sun is merciless and cruel.
I have better conditions
Although I live, perhaps, one-sidedly.
I decorate furniture, and houses,
Portals, arches, ceilings and vaults ... "
The scent of lilacs sighed in the garden:
"Unfortunate, he is only a copy of nature ..."
Today again Let's talk about decor.
Decor items- This is a product design. Decor items can be very diverse - ceramics, metal, wood, textiles.

Decor on ceramics

Decor on plaster

Sculptural wall decor

Facade architectural decor

Room interior decor

Decor on the wall - painting

Decor on the wall - fresco

Stucco decoration in ancient Egypt

Wall decor in ancient Rome

Sculptural decoration in ancient Rome

Ancient Roman Colosseum
The decor of objects happens simple or difficult using various techniques and techniques. Painting, painting, ornament, decoupage, embroidery, creating unusual textures with unusual materials(sponge, glue gun, semolina, pasta, threads, etc.), appliqué, print, casting, chasing, burning and others.

Pillow decor

Record decor
It should be noted that the decor creates additional expressiveness, linking together the decorated objects in a harmonious ensemble.

I suggest you check yourself. Presentation "Mysteries of decor".

Today open To you another decorating secret, and learn how to create amazing decorative compositions, which are obtained with the help of ordinary threads dyed with gouache. This type of decor can be used as interior decorations, a handmade gift, as well as when decorating packages, postcards, notebooks, etc.
Required Tools and materials:
white or colored paper A4 format,
- gouache of different colors,
- scissors,
- box lid
- threads,
- a saucer for paint.

And, as always, do not forget a good mood, positive and inspiration!
Progress
We take the lid from the box.

We place a landscape sheet on the lid of the box.
For convenience, you can attach the sheet to the bottom of the lid with adhesive tape.

Next, on a saucer, we dilute the gouache of the color we need with water to the consistency of cream or liquid sour cream. We cut the thread 40-50 cm long.
Helpful advice or hint: you can take threads, both thin and thicker, for example, woolen.

Before starting work, mix the resulting liquid thoroughly until smooth and begin to draw with threads. You can do this in two ways.
First way:
We dip the thread and make an imprint on paper.


Next, dip the threads in different colors and make complex patterns out of them, bend, twist.


Helpful hint or hint: For beginners, it is better to use a short thread so that the hand does not get tired quickly. For experienced ones, you can take a longer thread to get beautiful, more elegant patterns.

We experiment on the same principle with other colors.

We add paints of a different color to the composition in the same way.

We try to mix different colors on one sheet or different colors on colored paper.


Second way:
We place a thread dyed with gouache, bending and twisting, on one half of the sheet. We fold the sheet in half and press it with the palm of our hand. Pull the thread carefully.
Expanding the sheet...
We wait a bit for the paintings to dry.
And finally, the finished paintings are inserted into the frames.


Nitkography for kids
Krutenkova Alena Dmitrievna, teacher additional education, MBOU DOD "House of children's creativity" with. Molchanovo, Tomsk region
Dear colleagues, I bring to your attention the material where you can get acquainted with a powerful and unjustifiably forgotten tool in the visual means of the artist - "nitkography". The word "nitkography" consists of two words: thread and graphics(from “grafo” - “I write”) - a type of fine art that uses lines, strokes as the main visual means ... That is, it turns out, “I write with a thread” or, more simply, “I draw with a thread”.
The main task of the artist - nitkografist: find in the loops and hooks left by the thread on the sheet, images that can be recognized and used in drawings.
the main objective such activities: creating conditions for experimental activities child in the field of mastering the imagery and symbolism of color.
Tasks:
- to teach children to turn to their experience, analyze their feelings, create new meanings and forms;
- to develop the creative potential of children: fantasy and creative thinking;
- to instill artistic skills and aesthetic taste.
Form of organization of activity: individually practical.
The lesson is aimed at an audience of 5 years and above, with no age limit.
For nitkography, we need in large numbers Her Majesty Your Fantasy. What is a fantasy? The generous and brilliant storyteller Viktor Yuzefovich Dragunsky will help us figure this out.
Fantasy
I am a sky climber
I'm climbing the sky
And then from there - time! -
I drop to the ground.
You do not believe? So what...
It's not a lie anyway
And my fantasy.
Her Majesty Fantasy also woke up in my head, and was born little rhyme dedicated to this method of drawing.
Threadography
I want to invite you to create masterpieces -
Draw with ordinary thread.
Here is the image of a wolf, a cat or a lion,
Or maybe a long-nosed owl here?
The mice rustled from under the thread:
- And where are our elegant capes!
A wonderful bird stood on the wing -
Everything spun, went head over heels ...
And thoughts suddenly stirred,
They poured a wonderful song on the sheets,
They wrote a fairy tale for us,
The needle and thread was glorified.
And they are happy to dance on paper,
Fantasy dashing we would wrap around!
To make Her Majesty Your Fantasy come true, you will need the following: materials and tools: paper, gouache, ink or watercolor, pen, brush, threads of different thicknesses, needle, napkins.

So, to business! The technology for performing "nitkography" is extremely simple.

1. We take a white sheet of paper, A-3 format and fold it in half - this option is acceptable for elementary education, and if you get carried away, you can take 2 sheets that are not fastened together. We collect paint on a thread with a brush: we lower the thread into ink, or paint.
2. Randomly lay the thread with paint in loops and zigzags on a sheet of paper.

3. After the thread moistened with paint is laid, it is covered with a second sheet. Both sheets are pressed tightly against each other by hand, and the thread is pulled out by the end.

It is good to use a thick woolen thread - the pile leaves the most intricate silhouettes on paper.

4. Several colors can be threaded on one sheet. They can be intertwined with each other, or they can be printed separately from each other.

5. To create more interesting images, add a needle, with which we pierce the top sheet in the right place, and pull the thread through the hole.

6. After the thread is drawn, you have two mirror copies with intricate designs that can be further refined later.
Each time two identical drawings are obtained. They can be viewed from any angle...


This is an upside down picture...

The same print gives new images.


If you are observant, you will soon be able to deftly control the thread with the needle.
And now I want to tell you a fairy tale, which I composed with pleasure and tell my students in the classroom.Extraordinary Journey of Threads and Needles
Little Princess Thread was sitting and bored in her secret corner. She explored all the expanses of her kingdom, learned how to perform simple and complex seams: from basting details to amazing fine satin stitch embroidery. She wanted something new, unusual. Nanny Fingers never allowed even a step to take without them, but she really wanted independence ...
- What are you doing? - the maid Needle violated her solitude.
“Yes, I miss you,” Princess Thread said sadly.
- Listen, let's go on a trip! - Needle suggested cheerfully and joyfully.
“I would love to,” Nitochka sighed, only nurses and nannies are unlikely to let us go. And where will we go if we never know anything except our kingdom, - Thread said even more sadly and almost with despair.
“Just think,” Needle retorted briskly, “travels are necessary in order to study various countries ... Do you remember how the old Count Klubkov told us a fairy tale about the extraordinary country of Izproiziliya.
- Yes, I remember, but how will we get there, to this country of Izbraziliya?
- Stop whining! - Needle interrupted. - Let's go!
She grabbed Thread by the hand and dragged her along.
- Where are you taking me? Let go of my hand and tell me where we are going.
- Where where? Of course, to grandfather Klubko, - Needle answered with a smile and mischief. - What, hasn’t it reached yet?
- And what if he complains about us to the mothers and nannies? - Thread was still talking in a plaintive voice as she walked, barely keeping up with Needle.
- How do you imagine it? - Needle stopped, as if rooted to the spot. - That such an avid traveler as Count Klub ran to complain? Well, I'm begging you! Does he have nothing else to do?
- You're probably right, - Thread answered in a more cheerful voice. - Let go of my hand. I myself will go to Grandfather Klubka with pleasure.
The friends quickly ran along Pugovichkina Street, turned onto Spitsyn Street and ended up on Kluvochkin Street in front of the count's house.
- Oh, what will we say to Grandfather Klubka? – indecision again seized Thread.
Girl, you are so weird. Of course, we will tell him everything as it is. Come on, follow me!
The needle knocked loudly on the count's door.
-Who is there, - a cheerful, slightly hoarse voice was heard.
- Grandfather Count, it's us, Needle and my friend Thread.
- I'm going, I'm going - grandfather answered. “Well, hello, young princesses. How can I help you?
Hello, Grandfather Ball, - as if spellbound, the girls answered in unison. It was their first time in the count's domain, and they liked the garden and its snow-white castle very much. Knitted columns rose above the trees and flowers. A white gazebo, with lace trim, was buried in a blooming apple tree, in all corners, like a multi-colored carpet, there were all kinds of flowers: chic peonies, arrogant daffodils, beautiful roses. Everything was done in the same style, it was immediately clear that real masters had done their best work here.
- Well, what are we talking about - Grandfather Ball asked with a smile.
- We wanted...
- You know what, let's go into the gazebo, and there we will calmly discuss everything.
Grandpa Ball led the girls into the depths of the garden, to a fabulously beautiful gazebo. He rang a knitted bell, and immediately appeared thin, very graceful, his assistant Spitz.
“Dear Spice, please give us tea with honey and strawberry jam,” Grandfather Tangle ordered.
“Right now,” Spitz replied, and immediately appeared with a knitted tray laden with various dishes. She set a small elegant table, which was in the middle of the gazebo, and quietly left.
“Help yourself, beauties,” suggested Grandpa Ball.
- Thank you, - as in a dream, the girls answered in unison. They began to drink tea infused with rose petals and peppermint with strawberry jam.
- So tasty! Thread admired.
- This is a treat! Needle did not hide her delight. - Grandfather Ball, could you take us to the country of Izveziliyu, which you told us about at the festival of dreamers.
- To the country of Image? - Grandfather Ball asked with cunning. - Why do you need to go there?
“We are tired of sitting in our kingdom, we have already studied all the sciences well and decided to go on an exciting journey to learn something new,” Needle blurted out in one breath.
- Travel? This is cool! And what will Mother Pink Bobbin and dear Pincushion have to say about this?
“We are already five years old, and we ourselves can be responsible for our actions,” Thread, who had been silent until now, said with firmness in her voice.
- Well, since you are so mature and independent, then of course, I will take you to the country of paints and brushes. This is not to be in a distant kingdom, and not beyond seven mountains, but here, nearby, in a neighboring kingdom.
- Hooray! the girls shouted in unison. – When will we go there? they asked impatiently.
- Have you finished your tea? asked Grandfather Klubok.
- Yes, Thanks a lot! We have never had such amazing tea before.
- Do you want supplements?
“No,” Thread and Needle answered in unison.
- Well, then, you can go right now on the path!
“And what do we need to take with us,” Needle did not let up.
- Good mood and a little imagination, - Grandfather Tangle answered.
- Then go! - Nitochka chirped cheerfully and joyfully.
They left the Sewing Kingdom without any obstacles and five minutes later they were standing at the Main Exhibition Square of the country of Image. From the grace and beauty of the exhibited paintings, Thread and Needle felt unaccustomedly dizzy and breathless. They have never seen so many paintings done in various techniques and genres. And how beautiful and believable were the captured moments! The girls, together with Grandfather Klumochok, moved from one picture to another, admiringly examined various historical subjects, portraits of famous people, picturesque landscapes and animalistic genres.
“Do you want to see one of the workshops where such miracles are created,” Grandfather Ball asked.
“Of course,” the girls clapped their hands. – We will look with pleasure at the birth of paintings.
“Then come here,” said grandfather, and the whole company turned onto Inspiration Street. They went into the nearest workshop and witnessed a dispute between two young ladies of Tassels. One of them was thin as a reed, the other was the exact opposite: a very well-fed and wayward lady.
"Interesting," said the chubby Mousefur. - Why do we need skinny people like you?
- We are very much needed in the country of Image. After all, no worthwhile drawing can be completed without us, thin brushes, retorted the Reed Brush.
- Something I doubt - did not stop plump lady. - Look, what a rich smear, it turns out from under my pile.
She quickly sank into a jar of gouache and ran across the snow-white sheet of paper.
- But I leave a thin, barely visible trace.
And the reed brush left a thin, barely visible mark on the sheet.
- And you can try me too, - Nitochka could not stand it and interrupted their argument.
“Maybe I can do something,” Needle said uncertainly.
Both Tassels instantly fixed their eyes on the strange company.
- Who's squeaking here? Haven't you been taught not to interfere in other people's conversations? they said in unison, as if they hadn't noticed the girls.
- Dear ladies! We arrived from the Sewing Kingdom, - grandfather Ball stood up for his wards. These young talents decided to try their hand at a new field.
- Let them try, - Aunt Gouache stood up for Thread and Needle. “I love it when someone comes up with something new,” and she opened her domain to Thread.
- Wow, - Thread was delighted, and lowered her tail into the Yellow paint. But she was so small and light that she could not sink even three millimeters into gouache.
- Come on, come on, - Brushes began to gloat. Let's see what you can do.
“I myself don’t know what I’m capable of,” Thread almost burst into tears.
“Ladies, it’s actually not proper to greet guests from a neighboring kingdom like that,” a snow-white gallant Sheet of paper stood up for Thread and deftly spread out in front of her. “Come on, girl, don’t be shy.
- Forgive us girl, just when my sister and I start to quarrel, the whole world ceases to exist for us. I'll help you pick up paint, - said Tassel Reed guiltily.
She carefully helped Nitochka to dip up to her shoulders in paint. Soft paint caressed Thread's body, tired from the journey. Thread was happy. She got out of the paint and with pleasure spun on a sheet of paper into an unusual shape, but she didn’t know what to do next.
The snow-white leaf felt sorry for the girl, and he gallantly covered her with his second free half.
- Where are you! - Nurses shouted and with force pulled the thread from under the sheet. - We lost our feet, looking for you, and you are lying here calmly, cooling off - they did not let up.
Educator MBOU Kindergarten "Swallow", Sudak, Republic of Crimea
Article "Nitkography as a kind of non-traditional drawing in kindergarten"
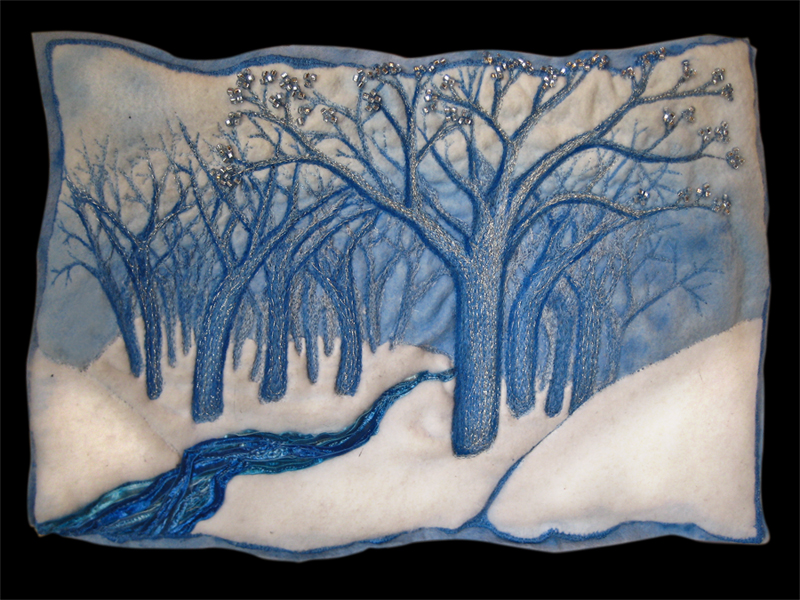
Threadography - an amazing drawing technique, in other words - “drawing with threads”. Using this technique, you can create vivid paintings without the use of brushes and paints, only with the help of threads and glue.Thread printing, as a form of fine art, has its origins in Mexico. Mexican masters create their paintings with ethnic elements from thick woolen threads. The basis for paintings is smeared with a special mixture, which includes pine resin and beeswax, and multi-colored woolen threads are laid out in the form of various patterns.
Drawing with threads allows a person to realize his artistic talent in a simpler form. Due to its low cost, nitkography began to gain popularity in our time. The image made in this technique is voluminous, textured, fascinating andseems "alive", in contrast to the usual contour images.
This drawing technique is accessible even to young children, as it is easy to perform and arouses interest in children. Bright and pleasant to the touch threads have a calming effect on children. Needlework develops children's interest in arts and crafts. Threadography is a wonderful way to improve children's finger skills. This contributes to the development of children's visual perception, imagination, hand-eye coordination, forms smoothness, rhythm and accuracy of movements, and at the same time the child's hand is prepared for writing.
To create pictures from threads you will need simple materials and tools. Usually used in kindergartenthick paper,PVA glue, scissors, a simple pencil or acrylic paints, thin wooden skewer, toothpick or knitting needle.
In order to make "thread drawings", you need to take threads of the same thickness. For convenience, it is better to immediately purchase different colors of the same company. If you use threads of different thicknesses and compositions, then the work will not look smooth, but embossed. The most suitable yarn for thread printing is wool, acrylic thread or floss.
Work with children begins withthe simplest drawings, usually prepared in advance by the educator, but simple patterns children can draw.The drawing is best depicted with a simple pencil. First of all, you need to coat the outline of the entire pattern with glue andglue the thread on the outline of the picture, and then proceed to fill in the entire image.Then smear the base with glue and fill it with threads, in the order of the color idea. The density and direction between the threads can also be any, for example, in a spiral, parallel and close to each other, the main thing is that the space between the threads is not visible.To make the turns of threads lie more evenly, you can use a skewer or a thin stick (toothpick).
After gluing the threads, they must be pressed a little with your hands to the base so that they stick evenly. If something didn’t work out for the child or the turns lay unevenly, you can redo everything by tearing the threads off the smooth surface.
Tohide some of the irregularities formed when laying out the picture,you can iron it with a slightly heated iron, covering the pattern with a wet, light-colored cloth or gauze.
Such paintings are best placed in a frame without glass or framed with a passe-partout so that you can feel the bulge of the image by touch.
Pictures in the technique of nitkography, made by the hands of children, are unique and carry a unique positive energy.
In our time, it is very common to believe that a person who does not have a hobby is absolutely unhappy. That is why the lessons of grandmothers in knitting, mothers in embroidery, grandfathers in wood carving and dads in burning are often remembered. All this creativity, which helps not only to distract from everyday difficulties. For some, this is a real way to make money. The uniqueness of crafts self made brings them special value. Today we will consider one of the techniques that will allow you to create real masterpieces.
The uniqueness of the patterns created by the thread
Nitkography - drawing with threads, this is an unconventional technique. With its help, you can create unique crafts that will not have competition, since everything will depend only on the author's imagination. True, for every artist who will use this technique, the pictures will be the most diverse. After all, the images that he will create on paper by drawing with thread and paint will be absolutely unique not only in the executed style, but also in what the artist could see in this image.
Nitkography for kids
Most often, this technique is used in the classroom in kindergartens. Drawing with threads helps children not only develop imaginative thinking, have a creative approach to some non-traditional situations. Such art also requires perseverance, helping young artists learn to control their fingers. And besides this, each masterpiece created by a child becomes absolutely unique and inimitable, because a child's, not yet tempted fantasy is included in the work.
Basic Tools
So, the thread drawing technique itself is quite simple, it requires a little skill and a lot of imagination. What do you need to work? A sheet of thick white paper, you can from the album. Someone prefers smooth ones, since the drawing lies more evenly on them, someone seeks to expand the scope for the possibilities of their imagination and uses rough paper. Next, you need a thread. You can take a few to try on a separate sheet, how the paint left by them lays down, and then choose what you like. And, of course, the paint itself. For starters, it may be the cheapest watercolor or gouache. When the technique of drawing with a thread is sufficiently mastered, it will be possible to purchase more expensive materials to create real masterpieces. You will also need dishes in which the thread itself will be painted.
For a more even coloring of the thread, it is better not to take disposable tableware. An uneven bottom surface can disrupt the structure of the thread, causing the pattern to become sloppy. A brush will also come in handy, with which the miracle thread will absorb paint. And in order not to breed a mess on the table, a box for used threads. It is worth stacking them without mixing colors. It is not recommended to throw them away, it will be clear later why.
Let's start creating a unique picture
To work, cut the thread into small, 30-40 centimeters, segments. To start this perfect size. Lay the thread in a bowl for dyeing. Be sure to bring the ends of the threads out so that they remain clean. Choose your favorite color. You can create your own shade by mixing paints. With a brush, apply paint to the thread, trying to soak it as best as possible.
Next, fold the sheet to grind. For dry tips, pull the thread out of the container with paint and, as fantasy tells, spread it on one side of a sheet of paper. You can use two at once, but this requires a good skill, because if the sheet is bent, the thread can move out and ruin the drawing. You can lay out in circles, loops, zigzags - as your imagination works. Pull dry ends down the sheet. With the other side of the sheet, cover the part on which the thread with paint is laid out. Press the sheet firmly, for example, with a book, gently pull the thread outward by the dry ends.
Depending on how the thread is pulled out, a different pattern will be obtained. You can pull both ends at once, you can only pull one, pull smoothly or sharply in turn. Unfold the sheet and carefully look at what happened. And it turns out a mirror image of fantastic lines.
Drawing an image
Children immediately begin to see in them the most incredible images. All they have to do is fill in the missing details. To do this, you can use the same paints, pencils, crayons and felt-tip pens. Looking at how children widely use their inner capabilities, one can recall that once upon a time everyone had such a potential. That is why it is recommended that adults not only teach children the technique of drawing with thread and paint, but also join them themselves in order to reawaken their dormant imagination. In addition, over time, adults get used to performing the main type of their work mechanically, which hinders the development of not only creativity, but also the motor skills of movements. When using this technique, the brain will have to use those parts of itself that have long ceased to respond to the outside world - parts that are responsible for the joy of creativity.
We bring variety with different threads
You can diversify the technique of drawing with a thread using yarn of various textures. For example, a thin and even thread such as iris or floss will give the pattern delicate and graceful lines. Yarn made of wool or acrylic will give volume and brightness. Only use them at the same time will not work because of the different thickness. You will have to do the drawing in several stages, always waiting for the previous layer to dry. Drawing is more convenient for young children or older people whose fingers do not have very good sensitivity. However, do not neglect the finer work. It is always worth improving in drawing with the help of threads and paints.
colorful choice

With paints, you can also do some experiments. It is very interesting to watch children who know absolutely nothing about color harmony, but confidently dye threads with one color, then another, achieving unrealistic results. It's just amazing what a variety of illustrations are obtained in the end. An adult, creating his creation, will have to think about the combination of colors in order to personal example to teach a child not just to stain paper with different colors, but to make images that are pleasing to the eye.
Drawing flowers with threads is very popular. To do this, it is worth keeping in mind an approximate version of the picture, which should be the result. Thread drawing technique provides various options drawing. You can dye a thread in one color, you can use two or more, you just have to take into account that when drawing a certain picture, it already makes sense to select colors accordingly desired result. Flowers are drawn by laying out the thread with loops. Depending on the expected result, the threads are pulled down, to the sides, or stretched and then pulled out on one side. This thread drawing technique helps to realize your fantasies. in an unusual way. Here it is possible to experiment not only with the form, but also with the color. Overlapping each other, the colors take on absolutely incredible shades, which are sometimes simply impossible to predict.
Thus, you can draw a whole picture, and then draw it, as fantasy tells you. And you can cut out individual petals and make an application out of them. Such works are often used in the classroom in the lower grades. high school. They help not only to develop imagination, but also accuracy.
pattern decoration
When the drawing is completely ready, it can be decorated using unconventional technique thread drawing. For this technique, you will additionally need transparent glue, a thin stick (you can use a toothpick or the back of the brush), scissors, dyed and dried threads with which the picture was drawn. You can just take threads of different colors.
Sort the threads by color. Cut them into small pieces, literally a few millimeters. Put in different containers. Next, you should carefully look at the drawing and decide which part should be decorated with such a drawing using threads cut into small pieces. Spread these places with a brush with glue and pour on them segments of those shades that fit this fragment of the picture. With a toothpick or the other side of the brush, correct the threads that lay unevenly or went beyond the border of the pattern. For a stronger fixation, fragments with cut threads can be additionally covered with glue on top. This will give the application a gloss. But if you want the drawing to look more voluminous, then you should leave it as it is.
Pictures from multi-colored threads

Drawing with threads can be not only using paint. Unusual pictures can be created using leftover threads after knitting or embroidery. Nitkography includes several more techniques. For one of them you need: cardboard or a piece of fiberboard, a pencil, transparent glue, brushes, scissors, threads, a stick. A drawing is drawn on cardboard. Next, a contour is drawn on it with glue, a thread is laid out on it, which will highlight the pattern. And again, everything depends on the imagination - the thickness of the threads, and the color, and the pattern, and the ornament. We apply glue with a brush, put a thread on it with a stick, trying not to leave gaps, tightly and evenly. The result is a unique masterpiece, which remains ironed and framed.
Isothread technique
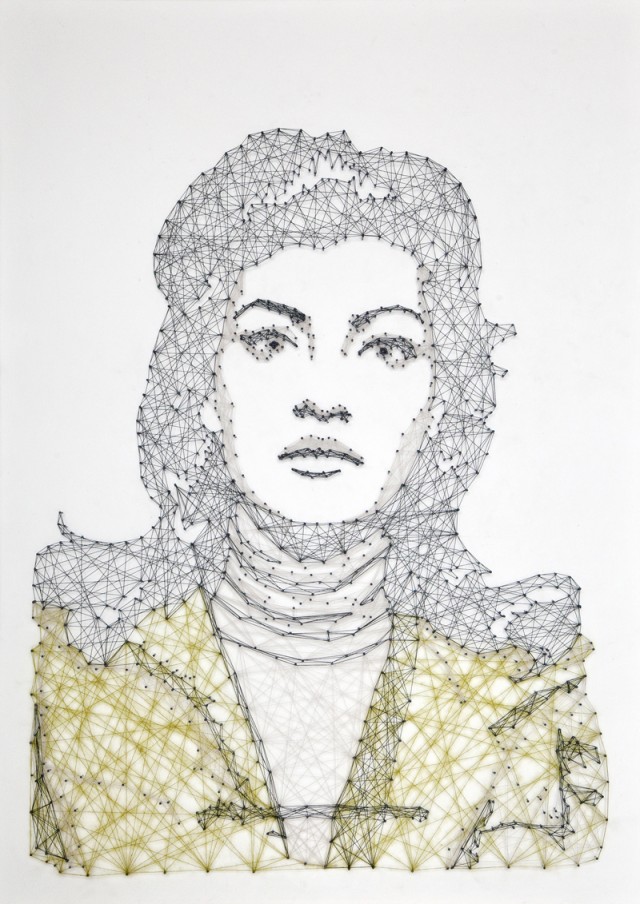
unconventional drawing threads is also possible in the technique of isothread. This technique is more complex not only in equipment, but also in execution. For it, you will need not only cardboard and glue, but also an awl, foam plastic, a special board with holes or nails, a needle with a wide eye, a bag or file for the substrate, an awl, as well as diagrams with numbers that will be used to create crafts.
Isothread embroidery

The first way to work with isothread is very similar to embroidery. A drawing is applied to the cardboard with a pencil or felt-tip pen. Then holes are pierced with an awl, according to the chosen scheme. Holes must be numbered to get a specific pattern. For greater clarity, you can draw it with a simple pencil on the back. Then it will be clearly seen what should be the result.
When the basic preparation is completed, you need to choose a needle with a wide eye, threads that will be used for this craft, and get to work. From the inside we make loops, from the face we embroider a pattern. Mastery is always comprehended from simple to complex. This technique is no exception. Do not rush to move on to complex processes. Do not overtighten the thread or leave it loose. The force of pulling the thread greatly affects the aesthetic appearance of the craft. From various elements embroidered in this way, you can create unique paintings.
Volumetric crafts
Another technique for working with isothread involves stretching it between numbered studs inserted into the holes of a special board in the form of a figure. To begin with, the thread is lowered into the glue and soaked in it. A file or a plastic bag is placed on the board. Nails or special building rivets are inserted into holes specially made in the board according to a certain pattern. Building rivets are safer and more convenient to use. A thread impregnated with glue is wound on them.
The product can be made voluminous if you do not press it tightly against the board. You can not pull the thread too much, so that inside the figure there is an impression of some kind of chaotic fullness. The finished figure must be left on the carnations until completely dry. When it dries, it can be removed from the carnations and used as a separate toy, or as an element of a certain picture.
The final chord in the work on the masterpiece

Crafts must be framed. Without them, any masterpiece looks like nothing more than a piece of paper with threads. IN Lately homemade frames from baguettes are very popular. Color-matched to the interior and picture and carefully made, they can compete with real rich frames, and weigh much less, which makes them much more convenient to use and transport.

All the techniques listed here have the possibility of a separate existence. They can be worked out and developed each separately, brought to perfection, creating masterpieces that will be a great decoration for your home or an unforgettable gift for friends. You can combine techniques with each other. Then these crafts will become even more original and unique.
If there are children in the house, this will be a wonderful workout for them and for fine motor skills, and for the development of the imagination, and for the aesthetic and labor education. And most importantly, children will feel like they are a part of something meaningful, creating decoration for their room together with their parents.
paintings on the wall abstraction print on canvas posters.com.ua print posters


