Do-it-yourself topiary for your birthday. How to make a do-it-yourself topiary with satin ribbon decor, step-by-step photos of creating topiary using different techniques for creating flowers
You can easily update the interior of the room, bring notes of dreaminess and tenderness into it - by making a do-it-yourself topiary for beginners from natural or decorative materials. You will have to work a little on the tree of happiness, but the result is definitely worth it. The craft will perfectly decorate any room, will become a good gift for a holiday for a friend or relative. For newlyweds, you can make a Bird's Nest topiary - a real tree of happiness, symbolizing a cozy family nest. It is not necessary to act on a grand scale and make a large topiary - small topiaries look no less decorative, and will fit on any shelf or desktop.
You can easily update the interior of the room, add notes of dreaminess and tenderness to it - by making a do-it-yourself topiary
Initially, figuratively trimmed trees and green shrubs in the yards of wealthy people were called topiaries. Over time, this art has changed. Now everyone can decorate their home with such cute decor. The size of a tree often does not exceed half a meter, and the variety of its shapes, colors and materials used to make it is almost limitless - at home they are made step by step from fabric and banknotes, coins and coffee beans, autumn leaves and dried flowers, even sweets and chocolates - everything do not list. See examples of topiary in the gallery below.
To create this craft, modern needlewomen use almost everything.
Here is just a small list of the most popular items for decoration:
- Artificial flowers from foamiram, satin and rapeseed ribbons, salt dough, plastic, napkins, organza and so on.
- Decorative berries, twigs, leaves.
- Large and small beads, beads, buttons.
- Coins of various denominations.
- Souvenir paper money.
- Old gears, bolts, scissors and other small tools.
- Thread pom-poms.
- Balls for decorating Christmas trees.
- Paper squares and more.
Synthetic little things, of course, make it possible to make topiaries of delightful beauty that do not lose their appearance for a long time, retaining their attractiveness for many years. But no less interesting are products made from natural, natural materials, such as:
- Cones, chestnuts, nuts, pistachio shells, acorns.
- Sea pebbles, shells, sand.
- Dried slices of citrus fruits, roses made from their peels.
- Rowan berries, physalis inflorescences, yellow leaves of any trees.
- Coffee beans, cinnamon sticks, star anise, cloves and other herbs.
The choice remains only with the needlewoman and her imagination. In each craft, no matter what it is made of, there is a special sincerity and warmth that fills the interior with harmony.
Gallery: do-it-yourself topiary (25 photos)


Classic tree of happiness: master class (video)
How to make the easiest do-it-yourself bead topiary: instructions
Of the many options, the wish tree made of beads or imitation pearls is undoubtedly the easiest to execute. Consider detailed wizard class to create it.

It turns out very nice
What you need to have:
- Foam base ball.
- A bunch of beads, pearls of one or more colors. In needlework stores, you can buy several low beads at once, so as not to glue them one by one.
- Two pieces of strong steel wire of the desired length, to which the depth of the pot and half the diameter of the ball are added, since the stem of the tree will enter the base by half, and into the pot - to the very bottom.
- Satin ribbons, preferably thin, matching the main colors.
- Satin roses, a little felt to decorate the bottom of the pot.
- Corrugated paper, organza, satin or rapeseed ribbon of medium thickness.
- fast drying adhesive or glue gun.
- Stones for filling the pot, gypsum for pouring.
- Paint and pebbles for decorating the ground.
- Plastic pot.
Let's start making the simplest wish tree
- We start by making holes in the ball for attaching steel wires, trying them on. We wrap the flight wire so that at the top it is close to the ball, and at the bottom - 5 cm below the expected ground height. Put aside.
- Then we take a low bead and carefully, starting from the very top exactly above the holes for the trunk, fasten the first bead. Then we apply transparent glue in stages and immediately fix the beads without removing them from the thread. When only a couple of three turns remain before the holes, we insert the wires for the barrel, preliminarily lubricating them with plenty of glue, and finish the winding, tightly closing the entire ball.
- Let's start working on the pot. We wrap it with corrugated paper, cover it with organza on top and grab it with tape. We glue the joints. At the bottom we glue a circle of felt.
- Now planting a tree. First, put the stem in the pot. We fall asleep pebbles and immediately fill it with prepared gypsum. Please note that gypsum expands when it dries, so do not fill it to the very top, leave some space. It will dry out within a few minutes.
- It remains only to decorate at your own discretion the ball itself, its bottom and the surface of the gypsum in the pot. It's so simple, beauty is created with your own hands.

Options may vary
Tip for a beginner: when making, it is most convenient to use a heat gun. The glue in it is always transparent, dries very quickly and holds securely.
Topiary from natural materials: a step-by-step master class
Beginning needlewomen can also easily cope with working on a tree made of cones, acorns, chestnuts, walnuts or hazelnuts. This is a great idea for a lesson with a child, allowing you to teach your baby to see beauty even in the most ordinary and simple things. In addition, many children love to collect such things while walking on the street. For the stem, you can even take an ordinary twig, which will give even more naturalness, environmental friendliness.

Beginning needlewomen can also easily cope with working on a tree of cones, acorns, chestnuts, walnuts or hazelnuts.
What you need:
- Styrofoam ball for the base.
- Cones, chestnuts or other nuts.
- Wire or strong twig for the trunk.
- A container in which we will plant a tree.
- Stones and plaster.
- Glue gun or dragon type glue.
- Acrylic colorless varnish, available in hardware stores.
- Decorations on request.
How to make a topiary from cones
As in the previous MK, first of all we pierce a hole under the barrel, try it on and decorate it. If you took a simple branch, then you can leave it unchanged.
- We take the base and glue the selected nuts or cones on it, tightly attaching them next to each other.
- Shortly before the end of the work, we insert the barrel into the hole and finish the ball. If you cover pine cones with artificial snow, then a wonderful New Year's option will come out.
- Chestnuts and acorns complement perfectly autumn leaves. And walnuts and hazelnuts look better if they are combined together and decorated with bright rowan berries.
- The last step is planting a tree in a prepared container, for example, a brown flower pot would be very appropriate here.
Newbie Tip: Finished walnut craft should be coated for durability acrylic varnish or paint. Best suited gold and silver colors.
Memories of the sea or what to do with shells brought from vacation
The craft made of shells and burlap with elements of twine looks very aesthetically pleasing. She will embody the dreams of a new trip to the endless sea. Reminds me of a good time. And the collected gifts of the deep sea will not lie idle.
For marine topiary you need:
- Foam base: balloon or heart.
- Porcelain white or transparent cup, vase, glass.
- Steel wire.
- Thermal gun.
- Shells, sea pebbles.
- Pearls are artificial.
- Burlap, twine.
- Gypsum or pebbles to fill the container.

A craft made of shells and burlap with twine elements looks very aesthetically pleasing.
Detailed instructions for creating a simple and straightforward:
- We determine the center of the base and make the usual hole for the trunk. We try on the wire, decorate it with twine, put it aside for a while.
- We carefully and accurately glue the foam base with shells, pebbles and pearls in random order. We make flowers, simple or lush bows from twine. We cling them between the main details. We insert the finished trunk into place and draw up the bottom of the base.
- We place the craft in a cup or a vase, fill it with plaster. We sprinkle the gypsum that has not yet hardened with sea or decorative sand. We decorate the container with several turns of twine. Another option is to wrap it completely with burlap and fasten it with a satin ribbon in pastel, light colors.
- If there is no desire to use gypsum, and the topiary itself is small in size and weight, it is preferable to plant it in a transparent glass or cup, filling it with the remaining pebbles and shells. Thus, a delicate decorative element is obtained, which at any time will remind you of summer holiday, charged with positive and energy.
Topiary ("tree of happiness", "European tree") is a small decorative tree that decorates interiors and exteriors, and is also often used for. Topiaries are good because they look very beautiful, and you can make them with your own hands in just 1 evening from improvised materials.
- This means that you can make several decorations at once, for example, one pair for New Year's serving, another for Easter, and a couple more for the mantelpiece.
In this material you will find 1 basic instruction on how to make a do-it-yourself topiary for beginners, as well as 3 step by step master class in addition to it, and 45 photo ideas for inspiration.
Basic instruction for beginners
Topiaries of even the most complex design are made according to approximately the same principle. Having mastered the basic manufacturing technology, you can create a variety of topiary, changing only the materials for decoration.
So, to make a mini-tree with your own hands, you will need to create it:
- Crown;
- Trunk;
- The base of the tree.
Step 1. Design planning
Topiary can be different not only in design, but also in terms of service life. Before starting work, think about why you need a “tree of happiness” and where will it live? The purpose and future place of the topiary will determine its style, color scheme and even materials for its creation.
If you want to make topiary for, then materials that are not too durable can be used - paper, napkins, sweets, fresh flowers, fruits. If you want to make a topiary as a gift or for interior decoration, then it is better to use a more reliable decor - cones, artificial flowers, coffee beans, ribbons, organza, etc.
In the next selection of photos, you can get design ideas for themed and festive topiaries.

Sweet candy topiary for a children's party

Halloween decoration with potted candy

Halloween decorations from pumpkin seeds, ribbons and sweets in tea cans

Easter trees made from eggs, artificial flowers, satin ribbons and moss

Christmas topiary from artificial leaves and holly berries, cones and ribbons with a stem from a branch

Candy tree for holiday table

Topiary for festive serving table made of artificial flowers, natural branches, dry moss and satin ribbons


And here is a selection of photo examples of the design of exclusively interior topiary (scroll through!).


Step 2. Prepare materials
To make a topiary with your own hands, you will need:
- Styrofoam ball with a diameter of 8-12 cm(available at many stationery and art stores) or floral foam ball (available at gardening and flower shops).

If desired, the ball can be made independently from polystyrene foam, the same floral foam, polyurethane foam, papier-mâché, etc. However, the base of the crown can be not only in the shape of a ball, but also in the form of a heart, a star, a number, a letter, an animal figurine and etc.
- Crown decor - depending on your idea, use flowers, satin ribbons, organza, coffee beans, banknotes, etc.
- Trunk - it can be made from a dry and clean branch, a simple pencil or any other stick. In addition, a tall candlestick can replace the trunk and pot.
- Barrel decor- the trunk can be at least covered with a matte varnish or painted. And as a maximum - wrap one or two tapes.
- Planter - It is most convenient to pour the mixture into a clay pot, but any pretty cups, mugs, vintage buckets, etc. will also work.
- Fixing mixture- it is best to make a do-it-yourself topiary with a mixture of alabaster, as it quickly hardens, almost does not crack and is cheap. You can also use cement-sand mortar, gypsum or putty. However, not only binder mixtures can fix a tree in a pot, but also the same foam, floral foam or stones.
- Everything for mixing- container, water, stick, etc.
- Decor for masking the fixing mixture- to create an imitation of soil cover, it is best to use natural materials: dry moss, small pebbles, expanded clay, sisal fiber. Artificial moss and stones are also suitable. In the pots of "edible" topiary, you can put sweets and dragees.
- Glue gun and some glue sticks- if necessary, it can be replaced with glue like "Moment", but it's best not to do this, since the glue in the gun is more convenient, and most importantly, it allows you to remove random "cobwebs".
- Scissors or cutter.
- Tailor's studs with a very small head(optional, used in addition to or instead of glue, for example, for fastening beads).
- Side cutters or nippers for cutting the trunk or any decorative elements.
On preparatory stage divide the decorative details for the crown into groups - for example, large, medium and small. So it will be more convenient for you to alternate the decor and distribute it evenly over the ball.
Step 3Create the Crown
First, you need to mark the ball - mark the place for attaching the trunk and mark the border around it, beyond which you do not need to go for some time, sticking the decor. Thanks to this technique, in the future you can easily fix the barrel in the ball without ruining the decor.

As soon as the glue warms up, proceed to the design of the ball in the following order: “trying on” the part without glue - applying glue to the right place - fixing the part. Remember that you need to act quickly so that the glue does not have time to soak into the foam. That is why the decor is better to apply and try on first.

Here are a few more nuances:
- You need to stick the decor on the ball, starting with large elements and ending with small ones. For example, if you are making artificial flower topiary, first glue the largest buds on the ball, then the medium ones, and only then the small flowers and additional beads.
- Some decor can be attached to the ball with tailor's studs. But it is best to combine carnations with glue.
- If some details have wire bases (for example, the same artificial flowers), then about 2 cm should be left from their “tails”. Then you can not only glue the decor, but also stick it into the ball.
- To make the white base ball less noticeable in the gaps between the glued parts, it can be painted to match the decor.
Now we need to work with the trunk. As already mentioned, making it with your own hands is not at all difficult from a branch, pencil or any stick.
If you use a branch, then you can not paint it, but only cover it with a matte varnish so that it is visible natural beauty tree. If you use a wooden stick, then it can only be slightly tinted, artificially aged, etc. If you want to completely mask the surface of the trunk, then you can wrap satin ribbons, fabric, paper, rope around it, or completely paint it.
What length should it be? Since the barrel deepens both into the pot and into the ball, its length can be calculated using the following formula:
- Stem length = 1/3 ball diameter + pot height + desired stem length between crown and pot.
To fix the barrel, you need to make a hole in the ball with a depth of about 2-3 cm at the marking site with an awl and a knife (depending on its size). When the hole is ready, fill its bottom with hot glue and put the crown on the trunk until it stops. Then continue to hold the barrel and gradually fill the hole with glue around the barrel.

- Keep in mind that the hot glue will melt the styrofoam and deepen the hole even more. To prevent the trunk from going deeper into the crown by more than 1/3 of its diameter, small pieces of paper can be laid between the layers of glue.
As soon as the barrel is fixed in the ball, mask the attachment point with decor.
Step 5. Prepare the binder mixture and fix the tree in the pot
It's time to "plant" the resulting tree in a pot. For this you need:
- Stepping back from the edge of the pot about 2.5 cm, put a mark - the mixture will be poured to this level. If there is a hole in the bottom of the pot, you need to cover it with tape or hot glue.

- Dilute the mixture according to the manufacturer's instructions and fill the pot with it.
- Align and fix the topiary in the pot, holding its stem until the mixture hardens.
- Leave the mixture overnight or overnight until completely dry.

Hint: As already noted, it is best to use alabaster as a binder mixture. To fill 1 medium pot, it is necessary to dilute approximately 1 kg of alabaster with 600 ml of water. The mixture is kneaded for about 1-2 minutes until the consistency of thick sour cream, and then quickly poured into a pot and the topiary is fixed in it for 2-3 minutes.
Hooray! The topiary is almost ready, it remains only to create an imitation of soil in a pot and mask the fixing mixture. If you are using sisal fiber (see photo), shells, artificial grass or moss, then they need to be fixed with a small amount of glue.

Master class 1. Corrugated paper topiary
Topiary with paper flowers is especially suitable for decorating a festive table or festive interior decoration. So, for example, this rose topiary was made for Valentine's Day.

Materials:
- Base ball with a diameter of 12 cm;
- Corrugated (crepe paper) of medium density (corrugated paper in the form of a tape is used in the master class, but you can use regular rolls);
- Floral foam bars and/or any fixative mixture (see basic instructions);
- Planter or flowerpot for the base of the topiary;
- The trunk is about 30 cm long;
- Dry moss for pot decor;
- Ribbon for decorating the trunk;
- Glue gun.
Step 1. Cut corrugated paper into strips 60 cm long and about 4.5-5 cm wide. If the paper is too thick and hard, remember the strips a little to make them more plastic.
Step 2. Now you need to roll the resulting ribbons into rosebuds. This is done very simply, just a couple of workouts and the principle becomes clear. Take one of the resulting paper tapes and turn it 1/3 as shown in the photo below.

Then fold one end of the ribbon diagonally at a 45-degree angle and start rolling it into a roll. After three turns, you will get the core of the bud. Now wrap the free end to the outside, and continue to turn the core of the rose - voila, you have the first petal.


Step 4. Once the crown is completely covered with roses, attach the stem to it (see Basic Instructions). IN this master class the barrel was pre-painted with white spray paint.


Step 6 Lay dry moss on the "soil" and glue it in some places with hot glue. And finally, tie a bow on the trunk.

The following selection of photos presents other topiary design ideas that you can do with your own hands according to this master class, not only from corrugated paper, but also from satin ribbons, tissue paper, etc.


By the way, not only roses can be made from paper, but also lush peonies or hydrangeas. Methods for making such flowers are easy to find on the Internet.
Ribbon topiary is one of the most popular handmade gifts. Not a single master class is devoted to how to create a beautiful tree with such an elegant, cute crown with your own hands. Flowers are usually made from ribbons, more often roses, which become the main detail of the topiary.
In order for the crown to be a scattering of delicate roses, you need to make at least ten of these flowers.

Making roses from ribbons step by step:
- Take the tape so that the wrong side looks at you;
- Start twisting the left edge in the direction from left to right, getting a column;
- Twist almost to the end, so that a small triangle with a side of 2 cm remains;
- Now you need to twist the rosette itself, hold the base of the flower with your left hand, and turn the ribbon away from you with your right hand, while bending it;
- With your left hand, thumb and forefinger, hold the rosette by the base, twist it counterclockwise, and right hand bend the top edge of the tapes away from you;
- When the rosette is formed, bend the end of the ribbon, connect it to the base;

In this case, the main thing is dexterity, the first couple of roses with your own hands may not be obtained immediately, and then the work will resemble a conveyor belt.
How to make roses for topiary (MK video)
Do-it-yourself topiary from ribbons: flowers, master class No. 2
You can also make flowers with petals outward, like chamomile. If you are making ribbon topiary for some joyful event, maybe for a child or teenage girl's birthday, this master class will be just right for the topic.

Step by step instructions:
- Take satin ribbons different colors, you can even with a pattern;
- Cut the tape into equal lengths;
- From two circles of felt, you can make the base of the flower;
- Bend one piece of tape in half, and insert the two open ends into the middle between the felt circles;
- Do this with each petal, and you can fix it in the felt core with a thermal gun or simply flash it;
- Petals can be multi-colored or plain, it all depends on what kind of topiary you want to end up with.

An alternative MK will show you how else you can make flowers for a topiary.
Flowers from ribbons for topiary (photo master class step by step)


Such a flower can become a bright highlight in your topiary, the rest of the elements can be made simpler.
Topiary from ribbons: how to make a sunflower
This MK also involves many variations. Most often it is a combination of materials, such as ribbons and coffee beans. This DIY option is probably the most popular.
It is not so difficult to make it. You will need a yellow satin ribbon, wide enough. From it you must cut at least 20 identical petals. So that the fabric does not crumble, it will have to be melted over the flame, but only together with the fasteners.
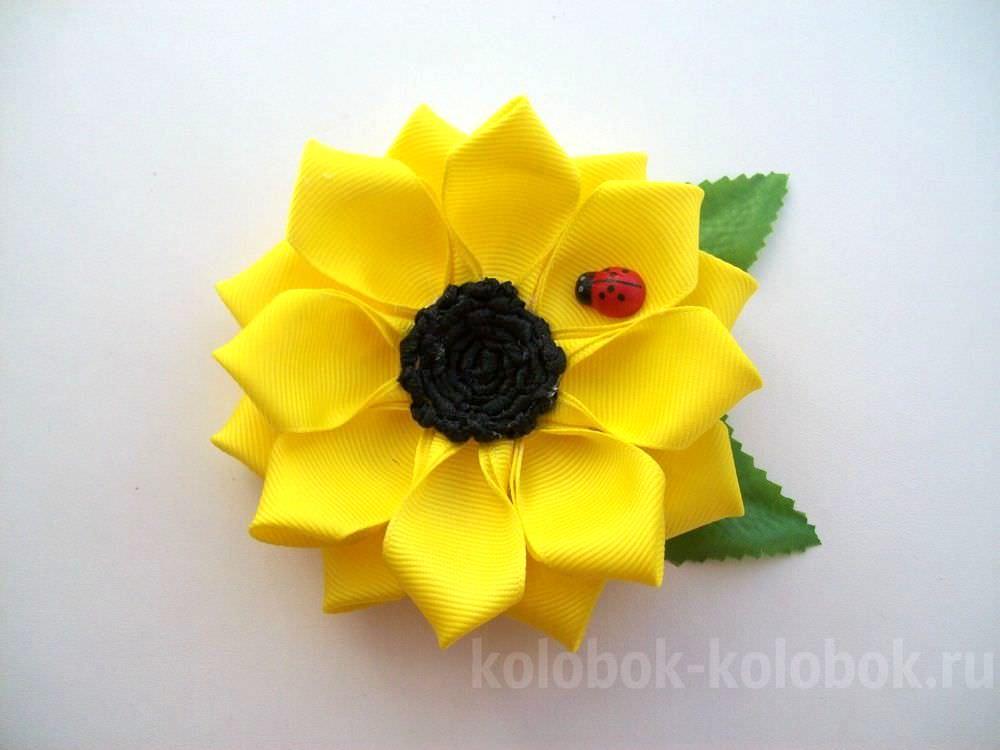
The fact is that you do not just cut out oval petals, everything is a little trickier.
To make a sunflower petal, you need:
- Take a segment 15 cm long, bend it in half;
- Bend so that when the ends are connected, a loop is obtained;
- When melting, the ends will not only not crumble, they will also be fastened together.

You make the core with your own hands from coffee beans. You can stick them on some kind of solid base like the same felt or ordinary cardboard.
Do-it-yourself sunflower from ribbons (MK video)
Topiary from ribbons: a master class from start to finish
So, it's time to use flower blanks, and finally, make this souvenir flowering tree.
Having collected all the materials together, you can start by making the base for the crown. Let's say you decide not to make this base ball with your own hands, but to use a foam blank. Great, save time. But if there was no such blank, take the most ordinary newspapers, threads and glue. Make a newspaper lump, weight it with glue, wrap it with thread until it looks like a ball. The base is ready!

- A newspaper ball needs to be painted to match the color of your roses, daisies, etc .;
- In one of the places of the ball, make a hole for the barrel;
- You can insert the barrel into the ball immediately, fix the branch or stick with hot glue;
- Hold the barrel in the ball for some time, do not let go until it “grabs” well;
- Now this whole structure can be decorated - wrap the trunk with a satin ribbon or decorative braid, without breaking out of the general color scheme;
- Fix the ends of the tape or braid with glue;
- It's time to attach the flowers, hot glue and a thermal gun will help to do this carefully, attach so that the gaps are not visible as much as possible;
- It turned out a trunk with a crown that needs to be planted somewhere;
- You can buy a beautiful flowerpot in a flower shop, and you don’t have to do anything yourself;
- You can also decorate any container - wrap a cup or glass with lace ribbons or crepe paper, paint it with acrylic paints, wrap it with knitting threads to match the crown, etc.;
- Now pour the gypsum solution into the pot and lower the tree there, hold until it stands firmly and evenly in the gypsum;
- Only the finishing decor remains - decorate the top layer of gypsum with transparent artificial pebbles that shimmer so beautifully in the sun.

On one of the flowers you can plant a figurine ladybug or a butterfly. Everything is ready, you have made a delicate topiary from satin ribbons with your own hands, worthy of a gift and best decor girl's room.
Topiary from ribbons: do it step by step (video)
Remember that the topiary is considered the tree of happiness, which means that by growing a tree in such a handicraft way, you create. And any creative work is connected with thoughts, desires, spiritual forces. Make a wish, and your tree may help materialize it.
Topiary from ribbons (photo)


There are a myriad of types of modern needlework. So, a fascinating activity, thanks to which amazing souvenirs are born, is the topiary technique. Miniature flower trees made of iridescent satin will become great gift colleague, friend or relative.
How to make a do-it-yourself topiary
Today, the technique is used to decorate a room and create souvenirs, and earlier this art consisted in giving garden plants clear geometric shapes. This type of needlework gained particular popularity with the use of satin ribbons, but they alone are for beautiful crafts not enough. Intricate trees and flower arrangements of spherical shapes are decorated with beads, buttons, beads and other elements, often decorated with pieces of organza or tulle. Craftswomen do not miss the opportunity to experiment, creating new master classes.
The main rule in the manufacture of topiary is that the proportions of the product should not change depending on the size: for example, the crown of a tree should exceed the size of the blank to which the trunk is attached. But the capacity of the container in which your tree will "grow" should not be more than the average size of the crown. The height of the craft should be made such that it is equal to three diameters of the spherical crown. The container for the satin product should be weighted so that the structure does not tip over.
How to make a do-it-yourself ribbon topiary with roses
To create a beautiful tree, you need to have the following tools:
- decorative pot or cup;
- satin ribbons of different shades, each should be 2.5 cm wide;
- foam ball;
- wire for trunks and ribbons to decorate them;
- decorative beads:
- glue gun;
- gypsum and water solution.
A master class that will help every beginner needlework lover to make a tree with their own hands:
- Prepare the ribbons, which will then turn into roses. Cut each into strips 30-40 cm long, depending on what size flower you want. Scorch the edges to make them stronger.
- Place the pieces with the smooth side towards you, bend the corners of each, twist, forming a rose. Secure the remaining end with glue at the bottom of the flower.
- Finished flowers alternately attach to the base - a foam ball.
- Wrap the wire-trunk with satin fabric, fix it with glue and insert it into a ball with roses.
- decorative pot(or cup) fill with a mixture of gypsum and water, then insert the trunk of a tree of roses.
- Decorate the container with ribbons, beads, and sprinkle decorative pebbles on the plaster.

How to make a kanzashi satin ribbon tree
The topiary looks original in the form of a sunflower, which is made using the kanzashi technique. So, the manufacturing process is as follows:
- Take the yellow satin fabric, whose width is 5 centimeters, and cut into pieces 6-7 centimeters long. The blanks that will serve as leaves and petals should be about fifty pieces.
- Bend each of them lengthwise and make a cut on one side, achieving a sharp corner. After turning the ends of the products, glue.
- Pour over the foam base of the ball with coffee beans, imitating sunflower seeds.
- The stem of the flower will be a wire inserted into the ball. First, it must be covered with green paint, and then covered with material of the same color.
- From the junction of the ball with the stem, start gluing sunflower petals, which were made using the kanzashi technique.
- Place the plaster in the pot, insert the topiary and fill the remaining space with the same mixture.

Topiary from organza and satin ribbons
Using these materials, you will create a decorative tree that differs from other topiaries with its chic appearance. Topiary from satin ribbons, which will complement the interior decor of the house, is very simple to make:
- Cut 7x7 cm squares from pieces of organza with scissors. If you don’t want to measure, then cut by eye.
- Place one square on top of the other so that you end up with six corners. Bend the workpiece in half, and fasten the lower part with a stapler. In the absence of a tool, the material can be sewn with a needle and thread.
- Attach the wire to the ball, it will serve as the barrel.
- Dilute the plaster and pour it inside the pot, then insert the wire there.
- The formation of the crown consists in putting artificial organza feathers on the glue, and inserting several satin roses between them.
- Decorate crafts with beads, lace.
Photo: satin ribbon topiary
Examples ornamental trees or there are many bouquets. Beautiful photos show how chic the satin ribbon topiary looks in this technique. The iridescent material is wonderfully combined with beads, sequins, butterflies, pieces of organza. Beautiful trees will become chic decoration coffee table or a desk.

Video
Topiary is a small ornamental tree with a rounded crown. This way of decorating garden vegetation came to our culture from Ancient Egypt, it was there that they first began to give trees an unusual shape. Over the centuries, the craft has developed into a decorative art, the fruits of which are increasingly found in modern interiors. At the same time, you can literally make a tree of happiness with your own hands in one free evening.
Topiary with corrugated paper flowers
Topiaries with cute crepe paper buds are often used to decorate wedding or birthday parties. Many brides even prefer to use artificial analogues of flowers for a bouquet, because such details will definitely not deteriorate at the most crucial moment, moreover, they are not at all inferior to natural peonies or roses.
So, for making crafts with roses, stock up on the following materials: corrugated paper of the selected shade - for the inflorescence; scissors; glue; pencil; green tape for the trunk; strong thread (can be replaced with a small wire); ruler; Styrofoam; a stick for the trunk (for example, a Japanese chopstick, a pencil, a branch); newsprint or other thick paper; pot for indoor plants.
To get a standard size topiary, prepare 30-40 flowers. Cut strips with parameters 3-4 cm wide and 35-45 cm long for each rosette. Bend the ribbon lengthwise by a third, and then wrap the top section at an acute angle and repeat the turns three times - this is how you form the middle of the rose. Keep turning until you have twisted the entire strip. Fix the tip with glue, and fasten the lower part of the flower with wire.
The base sphere can be purchased ready-made or formed from newsprint. Wrap the ball of newspaper tightly with thick thread. Please note that the paper blank must be larger than the size you want to get, as the thread will significantly reduce it. Glue the flowers securely to the sphere.
Take your chosen barrel stick and wrap it in twine or green tape. You can use corrugated paper by cutting long strips out of it, applying glue to the inside and wrapping it around the base. Put the ball on the barrel or fix it with glue.
As a primer, use foam or alabaster. In the latter case, fill it in, leaving 2-4 cm from the edge, and insert the barrel. In this case, the stick must be held until the solution becomes dry. Decorate the finished ground base with fabric, tinsel or beads - as you like. Ready!


Topiary from coffee beans
Coffee topiary is lovely gift that will decorate any corner of the house. It is eco-friendly, beautiful and, besides, it also has an incomparable delicious aroma. It is not difficult to make it - follow the basic instructions. Additionally, you will need coffee beans in the amount of 150–300 g, brown acrylic paint for covering and, if desired, decoration. All other materials and tools are standard, as for any other topiary.
You can perform a classic version without intricate shapes and decorations, the result will be elegant and concise. But if the heart craves creativity, we offer a few original ideas:
- The craft can take the form of a flowering tree and become great present for a girl, mother or teacher;
- Try to decorate the tree with dried fruits and place it in the dining area;
- Use summer motifs and decorate the work with small birds and butterflies;
- Create New Year's composition- a pretty coffee tree. The base can be made independently from thick paper or purchased ready-made;
- A man will surely appreciate a gift in the form of money tree. It is enough to glue coins to the ball, and around them - lightning, decorate the remaining space with coffee beans;
- If you are thinking about a present for Valentine's Day or a wedding anniversary, make a heart-shaped topiary;
- A cup hanging over a saucer looks very impressive, from which grains “spill”. It is not difficult to make it - instead of a stick, use a wire, mounting foam or hot glue.


Topiary from cones
Another idea of the eco-decor that is popular today is the cone topiary. It will harmoniously complement the autumn or winter composition, and it is quite simple to perform it.
In addition to the standard set of materials, prepare cones, pins, dried moss. Rinse the cones thoroughly and dry for 10 minutes in an oven preheated to 350 degrees. Prepare the trunk by painting it or rewinding it with twine. Fill the pot with mounting mix or chopped floral foam, fix the stem in it.
The sphere can be covered with brown paint. Use pins or hot glue to attach the cones to the ball. They must be fixed close to each other. Large parts need to be glued first, the rest - as they decrease in size. Attach the ball to the barrel.
Cover improvised soil with moss or other material that you like. Complete the composition with additional decorations if desired.
By the period new year holidays you can also form an improvised conical Christmas tree.


Flower topiary in quilling technique
A topiary made using this technique turns out to be very cheerful and pretty. It will complement the interior of the nursery or serve as an interesting decor in the dining room or kitchen. Try to do it yourself, it's not difficult at all.
So, you will need: thick, bright colored paper in various shades; quilling tool (if you don't have one, use a toothpick or a needle stuck in the wine cork); spherical base; scissors; a flower pot; stick for the trunk; glue (PVA and thermal gun); moss or other filler to cover the "soil"; chopped foam; decorative ribbons (optional)
cut into colored paper into wide (one color) and narrow (different shade) stripes. Cut wide parts along the edges, forming a fringe. Glue narrow elements to the edge of each such strip. Lubricate a thin strip with glue and twist it into a tight spiral with the selected tool. Do the same with the wide strip. Remove the craft from the tool.
Repeat the algorithm for the rest of the stripes in other colors. Unfold the fringe - you will get lovely flowers.
Take a ball and fix the flowers on it with a thermal gun so that there are no voids left. Lubricate the pot with hot glue and put the foam in it. Cut a hole in the foam for the barrel, grease it with glue and put the barrel in it.
Make a hole in the crown and put it on a stick-barrel, previously lubricated with glue. Decorate the foam soil with prepared moss or other decorative element. If desired, you can paint the pot in bright color, and also tie the trunk with a beautiful ribbon.


Shell Topiary
Topiary made of shells will perfectly complement the interior in a marine style. To make it, prepare the following materials: a foam ball for the base; various shells; wire; pot for stand; cardboard; twine or thread; scissors and hot glue gun.
To make a topiary crown, prepare: a foam ball, shells and white sisal. Using a glue gun, glue the entire surface of the sphere and wrap it with sisal. Prepare the shells and then attach them with glue to the sisal, leaving small gaps. Thus, you should cover the entire surface of the ball.
For the trunk you will need wire, thread or twine, scissors and a glue gun. Give the wire the desired shape and wrap it tightly with thread or twine. You can make multiple trunks using different colors of yarn and different twists.
To make a topiary pot, prepare a clay pot, styrofoam, cardboard or paper, ready-made trunks, scissors and a heat gun. To secure the trunks, place the foam in the pot. Then secure it with hot glue. Glue the finished crown to the trunk and stick it into the foam placed in the pot. Glue thoroughly with a heat gun. For strength, fill the empty space in the pot with crumpled paper, glue and cover with a circle of cardboard. Later, you can close it with sisal or small shells.
Fasten two shells together and place a "pearl" in them. Thus you will receive lovely decoration for the pot. Next, decorate the base of the pot as you wish. Using a satin ribbon, you can make bright accents and strew the crown with the same “pearls”.


