DIY Christmas toys for the Christmas tree: a snowflake from satin ribbons. Snowflakes using kanzashi technique from satin and brocade ribbons Do-it-yourself kanzashi snowflake from satin ribbons
On New Year's party everything sparkles and shimmers, in the center of attention - elegant, decorated with balls and garlands, and around it cute snowflakes and bunnies dance around - boys and girls. How do kids like to dress up? New Year. carnival costume mothers think over with special trepidation, especially when it comes to girls. Hair should also be decorated in a special way- use appropriate winter accessories. For girls fit so charming snowflake, which will become a decoration for hair clips or rubber bands. But you should also not forget about the youngest fashionistas who do not yet have luxurious curls on their heads, but they are already beginning to understand what the New Year is, and that on this day you just need to sparkle. For such babies, a comfortable elastic bandage decorated with the same snowflake will become a decoration. To make your own accessory, check out our step by step lesson. (I remind you that the basics kanzashi techniques can be seen.)
White and blue ribbon snowflake
The master class gives an exhaustive list of materials and tools that are necessary for the manufacture snowflakes from ribbons, step by step shows the assembly diagrams of five types of kanzashi petals and the way they are attached to the New Year's accessory.
What you need to prepare to create a kanzashi snowflake
When creating holiday accessories, you can stick to any bright colors, but when it comes to snowflakes, then it is better to use white and blue fittings. To make the same product, you will need from ribbons:
- - 6 strips of white satin ribbon 2.5 cm wide and 5.5 cm long;
- - 6 strips of white satin ribbon 2.5 cm wide and 10 cm long;
- - 12 squares of blue and white satin ribbon with a side of 5 cm;
- - 6 squares of silver lurex ribbon with a side of 5 cm;
- - 12 squares of blue satin ribbon with a side of 2.5 cm;
- - 6 squares of white satin ribbon with a side of 2.5 cm;
- - 12 strips of white satin ribbon 0.6 cm wide different lengths 6; 5.5 and 5 cm.
From decorative elements take:
- - half bead blue color 0.8 cm in diameter - 1 piece;
- - a holder suitable for a half-bead, 2 cm in diameter - 1 piece;
- - glue half beads 0.5 cm in diameter - 12 pieces.
Tools:
- - thread with a needle;
- - hot glue from a special gun;
- - scissors;
- - lighter;
- - burner.
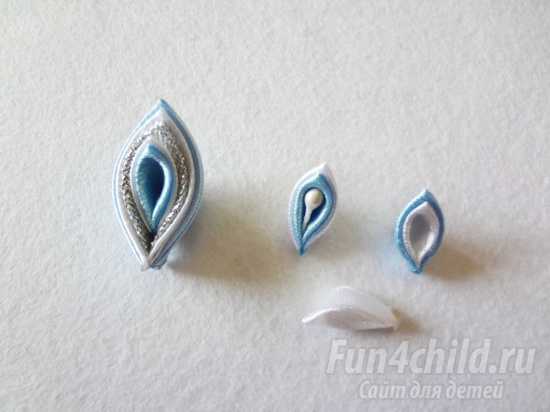
A snowflake consists of several flowers, twigs and sharp leaves. The main flower is a construction of five-layer sharp petals. The upper flower is composed of wavy white petals. Also, blue petals of a wavy design and triple branches are gently woven into the overall ensemble, the central petal of which is double sharp, and the two side petals are triple loops. The leaves are white quadrangles, representing triangular pieces of white ribbon soldered together.
How to make the top white layer
Take 6 pieces of white tape 2.5 cm long 5.5 cm (Pic 1).

Fold each piece at a right angle in the center (Pic 2).

Fold again, joining the two ends of the ribbon (Pic 3).

Gather the bottom of the petal into an accordion, make a triple fold (photo 4).

Glue the petals together (or use a thread with a needle to form a flower) (photo 5).

Formation of blue petals
Prepare 6 blue 5.5 cm long strips of 2.5 cm tape (Pic 6).

Position the strip with the front side facing you and horizontally. Lower the two upper opposite corners down, leaving a small space in the center (photo 7).

Fold the resulting triangular blank, leaving the back inside (photo 8).

In the resulting four-layer triangle, first bend one corner, pointing it towards the center (photo 9).

Then do the same on the opposite side (photo 10).

At the bottom of the petal, fix the fold with a flame or hot glue (photo 11).

Prepare 6 blue petals in the same way (Pic 12).

How to make five-layer sharp kanzashi petals
To make the petals, you need to prepare triple parts from white, blue and silver ribbon and double parts from white and blue ribbon. The blanks for such a procedure are squares with a side of 5 cm and 2.5 cm, indicated in the list (photo 13).

Fold each square 2 times along the central diagonal and fold the triangle in half again (Pic 14).

Put a small blue triangle on top of a white one, fold it into a petal shape and glue it together. Place large triangles on top of each other in the following order: white - blue - silver (photo 15).

A large petal is formed according to the same principle (photo 16).

Glue a small double petal inside a triple sharp petal to get a smart five-layer cake (Pic 17).

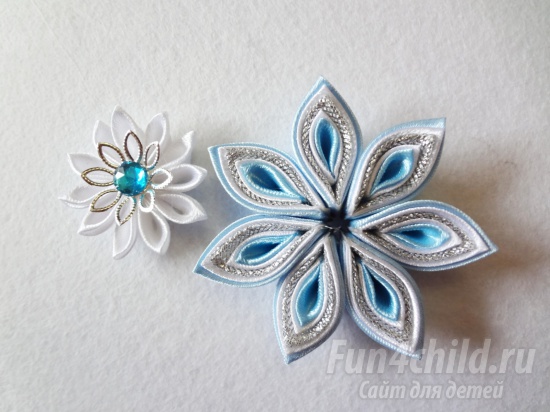
Assemble the fancy petals with a needle or glue (Pic 18). Glue a holder with a turquoise half-bead into the center of the white flower.

Assembling a snowflake
Glue the white flower, decorated with the center, on the main one (Pic 19).

Glue the blue petals between the petals of the bottom flower (Pic 20, 21).


Make branches. Their central element will be a double sharp kanzashi petal (photo 22).

For triple loops, take thin strips of 0.6 cm satin ribbon. Bend the strips, forming a three-layer loop, singe and glue the ends (photo 23).

Form 6 branches (Pic 24).

Glue the branches under the bottom of the blue petals (Pic 25).

Finish with 6 petals white color from strips of tape 2.5 by 10 cm. Fold the piece of tape with the front side inward and cut it diagonally with a burner (photo 26). You can use either one part of the petal or the other.

Glue sharp squares on the bottom, between the branches (Pic 27,28).


Add small half-beads to the petals of the top flower and to the pointy tips of the white leaves (Pic 29).
Glue the entire snowflake to the felt for further attachment to an elastic band, hair clip or elastic hair band. The size of the finished snowflake is 11.5 cm.


According to this master class, you can make any snowflakes using the kanzashi technique:

Or for your little fairy:

Snowflake from ribbons and oblique inlay
DIY snowflakes will decorate your home and will be a wonderful gift. The use of oblique inlay in kanzashi jewelry has become quite common. Most use it in, I tried to combine it with a satin ribbon. I liked the result, the product looks airy and unusual.

Necessary materials
For the snowflake we need:
- 14 pieces of white bias tape - 1.5 * 4 cm;
- 12 pieces of white satin ribbon - 5 * 5 cm;
- 6 pieces of gold brocade (you can also use silver) - 5 * 5 cm;
- 18 pieces of white oblique inlay - 1.5 * 7.5 cm;
- White felt base with a diameter of 4 cm;
- Tire gold color;
- Center with a strass chain with a diameter of 2 cm
- Felt base white 2.5 * 2.5 cm under the middle;
- The mount can be anything: a clip, an elastic band, a hoop, a bandage or a golden cord to decorate a forest beauty,
- Glue "Moment Crystal",
- lighter,
- needle with thread.
Step by step description of the snowflake
1. Let's start making our snowflake from the top tier. This is a small flower from a slanting inlay. We cut the inlay into segments of 4 cm. So that the inlay does not crumble, I used a thermal cutter. We need 14 segments. Take one piece, fold it in half lengthwise. We solder the edges with a lighter (Photo 1).

2. We collect finished blanks on a thread. You can also glue them together. Choose a method that is more convenient for you. On a felt base 2.5 * 2.5 cm we glue a golden-colored half-bead and around it a rhinestone chain on the Moment Crystal glue. It will take about an hour for the middle to stick well, then we cut off all the excess (Photo 2).

3. Glue our middle to little flower(Photo 3).

4. We proceed to the lower tier. It will consist of six triple sharp petals and twigs of oblique inlay. Let's start with triple petals. For one, we need two pieces of white ribbon 5 * 5 cm and gold brocade 5 * 5 cm. Take each piece and fold it in half diagonally twice. We get three triangles (Photo 4).

5. We put three blanks together so that the brocade is in the middle. We connect the edges together, cut the tip and solder with a lighter. We cut the bottom of the petal at an angle and solder (Photo 5).

6. In the same way we make the rest of the petals. They will need 6 pieces. From the felt we cut out a white felt circle with a diameter of 4 cm (Photo 6).

7. Glue our petals on the circle at the same distance (Photo 7).

8. We proceed to the branches from the oblique inlay. For six branches, we need 18 pieces of inlay. Each segment is 7.5 cm. From each segment we make droplets and glue them together (Photo 8).

9. We make six branches. They can be used on both sides. Choose which one you like best (Photo 9).
From fabric, with a skillful and creative approach, it is possible to make unusual and elegant snowflakes. Popular and affordable satin ribbons are suitable for kanzashi products, you can also use organza or silk, satin or metallic fabric. If we are talking about snowflakes, then it is better to choose gentle colors - white, blue or pink, cream.
This master class shows a photo tutorial on creating New Year's kanzashi snowflakes from satin ribbons, which can become the basis of a hair clip for a girl, part ball gown, Christmas decorations or interior decoration, mirrors. Such accessories will not go unnoticed at the New Year's holiday. If your baby will be a Snow Maiden or a snowflake on a matinee, be sure to decorate her hair and dress with similar exclusive products.
Snowflakes are made by a combination of multi-format sharp kanzashi petals: white single, white-blue double, triple with the addition of silver brocade. The scheme of their implementation is standard, in the photo lesson such a model is shown on the most complex triple example. To get started, prepare everything you need, based on how many products you want to make.
To create one snowflake using the kanzashi technique, we need:
- pieces of satin ribbon 5 * 5 cm blue, white and silver brocade of the same size - 7 pieces of details of each color;
- pieces of satin ribbon 2.5 * 2.5 cm - 28 pieces of blue and 39 pieces of white;
- 7 one-sided stamens (preferably pale blue);
- bead huggers - 2 cm;
- turquoise half beads - 0.8 cm.
Additional materials:
- for fastening New Year's composition- felt base with a diameter of 4 cm;
- for tape processing and gluing - scissors, lighter, thread with a needle, glue gun;
- for the manufacture of a hair accessory - a clip or elastic band;
- to turn into a Christmas tree toy - a thin ribbon in the form of a loop.
The diameter of the finished product for fittings of the indicated sizes is 7.5 cm.
Kanzashi snowflake master class with step by step photos
All petals will be made from squares of satin ribbon using a combination of two shades and silver. For triple petals, prepare squares of white, blue and brocade, the side of the square is 5 cm.

After carefully treating the cuts with a flame, bend all the prepared squares diagonally.

Make a sandwich of three double-layered triangles. Make the bottom blue, the middle white, and the top silver. When laying the parts on top of each other, shift the layers down by 1 mm.

Form sharp petals with a shiny center. Trim off the sharp tip and bottom base.

Make 7 triple petals.

From smaller 2.5 cm satin squares of white and blue, make double small petals. They are performed in the same way as described above, but you need to superimpose blue on white to reverse the colors.

Using glue, make an elegant sharp petal consisting of 5 layers - insert small parts into the central hole of the large ones (covering the silver layer).

Also, to model a delicate snowflake, you will need 11 simple single petals from a white ribbon, 14 white-blue details (with white centers) and 7 petals with a blue ribbon in the center, decorated with stamens. It is better to take stamens for work that do not differ in color from the main accessories.
Collect 11 white simple petals per thread, you should get a flower to decorate the middle.

Glue 7 large petals, consisting of 5 layers. Glue a hugger and a turquoise half-bead into the center of the white flower.
Glue volumetric snowflake from two prepared layers.

To fill the gaps between the rays, prepare the branches. In total, you need to make 7 branches, which will consist of a pair of double sharp petals with a white center and one central petal with a stamen.

Glue the branches around the circumference.

Glue the snowflake onto the white felt circle.

Christmas snowflake kanzashi is ready. It remains only to come up with an additional mount, depending on the purpose. Glue an elastic band or hair clip to the felt, a hoop or a machine gun will also work. And in order to hang on the Christmas tree, take care of a reliable loop. The color scheme used sets a frosty mood, so these decorations will look great on the Christmas tree.
Winter is a time of miracles, magic and expectation of pleasant surprises. Many people dream of preserving the atmosphere of the New Year holidays and winter freshness, perpetuating the icy beauty and fairy tale. But the holidays pass, the tree crumbles, the snow melts. Stop! What is that hanging on the tree? And what is this white ice flower that adorns the blouse? The petals are cool, silky, as if covered with ice. It's not a flower, it's a snowflake! A real kanzashi snowflake is a symbol of winter purity. And what is most wonderful, anyone can create such a memory of winter and snow.
What is a kanzashi snowflake?
The type of needlework has the full name kanzashi tsumami (kanzashi). This art came from Japan, where even in ancient times, there was a tradition to decorate the hair graceful flowers, folded of silk and decorated with wire, pearls and precious stones, which were attached to a wooden hairpin - kanzashi. Initially, these ornaments were worn to scare away evil spirits. This art is based on simple technique origami. And the word "tsumami" itself is translated as "pinch". Only the material for folding is not paper, but pieces of silk. To date, not only silk is used to create kanzashi, but also leather, a variety of fabrics, and even expensive thick paper. Flower petals are very small, therefore, to create a flower or a kanzashi snowflake, the master uses tweezers, with which he glues the petals together, or glues them to the base. A kanzashi-made snowflake has a variety of uses. It can decorate the interior by hanging it from the ceiling. Or stick a few snowflakes on a beautifully designed base and hang the created composition on the wall. Very often, such snowflakes are used to decorate clothes, hats, hairpins and headbands. Even in this technique, you can create original Christmas decorations as well as brooches and unusual souvenirs.
Necessary materials and tools
The minimum set of what is needed to create a kanzashi snowflake (photo below) includes: satin ribbons, scissors, glue, a burning candle (lighter or matches) and a little patience.

- Satin ribbons are the main material for making snowflakes, it is easy and convenient to work with. When choosing a ribbon, you need to pay attention to its width - it is more difficult to work with narrow ribbons, but the products are more accurate. For beginners, a convenient width is from 3 cm. If you want to diversify the texture and color of the product, you can use nylon, metallized and brocade ribbons.
- Scissors must be sharp.
- For fastening parts, it is best to use glue gun, but if it is not there, glue like "Moment" and "Second" can be a good alternative. You can also sew the petals with ordinary threads.
Matches, a candle or a lighter are needed to melt the ends of the cut ribbon (so that it does not bloom) and to connect the petals. As additional materials can be used:
- Cardboard, felt, paper - for the base.
- Various accessories (beads, sequins, scrapbooking materials) - to decorate the product.
- Wire, metal "crabs", hairpins, braid and cords - for the manufacture of pendants and hairpins.
- When making small parts, as well as when gluing the petals, it is advisable to use tweezers.

The basis of the snowflake - petals
In order to create a snowflake using the kanzashi technique, you need to make many petals, which are subsequently glued together, depending on the master's intention. Today on the Internet you can find and master the manufacture of many types of petals, a different combination of which allows you to achieve new patterns and shapes of products. And also get interesting combinations of color and texture.

Making sharp petals
It is enough for a beginner to learn how to make sharp petals using the kanzashi technique. A snowflake created from these petals will look quite professional.
The prepared tape or fabric is cut into identical squares and stacked. It is important that the squares are neat and even - it depends appearance finished product. Each square element is folded in half diagonally, and then 2 more times in the same way. For convenience, you can use pins. You should get a triangle resembling a book. This is the basic blank of the petal.

To get a sharp petal, it is necessary to clamp the triangular blank to prevent unfolding. It is convenient to do this with tweezers. Then form (cut off) the sharp corner of the triangle with scissors. Next, gently melt the cut over the fire. Hold for a short time so as not to spoil the material, and at the same time, with the help of tweezers, firmly squeeze the melted end, ensuring that the petal does not unfold. If you still cannot fix the petal in this way, you need to apply glue.
Kanzashi snowflake: master class
Despite the apparent complexity, there is nothing difficult in making a snowflake. To get a kanzashi snowflake (see the master class below), you need to make at least 10-12 petals. Having learned how to make petals, you can start gluing them together. To make the snowflake more interesting, it is better to make petals different colors and sizes. To begin with, you can try to glue the middle of the snowflake from the petals.
To do this, you need to combine and glue two petals. By fixing 5-8 petals in this way, you can get a flower. This is how the most simple snowflake. To make it bigger and more beautiful, it is possible to combine elements of two, three, four petals and glue them to the main center. You can put a small petal inside a large one. Finished snowflake decorated with beads - the middle is made of them. Small rhinestones and beads can be glued into each petal. And the wrong side of the product must be hidden with a circle cut out of fabric. Subsequently, a hairpin or magnet can be glued to this place. When making the pendant, you need to quietly hem the cord or rain between the petals. You can experiment, come up with your own new tricks. The more experience accumulates, the better, more beautiful and more original the snowflake will turn out.

If there is a desire to continue to engage in this type of creativity, it must be borne in mind that in the kanzashi technique, a snowflake is far from the only thing that can be created. From petal blanks, you can make a variety of flowers, dragonflies, butterflies, birds and even angels.
Having created several products, you can understand general principles making kanzashi, and after that it will not be difficult to bring to life many products, taking the image of a kanzashi snowflake as a model. Photos of finished products in this technique can be easily found on the Internet.
Thus, by showing desire and perseverance, you can not only create a wonderful gift, but also become a master in this unique technique.
Approaching new year holidays, which means it's time to think about creating original decoration and independently make a snowflake using the kanzashi technique.
What is kanzashi? It is the art of folding pieces of cloth so that they form beautiful flowers. Just using the kanzashi technique, you can make a beautiful snowflake.
Beautiful snowflake from satin fabric- excellent interior decoration, New Year's image, you can make a snowflake on a Christmas tree, a brooch or a hairpin.
Kanzashi snowflake - what you need to prepare for work
- Of the tools you will need scissors, a needle and thread.
- Glue (hot gun or Moment glue).
- Candle or lighter, tweezers.
- From materials, a satin ribbon 5 cm wide in white or pale blue.
- Cardboard or piece of felt.
- To decorate a snowflake, beautiful glue stones or small beads.
How to make a kanzashi snowflake
- We immediately draw your attention to the fact that it is necessary to prepare all the tools and materials, because the work to be painstaking, so be distracted by the search the right material and fixtures, not worth it.
- You need to cut out squares from a satin ribbon, 5 by 5 cm in size. In total, 42 squares will be needed. The number of blanks and their size may vary and depend on the type of snowflake. Therefore, if you want to make a snowflake with small petals, then you need to prepare another 3 cm wide ribbon and make blanks 3 by 3 cm in size.
- From each square you need to make a petal. How to do it: fold the workpiece diagonally, then again and again. Get a small triangle.
- The outer corners of the figure must be wrapped to the middle part of the workpiece to get a rounded triangle shape. It is best to work with tweezers, because it is very difficult to hold such a small detail in your hands. You can use a clip instead of tweezers.
- The first figure is ready, now you need to fix the corners. To do this, cut off the excess and use a lighter to melt the edges. When you melt the edge, press this place with tweezers. You can also press the cut point with your fingers a few seconds after reflow. The fabric will not be as hot, but it will still have time to grab.
- Look at the first petal - if it is uneven, you need to cut off the excess with scissors, trim and also melt the edges of the tape with a lighter.
- We make such 12 petals. There are still 30 blanks left in order to make pointed petals. The workpiece is folded in the same way, only the edges need to be made not rounded, but sharp.
- Cut off the excess, melt with a lighter. Make sure that all blanks are the same size.
- We take 6 petals, string them on a needle and thread, tie the ends of the thread. It turns out a round center.
- Now you need to glue sharp triangles together. Can be glued on with glue or strung on a thread. Only the petals are not glued completely, but in the corners.
- We made double petals, now we need to connect pairs of petals and insert a third one, this way we get blanks that need to be fastened in pairs (sewn or glued). Thus, the rays of the snowflake are formed.
- The workpiece must be attached to the base. We cut out a circle from thick cardboard (or from felt fabric). The diameter of the circle should be equal to the diameter of the central flower.
- From thin tape you need to immediately form a loop, glue to the workpiece.
- Next, you need to collect a snowflake: glue central part and successively rays. The work is painstaking, do not rush, everything will work out.
- The snowflake is ready, it remains to make a few touches: attach beads or glue rhinestones.
The Japanese kanzashi technique allows you to create unique fabric decorations. A kanzashi snowflake is non-standard, beautiful and easy enough to implement.
Products from satin ribbons look gentle and noble. They are great for Christmas tree decor.
Such snowflakes are so elegant that they are quite suitable as hair accessories. Delicate blue jewelry can become elegant rubber bands or hair clips, a detail for decorating a bandage or headband.
You can attach a pin to the back of the snowflake, then it will become an excellent New Year's brooch, which can easily be attached to a fluffy dress.
If you set out to make New Year's paraphernalia with your own hands, then the given master class will help you.
Kanzashi snowflake - the result of work
For convenience, here is the calculation of fittings for 1 product.
Prepare the following for one kanzashi snowflake:
- square-shaped satin blanks of pale blue and white flowers. The side of all squares is 5 cm. The number of parts is 12 and 6 pieces of the first and second colors, respectively;
- brocade blanks of a square shape are silver with the inclusion of a blue lurex thread. The side of the squares is 4 cm. The number of parts is 6 pieces;
- square-shaped satin blanks in pale blue and white. The side of the squares of this series is 2.5 cm. The number of parts is 7 and 37 pieces, respectively;
- round bead hugger with a diameter of 1.5 cm;
- blue half-bead with a diameter of 0.8 cm;
- a felt circle of white or blue color, the diameter of which is 3.5 cm;
- needle and thread, glue - for collecting flowers and attaching parts.
For the manufacture of New Year's product There are several parts to model:
- the main flower of 6 four-layer sharp kanzashi petals;
- a small flower of 7 double sharp petals;
- 6 branches, consisting of one central blue petal and four side white ones.
MK "Kanzashi Snowflake"
1. Prepare for one sharp petal blue and white squares with a side of 5 cm and a shiny square - 4 cm.

2. Bend all three parts in the same way - diagonally.


4. Bend the two corners and fasten. The right angle of the former triangular part will become the sharp end of the triple kanzashi petal. Cut off the side and bottom of the part.

5. To turn the resulting petal into a more elegant one, make it four layers. To do this, you need small white petals. They are performed according to the same scenario, but from a white satin ribbon measuring 2.5 cm.

6. Small elements also need to be prepared 6 pieces. The same parts in the amount of 24 pieces will be used in the future for branches. Insert sharp petals into the center of large blanks.

7. Cut 2.5 cm light blue and white satin ribbon into 7 squares each. Make double sharp petals so that the white part is inside the blue one. Collect the flower using a thread and a needle.

8. Prepare narrow sharp petals for twigs. For their manufacture, blue squares with a side of 5 cm will be used.

9. Such details will be one-color. The squares are folded twice.

10. Also, after the formation of the petal, the cut should be soldered, pressing it on the sides with your fingers.

11. Prepare 6 identical petals.

12. Collect the main flower on a thread. Also decorate a small flower with a bright blue half-bead and a hugger.

13. Stick one layer on top of the other in the form of a pyramid. Cut out a 3.5 cm felt circle.

14. Make designs from long blue petals and white small ones, combining them into snowflake rays.

15. Glue the rays into the voids between the petals of the main flower to turn it into a snowflake.

16. It remains to stick the product on a felt base to use as an accessory or decoration.


