DIY development toys. DIY educational toys
Many teachers and educators stubbornly talk about the benefits of educational toys. In fact, such entertainment is aimed at developing a child's skill or skill: fine motor skills, knowledge about colors, sizes, numbers and so on. For each age, toys are selected individually, because what is interesting one year old baby, is unlikely to attract the attention of a five-year-old.
0-12 months
At this age, the baby is only aware of his abilities, so it is important to develop coordination, the ability to concentrate, and a grasping reflex. Toys should be bright, textured and light: beads, rattles, mobiles, rings, rag balls, developing mats - what a child needs up to 6 months old. For older children you can find musical toys, sorters, nesting dolls and so on. From 9 months you can offer glove and finger puppets, strollers, soft books, insert toys, cubes and so on - they are aimed at the development of motor, speech activity, as well as fine motor skills.
1-2 years
Now you can give your child toys that can be disassembled and assembled, by the age of one and a half, offer your child objects that can be generalized according to one attribute: color, size, and so on. By the age of two, you can play object games - building, story games, use various cards, pyramids, sorters, books, and so on.
2-3 years
It is time to develop not only fine motor skills, but also the ability to distinguish the world around. Educational toys for this age include paper crafts, natural materials, plasticine, story and subject games to test knowledge and skills, home-made cards that simulate situations.
3-5 years
All possible games for learning numbers, the alphabet, seasons, clocks, children's board games, puzzles, constructors, lotto, books, development boards and so on.
What improvised materials can be used?
.jpg)
Dear needlewomen, do-it-yourself toys can be made from various materials: shreds of fabric, yarn, old clothes.
Using a variety of accessories (velcro, large buttons, zippers, buttons, buckles, patches, and so on - the main thing is that the child cannot tear them off and put them in his mouth), candy wrappers, cereals, pasta, bells, foil, fillers like foam rubber or synthetic winterizer and other things.
Do-it-yourself developing cube: master class
.jpg)
To make such a cube, you will need: 6 equal squares of fabric of different colors, synthetic winterizer or foam rubber for filling, interlining, various accessories - buttons, ribbons, scraps of fabric, brooches, and so on, threads, a sewing machine.
From the fabric you need to cut 6 equal squares.
.jpg)
From interlining, it is necessary to cut squares 1.5 cm smaller than fabric ones. We apply them to the fabric and heat it with an iron so that the interlining sticks to the base.
.jpg)
Each side of the future cube needs to be decorated: make an appliqué out of shreds, sew on beads, snakes, buttons, and so on. The easiest way is to draw a drawing with a disappearing marker, and then lay it out on the fabric. For example, like this.
.jpg)
When the decorative part is finished, you need to sew 4 squares into one strip.
.jpg)
Then we sew two more squares.
.jpg)
All stitched seams must be fixed, you need to sew along the contour of the non-woven edges. We sew a scan: two faces need to be docked, and the allowance of the third is wrapped inward.
.jpg)
In the corner of the last edge, you need to leave a hole: turn the finished product inside out, stuff it with padding polyester and sew it up with a blind seam. You can also put a bell or rustling paper inside the square. The product is ready!
.jpg)
We sew a developing pillow: a master class
Educational toys - the concept is quite voluminous, they can also include a pillow, but not the usual one for sleeping, but decorated with voluminous applications and details - an excellent tool for developing fine motor skills. Pillow "Birdhouse" will be interesting for children of different ages.
.jpg)
To create it, you need multi-colored shreds of fabric, interlining or soft material like teak, synthetic winterizer, braid, narrow tape, thread, needle. Optionally, you can sew on beads and buttons.
From teak we cut out the pillow itself in the form of a house (2 parts), sew it along the edge, leaving a small hole for stuffing.
.jpg)
From a bright fabric we sew a pillowcase of the same shape.
.jpg)
From two rectangular flaps folded in half, we make a roof for the birdhouse, decorate it with braid.
.jpg)
We cut a round hole in the frame of the house itself, sew the edges and decorate with braid.
Now you can sew a bird (2 parts for the calf, 4 parts for the wings), and you can also make eggs (two oval parts sewn together).
.jpg)
We use a synthetic winterizer as a filler, after which the hole in the body is sutured. We attach a ribbon to them, we attach the second end of the ribbon inside the birdhouse.
.jpg)
On the outside, we sew a pocket into which the “inhabitants” of the nest are placed.
.jpg)
The pillowcase can be sewn together or fastened with a zipper - then the cover can be washed. We put a stuffed pillow into the pillowcase, you can decorate it with appliqués and beads and start the game!
.jpg)
A few more options for developing pillows:
.jpg)
.jpg)
DIY lacing toys
In babies, the fingers are still very inept, so it is very difficult for them to perform precise movements and coordinate their actions. Fine motor skills are not only the development of certain areas of the brain, but also the preparation of the hand for drawing and writing. Lacing games are an excellent simulator that you can make yourself without any material costs.
The easiest way is to cut out a shoe-shaped figure from thick cardboard, make holes with a hole punch, arm yourself with suitable laces and offer your child new fun.
.jpg)
A more complex option is lacing toys in the form of animals or the so-called “sew-on” with prepared parts and holes: for example, a tree with leaves or a hedgehog with apples, or a cheerful sun with rays.
.jpg)
.jpg)
.jpg)
Developing mats for children of different ages
.jpg)
Choose a dense base for the rug: it can be a fabric with a padding polyester backing or an old one. Baby blanket- then the child will not be cold to crawl on the floor. The background can be made both plain and from large pieces, it is easiest to put the fabric on an adhesive base - it will last longer. Each element - from the button to the trimming of the fabric, is attached carefully so that the child cannot tear them off. It is best to duplicate the buttons from the wrong side. Velcro, rattles, rings, bags with rustling paper inside, buttons and applications - all this is suitable for decoration. By the way, if you wish, you can also knit the rug - whoever is good for what, as they say.
.jpg)
By the way, for older children, rugs can be themed: they can be decorated with animal figurines, numbers, letters of the alphabet, or even divided into 4 parts a la 4 seasons and decorated with snowflakes, leaves and other paraphernalia.
.jpg)
.jpg)
By analogy, you can make educational books with soft applications, the main thing is that they be bright and interesting.
.jpg)
.jpg)
.jpg)
For the little ones, you can sew or knit a relief rattle bracelet: in the form of a flower or a funny animal. Inside you can put rustling packages or bells.
But such a bracelet contributes to the development of the child's vision and hearing, as well as coordination of movements.
.jpg)
You can also make so-called slingobuses - they also contribute to the development of tactile sensations and fine motor skills. You can also attach funny knitted key chains to them. The easiest way to make beads is to crochet or knit them, and then collect them on a dense thread.
.jpg)
You can also make a developing stand from improvised materials, there are so many interesting things on it that you can turn, unfasten, press - a lot of fun for real explorers! And at the same time you can learn colors, numbers, letters and so on.
.jpg)
.jpg)
You can make rag pillows or figurines and stuff them various cereals- buckwheat, rice, beans and so on. Give it to the baby - let him touch it with his fingers: both he has work and his mother has a little rest.
.jpg)
.jpg)
For children from 3 years old, you can make a coloring or application with leaves of a tree, figures, letters, numbers, and so on can be cut out of cardboard or fabric and invite the child to recognize the figure by touch. Make cards, design crafts from matches, wire, polymer clay, plasticine, you can make a lotto from old kinders, skittles from bottles, sew rag finger puppets and arrange a performance - this simple action will bring you closer to your child and at the same time it is very useful for the development of the crumbs!
More recently, Grow Smart! invited to host. We prepared responsibly and the master class was a success! Thanks to everyone who came to visit us! However, most of our readers live very far from Kyiv, so we decided to create for you this photo review of educational toys that you can make yourself.
Why do kids need homemade toys?
Firstly, it is very sincere and great when a mother gives the baby the result of her efforts.
Secondly, many toys that kids need are simply not sold in stores. For example, sensory boxes only mom can do :) Just imagine how much good for little fingers in simple cereals, water, shreds and so on!
Thirdly, babies under 1.5 years old very quickly lose their attention to new toys. They study them, play, consolidate the information received and go in search of new knowledge. How often are disappointed loving parents who bought an expensive super-educational toy, and the child played with it for a week and left it unattended. This happens not because the toy is bad, but because the child simply learned everything he wanted about it.
So, let's begin!
1. Slingobuses. They are known to many mothers. This is an irreplaceable thing that will always help out in line or where there were no children's toys. It will also help the baby when teething. Someone buys such beads, and someone knits with their own hands. Maybe, it turns out, not too professionally, but with a soul.
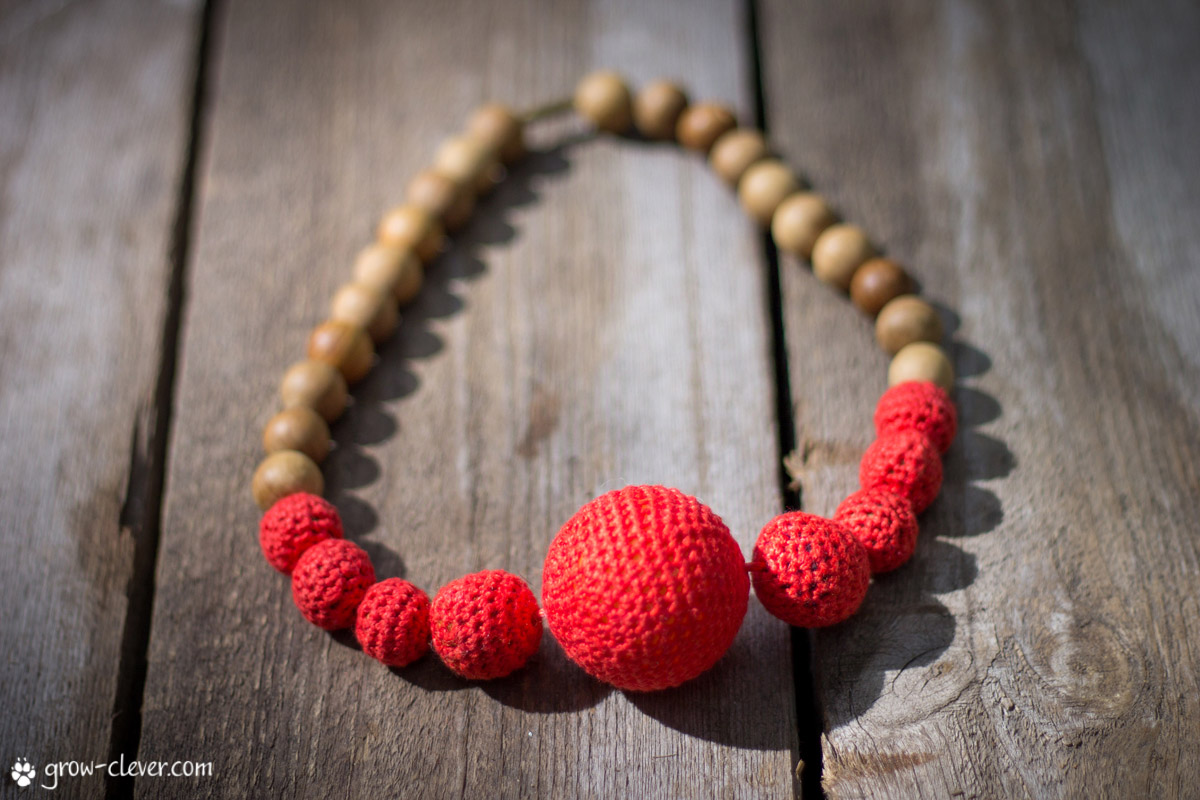
I knitted my slingobuses myself. I took cotton threads (which the seller in the store advised), the beads were from different toys etc.

2. Beads-nibbles. Wooden beads are now sold in various sewing accessories stores, as well as in needlework shops. They are perfect for small teeth.

Important rules:
- Beads should be large so that the baby could not swallow them.
- The thread should be as dense as possible so that it does not break or deteriorate from children's teeth and saliva.
- Beads must be unpainted. Often, the paint on wooden beads falls off easily, which means that it will enter the child's body.
Large beads need to be strung on a dense thread, then make a tight knot and make sure that it does not untie. Great teether ready to go!
3. Tactile sock caterpillar. Almost any kid will like this toy, because it is so pleasant to the touch!
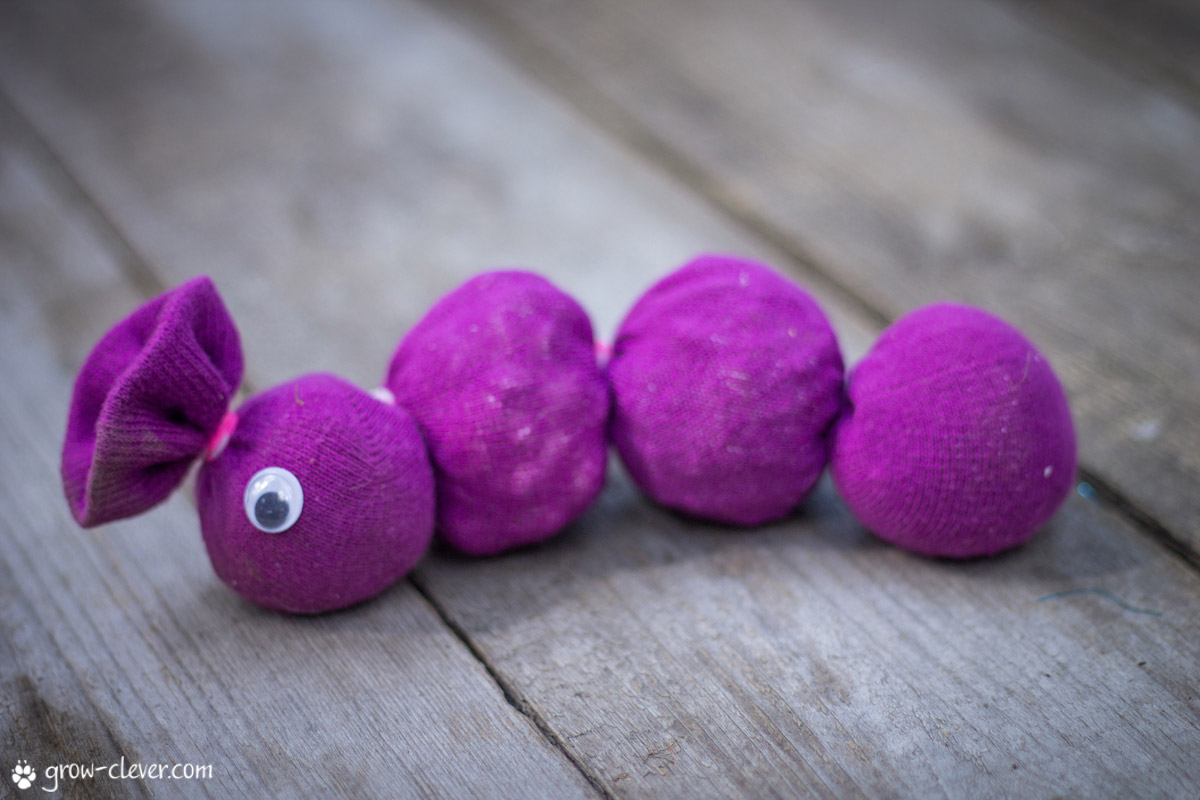
To make it, you will need: clean long sock, dense thread, fillers (buckwheat, rice, peas, beans, pasta, acorns, etc.), eye buttons.
Pour the first filler on the bottom of the sock, tie the resulting ball with a thread, pour the second filler and so on. At the end, fasten the thread well. Sew on button eyes and play!
4. Toy on hand from a sock. Work - 5 minutes, delight - the sea! You ask: “What is it about a sock with eyes?” Put such a sock on your hand and tell your baby: “Hello!”, see what happens :)

Faces for such a toy can be made in a variety of ways. But the most simple one is also suitable: button eyes and a forelock.
5. Snake with beads, ribbons and buttons. This character lived in our stroller for a while. It was amusing for children to touch various hanging and protruding things. For something you can always grab, pull, touch, pull.

This miracle was made from an old spoiled textile mobile for a crib. But you can sew from a regular piece of fabric. To do this, cut out a narrow and long flap, fold it in half in length so that it becomes even narrower and sew on the side. Turn this tube right side out and stuff with wheat or peas, sew up the bottom. Wrap the top so that the snake has a sharp nose and sew it. And then decorate the snake with different things and do not forget about the button eyes!
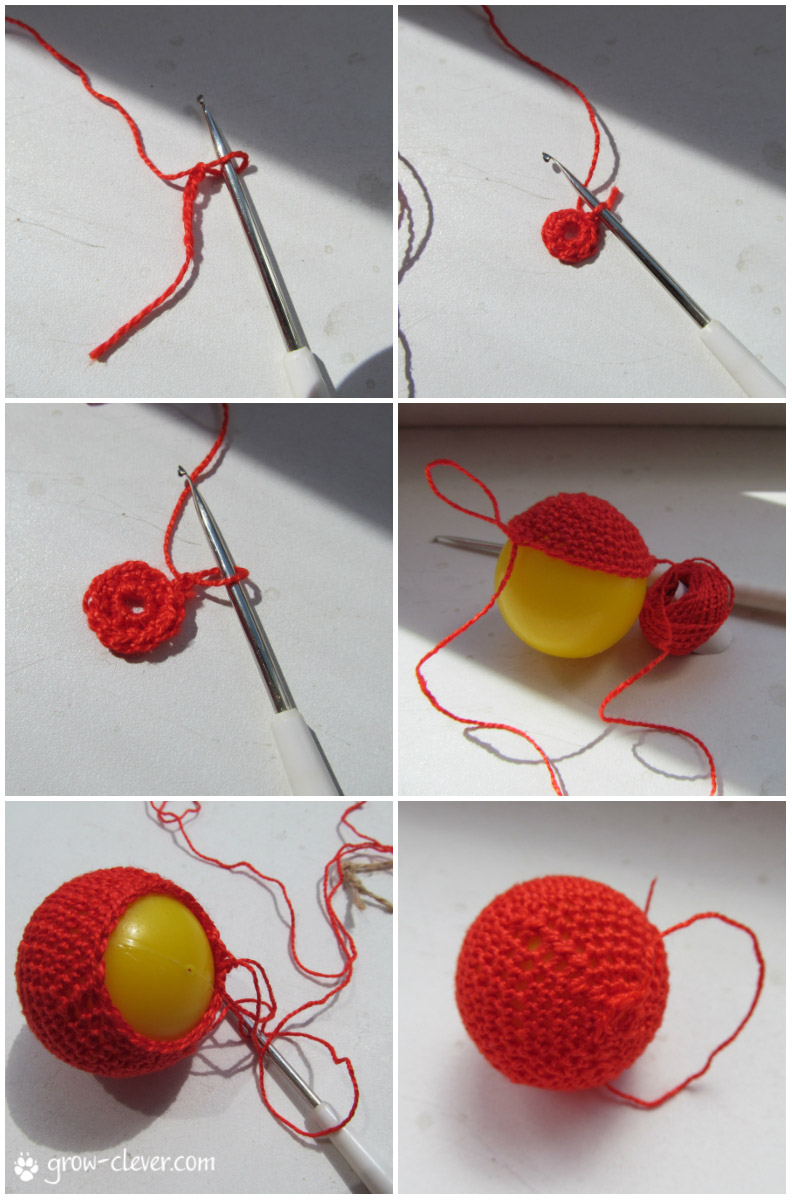
6. Balls and bagels– eternal love kids. They can be rolled on the floor, gnawed, thrown, kneaded in the handles, pushed into different places and so on. These small items will especially interest the baby who is learning to crawl and the little one sitting in the sling. To make the wool ball safe for children, it can be washed in hot water with soap. From this, it falls off and for sure not a single thread will move away from the ball and fall into a small mouth.

And a fluffy yellow bagel is easy to make from a wooden cornice ring and fleece ribbons. Each ribbon just needs to be tied into a double knot on the ring.
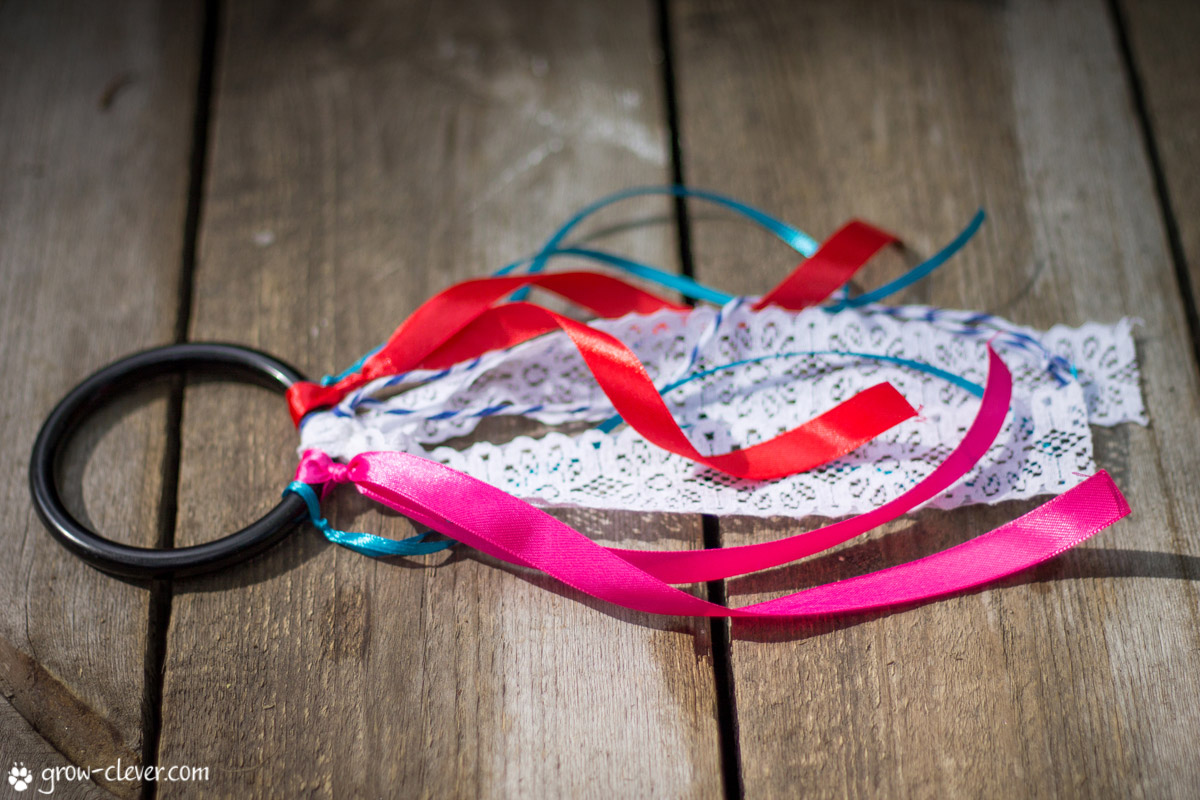
7. Ring with ribbons. This bright muffler is not a simple item. She teaches the baby to follow a fast moving object. Wavy colored ribbons catch the eye of masiks. Give such a ring in the hands of the baby and he will happily watch the movement of the ribbons. For such fun, a plastic or wooden ring, ribbons and lace about 40 cm long are useful. Each ribbon must be firmly and securely tied into a double knot.
8. Sensory pouches. They enable the baby to get a new tactile experience, because how many bags, so many different sensations in the fingers. But you can still walk on them with your feet, do a massage and throw yourself. If you sew the bags in pairs, you get a sensory lotto: find the bags that are the same to the touch. There is on our blog. By the way, it is not necessary to sew numbers on the bags.
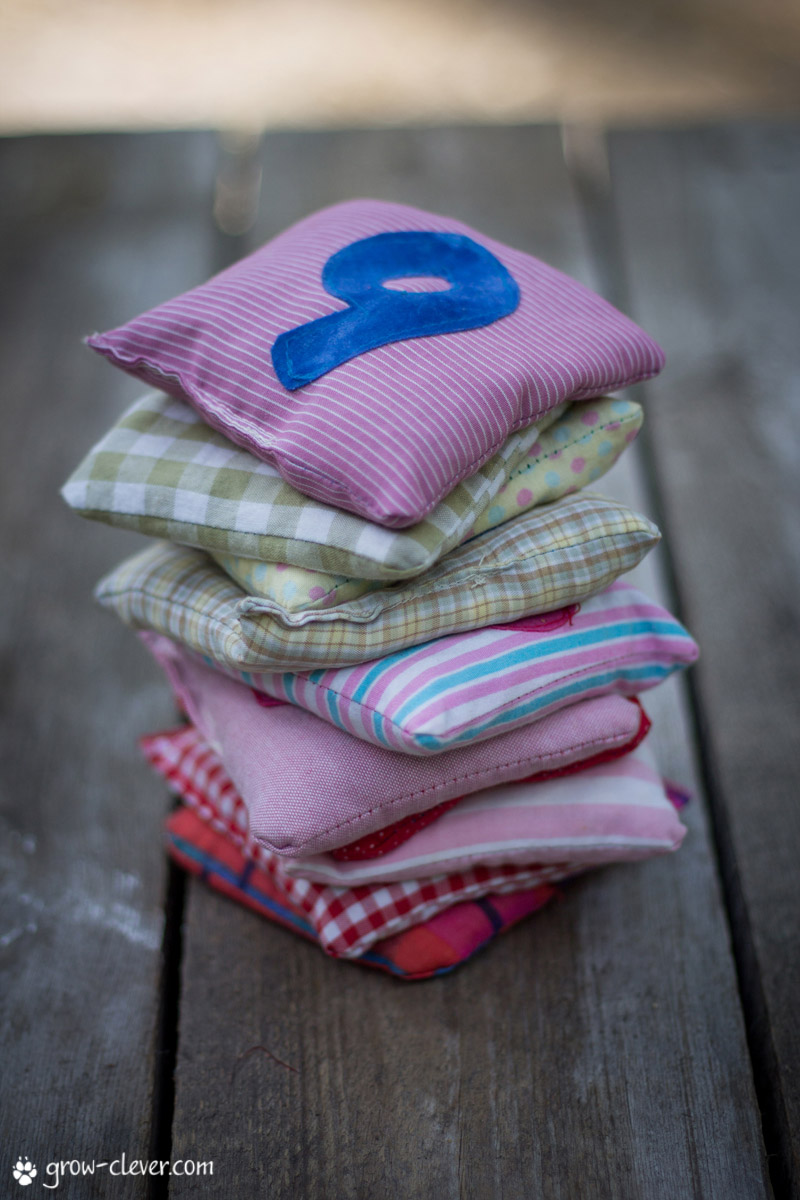
9. Sensory balloon pouches. In essence, this is the same as sensory pouches but much easier and faster. In addition, you can safely pour flour or salt into such bags.

- choose air balloons as high quality as possible. They will last longer.
- Do not put spicy pasta or other small items with sharp parts into the bags.
- Hide 1-2 beans in flour. It will be very pleasant to look for them with your fingers.
- Do not be afraid that this is a short-lived toy. Of course, anything can happen, but such bags can serve for more than one year, even in a children's center.
10. Small rattles. These wonderful educational toys are loved by kids. different ages. And the more such tiny rumblers, the better, because it means that there are more different sounds.

- They are convenient because they fit in a small hand.
- They look nice, so you want to play with them.
- Different sounds delight babies and they want to know what the next rattle sounds like.
- Homemade rattles make an excellent sound lotto: pick up a rattle of the same sound.
11. Filled bottles. There are many options for games with similar bottles. They can be used for both the smallest children and preschoolers. Toddlers who are learning to crawl can use this bottle to push it, watch it roll, crawl towards it, and push it again.
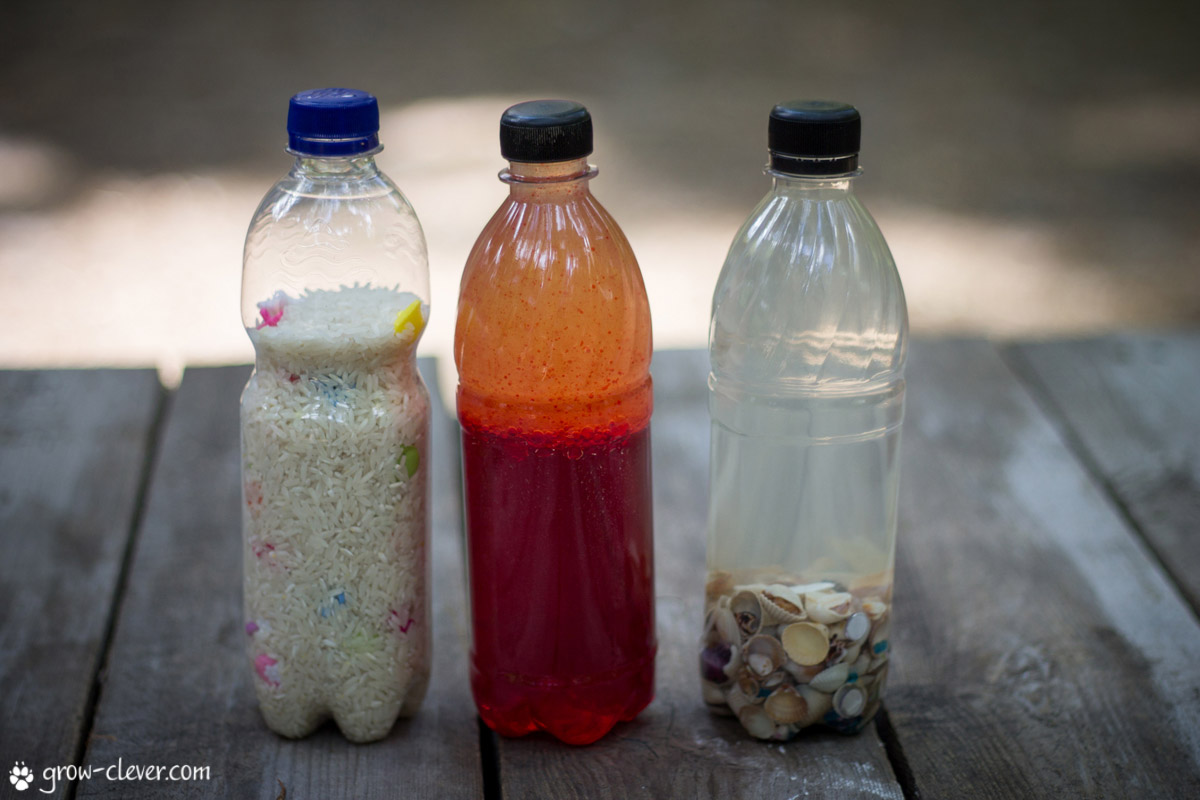
Bottle "Lava lamp". Pour 1/3 vegetable oil and 2/3 food coloring water into a clean bottle. Close the bottle with a cap, after lubricating the neck with superglue.
Search bottle. Pour into the bottle about half a bottle of rice and various small figures, beads, pebbles, buttons. Shake to hide small objects in rice. Add some more rice if necessary. There must be an empty space at the top. Close the bottle with a cap, after lubricating the neck with superglue. And now you can give your child tasks depending on his age. For example, find a pink elephant, or find the letter A. To complete the task, the bottle can be shaken, twisted, turned over until desired subject will not come into view. Read more about search games.
Sea bottle. For this simple toy you will need: water, seashells and sea pebbles and sparkles. Pour 1/3 of the bottle of pebbles, shells and sequins into the bottom, add water to the very top of the bottle. Close the bottle with a cap, after lubricating the neck with superglue.
12. Jar with filler. The principle is the same as for bottles, only the jar is smaller, it is convenient to hold it in your hands. Inside: water + glitter. Instead of sequins, you can use any little things. I know that such jars are also made with glycerin, but we have not tried it yet, and when we try, we will definitely show what happened.

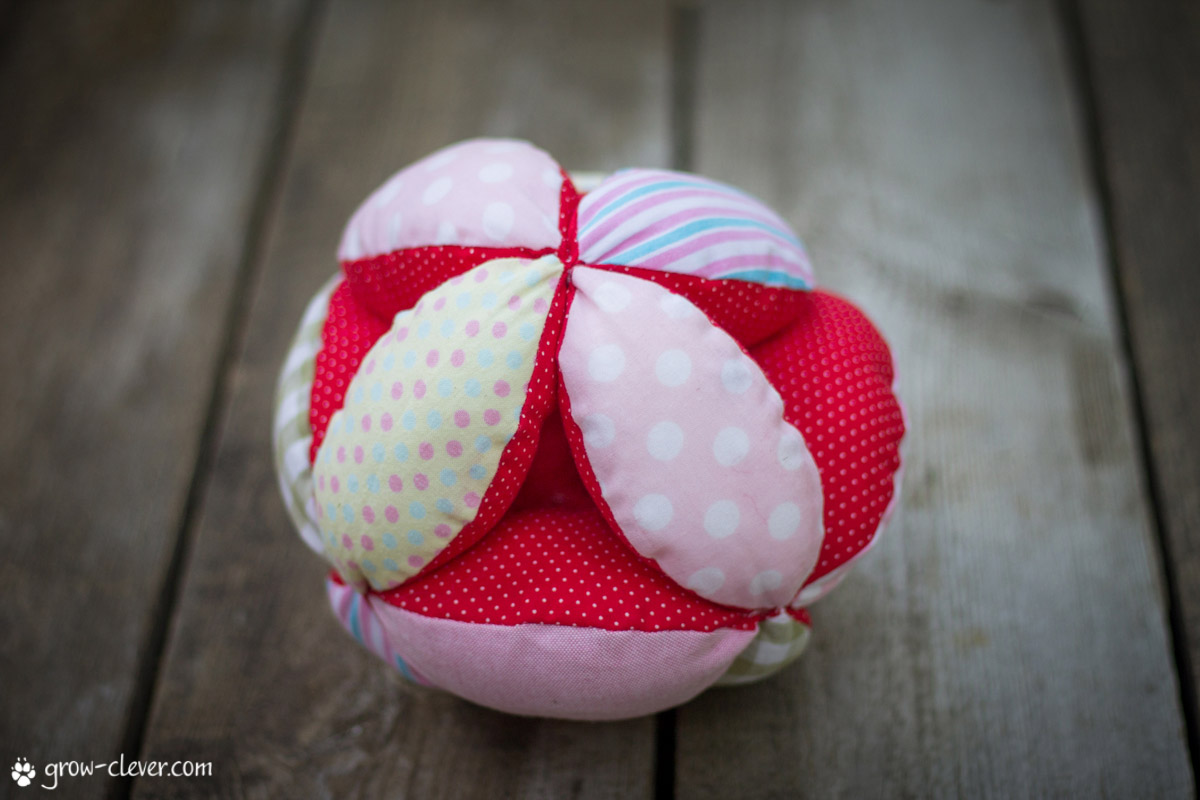
13. Patchwork ball. I am about him too. This is a wonderful helper for a baby in crawling. It is not difficult to sew such a ball, but it takes a long time.
14. Jars-boxes with holes. This is a mega-useful game, because it trains fingers, ingenuity, perseverance. In addition, many children like to push all sorts of little things into narrow holes. Classics of the genre: ice cream bucket + donut pom. Holes can be made with scissors, or you can burn them out with a soldering iron (this is what our dad usually does :)


17. Non-sewn fabric toys. Once I wrote how to make . And now I'll tell you how to make a simple octopus. By the way, this glorious octopus is very popular with children up to a year old, because it is convenient to hold it in your hands - you just grab one of the tentacles. You can make it in just half an hour.

For the octopus you will need: fabric (I have fleece, it is very delicate, just perfect for children's hands, and does not stick around), scissors, thread or rubber bands, buttons, needle, thread.

As you can see, most toys are quite easy to make with your own hands and the process of creating them does not take much time. We will be glad if our review inspires you to be creative.
Well, if you have not yet subscribed to the news of the blog “Grow smart!” and do not receive from us fresh ideas and materials for classes with children, then.
DIY soft toys: ideas + patternsLet's delve a little into this fascinating process and learn about sewing technology. soft toys. They are the easiest to make and the most sought after. To make toys with your own hands, you should pay attention to the color of the fabrics. They should be bright and cheerful and pleasing to the eye, you can combine several shades. If there is no home desired colors, the fabric can be dyed independently, for this you need to purchase special dyes.
Their choice should be taken seriously, because they will be in the hands of children and the dyes must be natural and not shed. It is necessary to cut the fabric very carefully and carefully, be sure to follow the same dimensions of the paired parts and the full correspondence of the sides.

And for those who want to play real games, I recommend the site http://mygame-s.ru. There are interesting games for boys and girls here that will bring benefits and a lot of fun.
This is not only racing, but also a lot of interesting games of different genres, as well as games based on famous cartoons and films. The mygame-s.ru portal will help you find your favorite entertainment and play it online!

Before processing the pattern on sewing machine it needs to be processed first. buttonhole stitch. If the fabric is loose, leave allowances for the seams. When the pattern is ready, you can fill it with various materials.
The most affordable and popular is the synthetic winterizer. Such toys can be washed in the machine, they dry very quickly and do not lose their shape. Toys can also be stuffed with sintepuh (these are soft small balls). It does not roll and also tolerates washing very well.
If you do not want to spend additional money on the purchase of fillers, you can use several options:
1. Remove such fillers from old blankets or pillows that you will no longer use.
2. Fill the toy with small pieces of soft fabrics available at home. Before you start sewing a toy, you need to know what will be needed to create it: - fabric of different strengths and colors;
Sintepon, cotton wool, foam rubber, and other substitutes;
Buttons and beads for eyes and nose;
Sewing tools;
Ruler, pencil and pattern paper.
For right choice the fabrics from which the toy will be sewn need to know their properties. For example, knitwear stretches well, you can sew any toy out of it. Cotton fabrics also suitable for different types, but the toys from them are more solid. Terry is perfect for toys where wool imitation is needed. A teddy bear, a bunny or a fox can be made from velor or wool velvet, such a fabric will do its job perfectly. From felted fabric, creative and original toys. But still, it is more suitable for the manufacture of additional details, such as paws, ears, nose, and so on.
Patterns of soft toys:
1.
2.
3.
4.
5.
6.
7.
8.
9.
10.
11.
12.
13.
14.
15.
16.
17.
18.
19.
20.
21.
22.
23.
24.
25.
26.
27.
28.
29.
30.
31.
32.
33.
34.
35.
36.
37.
38.
The long-awaited child has finally appeared in the family! Together with him, not only happiness and joy came to the house, but also worries and worries. In the first months of life, it is quite enough for a child to feel your love and care. But, starting from 3-5 months, a child needs various kinds of toys for normal development.
Starting from this age, parents begin to visit children's toy stores more and more often and buy something special for their baby in them, spending not only a lot of time and effort, but also money on finding and purchasing toys. However, it is not at all necessary to buy children's toys, since they can be easily made from improvised means on your own.
Pros of DIY toys:
- They are safe. It is unlikely that you will make toys from small parts or toxic materials.
- They do not require large investments. All toys can be made from improvised materials or things that everyone has at home.
- They are original in their own way. It is unlikely that in any store you will find a toy even slightly similar to the one you made yourself.
How to make an educational toy for your child yourself?
To please your favorite child new toy you need one free evening, improvised materials and a little imagination. Turn on pleasant unobtrusive music and tune in to fruitful work.
So, what educational toys can you make?
Beanbag
At the age of one year, the child needs to put light rattles into the handle and teach him to hold them tightly, shift from one handle to another. Thanks to the rattles, the baby's muscles will begin to "work", the baby will master new skills and movements. It is rattles that begin to develop fine motor skills of the hands.
Therefore, the first handmade toy should be a rattle. To do this, take a small bottle with a tight-fitting lid. You can pour cereals (for example, buckwheat) into it and tighten the lid well.
In order for the baby to be interested not only in “rattling” with a jar, but also just looking at it, the jar must be decorated. It can be tied with a bright ribbon, draw a picture on it.
Also, a rattle can be made from a transparent jar. So the child will have the opportunity to look at what is inside her. In this case, it is worth filling the jar with multi-colored beads or bright buttons.


mini pads
For children 5-6 months old, tactile sensations are incredibly useful and interesting. This allows you to develop fine motor skills, a sense of touch. Small pillows with a diameter of 7-10 centimeters will come to help in the development of the child. For their manufacture, it is necessary to take fabrics of different texture, color and print.
The big advantage of such pads is that you don’t need to buy special material for them. For this, old things will fit: a colorful dress, not right jeans, "pregnant bathrobe", which is no longer needed, and the little things of your crumbs will also come in handy. Pillows can be made square, round, oval. The pattern will depend on the shape.
Let's analyze the simplest round pillow. It is necessary to cut two circles of a given diameter from a piece of fabric. In this case, you can make a circle from one fabric, into the second from another from another, so future toy succeed. Do not forget to leave allowances of 0.5-1 centimeter, depending on the quality of the material. We fold the two cuts to each other with the right side and sew, leaving a gap of 3-4 centimeters, so that you can turn the pattern outward and stuff the pillow through it. We twist.
In the center, you can sew on a button that you have or you can make it yourself. To do this, take a coin and some cotton wool or synthetic winterizer. Roll up the ball and place it on the coin. Then wrap the resulting blank with a circle of fabric and fasten it at the bottom with a thread. Sew to the middle of the pillow. This technique will make your pillow even more interesting for the child. Now that the shell is ready, we fill it. To do this, you can use bulk materials - buckwheat, rice, millet, sand (look at the density of the fabric, the stuffing should not “leak” out), as well as standard synthetic winterizer, cotton wool and foam rubber. Now you need to sew up the stuffing hole. To do this, use a hidden seam.
To make it more interesting for the child, you can create pillows - animals, decorate with various ribbons, stickers and large buttons. Please note that all parts must be securely fastened and large enough so that the child cannot swallow them, because children's fingers are able to pick out even the most securely sewn beads.


Buying a developmental rug can hit the family budget hard. In cheaper models, low-quality paint is most often used, which can cause allergies on the baby's delicate skin. You can avoid wasting money and be sure of the quality of the finished product if you create it yourself. This does not require large investments, just desire and a little patience and time. In addition, in your rug you can include a large number of pockets and attributes than you will be offered in stores.
So, for the rug you need shreds of different colors and textures. The more variety, the brighter and more interesting for your child. Distinguishing fabrics to the touch, he will begin to understand what is smooth, what is rough, what is cold, what is warm. You can even make a small area from the edge of the wool so that it slightly pricks the baby. In order for the rug to be warmer and softer, make it two-layered and place a rolled synthetic winterizer between the layers. So that it does not move out, and the rug can be washed in case of an emergency, sew it along the borders of the patches.
For decor, you can use fabrics of other shades, various sewn applications. If fantasy and time allow, then you can make your own owl, dog, cat, hamster, penguin or hedgehog. This does not require special skills, it is enough to find detailed instructions on the Internet, make patterns and sew them in a certain sequence to the rug.
Use interesting tricks. Place a rustling material under a few shreds. To do this, use cellophane from store packaging from under clothes. They rustle louder than plastic bags. Pockets are a great addition to play mat. You can hide small toys in them, and then find them. The tweeters sewn inside will attract attention and teach you how to press pointwise with your finger or pen.


An alternative to a developing mat is a fabric sensory book.
If you set out to create an educational toy when the baby is already sitting confidently, then the rug may not interest him. Yes, help comes. Alternative option- developmental book. The principle is the same, but this time, the child is comfortable holding it in his hands and needs to turn the pages to see new images, which means it develops coordination and helps to better navigate in space.
To make such a book, you need different square pieces with a side of 20 centimeters. These will be the pages of the book. You don’t need to do a lot of them so that it is not too massive, because because of the applications, the pages will not adjoin each other and will create additional volume. On average, books have about 6 pages. Thus, it is necessary to prepare 12 shreds - the basics.
The child will be interested in looking at a book with multi-level applications. A good example is a house. Opening doors and windows will teach the baby to capture small details with two fingers. Imagine a child opens a window in a book, and there is a fox. Unexpected, joyful and memorable. Thus, the child made a fine-sensory movement, and recognized one animal. Opening windows and a rising tree branch work on the same principle. Mushrooms, berries and flowers should be bright.
It's good if you can sew zippers and Velcro into the book. Various buttons will also be useful inserts, which can be installed in the nearest clothing repair. Eyelets will allow you to create lacing on one of the pages. First, the child will look at it, and then he can begin active training. Use whatever you can find.


Board "Masters"
This educational toy will definitely not be left without attention, but it will be easier for dad to make it than for mom. To do this, you need to take a wooden base (it can be a cabinet door or part of the countertop). The wooden base must be sanded and varnished. After that, you can fix a latch, a switch, a door lock, hooks, latches, levers and all household trifles that so attract the attention of children on it. Such a "toy" is able to occupy both a boy and a girl for a long time.
In addition, the available switches, hecks and other attributes Everyday life it will be easier to explain when he already has an idea about them. Do as many movements as possible together, commenting on each action over and over again.
It is very useful to make a clock on the board, so you will teach your baby numbers and the concept of time. Let him not understand this yet, but in the future for him, obtaining this knowledge will be easier. Kids at 3-4 years old can already count up to 10-12, and learning by doing is always more interesting.


Making beads for the game
Beads can become an original and very useful toy for the development of fine motor skills, and hence the speech of the baby. Ordinary, purchased, inherited by the baby from the mother, will not work. Because most often they use the same beads, approximately the same size and texture. By making it yourself, you can add interesting details to the beads that the baby will not be able to ignore.
To make beads, we need a thread of 30-40 centimeters (it is best to take a double thread so that the child cannot break it). The length will depend on how much and how you place them on them.
Now, the fun part. Disassemble the old box with sewing accessories, I'm sure that you will find there a huge variety of buttons, tubes, bobbins from threads. If you manage to get a bell or bells that will ring merrily when you play them, then your beads will not be worth the price. For a change, you can knit small round balls of different colors. The more varied the materials, the better.
These beads will be useful not only for the crumbs, but also for the grown-up child. You can learn colors from them.


Moms know that they fly into the trash very beautiful packaging from children's toys, juices and other things. Sometimes you really want to keep the picture, but storing garbage in the house where the child lives is not hygienic and not practical. But if you cut out only an animal, a picture, then you get a small and very bright card that the baby can look at and learn new things. Ideally, if the picture has a caption that is drawn on it. For example, when cutting a juice box, try to capture the word apple if it is in the picture. This opportunity cannot be missed, so we take scissors and start cutting.
We cut out and put the cards in a box, and when enough accumulates, we strengthen them. The child does not yet understand that they cannot be torn, and if they get into water, porridge or soup, then they will deteriorate forever. Therefore, it is necessary to protect them from destructive actions. If you have a laminator at home, then wrap the cards in a laminating film. However, this is more of an exception than the rule. For the rest, there is another way to strengthen the cards. Take a wide tape and glue the card on both sides. Such protection is not the country's no action. If everything is done carefully and accurately, then the card can even be bathed.
It is better to store cards in a beautiful box that will encourage the child to look inside. In order to create it, you need to take the foundation. It's perfect for a shoe box. Shoe box enough for storage huge amount cards. Try to decorate it with children's drawings, not only outside, but also inside. If you stick an animal on the inside of the cover, you can play hide and seek. The animal will appear and hide in the box. The kid will definitely like this game.
Try to hide all the toys in bright, beautiful boxes. This has a beneficial effect on the memory of the baby. He knows for sure that the cards are in a red box with an asterisk, and the pebbles are in a blue box with a fox.


Another educational toy is pebbles. Ordinary stones collected in the sandbox can be incredibly useful at home. If you have the opportunity to collect river specimens with a smooth surface, then be sure to take a walk to the river. This will make your work easier in the future.
For creating useful toy for a child, you will need gouache, clear nail polish and a little imagination. Using multi-colored gouache, draw various animals on the surface of the pebbles. If they are beyond your power and you are a so-so artist, then draw flowers, berries, snails, hearts, cars and vegetables. For those who are not friends with the brush at all, we can recommend plain pebbles with stripes, dots, dotted lines and zagagulins. For children who are already able to remember numbers and letters - write them. Use contrasting colors to make them eye-catching and memorable. Even if you do not know how to draw at all and just color them in different colors- this is already a huge plus for the development of the child.
So, let's say everything is clear with the picture. Painted the pebbles, applied everything they could. Now the image needs to be fixed so that it does not smudge or wash off, we use ordinary nail polish. Instead, you can cover it with any other - yahny, acrylic.
At first, your baby will be able to sort them out, then lay them out by color, and then voice the pictures.
To make it easier for him to remember numbers and letters, learn a few rhymes and accompany the pictures with funny jokes. So the child will remember not only the score and learn to read, but he will also tell the rhymes himself.


Create a racing, multi-level track
Creating a track on which a ball, a car or an egg from a Kinder will roll is a very exciting activity not only for kids, but also for their parents. Every child will want to ride and see with what intricate moves the ball jumps.
In order to create such a toy, you will need several boards, corners (depending on the number of tiers), scissors and glue. You can also use regular cardboard. As a base, you can use any board (you can find it after repairs in your apartment or ask a neighbor or relative for a small piece) or an empty box.
You should not make very high stands, the child should easily reach the upper tier and see what is happening there. Corners can be easily found in hardware stores, they are not expensive, weigh little and are easily cut with a knife or scissors. In addition, they are very light, which allows them to stick on liquid nails, moment or all-purpose glue.
The biggest difficulty lies in the technical execution of the toy. It is necessary to calculate the slope, the distance between the beams, so that the rolling ball or the car does not fly out of the track. There is no specific calculation formula. Everything will have to be tested in practice. Choose two objects of different weights that you can roll and start experimenting. If the angle is greater than necessary, the machine will roll over and will no longer budge, and the balls will bounce and jump away from your child.
A beautiful soft toy will not leave anyone indifferent, especially if it is handmade. Both children and adults will appreciate it.
Making soft toys with your own hands is a rather interesting and exciting process that immerses an adult into childhood.

It doesn’t matter if you don’t have any experience as a seamstress, the main thing is the desire to craft, and everyone can control the needle and thread.
DIY soft toys for beginners
A handmade soft toy is much more priceless than a store bought one. To make such an original thing you will need:
- to study the simple technology of its creation;
- select source materials;
- competently make a template for the future product.

On the Internet, you can easily find a large number of workshops on making a variety of soft toys. You can also go to shops selling goods for needlework - there you can buy kits and manuals for creating soft toys with your own hands.
It will be just fine if you make a toy with the children. Such a pastime will develop their mindfulness, promote familiarization with work, order and accuracy.

The main thing is to remember about safety and do not leave children alone without supervision.

Materials used to create a soft toy
The following fabrics can be used to create a soft toy:
- Knitted;
- silk;
- Cotton;
- Woolen;
- Velvet and velor;
- Felt.
General instructions on how to make a soft toy
- Select the source material, carry out the necessary preparatory work- washing, ironing, steaming;
- Cut according to the template;
- Baste all the details along the marked lines;
- Sew details;
- Fill the product with filler;
- Fold all the details of the product and sew them;
- Finalize appearance toys.

The pattern is preferably made of cardboard - this facilitates the process of tracing the template on the material and increases its service life.

Master class: how to make a toy "Mouse" with your own hands
Wonderful, small toy "Mouse" is designed for babies up to 1 year old. It will help develop the sense of touch. It will be very interesting for crumbs to play with such a bright, funny little thing.

Sew "Mouse" is very simple:
- Take the suggested template;
- Prepare scraps of material, preferably bright colors and threads in a contrasting color;
- Align all parts of the product on the front side, sew them with a buttonhole;
- Make ears, eyes and nose;
- Put the synthetic winterizer inside and sew on the tail.
Below you can see a photo of the finished toy.

Something like this can be used as Christmas toys, for this it is enough to make a loop.

We sew a turtle
We will need:
- multi-colored shreds of cotton;
- cardboard template;
- synthetic winterizer;
- buttons or beads for the eyes;
- needles, thread, scissors.

- We make a pattern. To do this, draw the head, tail, paws and torso (with a radius of about 15 cm, make the bottom of the shell a little smaller);
- We fasten the template to the wrong side of the material, circle it. Next, you need to cut out two parts for the head, tail, shell and 8 for the legs;
- We make 4 tucks on the upper body. This will give volume to the product;

- We sew the parts of the head and paws together, stuff them with filler. We also sew the tail. We do not fill it;
- We sew all the details of the shell, leaving holes for the limbs and filler;
- We connect all parts of the product with a hidden seam, sew on the tail;
- We make eyes. The turtle is ready!
Soft toy "Cat"
In order to sew the "Cat", we need a sock, and a new one. Next, decide which cat you want to get as a result - fat or thin. It depends on where you need to cut off the toe.

For a fat cat, you will need the part that covers the sole. The upper part of the gum must be moved to the side. Then tightly stuff the toy with filler so that the body is larger than the head.
Note!

We bend the edges of the hole inward, pin it with pins and sew it together. Stretching, we form the ears. The next step is to embroider the eyes, nose and mouth with a thread of a contrasting color.

The finished product can be decorated beautiful ribbon, scarf, bow, brooch.

Below are photos of a variety of soft toys that you can sew with your own hands.

Sewing toys at home is not at all difficult, and the result of such work will bring satisfaction. We wish you success!

DIY soft toys photo


Note!


Note!


