How to sew a vest with your own hands from fabric. How to sew a women's vest made of fabric elongated, long, short with your own hands: beautiful models and styles for girls, women, overweight, patterns, photos
One of the most versatile pieces of clothing is back in fashion. This is an elongated sleeveless vest.
It is indispensable in cool weather and is a real lifesaver for women. different ages and complexes. Perfectly hiding undesirable features of the figure and favorably emphasizing the advantages, an elongated vest is indispensable in the wardrobe of any fashionista. Although it must be borne in mind that, visually stretching the silhouette, it visually shortens the legs.
The classic elongated vest is a representative of the English style in clothing, bringing respectability and aristocracy to the image. But variety of options its designs, proposed by designers, allow using this element of the wardrobe to create many modern and stylish images.
Of course, you can go to the store, buy ready-made clothes and become the owner of a standard production model. Or you can show female ingenuity and create a unique thing with your own hands that suits your style and figure.
Maximum originality
To sew some thing, it is no longer necessary to have cutting skills, since the models that are relevant in modern life do not require complex patterns and are available for manufacturing even for novice seamstresses.

To sew an elongated vest, we need:
- textile;
- sewing machine;
- threads;
- scissors, tailor's chalk, safety pins;
Consider several options for tailoring original models.
Option number 1 - the most simple model and a very simple pattern. For her, it is recommended to use a more interesting fabric or artificial fur. We take measurements: chest circumference and hip circumference, select the largest value and measure the size of a piece of fabric or fur from it, add a few centimeters so that you can wrap the vest.

We retreat from the edge the required number of centimeters (we focus on our measurements), as shown in the figure, and make markings for the armhole and cut them. We process the armholes and edges of the fabric with braid or inlay. The vest is ready. This model looks great with a contrast lining. You can wear this vest with a wide showy belt.
Option number 2 - vest-transformer. For this model, a fabric that drapes beautifully is suitable. You can make a pattern according to the figure below.
Option number 3. This model is sewn on the basis of a circle. Before work, it is better to wash and iron the fabric. To cut a circle, fold it in half, then fold it again to make a square. Cut around the edges to make a circle. You can use ready-made patterns for a smooth edge.
We measure the girth of the chest or the width of the back, in accordance with the measurement, mark the armholes. Then we cut them out. We process all open edges and armholes. It looks great if you process the edges with leather trim in the color of the fabric. A leather or suede belt completes the look.
This model is perfect for obese women, will hide imperfections and create a feminine silhouette.
Option number 4 - it doesn't get any easier. Knitted fabric or fleece is suitable for this vest. On a rectangular cut, we mark and then cut out the armholes of the desired size and - you're done! This fabric does not need processing. It turns out a warm and cozy thing for a cold evening.

Magic loops
For those who prefer a hook and knitting needles to a sewing machine, we can offer interesting models vests. Which look no less stylish, knitted from the original yarn using various patterns, arans and braids.

Option number 1
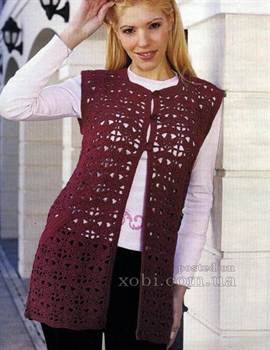
Long showy vest crocheted, will not leave indifferent any needlewoman.

Scheme and description of the process in the figure below:

Option number 2
Decorative model of an elongated vest for warm summer days, undoubtedly, will give the image lightness and youthful enthusiasm.

Pattern, diagram and description in the figures below:
Option number 3
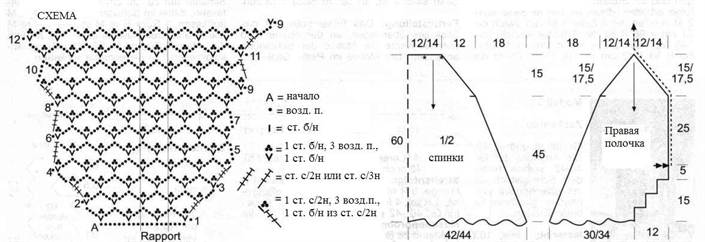
An openwork lingonberry-colored vest will add depth and mystery to the image.
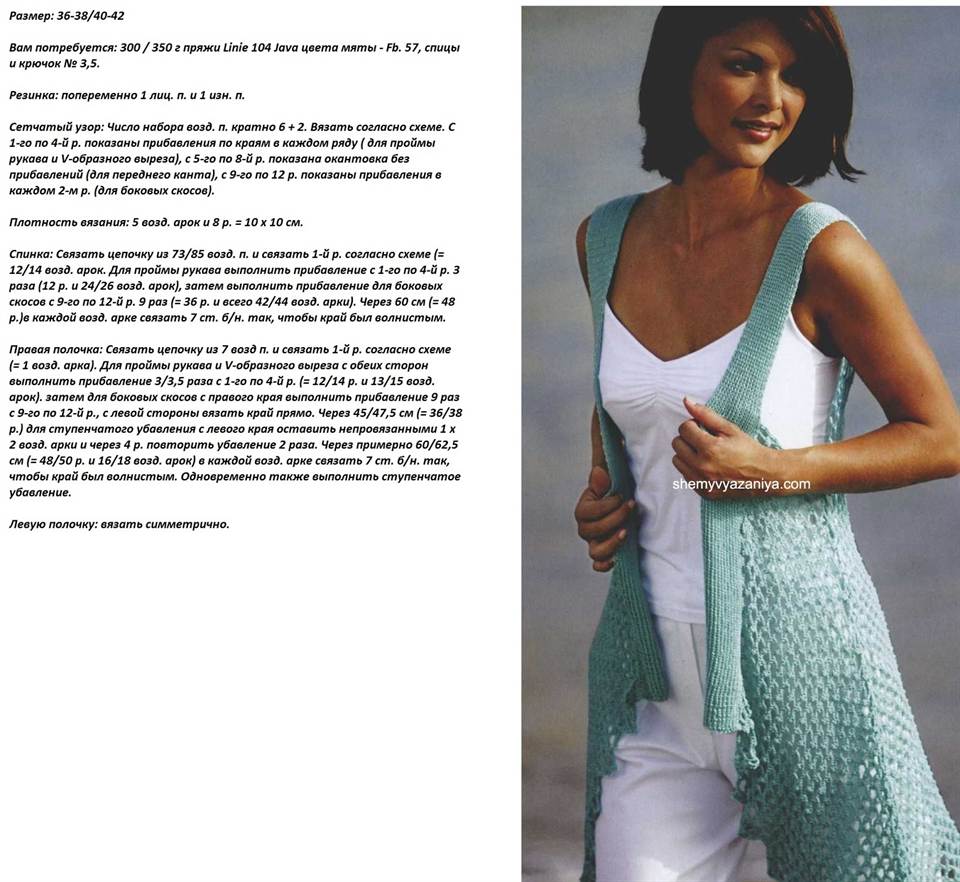
Yarn consumption and pattern is given for size 42-42.
You will need:
- 450 g of yarn (80% acrylic, 20% viscose);
- buttons 3 pcs., matching the color of the yarn;
- hook number 2.
Pattern scheme:

Pattern:

Description. Back:
- Recruiting 85 air loops and knit the 1st row with double crochets, then according to the scheme;
- After 50 cm, we close 7 loops for the armhole on both sides of the back and knit straight 22 cm
- After 72 cm from the beginning, we finish knitting the back;
The right and left shelves are knitted symmetrically to each other.
- Recruiting 43 air loops and knit the 1st row with double crochets, then according to the pattern;
- After 50 cm, we close 7 loops on both sides for the armhole;
- After 12 cm, we close 13 loops for the neckline and knit another 10 cm straight;
- After 72 cm from the beginning, we finish knitting the shelves;
We knit 2 parts of the pocket flap: we collect 25 air loops and knit 5 rows with single crochets.
- Prick wet parts on a pattern and dry;
- Run side and shoulder seams;
- Sew pocket flaps;
- Sew buttons on the left shelf;
- On right shelf tie hinged loops for buttons;
- Tie the product with 3 rows of single crochets or one row of the "Crab step".
Scheme for the implementation of hinged loops:

Knitting needles also offer a lot of opportunities to add a beautiful functional item to your wardrobe.


An elongated vest with braids creates an image of a modern and self-confident woman.
Scheme, pattern and description of knitting below in the photo:


Stylish makeover
Let's not forget about another way to update your wardrobe - this is a rework of old or out of fashion things.
English classics are relevant again. The vest has not come off for several seasons fashion catwalks. At first glance, this is not the most necessary thing in wardrobe. But once you buy or sew a vest, it becomes obvious - this is exactly the thing that makes it clear that its owner has a sense of style and taste. To make everything work out for you, in this article we will tell you how to sew a vest with your own hands quickly and without a pattern. How to sew, cut and cut for fat or thin different sizes(54, 46, etc.), sleeveless warm drape for free. An article for beginners can handle even young girls.
Features of the figure and design solution
Vests are shortened and elongated, classic fitted and oversized - there is no limit to this variety. They are suitable for both very young girls and adult women. Due to the variety of fabrics and styles, you can choose a vest that will visually slim and hide figure flaws, or, conversely, add volume where needed. It is worn with dresses, skirts, trousers, jeans, and even shorts.
Now almost all famous brands represent a wide range of vests, which is called for every taste and color. Price category - from minimum to maximum. But why not take a moment, make yourself, your loved ones happy, and sew a vest with your own hands without a pattern quickly and easily, while gaining invaluable experience in mastering the sewing business.
How to sew a women's vest with your own hands?
If you finally decide to implement this idea, then the main advice is not to rush. First you need to decide on the style of your vest, based on your data. Then you need to pick up the fabric, make simple pattern and last but not least, sit down at the sewing machine. To simplify the task, we will analyze everything in stages.
Choosing a fabric for a vest - what to consider?
Printed wool, tapestry, velvet, suede, leather, patchwork fabric. Today vests are sewn from the most different materials- the more bizarre, the more fashionable. But still, there are certain nuances, given which you will be satisfied with the result.
We study and choose:
- If you are going to wear a vest mainly for business meetings, then you should opt for a classic costume fabric. Such an alternative to a jacket in combination with a light blouse or shirt will be very appropriate in the office.
- Secular parties are the place where you can come in both satin and silk vest. This is an option for summer. When it gets cool outside, opt for velvet or suede. By the way, the latter is now more relevant than ever and is suitable even for sewing dresses.
- For everyday wear, a vest made of knitted fabric. Such materials are soft and comfortable, mostly cotton and natural, due to which a feeling of comfort is created. Another advantage of this option is knitted fabrics compare favorably in price.
- Now many wear vests over sweatshirts or even jackets. For this option, it is better to choose cashmere, light coat fabrics or boucle.
- The best option is to stay on a medium density fabric. Then a vest of any style will not ugly fit the body or make certain parts of the figure too convex.
Important! Overweight women should avoid short vests, vests made of very thin or thick fabric. “No” is worth saying to fabrics with imitation coarse knit and with the presence of decorative flounces and frills. All this will visually enlarge the figure.
As for the color of your future vest, you should not strictly adhere to trends, it is better to opt for what suits you:
- Marsala, khaki, dark blue shades indigo and nevi colors are quite popular this season.
- Also in line with them are pistachio, lilac (violet) and pastel mint and blue shades for summer.
- Classic and basic colors are always relevant - these are black, beige, sand, all shades of gray and blue.
- If you want visual variety, pay attention to the fabric in checkered, striped or floral patterns.

Method 1
The easiest way to sew a vest with your own hands quickly and without a pattern does not even require sewing machine. All you need is a piece of fabric, a ruler, tailor's chalk and scissors.
Important! For this option, it is better to choose a material that will not fray at the edges, such as neoprene, fleece or knitwear, because the cuts are not provided.
Operating procedure:
- We draw a rectangle on the fabric 115 cm wide, 75 cm long. Cut it out.
- From the upper left point to the right, lay off 15 cm. From the same point, lay down 37 centimeters and draw another, already smaller rectangle.
- From the lower right corner of this rectangle in a straight line down, draw a line - from 20 to 25 cm.
- Now, along this line, you need to cut the fabric.
- We fold our large rectangle in half, make the same hole on the other side - they should be symmetrical - these will be cutouts for the hands.
That's all! The vest is ready and it took 10 minutes.
Important! It can be worn as a wrap by making slots for loops and picking up beautiful large buttons that will serve not only as a fastener, but also as a decorative element of your vest.
Method 2
By the same principle, you can make another model of a vest - with soft, rounded edges:
- We again choose a fabric that is not loose, that is, that does not require processing.
- We draw a circle on the fabric, its diameter is 100-110 cm.
- We find the middle of the circle and from it to the right and to the left we set aside 25 centimeters.
- Now from each of these points we draw 2 straight lines parallel lines up. The height of these lines is 25 cm.
- We also cut these lines with scissors, and we get the armhole of the vest, and at the same time the finished vest.
Important! It will look especially beautiful in combination with a belt.
Method 3
Another way to make a fabric vest with your own hands is also simple and accessible to everyone:
- First you need to measure the volume of your hips - this will be the starting point in the calculations. Let's take a measurement of 96 cm as a sample, according to Russian standards it will be size 48 (96/2 = 48). It is worth adding another 4 cm to this - these will be seam allowances. As a result, we get 100 cm.
- So, on the fabric, from left to right, we set aside half of this measurement, that is, 50 cm (this is the width of the back and it is also the width of the shelf).
- Set aside 110 cm up and draw a rectangle.
- We determine its center and begin to make the neck of our future product.
- From the center point upwards we set aside 8 cm, to the right and to the left - 9 cm each.
- We connect the resulting points in a semicircle and cut them out. The neck is ready.
- Then, from the center point of our rectangle, we cut the fabric strictly in the middle, moving up. The front of the product is ready.
- Now we fold this rectangle in half, sew on the sides, leaving 15 cm to the fold, and we get the finished vest.
How to sew a fur vest?
The last method and style that we described is ideal for sewing a fur vest. A true fashionista knows that such a thing in a modern girl's wardrobe is a “must have”. In addition, a do-it-yourself fur vest is an exclusive. We will leave work with real fur to professionals, consider a simpler version of artificial fabric. Now you can choose worthy replacement fox or mink, which will be difficult to distinguish from the original.
Basic rules for working with fur
So, we will analyze step by step how to cut out the details of a future vest from such a fabric.
- The fur has the direction of the pile. Run your hand over the material - in the direction of the pile it will be smooth. This is important, because if you cut the fabric in the wrong direction, you risk getting a vest with the pile facing up.
- Before you start working with the material, it is better to first draw a pattern on paper. Then put it on the fabric, outline the contours with chalk or, on light fur, with a ballpoint pen. It is necessary to lay out the details of the pattern from the wrong side in the direction of the fur pile (the pile should be directed from top to bottom).
- Cut fur with a long pile should be very careful not to damage it. This should be done with well-sharpened scissors with sharp ends. With small movements, make small cuts, affecting only the knitted base of the material.
When sewing this capricious fabric, there are also features:
- It is necessary to sew the parts in the direction of the pile, that is, from top to bottom.
- To prevent the fabric from shifting and the side seams from turning out to be skewed, before laying the line, the parts should be chopped together with pins.
- When connecting parts from fur with a long pile, you need to capture the very edge of the base. And the pile must be tucked in with scissors.
- After sewing the seam on the front side, using a darning needle, carefully pull out all the villi from under the line, then the junction of the fabric will be almost imperceptible
Important! It is impossible to iron such a product. Fur is an artificial material, and under the influence high temperatures it will start to deform.
Turning a boring jacket into a favorite vest
An interesting and even unique vest can be sewn not only from new fabric, but by experimenting with your old things. For example:
- We take an old fur coat, turn it inside out, cut off the sleeves, while forming a rounded armhole line.
- Then we connect the lining fabric with the fur base with a hidden seam, and the vest is ready.
In the same way, you can transform an old jacket and wear it over a sweater or sweatshirt. A bored jacket can just as easily become a new, favorite vest. To thoroughly transform clothes, you can use jewelry - sequins, beads or rhinestones. Then you are guaranteed to receive an exclusive item.
What to wear with a vest?
Some things in themselves do not belong to a certain style, but by combining them with other details of clothing, the image changes dramatically. This magical property has women jacket. The variety of styles and materials will allow each girl to look like from the pages of glossy magazines:
- A classic vest over a white blouse creates a fresh and businesslike look. Fans of the business dress code have already seen this. You can add onions classic trousers with an arrow or a pencil skirt.
- It is worth putting on a silk T-shirt and tight trousers with a print under a classic black vest, and you get a luxurious romantic look for a date or a party.
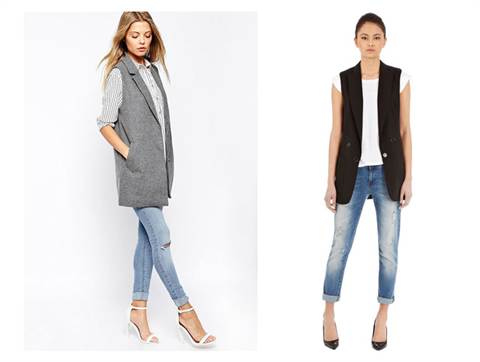
- The elongated model of the women's vest has become a real hit. She looks flawless with skinny jeans or trousers. Refreshing such an image is quite easy, changing a blouse under a vest for a T-shirt. Complementing this look with a top or a silk T-shirt instead of a blouse, you can go to fashion show, presentation or party.
- By changing jeans and a blouse under a vest for a dress, you get a very feminine and romantic look. A winning option is a maxi skirt or midi dress. And if you sew an elongated vest with your own hands and match it with wide trousers from the same fabric, you will get a chic alternative to a cocktail dress.
- A denim vest, like a jacket, is stylish and versatile clothing. Complete with a T-shirt, shorts, it will become your favorite outfit for every day. In combination with snow-white skirts, denim dresses are simply irresistible and always look stylish. However, jeans also look bright with floor-length skirts, long light sundresses and wide trousers made of light fabrics.
What figure is the vest suitable for?
- An unbuttoned long vest perfectly corrects the figure and visually stretches the silhouette. Girl with magnificent forms this will help to visually throw off those extra pounds.
- If you short stature, then it is worth considering that for you such an image plays the opposite role - the legs will look shortened. In this situation, high heels, skinny pants will help.
- If you want to hide problematic hips, choose a vest with vertical stripes or A-line patterns.
- A semi-fitted vest is ideal for owners of a magnificent chest.
- To broad shoulders not conspicuous, do not buy a model with a deep armhole or an extended top. A neat line of the shoulder along with a free style will balance the figure.
Now you are ready not only to make several models of the vest with your own hands, but also to combine them advantageously with the things already in your wardrobe. Looking beautiful and original every day is not a problem for you!
A vest is a beautiful piece of any wardrobe. This product is distinguished by its convenience and practicality compared to other things. A vest can be worn over a blouse when it gets cold, or complement the look if you are going to any celebration.
Classic long vest, made of dense suiting fabric, looks stylish. Such a thing lengthens the silhouette, making the figure much sexier and slimmer. It is easy to sew a thing from dense fabric with your own hands. Spend a couple of hours of free time, and in a couple of days you will be able to show off a new new thing.
If you have a jacket in your closet, but you don't feel like wearing it because it hasn't been in fashion for a long time, cut off its sleeves and process the seams. From a jacket of any size you get a fashionable, beautiful and unusual vest.
Sleeveless vests are also popular., which go well with light things. The size of any product must be carefully chosen so as not to miscalculate.
An experienced seamstress can quickly and easily build a pattern, cut a product, and sew it. And for beginner seamstresses, the task of making a pattern on their own sometimes seems overwhelming. But there is a simple way out - to find for free on the Internet a pattern of the right size, for example, 48, transfer it to paper, and cut out everything you need from it.
Men's padded vest and on the yoke, with an elongated back, button placket closure. Pockets created with leaves. A "cold" hood is sewn into the neck of the back between the collar and the back of the desired fabric or between the collar and back lining.
In the first version, the hood will only need to be worn with the collar up. Keep this in mind when sewing, and decide how it will be easier for you to use the hood.
The pattern of a men's long vest is considered with seam allowances: 1 cm for stitched seams, 0.7 cm for knitted seams.
Pattern preparation:
After cutting, sweep the details. Next, start trying on the vest, make any important adjustments, and start sewing. We determine the configuration of the lines of the stitches of the product ourselves. You can quilt as indicated on our sketch, or you can do everything according to your desires.
Armholes can be processed in several ways.: turning (cutting along the main details), edging or using knitted elastic.
Knitted gum can be made with your own hands on double stocking knitting needles, which is done the same way on the front and back sides of the work: first row, one front loop, one wrong side; the second row and all the other rows - we knit the front loops with the front ones, the wrong ones - remove and do not knit (the thread is in front of the work).
So we made a complete men's vest with our own hands from the right material.
Vest pattern for a woman and a girl
Almost every woman has a vest in her closet, and maybe even more than one. It's stylish, comfortable, beautiful. Women's vest can be different styles, different lengths, for different purposes. Modern vests are made from a variety of fabrics and materials, including leather and sometimes lace.
Consider a pattern of a women's vest with a collar and framed pockets. Pattern preparation and job description:

The vest comes with or without lining. The lining is created according to the main details without taking into account the picks and facings.
Conclusion
There are no important tips for tailoring this vest model. It is only worth recalling that armhole processing is carried out not only with the proposed facings, but also with a different method, for example, with an oblique inlay or a large piping. The main thing is that the processing method you choose is suitable for the type of fabric and the purpose of the thing itself. And of course, remember that you need to choose patterns according to your size, and then you can sew a vest with excellent quality.
Vest we are familiar with as sleeveless clothing - this is the main feature by which we distinguish the vest from all other types of clothing. But today vests are at the height of fashion and can afford to be very different and unpredictable.
The originality of this women's patterns vest consists in the presence of a small sleeve and in length - this long vest. Pockets are located in relief seams, in the middle before a zipper. If desired, you can change the type of fastening, for example, to loops and buttons. In this case, do not forget to give an allowance along the edge of the side and selection, respectively. You can also adjust the length as you wish.
The pattern is sent instantly by e-mail.
Download a program for viewing and printing patterns.
Note: first print one sheet with a 10x10 cm control square. Check that its sides correspond to exactly 10 cm. Achieve this using your printer settings. Now you can print all the pattern sheets and assemble them into one puzzle, according to the pattern, using narrow adhesive tape or a glue stick.
Before cutting out the pattern pieces, take a tape measure and compare your measurements with the pattern dimensions. Check all girths, length of the product. Determine the optimal size for yourself and cut out the details of the pattern.
ATTENTION! The pattern is given without SEAM ALLOWANCES!(When cutting, you must add them).
Recommended seam allowances: seam allowances 1-1.5 cm, overturned seams 0.7 cm, hemming seams 2-4 cm (depending on the processing method).Provide additional allowances in those places where clarifications after fitting are possible.
Additionally to the main details must be cut out from the main fabric pocket gaps - 2 parts about 20cm long and 6cm wide.
Pickup(2 parts) and burlap pockets(you will need 4 parts in total) remove from the shelf part, and back neckline(1 part with a fold) take off from the back part.
The vest can be either lined or unlined. The lining is cut according to the main details, without taking into account the picks and facings. Don't forget to give seam allowances, as well as additional allowances in those places where clarifications are possible when trying on. Before cutting, check again for compliance with your measurements with the parameters of the pattern. Having swept away the details, try on the product, make any necessary corrections and start sewing.
Beautiful women's vests made of fabric is a trend that is indispensable for real fashionistas and girls who always tend to create new interesting and interesting things with the help of clothes. great images.
Vests can be one of our best pieces of clothing at any time of the year! This happened due to the return of trends to retro and classic, but not only.
Many designers returned to their collections and entered long vests in a glamorous style. Leather vests for rockers also lengthened and began to be painted in new shades, now pastel and light products, took a very large street style Casual into his collection.
Boho and ethnic style is also inspired by the silhouette and uniqueness of women's elongated vests, and fits them perfectly into their layered looks.
Long women's vests from good stuff, it is not only a popular thing, but also a unique helper for creating images.
They are perfect for both work and walking on the street. Vests can not only revive simple and boring looks, but sometimes even completely change them, presenting them in a new style.
Such products will help to hide figure flaws, if any.
An elongated fabric vest will definitely help stylish mothers. At such a time, women are not very inclined to buy new things for their wardrobe, and with the help of one long vest, you can always be different and feel good.
In winter, a long fabric jacket warms, it is better to take a slightly denser fabric, coat, cashmere or drape. And in the summer, such products will help to place the necessary fashionable accents in the image, combined with shoes for the situation and jewelry for the mood and style.
Do-it-yourself fashionable vest
Pretty easy to make an elongated trendy do-it-yourself vest. The simplest idea- do not throw away the old jacket, but remove the sleeves from it and give the product new life. However, you can make women's vests from fabric from scratch. Patterns are now easy to find and purchase, but you can build them yourself.
To create a sleeveless vest pattern, you need to take a couple of measurements:
- The length of the thing - let's measure and set aside two values - from the neck to the waist and from the waist much lower, so it will be clearer where to create the darts.
- Chest and waist circumference - on the pattern we set aside the halves of these values \u200b\u200b+ three centimeters for fitting.
- Armhole depth.
- Neck circumference - set aside half on the pattern.
- Shoulder length.
Finished Particles lay out the patterns on the fabric. To do this, fold the product in half, lay out the detail of the back (on the right of the pattern) to the fold of the fabric, so the back will become one-piece. We decompose the shelf part (on the left) on the free edge - there will be only 2 of these parts.
Important points at work
Choose good quality fabric. If you want to make a more traditional vest, take costume fabrics, if the cut is extensive, then you can take knitwear. Do not skimp on the fabric, depends on its quality and appearance products and their duration.
- Costume-type products always have a lining, do not forget to purchase fabric for it - silk, viscose or polyester. The lining can be created both in the color of the main fabric, and in a companion shade or on a contrasting background. But remember that often an elongated vest is worn unbuttoned, therefore, the lining will become a particle of your entire image.
- We take all the measurements correctly, especially if you make the pattern yourself - the even fit of the vest depends on this.
- Beginning craftswomen should take the simplest models of vests - straight, not fitted, without complicated lapels and pockets. The main details of the pattern will then be: a shelf, back, facing armholes and throats (more elements of the shelf and back for lining).
A ready-made fashionable vest will make anyone, even a fairly ordinary one. the image is really beautiful and fashionable.
A vest is a unique thing for all family members. In addition, the sleeveless jacket is suitable for cool and warm weather. Any craftswoman can cut and sew this product with her own hands for herself, a baby or a husband.
Vest for girls with fur trim
In cold weather You can always take a warm vest. Sewing an unusual quilted sleeveless jacket with fur trim is quite within the power of a mother seamstress.
Our vest will be made from velveteen with fake fur trim. But you can use any other good fabric.
Materials that we need for work:
- The main fabric is velveteen.
- Lining fabric.
- Syntepon insulation.
- Not real fur.
We make material cutting. The pattern can be built on examples of products from the baby's wardrobe or take a finished one. You can see examples of other patterns in the photo. In our case, let's substitute our sizes.
- Cut out the details of the pattern from paper and circle them on the material: main and lining. We create seam allowances of two centimeters.
- We sweep or chip off the details from the upper material along the shoulder and side seams with needles.
- We sew these seams one centimeter from the edge.
- Cut out the contours of the main parts from the insulation.
- We fasten the insulation with a fabric lining.
- Then we sew the seams of the lining on the sides and shoulders.
- Slowly lay out the finished lining in the vest, straighten all the wrinkles. We chip with pins, align the sections.
- We sew the main and lining fabric so that they do not move.
- Cut a fur ribbon five centimeters wide for edging.
Attach the fur along the edge with pins or needles. We sew with a seam, one centimeter wide. Create a belt with fur pom-poms. To do this, cut a strip from the main fabric, tuck and sew. Cut out two circles from the fur. Let's go around the edges with a large stitch by hand, pull everything together and get a ball. So we made a vest with our own hands.
Conclusion. Do not be afraid to start making vests with your own hands, sometimes things can turn out better than store-bought ones if choose the right material, tools for the job and read all the tips and instructions for the job. Good luck in creating a beautiful vest, do not stop!

Pattern of a vest with a shawl collar
How to sew a women's vest with your own hands using this pattern
Read this guide:
General description of the style of the vest, a set of patterns for it
Electronic pattern of a vest with a shawl collar 40-52
File Format: PDF to life size and without seam allowances.
Price: 1.5 $ (payment in the currency of the buyer's country)
Sewing Difficulty Level: Professional - This pattern is not suitable for beginner couturier as this vest will require sewing skills outerwear. In particular, you need to perform the WTO, stick dubbing, process the shawl collar, pockets and connect the vest with the lining.
Tailoring this vest will seem difficult for graduates of tailoring courses, as well as for tailors of a light dress.
The set of patterns for a vest with a shawl collar imitating an English type collar includes (Fig. 1):
- Back patterns.
- Shelves
- Vest selection.
Armhole and lining facing patterns are not included in the set of patterns, as they are trimmed according to the product or according to the same patterns of the back and front.
The chest gain (Pg) is 12 cm - this is a large volume vest (can be worn over a thick sweater or as a double-breasted).
What fabric to sew women's vests of this style
Thick woolen fabrics that are used for sewing coats are suitable: drape, cloth, boucle, ratin. As well as dense costume fabrics such as lightweight drape or velor.
It is also possible to sew this vest model from velvet, jaccade and heavy suiting silk fabrics, but in this case, you should choose the size in such a way that the increase in the chest does not exceed 6 cm.
The consumption of the "top" fabric for a vest is from 170 to 190 cm - depending on the size of the product.
Dublerin consumption from 110 to 180 cm - depending on the width of the dublerin and on the size of the product.
Lining consumption from 130 to 160 cm - depending on the size of the product.
For a more accurate calculation of consumption, you should perform a preliminary layout of the patterns before buying fabric.
In addition to the fabric and butt, you will need a mannequin.
How to download and print patterns
How to choose a size without using tables and taking measurements
How to print a pattern at home in full size on A4 sheets
Ready-made patterns of dresses and outerwear in full size free download
How to cut a women's vest with a collar with your own hands
(detailed description of cutting at home)
Attention! Warning: all shawl collars are quite difficult to cut and sew, so this model is strongly not recommended for beginner home fashion designers.
When cutting this vest, it is very important not only to follow the direction of the grain thread, but also to add seam allowances very accurately. This is especially true for the collar and sides - it is precisely the precise allowances that provide the right fit for the collar and make its processing much easier.
Notches and construction lines when cutting a vest
Not less than important point– drawing notches and constructive lines at the cutting stage. Notches are needed at the waist and at the lower point of the inflection of the lapel. These notches are used as a guide when assembling the product.
An extremely important notch is made in the corner formed by the tuck and the cut of the pocket entrance - without a clearly made notch in this place, the assembly of the shelf is impossible. Notches in the corner imitating the lapel and others in the collar area are added during processing.
All professional tailors are well aware of the need to apply the lapel fold line with a slip stitch on both fronts and keep the thread markings until the end of the product.
Pay attention to the length of the line indicating the inflection of the lapel - you need to iron the lapel only at the bottom, at the beginning of the inflection line, or not iron at all. The second option, the so-called "rocking" lapel, is less preferred due to the small width of the lapel. At the same time, the ironing should fade smoothly at the top and its end should not be higher than the indicated line.
To save fabric, the selection can be cut out with an additional stitch (Fig. 2), that is, from 2 or more parts. There are nuances in this matter: the stitching seam should not be located above the beginning of the lapel kink, and in thick fabrics, it is imperative to make stitching on the left and right collars in different places.
In addition, the stitching seam can be used to open the stitching loops.
Seam allowances on a vest
Seam allowances are common for jackets and coats (pictures 2 and 3):
- shoulder and side seams, middle seam, tuck and pocket entrance, as well as seams of additional stitches and armhole facings - 1 - 1.2 cm each;
- on the bottom - 3.5 - 4 cm;
- on the departure of the side and collar - 0.7 - 1 cm;
- according to the departure of the selection - 1 - 1.2 cm.
- Allowances for the sprout, armholes, collar sewing line, inner edge of the pick are not added.
Pay attention also to the difference in allowances for the departure of the side and the pick-up: it should be 0.3 - 0.5 cm. The thicker the fabric, the more difference allowances. It is especially important to observe such a difference in the collar area. The size of the landing and the quality of the edging depends on the difference.
Separately, you should dwell on the allowance for the middle seam of the back (Figure 2 and 3). If a classic slot is provided, then the allowance for it will be 5 - 6 cm.
Figure 2 shows the layout for small sizes, Figure 3 for medium sizes.
As for dubbing, it is performed in the same way as when sewing a coat (Figures 2 and 3). That is, the back is duplicated below the level of the shoulder blades and the lower cut is cut out with large teeth. The shelf, pick and piping are duplicated completely, of course, with the exception of seam allowances.
In addition, you should duplicate the bottom. Do not forget that the indentation from the edge of the dubbing of the shelf should be 0.3 - 0.5 cm.
Undercut facings can be done both according to the product and according to the same patterns of the back and shelves (Figure 5).
Undercut according to the product for individual tailoring, of course, is preferable, since it takes into account the possibility of armhole correction.
The same can be said about the cutting of the lining - tailoring professionals usually cut the lining according to the product after processing the sides.
For those who prefer to cut ready-made patterns, lining, this is literally a minus of turning and a pick (Fig. 5). For economy and convenience of cutting, it is desirable to perform the simplest modeling operation - close the tuck and the pocket entrance.
The seam allowances for the lining are as follows(picture 6):
- shoulder and side - 1 - 1.2 cm each;
- along the middle seam, an allowance for opening the slots should be taken into account - 5 - 6 cm, a “pocket” slot in the area of the shoulder blades is desirable if the vest will be worn on thick clothes, but a couple of centimeters is enough for it;
- we do not add allowances on the sprout,
- along the cuts to the armholes and to the selection, a double allowance is added - 2 - 2.5 cm.
The layout is a jack, the fabric is folded along the width of the layout, that is, along the width of the shelf and back with allowances.
How to sew a vest step by step
- Sewing a vest with a shawl collar is no different from sewing a similar vest or coat.
- Darts on the shelf are processed with a strip of top fabric. See how to process darts in outerwear
- The pocket can be processed in the seam by adding a leaflet.
- The WTO of the vest is performed in the same way as the WTO of the coat.
- Fitting - taking into account the height of the shoulder pads on the products that you will wear under the vest.
- Further, there is also no difference from sewing a coat.
- see how to sew women coats in the section at this link.
See also models of other styles of this kind women's clothing
Vests women's patterns

Dress sizes 40, 42, 44, 46
Pattern of a fitted jersey dress with a collar
This model of a fitted dress can be sewn from silk jersey, other fabrics are not recommended. You can make an office or festive dress with the help of our pattern, the purpose will vary depending on the color and texture of the material.
Pants sizes 40, 42, 44, 46
Finished trouser pattern
The pattern of trousers is made for fabrics with elastane, the composition can be silk, woolen or cotton. Perfect for this pattern various options crepe. Great casual or office trouser style.
Dress sizes 40, 42, 44, 46
Pattern of a fitted dress with a collar with a zipper
Fitted dress pattern with zip collar and drawstring waist built for knitwear and jersey. Materials with cotton and wool are suitable for cutting.
Dress sizes 42, 44, 46, 48
Dress pattern with a hood
The dress pattern with a hood is made for soft fabrics. A variety of wool and cotton options are suitable for cutting, including knitwear and jersey. Unusual and elegant model of the dress.
Blouse sizes 44, 46, 48, 50
Pattern of a blouse with a secret fastener
The construction of the blouse with a hidden fastening is made for ordinary office fabrics. Can be used for cutting and sewing blends, poplin, silk, etc. The blouse differs from many models in the original cuffs of the sleeves.
Pants sizes 44, 46, 48, 50
Pattern of straight trousers with a high waist
The construction of a pattern of straight trousers with a classic high waist is made for silk and blended fabrics.
Skirt sizes 42, 44, 46, 48
Skirt pattern with bow pleats
The bow pleated skirt pattern is built for soft, well-draped fabrics. An excellent material option for this model is fine wool.
Dress sizes 50, 52, 54, 56
Dress pattern imitating a suit
The pattern of a dress imitating a suit is built specifically for overweight women. An excellent dress can be sewn for the office, and for everyday use, and as an evening dress.
Dress sizes 50, 52, 54, 56
Pattern of a straight-cut dress with a pleated frill
Dress straight cut with pleated frill and short sleeves built for obese women with sizes 50, 52, 54, 56. For the pattern, in addition to the top fabric, you will need pleated fabric and lining.
Dress sizes 50, 52, 54, 56
Pattern of a fitted dress with short sleeves for full
An excellent fitted dress with short sleeves according to a special pattern for obese women. The pattern is not difficult, but the dress does not have a side seam, so the sleeve sewing technique is a little more complicated than usual.
Jacket sizes 50, 52, 54, 56
Pattern of a straight jacket without a collar and a fastener
The pattern of a straight jacket without a collar and fasteners, with a three-quarter sleeve is designed for crepe fabrics. Some types of silk knitwear will also work. On the side and neck, you can sew a finishing braid.
Dress sizes 44, 46, 48, 50
Pattern of a mini dress with straps
Cute and simple mini dress with spaghetti straps - cocktail. The pattern is built for knitted fabrics. The model can be cut from velvet, before working with it, be sure to familiarize yourself with the features of the sewing technique and the WTO of this material.
Dress sizes 44, 46, 48, 50
Pattern of a classic straight dress
The classic straight dress pattern is designed for sewing from cotton blends, cotton and linen. The fabric should be well draped. The dress is complemented by a belt that fits the straight cut of the pattern. The dress is sewn on a lining.
Dress sizes 40, 42, 44, 46
Pattern of a straight dress with an inside pocket
Straight dress pattern with an inner pocket, short sleeves, drawstrings and large patch pockets with flaps is designed for cutting and sewing from cotton and blended materials.
Dress sizes 50, 52, 54, 56
Plain dress
Another dress pattern with a simple cut that beginners will love with the ease of cutting and sewing. You can cut from any summer materials, for silk you need to make an underdress or make a model with a double dress.
Dress sizes 50, 52, 54, 56
Ballon dress pattern
The balloon dress pattern is very simple. In fact, this is only a slight hint of a balloon. Dress - summer, cut and sew it from linen or cotton. The option of sewing from silk is possible, for this you need to cut the lining.
Dress sizes 44, 46, 48, 50
Pattern of a fitted dress with wide straps
The pattern of a fitted dress with wide straps is designed for sewing a summer dress. You can cut the dress from linen and cotton. The dress has a zipper at the back and a high slit in the front ribbed seam.
Pants sizes 44, 46, 48, 50
Pattern of flared trousers
The pattern of flared trousers is designed for cutting and sewing from silk fabric. The upper is built close-fitting and the pieces should be cut with additional seam allowances to ensure a precise fit.
Pants sizes 44, 46, 48, 50
Pattern of straight trousers without a belt
The pattern of straight pants without a belt is built for summer fabrics. You can sew trousers from linen, fine cotton, stretch fabrics or silk materials. When cutting trousers, an inner layer is made of thin and transparent silk.
Dress sizes 44, 46, 48, 50
Cocktail dress with thin straps
The pattern of a cocktail dress with thin straps with slanted folds of the neck was built for cutting and sewing from silk fabrics. Satin, veil and similar materials are excellent for this model.
Beautiful and fashionable models of vests for obese women
Hello dear craftswomen! A vest for overweight people is a real lifesaver! A well-chosen thing will help hide the lush hips, protruding tummy, make you slimmer and taller. There are so many models of vests that choosing your favorite is not difficult.
Do not neglect the fashionable detail of the wardrobe
Many girls believe that only older women wear vests. Today you will see that it is quite the opposite. A stylish sleeveless little thing will become a real highlight of your wardrobe. This fashionable detail looks much more interesting than jackets and jackets.
How to choose a vest
This item can be selected both by length and by season. From the variety of options, you will find the one that suits you and will certainly sew it.
For spring and autumn, an insulated vest can be the most indispensable thing. In the off-season, the weather is so unstable that it is difficult to guess with clothes. You have to take a jacket and an umbrella with you. A hooded bologna vest will save you from unnecessary things.
But this model is perfect for a cool spring. Wear it over any long-sleeve clothing so you never get cold.
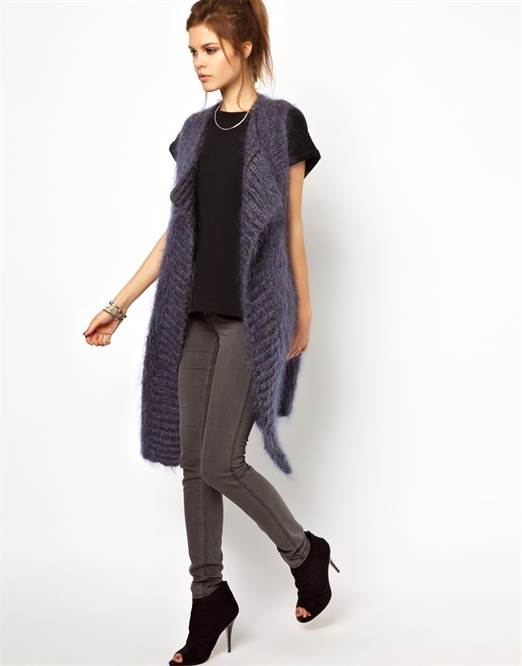
For owners of a luxurious silhouette, it is better to choose an elongated vest. It will cover everything you want, and also visually stretch the silhouette. If you don’t want to reveal full shoulders, then a piece of clothing with a small sleeve can even be worn with a T-shirt.
By the summer, you can sew summer light models that will decorate your look. Such a thing can be made from knitted fabric, which will hide excessive fullness.
Here is a complete expanse for imagination! Those who know how to knit can create fishnet vests. A few of these things can really change your wardrobe.
If you knit well on knitting needles, then you can create a knitted wardrobe item in a few evenings. Warm cozy hand-knitted models will never go out of fashion. Chubby women are not recommended to wear coarse knits, choose a smoother knit.
See how luxurious models look without fasteners: two flowing lines will visually stretch any figure.
Warm Models
Summer won't last forever, so a quilted vest is a must in your wardrobe. It is suitable for a picnic trip or an evening walk. You can choose a feminine fitted piece of clothing with a stand-up collar or a straight model in the style of Chanel. Quilted things are worn even with dresses, blouses or shirts.
Quilted products are so fond of young girls that they wear them everywhere. Cozy, stitched vests not only look stylish, but also warm well. A feature of the quilted material is that it is created from several layers, so it keeps heat perfectly.
Gizmos from natural fur love to wear auto-lady. If you are afraid to look voluminous, then choose products with leather inserts.
And if you really want to have a little thing with a long pile, take a look at leather or textile models with fur inserts.
What colors to choose
Fat ladies prefer dark colors, hoping that they will hide all the flaws of the figure. Try to sew a vest in rich colors, and wear a blouse or T-shirt in soothing colors under it. White things look very nice.
Also choose models of neutral colors: gray, sand, black, to multiply the possibilities of picking with other wardrobe items.
Fashion designers offer marsala color, khaki, dark blue trendy shades. For summer, pistachio, violet, mint and blue shades go.
Vest length
How long should the vest be? Choose clothes according to your height. Shortened or long models, and tall ladies are suitable for models of any length, the main thing is that they cover lush hips. Look how advantageous the long vest looks!
Make a luxurious look details:
- White silk blouse is not wide, but not tight.
- The jacket has no fasteners, so the vertical shelves greatly elongate the silhouette.
- Jeans can be worn in a classic cut, because not all young ladies dare to wear tight-fitting models.
- Accessories complete the look: bracelets and gold-tone watches, a pendant on a chain, sunglasses in a tortoiseshell frame, a white leather clutch.
- Shoes - flesh-colored sandals with an open nose, like a barefoot girl, completely without shoes. This well-known technique adds lightness and grace to the image. The photo is just such an attractive image.
What to wear?
Many ladies prefer white blouses, but the choice is yours. T-shirts, blouses, romantic blouses of various colors look beautiful. Instead of jeans, you can wear a pencil skirt or tight trousers.
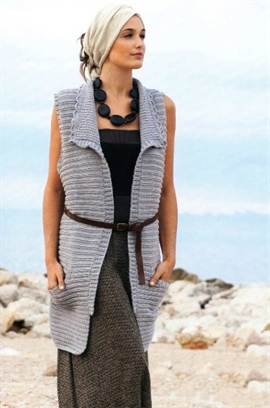
Some young ladies boldly combine a vest with a long wide skirt. It's very trendy right now!
Fashionable denim vests can be safely combined with any clothing - T-shirts, tops, jeans, loose light sundresses.
How to sew a vest out of fabric
In order not to waste time looking for a fashionable little thing, sew it with your own hands from fabric. The model, made of suit fabric with a stand-up collar, looks extremely elegant, beautifully stretching the silhouette. This season, the stand-up collar is a fashion favorite! Take up sewing so that in 2-3 days you will go out into the street in an exclusive new thing.
An elegant product made of dense gray fabric will decorate any figure.
The pattern is convenient in that it is not necessary to sew on buttons, Can be worn with a strap or loose.
Pattern for new clothes with a stand-up collar.
The stand-up collar is easy to cut out according to the proposed patterns.
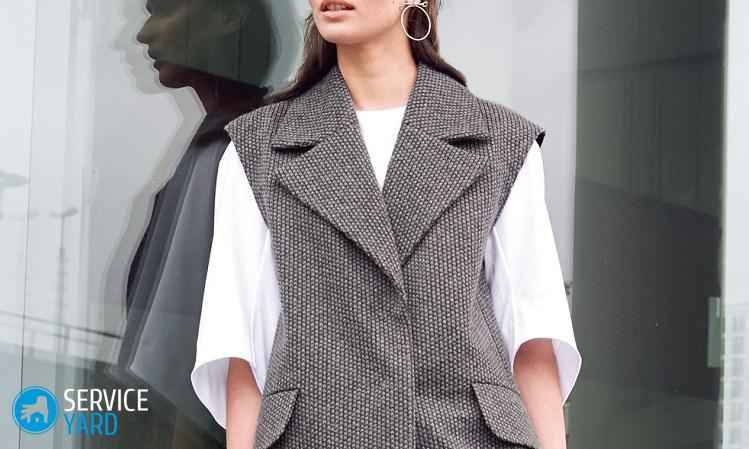
Today, vests in the form of a men's jacket look especially fashionable. A successful model will emphasize your individuality, add sexuality and incredible elegance to your image.
The style of this long vest is suitable for any type of figure.
Sew a piece of woolen fabric. In this case, you will have to reinforce the collar with adhesive material. Today it is sold in the form of a mesh, which you just need to smooth with an iron to the fabric.
Product pattern:
From soft tissue sew a loose vest.
The pattern consists of simple circle. Beginning dressmakers can try their hand at sewing fashion items.
A simple cut, but the image is extremely original.
From everyday to festive!
The fitted model sits perfectly on the figure, giving it harmony and chic. To keep up with fashion, wear these practical items with great pleasure.
Thinness is no longer in fashion, so feel free to wear fashionable things and be proud of your mouth-watering forms. Here is a very simple pattern, modeling, you can come up with many styles.
The parameters indicated in the patterns must be changed according to your size, and the length can be made at your discretion.
How to sew a jacket without a pattern
Watch fashion shows, many famous fashion houses present vests for every taste and color. It is worth immediately seizing the moment and sewing the product with your own hands.
Where will you wear this piece of clothing? If you often go to business meetings, then choose a suit fabric. A fashionable product will replace a boring business jacket.
For a secular party, a satin and silk vest is suitable.
On cool days, velvet or suede will look expensive and elegant. Knitted item fabric fit for every day.
So, to begin with, we will sew from non-flowing material so that the sections are not processed:
- Directly on the fabric we draw a rectangle 115 cm wide, 75 cm long.
- Cut out.
- From the upper left point to the right, set aside 15 cm. From the same point down, set aside 37 cm for full hands. Connect the dots to make a small rectangle.
- From the lower right corner of this rectangle in a straight line down, draw a line - from 20 to 25 cm, cut out a slot for the hands.
- We fold a large rectangle in half, on the other hand we make the same hole for the other hand.
- Set your dimensions.
That's all! Update is ready!
How to combine
A new vest will help to radically change your image! To get a romantic look, you should wear a silk T-shirt and tight trousers with a print.
An elongated vest looks great with skinny jeans or skinny pants. Want to freshen up your boring denim look? Wear a dress instead of a blouse and jeans. A fresh option is a maxi dress.
Having made an elongated vest, sew wide trousers from the same fabric to it.
Owners of lush breasts are better off wearing a semi-fitted model.
Pay attention to the cutout of the product. Beautiful breasts can be emphasized by a deep neckline. A modest round neck will help to reduce large breasts. A round neckline will suit young ladies with an oval face and a swan neck. A V-neck will help lengthen a short neck.
The easiest option. If you have a rather boring jacket, tear off the sleeves from it, carefully fold the cuts, sew on other buttons and flaunt in a new thing!
Finally, as soon as you read this article, get creative, feel free to buy or sew your own fat vests to update your wardrobe. You will succeed!

Building a pattern of women's vests - part 1
In this tutorial, I will show you how to design your individual base pattern in order to make a women's vest pattern. You can independently build a pattern for a classic-style vest (part 1), or with a jacket-type collar and a stand-up collar (part 2).
Vest number 1 is a classic women's wardrobe.
The classic women's vest is a model with semicircular reliefs from the armhole or with vertical reliefs from the shoulder seam. The cutout can be of any shape: triangular or semicircular - the models on the first collage.
In order for the vest to fit the figure perfectly, the patterns of almost all models are built with a middle seam on the back. This will help to adjust the pattern during the fitting.
We draw the lines of the neck and armholes.
Then we draw new lines for the neckline and armholes on the back and front pattern. The depth of the classic triangular cutout is 17 - 18 cm - point 1. You can draw straight or concave lines, depending on the model of the vest.
Expand the necklines on the back and shelf by 1.5 - 2 cm - points 2 and 3, on the back deepen by 0.5 - 1 cm - point 4. Draw new neck lines, as shown in the drawing.
The line of the shoulder seam is made shorter by 2 - 3 cm, and the armhole must be deepened by 3 cm. Draw new armhole lines in front and back as shown in photo 1.
The bottom line of a classic vest is drawn on the back pattern at a distance of 6 - 10 cm from the waist line. On the shelf, the distance from the waist line to the top of the triangle can be 12 - 18 cm. It is important that the triangular bottom of the front looks proportional.
For example, if you chose a distance of 12 cm from the waist line along the relief line (point 5), then on the line of the edge of the bead from the waist, measure 6 cm down (point 6), and connect the resulting point with point 5.
Pay attention to the thin dotted lines on the neck line of the shelf near point 1. I recommend making the distance between them as in the photo - from 0 to 1 cm, depending on the density of the fabric. The thinner the fabric, the smaller this distance, optimally - 4 - 5 mm.
If you are sewing a vest from a loose fabric: wool, tweed or boucle, measure 1 cm. If you are making a pattern on tracing paper, simply lay the fold to the point of the center of the chest, and pin it or tape it. This is done so that the neckline of the finished product fits nicely with a blouse or jumper.
We model semicircular reliefs.
Draw semicircular lines of reliefs on the patterns of the back and shelves, which smoothly turn into vertical tucks. And also draw the lines for the location of the pockets - photo 3.
Cut the shelf along the relief line, from the armhole to the bottom line. Connect the sides of the chest tuck - photo 2. If you have a base pattern without a shoulder tuck on the back, then you can cut the back pattern along the relief line.
When finished, your pattern of a classic women's vest should be the same as in photo 4.
On the basis of the pattern, it is easy to make a shoulder tuck. It is enough to extend the shoulder seam on the back by 1.2 - 1.6 cm - point 8, divide the resulting distance into 3 parts, and draw a straight line 7 - 9 cm long perpendicular to the line of the shoulder seam. From this line (the center of the tuck), set aside to the right and to the left 6 - 8 mm each (1.2: 2 = 0.6 mm).
For a vest model with semicircular reliefs, it is necessary to convert the shoulder tuck into a relief. To do this, draw a straight line from the top of the tuck to the relief (at a right angle) - photo 9.
Then cut the pattern along this line, connecting the edges of the shoulder tuck - photo 10.
In order for the length of the reliefs to remain the same, cut off the excess - point 11.
Building a raglan sleeve pattern - in detail and with a photo
Shawl collar - 3 ways of pattern and modeling
We continue to make a base pattern of size 54

How to sew a vest with your own hands quickly and without a pattern?
English classics - again relevant. The vest has been on the fashion runways for several seasons now. At first glance, this is not the most necessary thing in the wardrobe. But once you buy or sew a vest, it becomes obvious - this is exactly the thing that makes it clear that its owner has a sense of style and taste.
Summary:
To make everything work out for you, in this article we will tell you how to sew a vest with your own hands quickly and without a pattern.
Features of the figure and design solution
Vests are shortened and elongated, classic fitted and oversized - there is no limit to this variety. They are suitable for both very young girls and adult women. Due to the variety of fabrics and styles, you can choose a vest that will visually slim and hide figure flaws, or, conversely, add volume where needed. It is worn with dresses, skirts, trousers, jeans, and even shorts.
Now almost all well-known brands represent a wide range of vests, which is called for every taste and color. Price category - from minimum to maximum. But why not take a moment, make yourself, your loved ones happy, and sew a vest with your own hands without a pattern quickly and easily, while gaining invaluable experience in mastering the sewing business.
How to sew a women's vest with your own hands?
If you finally decide to implement this idea, then the main advice is not to rush. First you need to decide on the style of your vest, based on your data. Then you need to pick up the fabric, make a simple pattern and, last but not least, sit down at the sewing machine. To simplify the task, we will analyze everything in stages.
Choosing a fabric for a vest - what to consider?
Printed wool, tapestry, velvet, suede, leather, patchwork. Today, vests are sewn from a variety of materials - the more bizarre, the more fashionable. But still, there are certain nuances, given which you will be satisfied with the result.
We study and choose:
- If you are going to wear a vest mainly for business meetings, then you should opt for a classic suit fabric. Such an alternative to a jacket in combination with a light blouse or shirt will be very appropriate in the office.
- Secular parties are the place where you can come in both satin and silk vest. This is an option for summer. When it gets cool outside, opt for velvet or suede. By the way, the latter is now more relevant than ever and is suitable even for sewing dresses.
- For everyday wear, a vest made of knitted fabric is suitable. Such materials are soft and comfortable, mostly cotton and natural, due to which a feeling of comfort is created. Another plus of this option is that knitted fabrics compare favorably in price.
- Now many wear vests over sweatshirts or even jackets. For this option, it is better to choose cashmere, light coat fabrics or boucle.
- The best option is to stay on a medium density fabric. Then a vest of any style will not ugly fit the body or make certain parts of the figure too convex.
Important! Overweight women should avoid short vests, vests made of very thin or thick fabric. “No” is worth saying to fabrics with imitation of large knitting and with the presence of decorative flounces and frills. All this will visually enlarge the figure.
As for the color of your future vest, you should not strictly adhere to trends, it is better to opt for what suits you:
- Marsala, khaki, dark blue shades of indigo and nevi are quite popular this season.
- Also in line with them are pistachio, lilac (violet) and pastel mint and blue shades for summer.
- Classic and basic colors are always relevant - black, beige, sand, all shades of gray and blue.
- If you want visual variety, pay attention to the fabric in checkered, striped or floral patterns.
The easiest way to sew a vest with your own hands quickly and without a pattern does not even require a sewing machine. All you need is a piece of fabric, a ruler, tailor's chalk and scissors.
Important! For this option, it is better to choose a material that will not fray at the edges, such as neoprene, fleece or knitwear, because the cuts are not provided.
Operating procedure:
- We draw a rectangle on the fabric 115 cm wide, 75 cm long. Cut it out.
- From the upper left point to the right, set aside 15 cm.
- From the same point, lay down 37 centimeters and draw another, already smaller rectangle. From the lower right corner of this rectangle in a straight line down, draw a line - from 20 to 25 cm.
- Now, along this line, you need to cut the fabric.
- We fold our large rectangle in half, make the same hole on the other side - they should be symmetrical - these will be cutouts for the hands.
That's all! The vest is ready and it took 10 minutes.
Important! It can be worn as a wrap by making slots for loops and picking up beautiful large buttons that will serve not only as a fastener, but also as a decorative element of your vest.
By the same principle, you can make another model of a vest - with soft, rounded edges:
- We again choose a fabric that is not loose, that is, that does not require processing.
- We draw a circle on the fabric, its diameter is 100-110 cm.
- We find the middle of the circle and from it to the right and to the left we set aside 25 centimeters.
- Now from each of these points we draw 2 straight parallel lines upwards. The height of these lines is 25 cm.
- We also cut these lines with scissors, and we get the armhole of the vest, and at the same time the finished vest.
Important! It will look especially beautiful in combination with a belt.
Another way to make a fabric vest with your own hands is also simple and accessible to everyone:
- First you need to measure the volume of your hips - this will be the starting point in the calculations. Let's take a measurement of 96 cm as a sample, according to Russian standards it will be size 48 (96/2 = 48). It is worth adding another 4 cm to this - these will be seam allowances. As a result, we get 100 cm.
- So, on the fabric, from left to right, we set aside half of this measurement, that is, 50 cm (this is the width of the back and it is also the width of the shelf).
- Set aside 110 cm up and draw a rectangle.
- We determine its center and begin to make the neck of our future product.
- From the center point upwards we set aside 8 cm, to the right and to the left - 9 cm each.
- We connect the resulting points in a semicircle and cut them out. The neck is ready.
- Then, from the center point of our rectangle, we cut the fabric strictly in the middle, moving up. The front of the product is ready.
- Now we fold this rectangle in half, sew on the sides, leaving 15 cm to the fold, and we get the finished vest.
How to sew a fur vest?
The last method and style that we described is ideal for sewing a fur vest. A true fashionista knows that such a thing in a modern girl's wardrobe is a “must have”. In addition, a do-it-yourself vest made of fur fabric is exclusive. We will leave work with real fur to professionals, consider a simpler version of artificial fabric. Now you can pick up a completely worthy replacement for the arctic fox or mink, which will be difficult to distinguish from the original.
Basic rules for working with fur
So, we will analyze step by step how to cut out the details of a future vest from such a fabric.
- The fur has the direction of the pile. Run your hand over the material - in the direction of the pile it will be smooth. This is important, because if you cut the fabric in the wrong direction, you risk getting a vest with the pile facing up.
- Before you start working with the material, it is better to first draw a pattern on paper. Then put it on the fabric, outline the contours with chalk or, on light fur, with a ballpoint pen. It is necessary to lay out the details of the pattern from the wrong side in the direction of the fur pile (the pile should be directed from top to bottom).
- Cut fur with a long pile should be very careful not to damage it. This should be done with well-sharpened scissors with sharp ends. With small movements, make small cuts, affecting only the knitted base of the material.
When sewing this capricious fabric, there are also features:
- It is necessary to sew the parts in the direction of the pile, that is, from top to bottom. To prevent the fabric from shifting and the side seams from turning out to be skewed, before laying the line, the parts should be chopped together with pins.
- When connecting parts from fur with a long pile, you need to capture the very edge of the base. And the pile must be tucked in with scissors.
- After sewing the seam on the front side, using a darning needle, carefully pull out all the villi from under the line, then the junction of the fabric will be almost imperceptible
Important! It is impossible to iron such a product. Fur is an artificial material, and under the influence of high temperatures, it will begin to deform.
Turning a boring jacket into a favorite vest
An interesting and even unique vest can be sewn not only from new fabric, but by experimenting with your old things. For example:
- We take an old fur coat, turn it inside out, cut off the sleeves, while forming a rounded armhole line.
- Then we connect the lining fabric with the fur base with a hidden seam, and the vest is ready.
In the same way, you can transform an old jacket and wear it over a sweater or sweatshirt. A bored jacket can just as easily become a new, favorite vest. To thoroughly transform clothes, you can use jewelry - sequins, beads or rhinestones. Then you are guaranteed to receive an exclusive item.
What to wear with a vest?
Some things in themselves do not belong to a certain style, but by combining them with other details of clothing, the image changes dramatically. A women's vest also has such a magical property. The variety of styles and materials will allow each girl to look like from the pages of glossy magazines:
- A classic vest over a white blouse creates a fresh and businesslike look. Fans of the business dress code have already seen this. You can complement the bow with classic trousers with an arrow or a pencil skirt.
- It is worth putting on a silk T-shirt and tight trousers with a print under a classic black vest, and you get a luxurious romantic look for a date or a party.
- The elongated model of the women's vest has become a real hit. She looks great with skinny jeans or trousers. Refreshing such an image is quite easy, changing a blouse under a vest for a T-shirt. Complementing this look with a top or a silk T-shirt instead of a blouse, you can go to a fashion show, presentation or party.
- By changing jeans and a blouse under a vest for a dress, you get a very feminine and romantic look. A winning option is a maxi skirt or midi dress. And if you sew an elongated vest with your own hands and match it with wide trousers from the same fabric, you will get a chic alternative to a cocktail dress.
- A denim vest, like a jacket, is stylish and versatile clothing. Complete with a T-shirt, shorts, it will become your favorite outfit for every day. In combination with snow-white skirts, denim dresses are simply irresistible and always look stylish. However, jeans also look bright with floor-length skirts, long light sundresses and wide trousers made of light fabrics.
What figure is the vest suitable for?
- An unbuttoned long vest perfectly corrects the figure and visually stretches the silhouette. For a curvaceous girl, this will help visually lose those extra pounds.
- If you are not tall, then it is worth considering that such an image plays the opposite role for you - the legs will look shortened. In this situation, high heels, skinny pants will help.
- If you want to hide problematic hips, choose a vest with vertical stripes or A-line patterns.
- A semi-fitted vest is ideal for owners of a magnificent chest.
- To keep wide shoulders from being conspicuous, do not buy a model with a deep armhole or a wide top. A neat line of the shoulder along with a free style will balance the figure.
- Pay attention to the cutout of the product. If you have beautiful breasts, accentuate her deep neckline. To hide a large bust, choose a modest neckline. round neck suitable for girls with an oval face and a long neck. A short neck can be lengthened with a V-neck.
- For owners of the classic female figure with a pronounced waist, any model of the vest can be recommended. A belt or belt will help to emphasize the waist.
Now you are ready not only to make several models of the vest with your own hands, but also to combine them advantageously with the things already in your wardrobe. Looking beautiful and original every day is not a problem for you!


