Light postcards for 23.
Time flies is not noticeable, it seems that's just been New Year, Maslenitsa and Valentine's Day, and it's time to congratulate our men on their truly masculine holiday, February 23rd.
And there is nothing more beautiful for every dad than a gift from a child, executed on his own. In our country, it is very common in schools to make various postcards at labor lessons. But sometimes you want something original and interesting performance.
We have tried to find you the most interesting and not regular options making greeting cards. The main thing is to follow our instructions exactly and the result will please you.
Tricolor as a gift
Quite patriotic and simple in execution, your dad will definitely like it. 
Required tools:
- Multi-colored sheets of cardboard - 2 pcs.
- Multi-colored paper (blue, red, white) - 3 pcs.
- Sharp scissors -1 pc.
- Ruler — 1 pc.
- Stationery glue - 1 pc.
 You can start:
1. Cut a strip of at least forty millimeters wide from each sheet of multi-colored paper.  2. Bend the blanks and glue to each other. Then shape them into a flag Russian Federation.
 3. Draw and cut out a flag holder on black cardboard.
Tools :
- Colored paper - 4 different colors
- Glue - 1 pc.
- Scissors. - 1 PC.
Operating principle:
Cut out a rectangle 25 * 20 centimeters. Cut off a strip 5 centimeters long from the top, stepping back 5 centimeters from the top. And cut out a tie from black paper.
Glue these two blanks.
From green paper, cut out a rectangle 40 centimeters wide and 20 centimeters long. Glue shoulder straps and yellow paper buttons to it.
Connect all the details together.
Cap postcard
Such a postcard for a cap can be made by February 23.
In our country, both military service and the army itself are very popular. In the last decade, the state has been very encouraging of its military personnel, which gives them a reason to be proud of their work. Therefore, we offer to give your dad a postcard cap, which will always remind him of his military service. 
List of required tools:

Let's get started:
On colored cardboard we draw a cap. And we cut.  From multi-colored paper, cut out a visor, an asterisk, a rim, a cockade and petals in the style of quilling. We divide the lace into two parts, by cutting off 1/3, this will be one part.
  We collect the cap: We attach the rim to the workpiece, attach the visor, asterisk and cockade with decorations.
  That's all you can congratulate the defender of the motherland on his professional holiday.
Postcard - congratulations
Surely everyone wants to convey to their beloved dad an incredible amount of warm phrases, but in our rhythm of life, sometimes there is no time, sometimes it is not appropriate. Only on holidays do we allow ourselves to speak from the heart. Therefore, we bring to your attention a way to simultaneously say dozens of congratulations. And will be a joyful memory for many years. 
Required tools:
- Multi-colored squares - 16 cm.
- Scissors - 1 pc.
- Ruler — 1 pc.
- Pencil - 1 pc.
- Stationery glue - 1 pc.
- Helium pens — 1 pc.
You can start:
We bend one blank diagonally and along the floors on both sides.  On one of the resulting squares, step back from the fold 2 cm and draw a line, not reaching the edges of 1 cm. Then draw from the ends of the strip to the upper corners to make a trapezoid. Cut it out.
  Spread glue on the remaining piece and glue from below to the adjacent sheet.
  This is how it should be for you.
  We carry out exactly the same manipulations with the rest of the colored paper.
  Next, glue them one by one. Pressing them tightly together. Then we attach a card of a different color to the center of each base. And we write different words on it.
 We glue the date of the celebration on the front side. That's it.
DIY postcard with a ship
Sometimes it takes quite a bit of effort to make a pleasant surprise. And the pleasure received from the words of gratitude will more than overlap your efforts. 
Tools:
- Cardboard blue color- 1 PC.
- Sheet of white paper - 2 pcs.
- Scissors - 1 pc.
- Glue - 1 pc.
Let's get started:
Fold a white leaf in half and on one side draw a sketch of the future ship on the waves, seagulls and clouds.  Cut along the contour of everything that you have drawn.
  Bend the two parts of the boat, as in the picture. Draw the windows of the holds on three floors. You can draw them square or round, or as in the picture, two options.
  Spread glue on the top of the workpiece and the sides.
  Gently but fairly firmly press the smeared parts onto the aquamarine cardboard.
  Around we glue additional details of the decor.
  Ready. Look how beautiful it turned out. Add a congratulation on the front and you can safely give it to the recipient.
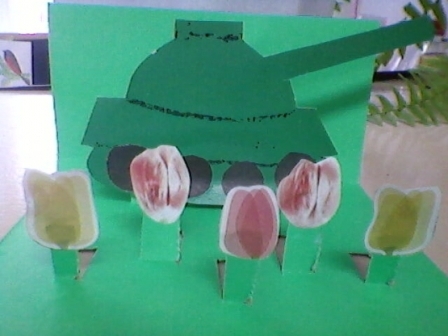
Do-it-yourself gift for February 23 - tank
Required tools:
- Jars of Coca-Cola - 3 pcs.
- Candies m * ms - 2 pieces
- Two types of ritter sport chocolate - 1 pc.
- Candies Rondo — 1 pc.
- Candy tik tak - 1 pc.
- Any chewing gum - 1 pc.
- Military-colored fabric — 1 pc.
- Green strips of fabric - 1 pc.
- Scissors - 1 pc.
- Double sided tape — 1 pc.
Let's start making:
Using adhesive tape, wrap the lemonade in military cloth. And fasten together with ribbons.  Alternately, using double-sided tape, we attach sweets to our base, checking each time for strength. Try to fasten them so that the adhesive tape is not visible.
  That's it, your gift is ready!
DIY postcard for February 23
In the modern world, development does not stand still, there are 3D movies, pens and printers that have already learned how to print human skin. Therefore, we can also make a 3D postcard with our own hands as a gift. She looks unusual and interesting. 
Required tools:
- Empty box from any chocolates - 1 pc.
- Picture or own drawing — 1 pc.
- Styrofoam - 1 pc.
- Scissors - 1 pc.
- Glue gun — 1 pc.
- Toothpicks - 3 pcs.
- Cutting board - 1 pc.
- Stationery knife - 1 pc.
- Colored plasticine - 1 pc.
You can start:
Take an empty candy box.  With the help of a ruler and a pencil, draw the outline of the future picture.
  Place a cutting board under the box and use a clerical knife to cut out the unwanted part.
  Choose a picture from military theme or draw it yourself.
  From the foam, cut out the figures and cut them out.
  To mold a tank and an airplane from colored plasticine.
  Using a glue gun, attach the picture and figures to the box.
  3D postcard is ready, you can congratulate!
Postcard insert for February 23
It also looks very interesting postcard inserts, which consist of several prefabricated elements.
You can exactly repeat the postcard according to our example, and here you can also replace the elements with something else to your liking. 
Necessary materials :
- Several different colors of double-sided cardboard - 5 pcs.
- Ruler — 1 pc.
- Pencil - 1 pc.
- Glue stationery - 1 pc.
- Contour map — 1 pc.
- Silver braid - 20 centimeters - 1 pc..
Let's get started:
Fold one sheet of double-sided cardboard in half. For a stronger fold, you can press down with a ruler.  Stepping back from the top 4 centimeters draw a cut line.
Cut off the top. On the first sheet, draw a semicircle in order to cut off the corner. And cut out. 
 Take an old contour map and circle our front part on it. Cut out.
  Along the fold line at the very bottom we make an incision 0.5 centimeters. We bend the right side inward, and cut off the left side.
  Glue the bent strip and the sharp lower corner of the front part with glue and glue both sides. Reduce the contour map at the edges by one centimeter and glue it exactly to the base.
  Cut out a rectangle 4 * 6 centimeters black and stripes 1 * 6 centimeters orange, and glue together. Next, we glue this blank to the base. We fasten them, beautifully spreading them out on a postcard. Insert a ribbon under the star.
  Cut out a rectangle 3 * 5 centimeters red and 2.5 * 4.5 white. On white, write "February 23", preferably in red.
  Cut a yellow shoulder strap 3 * 10 centimeters, attach a red star to it, and make a hole on top. Tie it to the braid. Insert the shoulder strap into the pocket. Our postcard is ready!
Postcard for February 23 in the style of scrapbooking
Another interesting way making a postcard as a gift for February 23 - scrapbooking. Very interesting and exciting, allows you to create simply unimaginable masterpieces with minimal tools. And variations of performances depend only on the imagination of the person creating it. So let's get started. To make this postcard, you will need art ink, which can be purchased at any art supply store.
Tools:
- Sheet of A4 paper - 1 pc.
- Scissors - 1 pc.
- Printing for ink - 1 pc.
- Ink - 6 pcs.
- Pencil - 1 pc.
Let's get started:
The basic rule in this technique is to always start with the lightest shade of ink.
We take light beige ink and tint the sheet with a special print with a pad. Movements are carried out in circular motions and whether as if drawing a sign of infinity.  The next ink color is brown, we also make the same movements with them, trying not to leave any white spots painted over on the sheet.
  We apply them to the base and tint especially carefully with each color separately. Here's what happens in the end.
  And now, working with such a base of military camouflage, you have the opportunity to create an unimaginable number of postcard options. For example, with the help of beads, threads and fabric, such beauty is obtained.
  And if you change the theme of the pictures depending on the type of troops, then we get such a postcard.
  Imagine, try different variants and you will definitely get something special and unique.
For the holiday of Defenders of the Fatherland Day in kindergartens and schools, they begin to prepare in advance: educators and teachers need to figure out what their pupils will give to their beloved dads and grandfathers, and children - to bring all these ideas to life under the strict guidance of adults.
To congratulate a man on Defenders of the Fatherland Day, we offer the most an expensive gift- a postcard or drawing made by the hands of a child. What can kids do for their dads and grandpas? Read in the article.
How to draw a card for February 23 with a pencil and paints for children?
IN kindergarten children learn to draw their first schematic drawings. Step-by-step lessons will help educators in preparing gifts for dads and grandfathers on February 23, because it is in a preschool institution that kids learn about the holiday and its meaning, and why men are congratulated on this day.
Let's start with a drawing. We will need:
- protractor (we will use it to draw a star)
- a compass or other device that can be used to draw a circle
Let's move on to drawing:
- We draw a circle and draw two lines in it that will divide it into 4 equal sections.
- We measure 72 degrees on the protractor and draw a line inside along two opposite sections.

 We measure 72 degrees on the protractor and draw a line
 - Again we measure 72 degrees from the already drawn line and draw the second straight line, and then the third.
 We repeat
 - In order not to get confused, we mark with dots what and from what we measure. How to draw the lines correctly can be seen in the photo.

- We should get 10 identical sections. Let's outline a dash in the middle of each line (through one straight line). Draw a star and round the corners a little.
- We erase the circle and additional lines inside the star with an eraser. Draw a contour around the star.

 We draw a line around the contour
 - Now we will depict the St. George ribbon with the edges bent down. Continue the edges of the ribbon on either side of the star.

 Draw a ribbon
 - We draw three parallel black lines on each part of the tape. We turn the schematic drawing into a postcard by decorating the star and ribbon, and adding the inscription "Happy Defender of the Fatherland Day."

 We bring the ends of the tape to the edges of the sheet
 Draw stripes on the tape
 Video: Simple drawings. Soldier
An excellent drawing on the theme of Defender of the Fatherland Day - a valiant soldier on duty. Such a drawing will decorate both a postcard and a school wall newspaper prepared for the holiday.
For drawing you will need:
- blank sheet of paper
- simple pencil
- colour pencils
- ruler

- We divide the sheet into two halves by drawing a vertical line in the center. Left-hand side should be slightly narrower to the right. We draw an oval in the upper third. This will be the head. Under it we draw the outline of the future collar.
- Focusing on the preliminary markup, we draw in detail the head of a soldier, on which a hat with earflaps is worn. Add neck, shoulders. The soldier will be in a pea coat, so we outline his outline.


- We draw the face, hands. We finish the small details of clothes.
- Do not forget to draw our defender the machine gun that he holds in his hands. First, sketch out the lines, and then draw in more detail. The photo shows what needs to be depicted.


- Now you need to draw the protective coloring of the form and the outline of the banner in the background.

- We write the inscription "Happy Defender of the Fatherland Day" on the left side of the sheet and specify the background.
- After that, it remains only to decorate the drawing.


If the previous drawing is difficult to draw, then with a schematic representation of the tank presented in step by step lesson below, the child can cope without the help of adults.
- For the drawing you will need pencils and a piece of paper. It is better to use a notebook sheet in a box. So it will be easier for the child to navigate and draw all the lines correctly.
- Let's draw the muzzle of the tank: in the center of the sheet we draw a line 4-5 cm long, and above it, at a distance of about 1 cm, another parallel one.


- On the left side of the line we will connect, and on the right side we will depict the beginning of the barrel with an oval.
- Let's start drawing the tank's turret. To do this, step back 1 cm down and at a distance of about 1/3 from the length of the muzzle, draw an elongated rectangle 10-12 cm long. We step back from the edge of the base about 0.5 cm, put dots and connect them in a semicircle.


- From below we draw the base of the tank caterpillar. How to do this is shown in the photo. Draw 5 circles inside the base and draw them with a black pencil.

 Draw a tank track
  Paint over with black 5 circles at the base of the track
 - Let's draw an asterisk in the center of the tower and a developing flag on a long pole. Coloring the tank in green, an asterisk in red and add an inscription.


Video: Simple drawings. baby tank
Video: Postcard to Dad on February 23, Military Aircraft
The student can easily cope with the drawing "Warship", which will become a good gift dad or grandfather, if tanks and planes have already been given to the perpetrators of the holiday.


Since Defender of the Fatherland Day once had the name "Day of the Soviet Army and Navy”, then all the military celebrate it: both on land and at sea.
Here is what we will draw:

To get started, let's prepare everything you need:
- blank sheet of paper
- simple pencil and black marker
- colored pencils or available paints


- Divide the sheet into two halves by drawing horizontal line. Do not forget that we draw all the preliminary contours without pressing the pencil, so that later there is no trace of the erased lines.
- The ship will be drawn in the lower half. First, draw a wavy line that will depict the water surface. Let's draw the stern with all the necessary ledges.
- Draw a cannon on the left side of the stern. In the central part of the stern we will add the following elements: the captain's cabin and the radar. It is not difficult to draw them if you repeat all the lines exactly, as in the photo.


- In the lower part of the captain's cabin, draw a battery of torpedoes, add a row of portholes.

- We draw a developing flag and for greater realism of the picture we add a couple of birds flying in the distance.
- You can stop there and move on to coloring. But for a greeting card, this is not enough: you will also have to add an inscription.
- You need to color the drawing like this: a warship - gray-blue, water - blue, draw a red stripe at the bottom of the ship and pick up desired colors for the image of the national flag.


Video: How to draw a cool drawing for February 23?
Ideas and templates for postcards for February 23 in kindergarten
- The issue of preparing for the holiday on February 23 begins to worry kindergarten teachers and school teachers long before it comes. It only at first glance seems that there is nothing difficult in choosing the right option for a presentation.
- But this is not at all the case, since the process of creating handicrafts or postcards with your own hands, which children will then give to the dearest people - dads and grandfathers, should captivate them, and therefore you should immediately refuse complex elements or multi-tiered paper structures.
- A simple but original postcard or craft will appeal to both the little “creators” of the masterpiece and adults much more. What gifts can be prepared for the holiday on February 23 with children in kindergarten - see the photo selection below.


 Cover for a postcard


Ideas and templates for postcards for February 23 to school
The guys at school already know a lot, and therefore a simple image of a tank or an aircraft will not bring such pleasure as creating with my own hands cards with a surprise, retractable details, special appliqué and more.
See the photo below for a selection of gifts for the holiday of February 23, made by schoolchildren, and be inspired!


- Cut out a star from colored red paper. To make it voluminous, you need to bend the "ears" that will be glued to the postcard. The star is bent along the lines with the outer edges outward, and the inner edges inward.
- We glue the star on the wrong side of the postcard (turn).

- We will decorate with stripes cut out of colored paper golden color. We will also make a small star golden.
- We glue 3 golden stripes vertically and horizontally on the front side of the postcard, as shown in the photo. Glue a gold star next to it. In order for the strips to stick evenly, it is better to first mark with a dotted line the places where they should be.


 How to fold an asterisk
 - A voluminous postcard can also be made using the quilling technique. To make a postcard, in addition to paper (colored and white), you will need toothpicks, glue and scissors.
- Fold the sheet so that one part is slightly longer. We write on it large numbers of the date of the holiday. The deuce should be on the front side of the postcard. After the deuce is drawn, on the second page of the postcard we add a triple. Cut out the numbers along the outer edge.
- We prepare "curls" from strips of colored paper. To make them, a strip of colored paper needs to be “planted” on a toothpick and twisted. How to stick the resulting curls on a postcard - you can see in the photo.
- We apply each spiral with the glued side to the numbers, trying not to leave large gaps between the curls. Add an asterisk between the numbers and sign the card.
- We draw a boat or print a ready-made template on double-sided cardboard.
- Cut out some parts of the picture.
- Fold the card along the fold line.
- With a felt-tip pen, draw a dotted line along the edges of the postcard and the image of the boat.
What card should I make for my brother by February 23?
You can surprise your brother with the original “Ship” postcard.

 Postcard "Ship"
 Such beauty can be done in half an hour. So let's get started!


For a brother who has not yet served in the army, you can make a shirt card.
Video: DIY / Postcard - SHIRT / Gift for February 23
Hi all! Today I am with you, Sophia!
It's time to congratulate men with their February holiday - Defender of the Fatherland Day. And what can I give dad on February 23?
I think that best gift for dad - this is attention and gratitude!
I want to make something non-standard, bright, courageous and beautiful… I will make a fold-out postcard with flags! Great idea. Let's start with thinking.
February 23 is the day of courage and courage, this is the male will, the protection of loved ones, the Motherland, the borders of the country. The symbols must be the same!
And plus, daddy should to understand that I am grateful to him for his patronage, strength and readiness to protect me always. Still need to wish Health, Strength. I came up with a phrase, hurrah!!!
Dad - You are my ideal. For me, you are the general!
I came up with a postcard I am with my mother, the layout was made by Evgeny Shaulin, and you can do it yourself.
Folding postcard templates for printing on a printer
The fastest way our high-quality layouts allow you to make an original Hand-Made postcard. Postcards can be printed on any color printer, cut and folded. It remains only to sign the postcard yourself, or print the inside of the postcard with already ready congratulations(included in the archive).
And given the fact that there are usually not enough postcards on sale, then printing postcards on a home printer or photo center will be the only option.
Postcard "Dad - You are my general" for February 23
Thanks to the design it turns out a bright, courageous folding card with wishes and recognition of masculinity, primacy and patronage of the pope. I'm sure you'll love making this postcard. And how happy the Pope will be with the original postcard!


Thanks to our layout, a card for dad can be done in half an hour. Mum's help might be needed. I asked her to make cuts on the sheet with a clerical knife. She did the rest herself. Detailed instructions how to make a postcard, see my video.
So, we need:
- Download the file "Postcard February 23" (link at the end of the article)
- Print the layout on thick A4 size photo paper
- Scissors
- Stationery knife
- Glue stick and tape
- Double-sided tape (on a thick basis). If you don't have one, use glue
- Rulers - 2 pcs (one plastic with a blunt end)
- Black threads
- Strips of colored paper (black, red, green, blue) for flags
- Stud button

I'm sure you won't have difficulties in the production of our postcard. The main thing is a good mood, look at the finished sample, use logic and sleight of hand. Do the folds on the card correctly and Good luck to you.
- Use A4 matte photo paper with a weight of at least 250 g.
- You can print a postcard layout on both a color inkjet and a laser printer.
- Make sure the printer is set to the highest print quality.
Clue!
For those who don't have printer or desired paper for printing. Don't worry, there is a way! Download the layout to a USB flash drive, go to the nearest Photo Studio and print out the postcard sheets on the required photo paper. Design or matte photo paper, density from 250 to 300 g is suitable for you.
Bulk postcard (Pop-Up postcard) can be nicely packaged. For simple packaging, you will need plastic bag(Zip-Lock), a card for a congratulatory text, and a clip on a plastic bag (Clip-Lock). The greeting card layout and Clip Lock can be downloaded on the same page and printed on your home printer.


One of the favorite men's holidays in my family is February 23, and my children and I always make postcards for February 23 with our own hands to our relatives and friends. Perhaps someone will say that it is easier to buy ready-made cards, but the children really like to make them, so we do it together.
By the way, I heard a version from several acquaintances that only those who served in the army should be congratulated, but I do not support this point of view - every man is the defender of the fatherland.
What to portray
To make a beautiful one with a child with your own hands, first of all, you need to choose the plot of the product. If the man to whom the present is intended served in any army, then you can choose any suitable symbolism.Similar variant:

And if not, then you can just pick up a courageous symbol - for example, my son often draws horses for his grandfather, my brother receives cards with a tank because of his addiction to a famous game.
Choose an artistic style of work, and get started - making it will not take much time, and your loved ones will be happy with such a gift for a long time to come.
Application option
Various inscriptions for download:


Making an application is quite simple - you can look at the photo of the postcard you like and repeat. But if you want to definitely do everything from scratch, then follow the instructions.

- On plain paper (it can also be in a box), first sketch a future postcard - determine in advance the shape and color of all elements, location and composition, work out the shape.
- Make a pattern for each element (especially if you do with a child - it's easier for them to circle finished pattern). To do this, draw all the elements on one sheet of thick paper or even cardboard (if you plan to use the pattern repeatedly), mark the front side and cut it out with a sharp breadboard knife or good scissors.
- Pick a base for your postcard. It can be a piece of thick cardboard or even an ordinary white drawing paper, special paper or a leaflet from a watercolor album.
- Give the blank the desired shape - cut the corners, cut off the edges, make a creasing - a groove along which the postcard will fold. To do this, you need to draw a line along the ruler with any non-writing pointed object. The most commonly used is an old ballpoint pen.
- Pick up colored paper for the application and cut out the desired elements. You can use plain colored paper, you can buy shiny or velvet, neon or glitter.
We always have scrapbooking paper at home and I let the kids take a few sheets for their postcards. And if you really need some color of paper, which was not at hand, then you can always just mix paints and paint the desired leaflet.
- Sequentially lubricate the elements with glue and stick in the right places, gently smoothing with a dry, clean cloth.
- Put the appliqué under the press in order to remove excess waves from the glue.
- Don't forget to sign the postcard.

Another option (it is better to make such a postcard from thick cardboard):


Volumetric work techniques
A beautiful do-it-yourself postcard to your beloved dad on February 23 can be voluminous. Think about how you or your child would like to give volume to the card - it can be quilling, voluminous appliqué, or even a card that becomes voluminous when unfolded.I sometimes help kids make scrapbooking cards, but much more I like to watch what they come up with themselves - so if the child is not averse to dreaming up, be sure to listen to his desires.
quilling
In this technique, it is easiest to make a voluminous postcard, especially since you don’t have to come up with any special plot, quilling is very attractive in itself, so it’s enough just to depict the date of the holiday in this technique. However, if you want, you can schematically depict something .

To make greeting cards using the quilling technique, you will need to purchase or make a blank for a postcard, as well as strips of quilling paper - you can buy them ready-made. You can choose colors to your taste - these can be classic shades of khaki, symbolizing military uniform, or any others that seem appropriate.


paper cutting
Volumetric postcards are always very effective, and therefore it is not surprising that a child may want to make just such a postcard. Do-it-yourself voluminous postcard for February 23 can be quite complicated - if you have chosen this option, then it is better to watch a video tutorial.Or you can use a hand-made sketch - especially when you plan to make a folding card.
For example, you can draw on paper some plot that is not too difficult to cut out, and make a postcard that can be placed on a table or shelf. Another one is glued to the carved part - the back, and a beautiful curly congratulation is obtained.


You can try to make a postcard, where the three-dimensional structure will be in the middle - for example, cutting and gluing a ship on the waves is not too difficult.

Or you can just make a three-dimensional application - the cut out elements are not glued to glue, but to special adhesive pads and springs, and then the decorative elements are slightly behind the paper.

And a few more ideas for inspiration:
Now you know how to make a card that every father will be happy to receive!
On February 23, dad or grandfather will be pleased to receive a hand-made postcard from the child. Postcards for February 23, which we offer in this section, are decorated with plain or voluminous applications made of colored paper. There are quite simple applications accessible even to children 2-5 years old. There are more difficult crafts for older preschool and younger children school age. For young children, prepare in advance, cut out all the details of the picture so that they only have to stick them on the postcard. Adult children can cut out parts of the application themselves.
Dads love technology, so postcards for February 23 with her image will come in handy. Make an application with a typewriter, airplane, rocket. The application can be both simple and voluminous.
Boat application.
Even a three-year-old can make a simple paper boat application. On the site Pochemu4ka.ru you can download a ready-made template for making a simple application of a paper boat. See link >>>>
Here are more complex examples. voluminous applications with pictures of ships. How to make such postcards by February 23 with your own hands can be guessed from the photographs.
Application machine.
We invite you to decorate a postcard for dad on February 23 unusual application in the form of a machine made of candy wrappers. Master class on making this postcard on February 23, see the link >>>>
applique planeApplication rocket
Finally, from transport, a rocket application is also suitable for decorating a postcard for dad or a postcard for grandfather. In the window, the child can paste his own photo or a photo of his beloved dad / grandfather. You can download a ready-made rocket template.
And here is a three-dimensional postcard for February 23 with the image of a rocket.
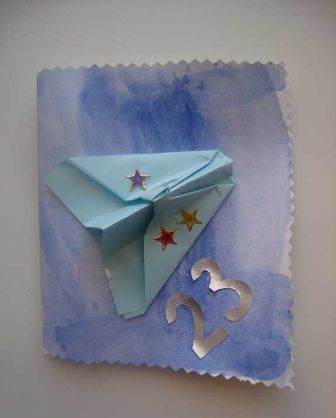
Another interesting option do-it-yourself postcards for dad - postcard origami shirt. There are many ways to make postcards of this type, we will talk about the main ones, starting with simple options and ending with more complex origami postcards.
The easiest way is to fold a rectangular piece of paper in half. From the back of the card, cut off a strip of paper from the top. In front, make two shallow cuts on the sides and bend them towards the center to make a "collar" of the shirt. Separately cut out a tie, decorate it with pieces of colored paper, and then stick it on a postcard.
But everything is the same, only the "collar" of the card-shirt is made on the other side (that's why it is double) and decorated with buttons. For detailed instructions (with photo) on making this postcard by February 23, see the link. A ready-made tie template can be downloaded.
The Land of Masters website offers a more interesting version of this volume postcard on February 23rd. A postcard in the photo below with a surprise! An elegant vest can be unbuttoned and a note or a congratulation can be found in the inner pocket. In order to make such unusual tie, you will need a few candy wrappers. The use of "candy wrapper design" allows you to give the image of the costume a unique festive look. detailed wizard see the class for making this postcard on February 23 at the link. Do-it-yourself postcard for February 23. Postcard origami
Make such original postcard origami for February 23 as a gift to dad or grandfather is much easier than it might seem at first glance. With a little help from an adult, even an older child can do it. preschool age. See the detailed master class below.
1. Fold a piece of paper rectangular shape in half.
2. Bend the sides towards the center.
3.4. Bend the edges of the sheet as shown in photos #3 and #4. Now you are making the sleeves of the future shirt.
5. Turn the paper over and fold over the top edge.
6.7. Turn your workpiece back and bend the top corners towards the center as shown in photos #6, #7 and #7a. Now you are making a collar.
8. You just have to fold the bottom edge and tuck it under the collar. Postcard for February 23 is ready!
You can decorate it with a homemade tie and write a congratulation for dad or grandfather inside the card or directly on it.
Instead of making a card-shirt, you can glue on greeting card pocket, decorate it and put a congratulation in it. Simple and tasteful!
3. Do-it-yourself postcard for dad.
Another do-it-yourself postcard for dad can be made in the form of a suitcase with tools. You can download ready-made tool templates. Print and cut them out. Let the child color the instruments and on the back of each of them write one positive quality of his dad. You will understand how to make a suitcase from a sheet of colored cardboard if you carefully consider the photos below.
4. Postcard for grandfather.
If your grandfather or dad is fond of fishing, then the following do-it-yourself postcard by February 23 will be appropriate for him. To make it, in addition to colored paper, you will need a thin rope. From it you will make a fishing line for a fishing rod.


