Mother's Day: how to choose flowers for mom. How to make a gift for mom with your own hands
Approaching - Mother's Day. On the eve of this holiday, we think: what to give to your beloved mom? You can find the answer to this question in our article. We have prepared great ideas for DIY gifts.
You will need: 3 A3 sheets, black pastel paper 50x65 cm, 2 types of scrapbooking paper (red and with flowers), Moment Crystal glue, pencil, ruler, red satin ribbon, mug, 4 bars.
Master Class
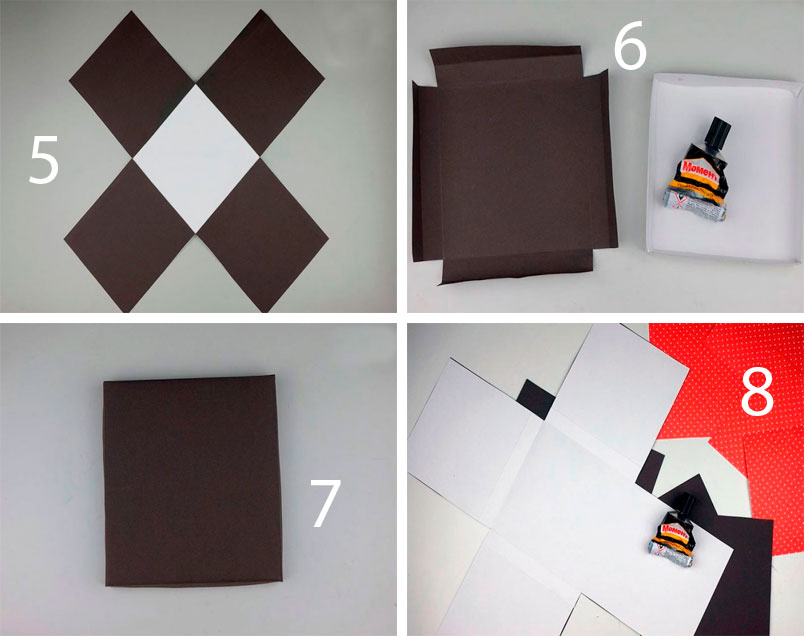
- Take a sheet of A3 format and redraw the diagram of the box.

- Take another sheet of A3 format and redraw the side edges of the box.

- Take the third sheet of A3 format and redraw the diagram of the box lid.

- Cut out pieces from 3 sheets.
- Glue the sides of the box.
- Fold 2 times inside the edge of the lid.

- Fix with glue.
- Cover the sides of the box with black pastel paper.
- Cut out a blank from black paper according to the lid pattern.
- Cover the lid with black pastel paper.
- Cut out 4 rectangles measuring 15x16 cm from black pastel paper.
- Cut out 4 rectangles measuring 13x14 cm from red scrapbooking paper.
- Paste the inside of the box with black rectangles.
- Attach a piece of red ribbon to each side.
- Glue the red rectangles to the inside of the box over the ribbons.
- Cut out a 15x16 cm rectangle from floral paper for scrapbooking.
- Glue it to the center base of the box.

- Cut out a 13x164 cm rectangle from floral scrapbooking paper and glue it onto the lid.
- Arrange 4 bars on the sides and tie with ribbons.
- Place the mug in the center, raise the edges and close the lid.

- Decorate the lid with ribbon and tie a bow.
Tulips from corrugated paper and sweets
You will need: corrugated paper of your favorite colors for buds, green corrugated paper for leaves, Raffaello sweets, double-sided thin tape, green teip tape, satin ribbon, packaging material for the bouquet, scissors, wire, pliers, wooden stick, if desired, to create dew - transparent beads , glue gun, tweezers.
Master Class
- Prepare the wire by making the desired number of stems of the same length.

- Cut long strips corrugated paper, cut into 2 parts a long strip of corrugation, then cut into 4 parts. You should get 8 strips, 6 of them will be needed for the tulip bud.
- Turn each strip around the center, bend in such a way that the front sides of the strip are directed in one direction.

- Make 6 blanks in the same way.
- Attach double-sided tape to the end of the wire.

- Attach the candy to the end of the wire.
- Collect the tulip bud in this way: take the first petal and attach it to the adhesive tape. Place the second and third petals near the candy and, holding with your fingers, fix with tape tape.

- Attach the remaining petals in the same way, forming a tulip bud and securing with tape.
- Trim excess crepe paper at an angle at the base of the bud.
- Wrap the stem with tape.

- Cut off a strip of green crepe paper.
- Cut into two almost equal parts.
- Fold each part 4 times and cut out the leaves.
- Pull each leaf out in a spiral using a wooden stick.

- Place a short leaf, and lower on a longer one. Secure each leaf with tape. Tulip is ready! Make the right amount of tulips in different colors.
- Collect tulips in a bouquet in this way: connect 2 tulips and pull them together with teip tape, then add one tulip one at a time, placing the colors in a checkerboard pattern.

- Cut 20 leaves, and arrange them around the perimeter of the bouquet, fixing with teip tape.
- Wrap the bouquet in wrapping paper and tie with ribbon.

- Create dewdrops on the tulip buds by gluing clear beads using tweezers and hot glue.
Vase in decoupage technique
You will need: glass jar, acetone, cotton pad, sponge, decoupage napkins, brush, pva glue, acrylic paints, twine, scissors, acrylic lacquer water based.
Master Class

A vase from a decoupage jar is ready!
fashion necklace
You will need: large colored rhinestones, plastic mesh or thick leather, satin ribbon, superglue, wire cutters, round teeth, golden wire, scissors, a simple pencil, a plate.
Master Class

Fashionable necklace is ready!
Salt dough pencil
You will need: water, flour, extra salt, a cardboard jar for the frame, PVA glue, scissors, a piece of decorative cord or corrugated paper, gouache, a brush, a button, stacks, acrylic varnish for crafts, a toothbrush.
Master Class
- knead salty dough in this way: pour a glass of flour, a glass of salt, add water, then knead to the desired consistency of modeling. Separate part of the dough, add beige gouache, then knead.
- Roll out the cake with a thickness of 10-15 mm.

- Apply PVA glue to the outer rim of the jar and wrap with dough. Cut off the excess with a stack, and smooth the joints with a damp brush.
- Create a small dotted texture with a toothbrush on the surface of the dough.
- Knead the brown dough, roll it into a cake 10-15mm thick.

- Cut a 2" wide strip of brown dough and glue it to the bottom of the jar.
- Make 2 large bases for owl eyes from white dough, then glue them.
- Make a beak from brown dough and glue it.
- Blind eyes from turquoise dough and glue them.
- Roll up 8 strips of pink dough, twist 4 flagella from them and make a bow, then leave it to dry for 2 hours.
- Form owl wings with brown dough drops, then glue them on.

- Weave bundles of beige dough and glue on the neck of the jar.
- Roll up a sausage from white dough, draw a lace texture with a stack and glue it as a collar under the beak.
- Put the craft in a warm place for a day.
- Paint the lower part and wings with brown gouache and decorate with white dots.

- Draw pupils and eyelashes with black gouache, wait until the paint dries, then draw white highlights on the eyes.
- Glue a pink bow over the wing.
- glue a button with a bow from a corrugated strip onto the lace.
- Cover the craft with varnish and wait until it dries completely.
Pencil out salt dough ready!
Foamiran head wreath
You will need: foamiran 0.5 cm thick (orange, yellow, cream, light green, dark green and red), scissors, toothpick, curly scissors, oil paint in autumn shades, sponge, sheet of paper, iron, floral wire, ruler, super glue, lighter, lilac clay (for blueberries) or beads, teip tape, foil, wire at least 2 mm thick and 60 cm long, tape or rope, mold (leaf figure).
Master Class
- Print or redraw the leaf templates, then cut them out.
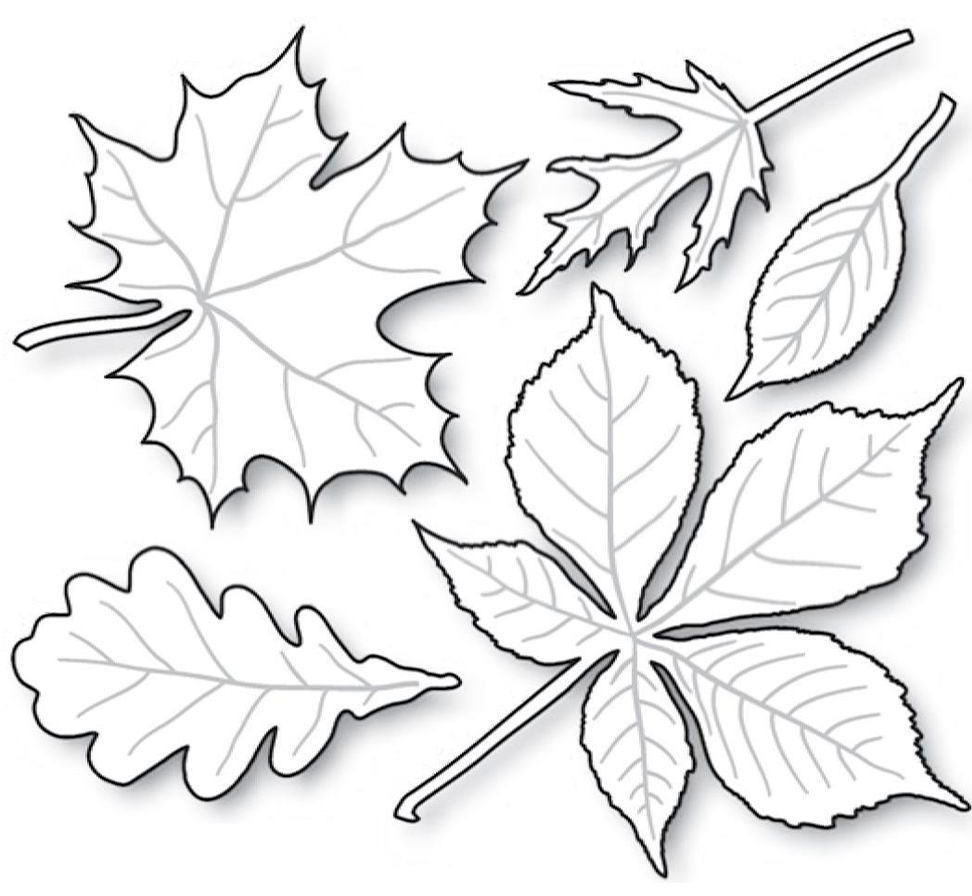
- Circle the templates on foamiran with a toothpick, then cut them out.
- Make a sufficient number of multi-colored leaves, for example 60, remember, the more there are, the more magnificent and beautiful the wreath will look.

- Give some realism to some of the leaves by trimming the edges with curly scissors.
- Scratch a small part of the leaves with a toothpick.
- Tone the leaves in this way: apply a little on the sponge oil paint, blot a leaf of foamiran, then remove the excess with a piece of paper.

- Combination of colors: protonate a yellow foamiran leaf with light green and brown paint. Also protonate some yellow leaves with orange, red and light green paint. Protonate red leaves brown, green leaves - burgundy, brown and dark green.

- Heat the iron on the second mode, attach the sheet for 2 seconds, remove and press against the mold to make an impression of the sheet. Repeat this process with all sheets. Please note that this should be done quickly and very carefully, since foamiran is highly flammable. If you are new to this business, it is better to skip this paragraph and get on with your work.

- Cut the floral wire into 7 cm lengths and make a loop at the end.
- Glue floral wire onto each sheet from the front using super glue.

- Burn the edges of the leaf with fire using a lighter. The edges should be realistically curved. Repeat this process for all leaves. Do this carefully, I remind you that foamiran is highly flammable.

- Roll a blueberry-sized ball of purple clay. Blind 15 berries, put each blueberry on a wire with a loop greased with super glue. Make notches with the tips of scissors on the top of the blueberries and set aside to dry. Beads can be used as blueberries.

- Start assembling the wreath in this way: form small bouquets of leaves and berries, fasten them with teip tape.
- Cut out rose petals in the form of a drop from red foamiran. For one bud, 10-15 petals are required. The number of buds depends on your desire, you can make from 3 to 7.

- Tint the edges of the petals with brown oil paint.
- Make the petals thinner in this way: heat the petal on the iron for 2 seconds, then fold it into an accordion and grind the petal with your fingers. Open the petal and create an indentation and curl the edge of the petal outward. Repeat this process for all petals.

- Finish the edges of the petals with a lighter.
- Roll up a drop of foil, make a loop on the wire, apply super glue and put on a drop of foil.
- Glue 2 petals opposite each other, and form a bud by gluing the petals in a checkerboard pattern, opening the flower. Form the desired number of roses in the same way.
- Make the base for the wreath by cutting 60 cm of wire. Make loops at the ends.

- Cut the tape into pieces 15 cm long, fold the sticky side inside each piece and cut lengthwise into 2 halves.
- Open the tip of the tape, attach to the base 10 cm from the edge and wind the wire.
- Attach bouquets of leaves and berries, fixing with teip tape.

- Weave them in the order you like best.
- Do not forget to insert roses in the gaps between the leaves.
- Attach a string or ribbon to the ends of the wreath.
A wreath on the head of foamiran is ready!
Exquisite topiary
You will need: cream-colored sisal, alabaster, glue gun, newspaper, planter, yarn, trunk, scissors, decoration elements - flowers, beads ...
Master Class

Exquisite sisal topiary is ready!
Handmade soap
Benefits of this soap: has antibacterial and scrubbing properties, ideal for oily and problematic skin, has a pleasant aroma.
You will need: 100g soap base, zest of half a lemon, a teaspoon of liquid honey, a teaspoon of dried lavender flowers, 5 drops essential oil lavender, 2 drops of essential lemon mala, mold, dishes.
Master Class

Lavender-citrus soap self made ready!
Book safe

Every country celebrates Mother's Day with great joy, and ours is no exception. It is celebrated annually in last sunday autumn. Among huge amount holidays - this one is special. On such a day, attention is drawn to the women who gave us life, the dearest people to everyone - our mothers. Best of all, your love and appreciation will be expressed by words, well, and a gift will perfectly complement them. You can make it yourself.
Mother's Day Cards
If you don’t know what to give for Mother’s Day, make a card with your own hands. A postcard is a great way to congratulate loved one, and when it is also created with one's own hand, it is doubly pleasant.
Chamomile card
You will need:
- sheet of white paper;
- colored cardboard;
- glue;
- decorative paper with a pattern or a piece of wallpaper;
- pencil;
- stationery knife;
- colored paper.
Now you need to follow these steps.
- Draw a chamomile petal template. Then transfer it to paper and cut out about 32 petals and two circles for the core from white paper.
- Bend the petals slightly in the middle and use a pencil to twist their edges outward. Then glue half of them in a circle to one core, and the other half to the other. Thus, you should get two daisies.

- Glue two flowers together, and then glue a circle cut out of yellow paper. Cardboard sheet yellow color fold in half. Draw on any paper a flower that resembles a daisy in outline.
- Carefully cut it out so as not to damage the sheet. Now attach the template to the side of the cardboard that you marked with the front, and transfer the drawing to the center of it. Now carefully cut out the flower.

- From patterned paper or wallpaper, cut out a rectangle the size of a postcard page, and then paste it inside (if you have a color printer, you can print a template for the picture below).

- Cut out several thin stripes from green paper and curl them a little with scissors. Glue the strips in the upper right corner of the postcard, then attach a chamomile next to them. Draw then cut ladybug and glue it on the flower.

Floral card
Postcards made using the quilling technique come out incredibly beautiful. This technique seems complicated only at first glance, in fact, even a child can make a gift for mom using it.
You will need:
- double-sided colored paper;
- wooden skewer or toothpick;
- scissors;
- glue.
Instructions for creating a postcard are presented below.
- Cut lengthwise into strips 5 mm wide green paper. Wind one of the strips onto a stick, remove it and let the paper unwind a little. Then glue the end of the strip to the base.
- Holding the circle on one side, squeeze it on the other, as a result, you should get a figure resembling a leaf. Make five of these sheets.
- Now let's start making large flowers. Cut out several strips of colored paper, 35 mm wide (cut the sheet of paper lengthwise). Fold the strip 4 times and cut it into thin strips on one side, not reaching the edge of about 5 mm.


- From orange or yellow paper, cut strips that are 5 mm wide. Twist one of them tightly and fix its end with glue - this will be the core of the flower. Now glue the lower end of the fringed strip to the core and twist it around.
- Glue the end of the fringed strip with glue and spread the petals outward with a toothpick. Make the required number of flowers. Small flowers are made in the same way as large ones. The only thing is that the strips for them should have a smaller width, approximately 25 mm.
- The middle can be made two-color, for this, use thin stripes of different colors, for example, red and orange.
- Wind a small section of an orange strip, then glue a section of a red strip to it, make the required number of turns, then glue the orange strip again, wind it and fix it.


- To do bicolor flower, first make the base for a small flower. Without bending its petals, glue a fringed strip of a different color and larger size around the base of the workpiece.
- Now you need to make a few curls, for this, fold the green strip in half. From the bent end, twist it onto a stick, then let it straighten out.
- Glue a piece of paper with an inscription to the base of the postcard (a sheet of colored cardboard is suitable for it), then assemble the composition and fix it with glue.
Wall newspaper
In addition to postcards for beloved mothers, you can make a poster. Wall newspaper for mother's day, can be done in perfect different techniques. For example, drawing, appliqué, photo collage, you can use the same techniques as for making postcards. 

Whatever you decide to make a wall newspaper, be sure to write to the dearest person at least a few warm words and good wishes.
Mother's Day Crafts
A wonderful surprise for all mothers will be children's crafts for Mother's Day. Older children will be able to make them on their own, but kids with the participation of adult sisters, brothers, dads, or even their caregivers.
Paper shoe
Heeled shoes are a purely feminine thing, so by the main day of all mothers, crafts in the form of them, and even filled with sweets, will come in handy.
You will need:
- beads;
- colored paper;
- ribbons;
- glue;
- marmalade, dragees or colored caramels;
- scissors.
Instructions for creating shoes are presented below.
- Print or draw a template for a shoe and decorations for it.

- Bend the pieces along the dotted lines and glue them together.


- After the shoe dries, decorate it with a flower, beads or any other decor. After that, wrap sweets in a piece of organza or any other transparent fabric and place them inside the craft.

Such DIY crafts for Mother's Day can be made from plain paper, but they will look much more interesting if they are made from paper with a pattern.
Basket with flowers
This is a simple, but at the same time very cute craft. She will certainly please many mothers.
You will need:
- three wooden skewers;
- green corrugated paper;
- a couple of paper plates;
- scissors;
- colored paper;
- paints;
- glue.
Your actions:
- Cut one of the plates in half, for greater decorativeness, you can do this with curly scissors. Paint a half and a whole plate with ordinary or mother-of-pearl gouache, you can also use acrylic paints. After the paint has dried, glue the plates with the middle inside.

- Paint the skewers green, they will play the role of stems. Next, cut the colored paper into identical strips and make loops out of them, gluing the ends together.

- Cut out three circles from colored paper or cardboard and glue four petal loops to each of them.
- Glue the skewers to the back of the flower heads, then cut out three more circles and stick them on the ends of the skewers, thereby hiding the gluing point. From corrugated paper (you can also take plain paper), cut out the leaves and glue them to the stems.

- Insert the resulting flowers into a basket and decorate as you wish.

mother's day gifts
Every child dreams of giving their mother the best gift in the world. For a mother, no, even the most valuable thing, can be compared with what her child made with her own hands. A do-it-yourself gift for Mother's Day can be anything - vases, paintings, applications, photo frames, boxes, organizers, decor items, jewelry. Let's look at some interesting ideas.
Vase from a jar
Even a child can cope with the manufacture of such a vase. To make it, you only need a suitable jar, paint, double-sided and ordinary adhesive tape, a photo of a mother or child.
- Cut out a piece of cardboard equal to the size of the photo, its edges are better to make wavy. Using double-sided tape, glue the fragment to the center of the jar.
- After that, cover the jar with several layers of paint. When the paint dries, remove the cardboard fragment - you will have a window.

- Opposite the window from the inside of the jar, glue the selected photo with tape.

- If your bank has a convex inscription, you can make additional decor. To do this, simply scrape off the paint with a clerical knife from the bulges.

Photo frame for mom
A good gift for Mother's Day is a photo frame. You can put your favorite photo of your mother in it, this will make the gift even more beautiful and valuable. To make a photo frame, you can use different materials- buttons, shells, cereals, pencils, beads, artificial flowers, coffee beans and even pasta. 
- To create a frame, you can use any ready-made base or make it yourself from cardboard. To do this, you will need cardboard from the box, scissors, a pencil, a ruler and glue.
- First you need to decide for a photo of what size you will make a frame. After that, add 8 cm to each side. For example, if the photo is 13 by 18, our frame will be 21 by 26 in size. Now draw, then cut out two rectangles equal to the size of the frame.
- In one of the rectangles, draw a rectangle the size of the photo, and then cut it a millimeter closer to the middle of the marked lines.

In this article, we will tell you about mother's day crafts that children can make with their own hands as a gift to their mothers. All crafts for Mother's Day, which will be discussed in this article, are original and practical. For example, on our site you will find several simple master classes for making boxes with their own hands. We will also tell you how you can make a cute napkin holder from wooden clothespins or a flower pot from plastic container and colored yarn. And this is not a complete list of crafts for mothers on Mother's Day, which you will find on our website.
1. Crafts for mother's day. mother's day in the garden diy
We suggest you make a napkin holder from wooden clothespins as a gift for mother's day to your beloved mothers. Making such a craft for Mother's Day is very simple, and the finished work looks no worse than a purchased little thing.
So, to make this children's craft for Mother's Day, you will need:
Wooden clothespins (29 pcs.)
- acrylic paints
- glue gun or glue "Moment"
- colored lace
- beads
Divide the clothespins into separate halves.

Glue the two halves together, only with the reverse side.

The photo below shows one side of the napkin holder. The parts are assembled together, but not yet glued together. 12 clothespins per side. Before gluing, we will have to paint them with paint.

Paint the parts with waterproof acrylic paint. Half of the details in one color (for example, red). The second half - in a different color (for example, yellow).

Glue the details of the Mother's Day craft together with a glue gun or Moment glue. In the same way, make the second half of the napkin holder.

Now let's make the bottom of the napkin holder. The photo below shows how to do it.


It remains only to glue the sides and decorate the finished children's craft for mother's day with decorative lace and beads.

2. DIY crafts for mother's day. mother's day diy children
An original and practical craft can be made by any child on Mother's Day with their own hands. This is a box for all sorts of little things, made of wooden sticks for ice cream or medical spatulas.

To make this DIY Mother's Day craft, you will need a lot of wooden sticks and a hot glue gun. The sticks will need to be pre-painted with acrylic paints or gouache in different colors. Before you start making this children's mother's day craft, you will need to wait for the paint to dry. detailed wizard class see the photo below.

3. Crafts for moms for mother's day. Children's crafts for mother's day
Any mother will be pleased to receive such a beautiful children's craft for Mother's Day from a child. These bright ornate beads are made of pasta in the shape of butterflies and thermomosaic. Also, to make this mother's day craft, you will need waterproof acrylic paints and strong thread.


4. Crafts for mother's day. mother's day in the garden diy
Thermomosaic is a mosaic, the chips of which are firmly and firmly connected to each other after heat treatment (ironing with an iron through tracing paper). You can play with ready-made crafts, you can give them, hang them on the walls and the like.
From this material for children's creativity, you can make an original heart-shaped box as a gift for mom on Mother's Day. The individual parts of the product are glued together with a glue gun.

In a similar way, you can make a beautiful multi-colored dish out of thermomosaic. Be sure, any woman will like this mother's day craft. After all, it is not only beautiful, but also practical.

The photo below shows in detail the entire process of making this children's craft for mother's day.

5. DIY crafts for mother's day. mother's day diy children
We offer you to make such a beautiful box (casket) using decoupage technique as a gift for mother's day to your mother. To make this craft, you will need: a small flat cardboard box, for example, from cheese; napkins; PVA glue.
First, paint the box with white acrylic paint. Wait for the paint to dry. After that, mix PVA glue with water in a 1: 1 ratio. From the napkin, separate only the top layer with the pattern, you will not need the rest of the layers. Lubricate the box with glue diluted with water. Gently smoothing out the folds, glue the napkin on top.

6. Crafts for moms for mother's day. Children's crafts for mother's day
Pincushion-bank - convenient and practical gift, which a child can make with his own hands as a gift to mom for mother's day. Inside you can store any sewing small things, and on top - needles.

How to make a needle jar with your own hands:
1. A suitable jar is selected. A cardboard circle is cut out (from very thick cardboard) along the diameter of the can lid and a fabric circle twice the diameter of the lid.
2. The fabric circle is gathered around the edge.
3. Stuffed with padding polyester (or any other fillers). A cardboard circle is placed on top and the fabric is pulled over it.
4. The needle bar itself is ready, it remains to attach it to the jar.
5. To do this, sand the cover. Only not much - so that the surface becomes scratched, and not polished.
6. Glue "Moment" glue the needle bar on the lid.
7. We decorate the edges of the lid with braid using the same Moment glue.
Fast, easy, accessible to everyone!
7. Crafts for mother's day. mother's day in the garden diy
See how beautifully you can decorate an ordinary ceramic pot using the mosaic technique. For this mother's day craft, you will need: store-bought modeling clay and acrylic paints. Roll out the clay with a rolling pin. Use a knife and ruler to cut the resulting layer into small squares. This craft for mom on Mother's Day will turn out more interesting if the squares are of different sizes: some are larger, others are smaller. When the clay is completely dry, paint the details of the mosaic with acrylic paints of different colors, but in one color scheme. For example, in blue-blue as in the photo.

8. DIY crafts for mother's day. mother's day diy children
From colored yarn and a plastic cup, you can make a bright and original pot for indoor plants. This craft from waste material - great gift mom for mother's day, which a child can do with his own hands.

You probably already paid attention to the fact that we have a lot of crafts for Mother's Day on our site. And they are all unusual, bright and colorful. This decorative pot flowers are no exception. When you make this mother's day gift for mom, try to use yarn in contrasting colors, as in the photo.

9. Crafts for moms for mother's day. Children's crafts for mother's day
On Mother's Day, you can make beautiful lids for jars as a gift for your beloved mother. For this mother's day craft, you will need polymer clay. Polymer clay is an elastic material that is pleasant to work with. It is produced with different properties: one should be dried in the oven, the other is self-hardening. Manufacturers polymer clay today there are a lot, these are FIMO, Decoclay, Cernit, Kato and other companies.

10. Crafts for mother's day. mother's day in the garden diy
From the usual plastic bottle You can make a cute pot for a houseplant. For this mother's day garden crafts, you will need waterproof acrylic paints. Use permanent marker black color in order to draw the eyes, nose and whiskers of the cats.

Material prepared: Anna Ponomarenko
In the very near future, the most beautiful is expected in our country. family celebration- Mom's Day! For everyone who wants to present themselves a great opportunity to thank their dearly beloved mothers for all the sleepless nights, worries, worries that we sometimes manage to deliver to them! None of the blessings of the world are enough to express our gratitude to mothers!
However, there is something that can convey our love and gratitude to you! What is this? This is some small SURPRISE, made with my own hands, containing all our affection for mom, made with love and a lot of positive thoughts!

Yes, this one can be completely useless for anyone, BUT NOT FOR MOM! When the children grow up and leave the parental nest, all that remains for the mother, in between rare calls, is to go through all the “gifts” and “surprises” that you gave her throughout your childhood and youth! Such "surprises" contain the most valuable things: memory, love, bright sadness! The holiday is coming and you still don't know what to give your mom? Then you have come to the right place! We bring to your attention simple cute crafts that are simple, original and do not require much time and money.
DIY gifts for mom for Mother's Day
Before moving on to step by step instructions making for gifts, let's first look at the options offered:

Fabric tulips
To make these wonderful fabric tulips, we need:
- Bright fabric clasps for flowers;
- Green pieces of fabric for stems and leaves;
- Wire, to give the stems rigidity and the desired shape;
- Filler sintipon;
- Scissors;
- Needle with thread;
- Pattern.
Step-by-step instructions for making crafts soft tulips:
1. Draw a pattern for your future tulips on a piece of paper. It should look something like this:

2. Select the claps desired color, fold them in pairs with the front side inward, attach patterns to the fabric and carefully cut out the details. Do not forget to leave 0.5-1 cm for seam allowance!
3. Sew a tulip bud in a circle, through a small hole near the base of the flower, turn the part right side out. Carefully fill the "" with a synthetic winterizer filler and carefully sew up the hole.
4. Sew the "leg" of the tulip, turn it outward and loosely fill it with synthetic winterizer. After the leg has received its volume, insert the wire into the leg, while slightly rounding its ends (so that the sharp edges of the wire do not tear through the fabric and crawl out of the leg).

5. Sew the leaves, turn them out and straighten them well, iron them with an iron. Give them shape. If desired, they can be sealed with non-woven fabric (cut a piece of a sheet of non-woven fabric, glue it with an iron to the wrong side of one of the wrong side of the sheet, and then proceed to stitching all the details).
6. We collect our tulip - carefully put it on and sew the flower head to the stem.

We wrap the leaf around the stem and sew it on. Sew a whole bouquet of such soft tulips - they will stand for a long time, withstand more than one wash and will delight your mother for a long, long time!
But with such a wonderful vase for sweets or fruits, your mother will be even more delighted! Not only did you make it yourself, but it is also very practical - it will look great on any table, and even delight every member of the family with all sorts of "sweets"! By the way, when you give it - do not forget to fill it with something tasty - so to speak, Surprise No. 2.

To make this "masterpiece" with your own hands, prepare:
- Plastic bottle from under water on 19 l;
- 6 l plastic bottle;
- Toilet paper;
- PVA glue;
- Brush for glue;
- Simple pencil;
- Scissors;
- Twine;
- Two spray paints in gold and black.

1. For two plastic bottles, carefully cut off the upper part together with the neck with a sharp knife or scissors. The top of the 19 liter bottle will serve us in the future as the bowl of our vase, and the top of the smaller bottle will serve as the foot and stand of our vase. See what our details should look like:

2. The next stage, while the details are still disconnected, is the decoration of the future vase. To do this, you need to use the skills of the papier-mâché technique:
- We coat the wide part of the bowl and the stand with PVA glue;
- Gently apply (wind) toilet paper, let the first layer dry;
- We repeat this procedure again 4-5 times until the walls of the parts are aligned and acquire some monumentality.
- We dry our workpieces well.
- With help toilet paper, also, we create artsy stucco molding (to your taste - clusters, flowers, ornaments, intricate patterns). To this end, moisten your hands with water and, taking pieces of toilet paper, we make balls, flagella, which will help our vase acquire its originality and exclusivity. Glue the resulting flagella, balls with PVA glue to the vase, having previously applied some intricate pattern with a simple pencil. Dry everything well.

3. On the finished, well-dried halves of the vase, apply a black tone with spray paint. After the black paint dries a little, apply the next golden coat using spray paint. golden color. If in some places you find gaps in golden paint, then use a brush and hide all the errors.

4. It's time to finally connect the vase bowl to the stem! To do this, use a special glue for plastic, wrap the junction picturesquely with twine dipped in PVA glue, tie a pretty bow and wait for the product to dry completely.

And now hurry to the store for sweets, fill them with a freshly prepared vase and give this wonderful gift to your mother as soon as possible! Believe me, no matter how old you and your mother are, SUCH a gift will not be left without her attention! A vase, and even filled to the brim with sweets - mom's heart will surely tremble and be delighted!
Rarely whose mother can remain indifferent to such a prickly miracle as a cactus! And when this miracle also manages to bloom - that's it, mom's heart is forever smitten with love for this prickly, but very beautiful plant!

We bring to your attention a gift-joke "CACTUS for mom". She will definitely appreciate this surprise! And for invention, and for resourcefulness, and for an excellent and absolutely not requiring special attention, interior decoration.
To make flower pot with stone cacti you will need:
- Clay pot for small flowers;
- Sand;
- Smooth pebbles (pebbles) of medium and small size;
- 2-3 shades of green acrylic paint;
- Corrector.

1. First, put the stones on the table and take a good look at them. Select those that are most similar to real cacti. Set aside the rest separately.

2. Paint the selected pebbles with acrylic green paint and wait for them to dry completely.

4. Darken a little where needed, lighten your stones a little with different shades of green. In general - revive your cacti. Make them real.

5. Fill the bottom of the pot with small pebbles. Then fill it ¾ with sand, install the newly appeared “cacti” in any order you like, cover the remaining space in the pot with small pebbles.
Stone cacti are ready! Early in the morning we put a pot of cacti for mom on the bedside table at the head of the bed - let the morning be pleasant and festive for her! And these wonderful cacti will give you unforgettable impressions and joy for a long time.

DIY gift sweet bears
Moms are big girls, and what kind of girls don't like sweets? Therefore, your mom can and should give something sweet for Mom's Day! Heart-shaped sweets are perfect for this! And in order to present these sweets beautifully, you need to come up with some unusual packaging for them!

Prepare well before you start making these candy holder characters.
You will definitely need:
- Sweets-hearts;
- Cardboard;
- Simple pencil;
- Scissors;
- Glue;
- Various figurines of cute animals.
Start by laying out a piece of cardboard in front of you.

Attach a candy-heart to the animal's chest and glue it with glue. Fold the paws of the animal on the chest around the candy, glue them with glue - you get a hug with a candy inside.

Draw a cute face for the animal, or cut it with scissors. The packaging is ready - hurry up to congratulate your mother on the holiday - Mother's Day!
Now every inhabitant of our country has accumulated a sea of all sorts of unnecessary disks. Throw it away - it's a pity, maybe it will come in handy! A familiar picture?

We bring to your attention the technology of making photo frames from these rainbow discs. Such a frame looks great in itself, and if you insert your mother's favorite photo into it, the effect of surprise and celebration will be achieved!
Prepare the following materials:
- CDs, DVDs;
- Glue;
- Stained glass paints in black;
- Thick cardboard;
- Scissors.
Have you considered what size your frame will be? Then feel free to take scissors and cut out the necessary shape from cardboard for your future frame.

With scissors we cut two unusable disks into pieces of any irregular shape (it will be more picturesque). It turned out a rainbow mosaic of disks.

We thoroughly smear the cardboard frame with PVA glue and glue a mosaic of CDs, DVDs to it. It turns out very nice:

Now black comes to the rescue stained glass paint with a thin tip. With its help, we fill the space between the mosaic, thereby shading our frame and giving it a more solid and finished look:

Admire the final result of your efforts and creative pursuits:
Such flowers will perfectly fit into the decor of any interior. Can easily become part of any greeting card, or part of festive packaging. A bouquet of spiral flowers will create a spring mood even in the coldest winter cold!

Don't forget to prepare the following materials for making spiral flowers:
- Sharp scissors;
- PVA glue for paper;
- Double-sided colored paper in different shades;
- Pencil.
Where do we start:
1. We start by making a template for the future flower bud:
- To do this, draw a circle with jagged edges on a bright double-sided sheet of colored paper.
- From the center of the circle, unwind (draw with a simple pencil) a spiral.
- Carefully cut out the spiral along the resulting contour.

We take the outer edge of the resulting spiral and begin to twist it tightly along the entire length.


Fabric birds - do-it-yourself mom
A colorful and cheerful family of birds made by your own hands is able to give mom that spring mood that is so lacking on winter evenings!

To give such a bird family to your mother, which exactly repeats the images of all members of your family, you need to cook:
- Bright and colorful pieces of felt;
- Needle and thread;
- beads;
- Ribbons;
- Scissors;
- Glue;
- Sheet of white paper;
- Simple pencil;
- Sintipon as a filler.

First, create a pattern of all the details of these funny birds. Take a white sheet and a pencil and dream up. Cut out the resulting patterns. You can use our samples:

Take the felt pads, fold them in half and attach the finished paper patterns to them. Circle the paper patterns and cut with scissors strictly along the contour of the figure.
It's time to take up the needle! Sew the details of the bird's body, fill the body with synthetic winterizer. Sew up the remaining hole. Sew on the bird's beak. Wings just stick with glue. Sew on beads instead of eyes.

Make some of these birds different sizes to get mom, dad, son and daughter! Cheerful family!
If you wish, you can hang the birds from the ceiling using multi-colored ribbons, or install them in a flowerpot on sticks - forming such a bird's nest!

Carry out all your gifts for mom with love, awe. Let this feeling be transmitted to her as soon as she sees the work of your hands! Take care of your mom and spoil her with handmade crafts more often! Give her warmth and love, care and do not forget about help!
Alena Schukina
Day mothers- everyone's favorite international holiday, which is dedicated to the dearest people in our lives - mothers. On such an amazing and touching day, you always want to give your beloved mothers something very pleasant.
As a gift to mom, the guys and I decided to do it ourselves postcard"Flower".
In order to make it, us need: yellow circle 4 cm in diameter, twelve red circles 4 cm in diameter, three green circle: Two is 4cm in diameter and one is 6cm in diameter.
Glue a yellow circle with a diameter of 4 cm onto a sheet of white paper.

We roll a green circle with a diameter of 6 cm into a tube, glue it along the edge so that it does not unfold. Glue the resulting stem at a distance of 1 cm from the yellow circle.

We fold twelve red circles with a diameter of 4 cm in half and, putting the petals into each other, glue along the contour of the yellow circle.

Fold two green circles with a diameter of 4 cm in half and glue to the stem. Got leaves.

Here now flower ready.
Related publications:
Abstract of the lesson on fine arts "Flower for Mom" Topic: "A flower for mom" Program content: Raise children's interest in non-traditional forms of education. Learn to reflect figuratively in the application.
"A flower for mom" - modeling from plasticine and natural material Objectives of the lesson: 1. Continue to expand the horizons and knowledge of children about nature. 2. Learn to create images of plants in unconventional technique using.
Gift for mom (flower) You will need: Colored cardboard in red or any other color Colored cardboard Green colour Scissors.
We present to your attention a photo report on the exhibition of children's creative works which took place in our kindergarten. The exhibition was timed.
Theater for children is an amazing and fabulous atmosphere. Going to the play will help children learn to empathize and make up their own.
By the day of March 8 children senior group made a flower for mom. Material: skewer, chocolate candy, double-sided tape, PVA glue, rectangles.
For work, we need: cardboard, white and green paper, yellow woolen threads, PVA glue, a simple pencil, scissors, a flower leaf template.
Mother's Day is approaching, and the kids and I decided to make for them unusual flower. For work we needed: *Colorful napkins.


