Crafts from chestnuts and plasticine winter and on the theme of autumn for children in kindergarten, school: ideas, photos. How to make a topiary, a hedgehog, a house, a cheburashka, a bear, an owl, beads, an ant, a horse, a basket, a vase, a Christmas tree, Christmas decorations, cards from chestnuts with your own hands
Autumn is the time of the year, which presents us with a lot of materials for creativity. Many adults and children are happy to collect cones, bright leaves, dry flowers to create original products with your own hands. IN Lately crafts made from the fruits of the chestnut tree became quite popular. Chestnut can serve as the basis for many creative ideas.
Chestnut topiary
One of the most interesting chestnut products is the topiary. To make a unique tree with your own hands, you will certainly need a ball for the base, a trunk, a container in the form of a pot, or some kind of stand. Fruits can be painted in the desired shade or used in its natural form. For crafts, you may also need twine, beautiful braid, beads, and much more. It all depends on the capabilities and imagination of the author.
1. The first step is to prepare the base. First you need to think about the base ball. You can use a ready-made blank, which is purchased at a needlework store at an affordable price. Or you can make a ball from improvised materials:
- papier mache;
- wrap a dense bundle of newspapers with threads;
- use an old rubber ball or any round object.
2. Selection of the trunk. Any wand can be used here. A pencil, a branch, a small rail will do.
3. The connection of the base and the trunk. To do this, you need to make a neat cut at the base with a clerical knife and place the barrel in it.
4. Work with a potty. Most often, craftsmen use a small vase or an ordinary flower pot. You can choose the capacity appearance in advance, or you can decorate it yourself.
5. Gypsum mortar is poured into the pot. When it starts to harden a little, you need to insert the barrel together with the ball into the mass and wait for the gypsum to dry completely.
6. The next step is to decorate our crafts.

Gluing chestnuts is one of the most interesting and exciting stages. It is better to choose for this not round fruits, but slightly flattened ones. Hot glue is best for gluing. It will allow you to quickly fix the decor on the base. It is recommended to start from the top.
When gluing fruits, rarely anyone manages to avoid emptiness. Now is the time to think about how to cover it up. For the final decor, both the base and the planter are perfect:
- pistachio shells;
- small slices of dried citrus;
- coins;
- decorative braid or ribbons;
- beads;
- cereals or pasta of an interesting shape;
- coffee beans.
In order for the chestnut craft to be done neatly and in an original way, you should pay attention to a number of tips:
- Chestnuts in mixed decor look interesting. For example, some of the fruits are left in their natural form or simply varnished. And others are wrapped, for example, with twine.
- Separately, you can use hats from chestnuts.
- Both the hats and the fruits themselves can be painted with spray paint. It is better to give preference to gold, silver, bronze shades.

Christmas tree from chestnuts
On the eve of the New Year, you can create an original Christmas tree from chestnuts with your own hands.
This will require the following materials:
- chestnuts different sizes;
- thick cardboard;
- hot glue;
- paints in spray cans;
- decoration material.
First, the basis for the New Year's beauty is made. To do this, a cone is made of thick cardboard, depending on the required height of the finished craft.
Before proceeding to the most important process, chestnuts need to be sorted by size. You need to start work with the largest fruits.
Using hot glue, chestnuts are attached to the cone made, starting from the bottom border. Toward the top, the size of the fruit should decrease.
Now it's time to paint the product. Spray paint works best. Color can be any, it all depends on the imagination.
After the Christmas tree has dried out, it's time to decorate it, for this you can use:
- tinsel;
- beads;
- homemade bows;
- tapes;
- small Christmas toys.

Decorative vase of chestnuts
To create an original vase decorated with chestnuts, you will need:
- base for a vase;
- fruits of a chestnut tree;
- hot glue;
- dye;
- decoration materials.
First you need to prepare the base for the vase. As a basis, you can use finished vase or make it from improvised materials, for example, from cardboard or take some kind of jar. The disadvantage of a cardboard product will be the inability to use it for fresh flowers.
To make possible gaps between the chestnuts not so conspicuous, you can paint the vase with brown paint and let it dry.
Fruits are attached to the chosen basis of our chestnut craft using hot glue and a gun.
When designing a product, it is first of all better to close the “emptiness”.
For decorating chestnut vases fit:
- dry flowers;
- coffee beans;
- beads;
- ribbons.

House of chestnuts
Children enjoy making crafts natural materials and especially they like chestnuts. When doing crafts for a school or kindergarten, it is quite possible to create a composition with a chestnut house.
It will require:
- chestnuts;
- bright leaves autumn trees;
- dry branches of small sizes;
- legumes, such as beans;
- dried rowan berries;
- plasticine;
- hot glue.
Now consider the sequence of work:
- We select the basis for crafts from chestnuts. It can be a box or just thick cardboard.
- A small corner is covered with carefully mashed plasticine. But the rest of the "territory" is laid out with dried leaves. They can be fixed with glue from a gun.
- A large flat oval is made from blue or blue plasticine - this will be a lake. finished part spread on the "plasticine" area.
- Around the reservoir, you can lay out a fence of some seeds.
- We select the basis for the house. It is best to use a ready-made box, make a cardboard roof.
- We cover the base with chestnuts. They can be attached to plasticine, but it will be more reliable to use hot glue.
- Places for windows can be left in advance by making them from plasticine yellow color. Or glue them on top of paper or cardboard. With plasticine windows, the house will look more comfortable.
- From the branches you can make a pipe.
- Now the product can be varnished.
- The clearing around the house can be decorated at your discretion, depending on availability various materials. Next, we will consider how to make mushrooms and various animals from chestnuts. They can be placed in the clearing around the house.


chestnut mushrooms
To make mushrooms from chestnut fruits, you will need:
- plasticine;
- chestnuts;
- acorns;
- natural materials for decoration.
So, let's start making mushrooms:
- For the base, you need to make a small clearing of plasticine. To do this, a small "cake" of green color is made.
- An acorn is attached to the clearing - this will be the leg for the mushroom.
- The chestnut is attached on top of the plasticine. It is better to lay it down with the rough side.
- Ready mushroom can be decorated. For example, rowan berries will look original on a mushroom. Around you can make grass, it will turn out beautiful from spruce needles.


chestnut animals
Many different animals can be made from the fruits of the chestnut tree. Let's consider some options.
Bug
To make an insect, you will need the fruit itself and the peel from it, as well as plasticine, twigs.
The craft is done as follows:
- The peel needs to be slightly dried, it is not required to divide it in half.
- An oval or a flattened ball of brown plasticine is attached under the peel.
- Branches are attached to the plasticine on the sides - these will be the legs of the insect.
- Now the head of the beetle is attached from the chestnut, on it you need to make eyes from plasticine and antennae.

Caterpillar
To make a caterpillar you will need:
- several fruits of a chestnut tree of the same size;
- plasticine;
- toothpicks.
Let's start crafting:
- In one of the chestnuts, you need to make two small holes and stick halves of toothpicks into them. It is recommended to stick small balls of plasticine on the tips. This will be the caterpillar's head with horns.
- Plasticine eyes are attached to the same fruit.
- The remaining fruits are attached to each other with small plasticine pieces. The chestnut head will be extreme.

Bear
To make a clubfoot inhabitant of the forest you will need:
- chestnuts;
- plasticine;
- "hats" of acorns.
- The body of the bear is made from the largest fruit.
- For the head, a smaller chestnut is taken and attached to plasticine to the body.
- For ears choose the smallest chestnuts.
- Paws are made from acorn caps, and the eyes, nose and mouth are molded from plasticine.

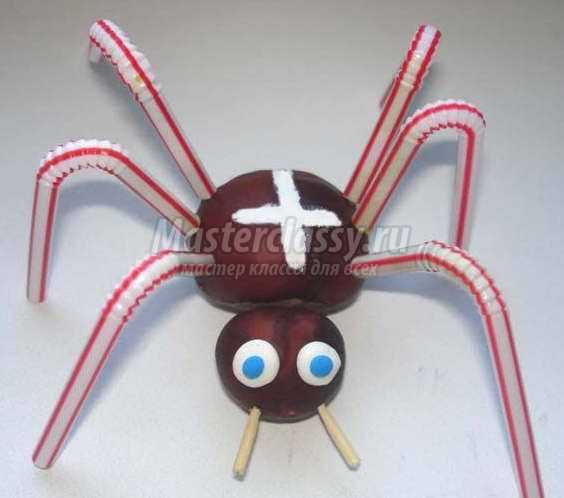
Spider
A spider can be made very easily and quickly. Required:
- one chestnut;
- 8 toothpicks;
- plasticine.
Four holes are made in the chestnut on the sides, broken toothpicks are inserted into them - these will be paws. And eyes are molded from plasticine. The spider is ready.

Cheburashka
To make a fairy-tale hero, you need 8 chestnuts and toothpicks.
It is done as follows:
- Small holes are made in chestnuts for toothpicks to connect the fruits together.
- Larger chestnuts are chosen for the head and torso, and smaller chestnuts for the ears and paws.
- After all the chestnuts are connected, the face is drawn with a felt-tip pen or made of plasticine.
Creativity using natural materials is always a fascinating process. Create, experiment, create your own unique products.
63 photos of chestnut craft ideas


The coming autumn is an abundance of natural materials: chestnuts, leaves, acorns, plant seeds, chestnut peel.
What can you do with your own hands from chestnuts on the theme of autumn for a kindergarten or school?
What crafts from chestnuts to prepare for the autumn holiday? Where can I find videos and photos on making crafts from chestnuts?
The most famous and simple crafts: caterpillar, cheburashka, mushrooms, bear cub, hedgehog.
Among the little-known, but not requiring special time and material costs: a snail, a horse, a dog, a fox, a turtle, a bird, a spider, a beetle, a hare, a butterfly, a dragon, a heart, beads, bracelets, a captain, a snowman, a house, a basket, a monkey , cat.
Let's look at each craft in detail, from the selected materials to the finished product.

Necessary for manufacturing: chestnuts - 4 large, 3 small, matches or toothpicks, plasticine, marker, paper knife, needle for holes or awl, proofreader if there is no indelible marker.
- We lay out the prepared tools and materials and select the largest chestnuts - the body and head - 2 pcs. We spread Cheburashka on the table to see how it will look like in our finished form. If necessary, replace unsuitable chestnuts.
- We collect the head, having previously made 2 holes in the chestnut head with a large needle or an awl for the ears. Before making a hole, try on how your Cheburashka will look like.
- We insert toothpicks or matches into the finished holes and slightly sharpen the ends. We perform similar operations with the ears. We choose chestnuts that are flatter on one side for the ears. We attach them to the head, attaching them to toothpicks.
- We select the second large chestnut and with the help of toothpicks we attach the head to the body in the same way.
- The arms are small chestnuts attached to the body with toothpicks.
- The legs are small chestnuts, cut in half, if there are flat chestnuts left, then they will do.
How to draw a muzzle?
Let's look at 3 ways:
We draw a muzzle in a place where it is slightly rough and differs in color from the main smooth dark Brown. Draw eyes, nose and mouth with a waterproof marker.
With the help of a corrector and a marker, or for black, we use plasticine. Similarly, draw the eyes, mouth and nose.
Using a needle or awl, we make holes or cut out the mouth, nose and eyes with a knife.
If you have toy eyes, or if you've purchased them and they fit, you can make them from a pack of pills if you like.
Cheburashka is ready, check that she stands steadily on the surface, if she cannot boast of such an ability, it is worth redoing her legs.
In this tutorial video you will see how to make Cheburashka and other characters.
How to make a mouse out of chestnuts?

Necessary for making a mouse: chestnuts - 4 large, 3 small, matches or toothpicks, plasticine, marker, paper knife, needle for holes or an awl, corrector if there is no indelible marker.


Here we have such a mouse, look at the photo.
Teddy bear or chestnut bear

In this photo, you see 4 options for chestnut bears using plasticine, acorns. Ideas for creating such craft options will be very useful for creating a composition or a finished craft. All that remains is to make a tree and the clearing itself or a platform for a bear, or maybe a lair. A tree can be a cone or a leaf from a maple, oak, chestnut.
It is done similarly to a mouse, only for the ears we use small chestnuts, as well as for the legs and arms.
We will need: chestnuts - 2 large, 6 small, matches or toothpicks, plasticine, marker, paper knife, needle for holes or awl (nail file), corrector, if not, non-washable marker. 
We perform similar operations, as in the creation of Cheburashka crafts, only we attach the ears to the top of the head. We make the nose from black plasticine and draw the mouth with a black marker.
If there are no small chestnuts, we make these parts from plasticine, the second option is in the photo of the bear cub.

How to make mushrooms from chestnuts?
We will need: chestnuts according to the number of mushrooms, a knife for cutting paper.
- Carefully cut off a section of the brown skin of the chestnut, shaping the top into a mushroom cap shape.

- Give the white inside of the chestnut the shape of the stem of the mushroom, choose the shape that you like best.
- The mushroom is ready, now it remains only to place it in your clearing next to other heroes.

A detailed master class on carving a chestnut mushroom is shown in this video with step-by-step explanations - Prepare: chestnut, peel with needles, plasticine, scissors with curved ends.
- We attach a nose from gray plasticine to the chestnut and 4 legs under the bottom.
- From above we smear a rather thick layer of plasticine, making cuts on it with scissors with curved ends.
- Attach a small ponytail as desired.
- Put a mushroom or a small apple on the needles.
- Choose a chestnut of the correct shape so that by cutting off the skin of the chestnut and the chestnut itself, it is easy to get an elongated spout.
- If there is no such chestnut, mold a nose out of plasticine and make eyes and a mouth with a needle or marker.
- Blind 4 legs from plasticine in the form of columns or bent sausages, attach a hedgehog and a tail to the tummy.
- We fasten the chestnuts to each other and the peel with the help of: a glue gun, toothpicks or plasticine.
- The second chestnut with a peel, it will not be necessary to fix it if you did not get a chestnut out of it. The peel should be from 2 halves and diverging to one of the ends - these are the wings of our beetle.
- The head must be supplemented with a mustache made of twigs by gluing or inserting into pierced holes. Draw your beetle's eyes and mouth with a marker, varnish, or a corrector stroke.
- If there is only PVA and paints, then add paints to it and paint your beetle's head with it.
- Choose one chestnut that is slightly smaller than the second, this is the head and body of our cat.
- Connect to each other with plasticine cakes.
- Then we sculpt the ears - these are 2 triangles. Eyes - 2 white circles, with black dots or stripes in the middle, tail - sausage.
- We fasten the cat by attaching plasticine to the chestnuts. A smaller chestnut to a larger one, replace the ears, eyes and tail.
- The muzzle is 2 circles connected together and on top of the pink dot is the nose. Be sure to use a paste or a needle to put dots on the muzzle and add a mustache from the fishing line by simply sticking them.
- Paws sculpt sausage and 4 fingers for each. For our cat, 2x will be enough, because. he's sitting.
- Under the 2nd lower chestnut we make only a foot, a sausage and 4 fingers, we attach everything to the chestnuts.
- The cat is ready, it remains to make him a bowl or sausage to give the image of reality.
Secret: for a short leg - cut out the mushroom from the upper part of the chestnut, for a long one - we make a hat from the side of the chestnut.
More detailed wizard the class is shown in the video - a lesson on carving mushrooms from chestnuts.
2 method of mushrooms with plasticine
If you want to get collapsible mushrooms, then use method 2.
We cut out a mushroom cap from a chestnut or use a chestnut that is suitable in shape, with a flat one of the sides and a convex second.
We sculpt a mushroom leg from plasticine and stick yellow plasticine on the lower part of the mushroom cap, exactly matching the shape of the hat.
Making with a needle a large number of small holes, like butter.
We attach the leg to the chestnut with plasticine or toothpicks.
The mushroom is ready.
Caterpillar or centipede

The simplest craft, it will fit even 3 summer babies.
The number of chestnuts is the length of your caterpillar. We fasten them together with plasticine or toothpicks, previously threaded holes.
We draw a muzzle and insert antennae from toothpicks or sticks.
For older children, we sculpt legs and arms with them.
Chestnut hedgehog - 4 options

with mushroom
Hedgehog from chestnut peel

From green chestnuts
We need to create a hedgehog craft: chestnut peel, chestnut or slightly greenish chestnut already in the peel, a marker and plasticine.
hedgehog standing
For those who want to make a hedgehog standing on its hind legs, we use similar materials, just think about how or by what means it will be attached to a table or other flat object.
snails

We sculpt snails from colored plasticine. We roll sausages and make them thinner at the end, and divide the second into 2 parts to make thin horns.
And the houses are our chestnuts. At will, you paint them with circles or not. Such a family is easy to make in a few minutes.
Basket
We cut out a basket from a large chestnut, suitable for crafts in the garden or to school, to fold tiny mushrooms.
The second option is to glue the chestnuts in the form of a basket, it is better to fasten the chestnuts to each other with a hot gun or instant glue. For decor, use cones or other natural materials.
2 variants of chestnut turtles
Needed: chestnut peel with cut needles, plasticine, scissors.
Armor
We cover the prepared peel from half of the chestnut together with the chestnut itself with green specks of plasticine or use scissors to make oval rounds if there is only one chestnut.
We cut only the brown peel with scissors with curved ends.
Head
We roll a plasticine sausage of medium thickness, bend 1 side of it and slightly thicken it, giving the shape of a turtle's head.
Slightly flattening it on the edge, if the neck turned out to be very long, remove a piece of sausage.
On the head with a toothpick or a needle we make eyes and a mouth. Option 2 eyes are made of white with black or green plasticine.
We fasten the head to the body, pressing down on the chestnut itself from the back side, where the legs are.
Turtle legs
These can be plasticine barrels made from thickened sausages. We need to form 4 identical ones. In order for the turtle to stand, check the soles, they must be even.
Draw the turtle's fingers with a needle or a toothpick, if there is cumin, we make nails from them.
Tail
The tail is made of plasticine. Roll out the sausage and thin towards the end.
We attach the legs molded from plasticine, head and tail to the body. If they do not hold well, then use toothpicks for better fastening or a hot gun, then the turtle will turn out to be non-separable.
If there is little plasticine, and there are a lot of chestnuts, then we make a turtle from chestnuts like this:
On the chestnut we scratch the shell with a compass or any other sharp object.
We make legs from other small chestnuts or cut them out of chestnuts.
Bug
Materials needed: 2 chestnuts, chestnut peel without needles, marker or varnish, sticks for mustaches and legs.
How to make a cat
You will need: chestnuts, plasticine, a modeling board and paste or a needle, a little bit of mustache fishing line.

What other animals or insects are easy to make from chestnuts?
Spider
horses
Dog
Fox
Bird
Hare
little people
Gluttons or alien creatures
Elephant
pigs
ladybugs
House
beads
Bracelet
What crafts from chestnuts on the theme of autumn can be made for the garden and school? (photo)

Come up with a plot. For example: from a cartoon Winnie the Pooh, Owl and Piglet pick mushrooms in a clearing, 3 pigs hide in a chestnut house from an evil wolf, a hedgehog picks mushrooms and apples in a clearing, Tsokotukha Fly and Villain Spider. Remember fairy tales or cartoons about autumn and heroes, it will be much easier for you to create a picture.
For ready-made heroes, it remains to make a clearing, a house or other decorations. Often in kindergartens or schools they suggest plots or main characters.
Use such natural materials in creating crafts: acorns, leaves, mountain ash, sticks.
It's easy to create a whole kindergarten or a school of chestnut men at the blackboard and at their desks. If you want to fantasize without limits, then flying saucers with gluttons are perfect for this!
For school, make a clearing with mushrooms or an autumn forest of leaves, cones, chestnuts.
What crafts from chestnuts to do for the autumn holiday with your own hands?
How to imagine autumn? Collect leaves, twigs, chestnuts and acorns. Come up with a composition, for example, a house and a clearing.
The house (description above) of hedgehogs and the family of hedgehogs in the clearing. Make hedgehogs, as described in the article, adding rowan berries to them on needles.
Bears or other forest dwellers can also live in this house.
DIY planet in autumn
Find a polystyrene in the shape of a hemisphere and paste over it with leaves and decorate with twigs. Add other gifts of autumn: acorns, rowan, nuts, chestnuts and cones. Call the craft “Autumn has come to the planet” and come up with a story or take a poem about autumn. The following videos show options for crafts for kindergarten and school, look and take interesting ideas note to yourself.
We hope that it will become much easier for you to make chestnut crafts after reading our article and watching video tutorials. It's time to start creating crafts from chestnuts, we wish you good luck in such an interesting and creative process.
Looking for autumn crafts from chestnuts on the theme "Autumn" in a kindergarten or school? Or maybe you don’t know what to do with your child on the weekends? I propose to do with your own hands simple, but very interesting autumn compositions using natural materials.
Let's create a family of beetles in a forest clearing together. For this you will need:
- chestnuts of various sizes
- colored paper and cardboard for the base
- paints with a brush
- plasticine
- dried leaves.
Crafts from chestnuts on the theme "Autumn" for children - do it yourself
So, we will select the smallest and preferably flat samples from the stocks of chestnuts, glue plasticine eyes and spouts on them. We got funny beetle heads. So far, there is nothing complicated in the work.

Preparing for the event, I found interesting information about beetles on the Internet in advance. The child enjoyed listening to the entertaining material.
For example, beetles are a fairly large group of organisms on Earth, which lives in almost every corner of our planet, with the exception of glaciers. The largest beetles in the world are the titan lumberjack, the hercules beetle and the stag-horned bigtooth. The length of the body of these insects reaches almost 17 cm. The smallest representative of the group is the featherwing, which was not destined to grow more than 4 mm.
It's time to do the body of our beetles. We select large chestnuts and with the help of pieces of plasticine we attach them to the heads.

Now organizing for Coleoptera forest clearing. We will plant a tree on a green sheet of colored paper, and around plasticine or PVA glue we will attach beetles. Our tree is real. This is a dried branch.

Take a brush in your hands, dip it in brown watercolor and draw six legs for each beetle. By the way, the structure of the legs of beetles is different and depends on the way of life. Scientists distinguish running, digging, swimming and other types of legs.

There are finishing touches left. We finish drawing two paws and continue the informative story.

There are many predators among beetles, but there are also individuals that feed on plants, flowers, roots, or sweet pollen. Predators prey on pupae of mosquitoes, ticks and larvae of other insects. Among the sweet tooth, one can separately distinguish a large goldfish, outwardly similar to sunflower seeds.
Our beetles do not belong to any of the species that exist in nature. Let's single them out in a separate group - chestnut insects.

Craft from chestnuts called "Beetles in autumn forest" can be considered completed. As decorative elements, we added dried green and yellow leaves to colored paper. In the background, they planted a Christmas tree in the form of a pine cone.
Beautiful autumn composition!
Photo ideas for autumn chestnut crafts


DIY crafts from chestnuts and plasticine

Do crafts from chestnuts The kids really like it, not only because of the end result. The fact is that chestnuts are so beautiful, so pleasant to the touch that working with them turns into a real pleasure. At the same time, while creating with a child, by all means praise all his successful actions, do not focus on failures, pay attention to the fact that with the help of the most trivial movements you will together create figures of various animals, insects, birds and people. Creating crafts with the help of such natural ingredients will allow the baby to see the beauty of nature and the unlimited possibilities that handmade opens up.
Crafts from chestnuts with your own hands
Bunny
To make a funny figurine, you will need to stock up on a couple of fruits, the smaller one will play the role of a bunny's head, the large one will be a calf. At the same time, keep in mind that the natural material must be fresh - only then will it be well pierced with toothpicks (they will be needed to attach other parts). However, you can also take dried specimens, only then mom or dad will have to make holes in them with an awl.
Insert a couple of toothpicks into the head and wrap plasticine around them to make ears. This measure is necessary, because voluminous plasticine parts themselves do not adhere very well to slippery chestnut surfaces. But you can try to stick the plasticine eyes, mouth and nose - they should not fall off.
Now go to the body - you will need to attach the tail and paws to it. Then, using half a toothpick, connect the head and body of the animal together. As a decor, you can also fashion a bright plasticine carrot for a bunny.
Make and - the child will certainly like it too.
birdie
Attach the eyes and beak to the chestnut-head of the bird, you can make them multi-colored - it will be more fun. Just like with a bunny, you will need to attach the bird's head to the body - for this you need to make holes with an awl in the appropriate places of the chestnut fruit. Connect them together with toothpicks. Now it remains only to make the wings.
If you wish, then from the plastic mass and dry twigs you can build a nest for the bird.

To make a horse, select large fruits. In the chestnut body, punch 5 holes with an awl - for the legs and for the head. Sharpen 4 matches and insert them into the leg holes. Do the same manipulations with the match for the head, only it will need to be sharpened on both sides. Connect the chestnut head and body.
The mane and tail are very easy to make - for this you will need to use woolen threads. Then they will need to be attached to the craft, wielding an awl.

A funny bug will turn out not only from the fruit, its peel will also be needed. Fasten the torso and head with a plastic mass. Make eyes using any suitable natural material, such as cereals. Legs and antennae are leaf petioles or thin twigs.
The kids will love it and - we bring to your attention a master class with step by step photos graphs.
A spider is also made very simply, only for its manufacture it will be necessary to take a couple of fruits already. Connect them in a way that is already familiar to you. Cut eight plastic tubes (you can just halve 4 pieces), put them on plasticine - these will be the legs. Don't forget to sculpt your eyes.

Collect fresh fruits, they should all be approximately the same size. Drill them through with a thick awl, but if you have a small drill, then by all means use it to make your work easier. You can also make holes with a nail, driving it with a hammer.
Prepare small wooden beads in advance. You can do nothing with them - the wooden texture looks unusually harmonious, or you can paint acrylic paints the color you want. After the acrylic has completely dried, collect the beads on the fishing line, alternating the "beads". Make a knot on the fishing line, and melt the ends, then they will not be untied. You can hang such decorative beads on the wall to create an autumn entourage in the apartment.
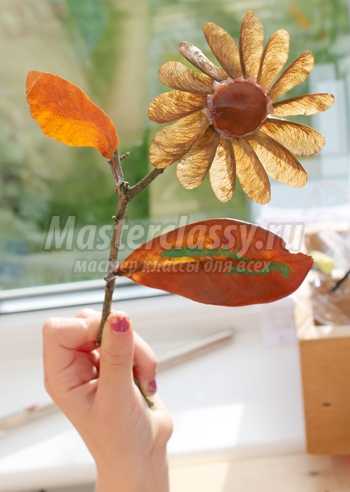
One more children's crafts from chestnuts and other natural material can be called a delightful flower. The middle chestnut with a glue gun will need to be attached to a branch of the desired shape. With the same tool, attach petals to the middle - maple lionfish, and leaves made from beautiful autumn leaves to the branch-stem.
Crafts from chestnuts with your own hands - photo:
Crafts from chestnuts and acorns
BearPut a small chestnut on a large chestnut - you get the body and head of a bear. You can use the same technique with toothpicks, or you can use some kind of plastic mass. Glue the ears to the head - a couple of tiny chestnuts.

Eyes for the bear can be made using two miniature buttons, roll up the nose and mouth using plasticine of the appropriate color. Attach to your head. Make paws for a bear cub very simply - put it on four acorn plushes, fixing it with plasticine.
If you would like to do crafts from cones and chestnuts, then you can plant a bear cub near a large pine cone, previously painted with green gouache. It turns out that the bear is sitting under the Christmas tree.
Cow
Our main material will act as the cow's body. For the legs, roll up four brown or black plasticine sausages, put the body on them. A thin plasticine sausage, fixed at the back, will imitate a ponytail. Attach a small plasticine cake cut with scissors to its tip.
A cow's head is an acorn without a hat, a pair of fashioned white horns, eyes and ears should be fixed on it. In place of the nose, a molded cake should flaunt - make two nostril holes in it. Attach the head to the body.
Mushrooms
Lay out the lid of the box autumn foliage- it can be both fresh and dried. Using plasticine, connect together an acorn without a plush and a chestnut. Choose acorns that are not very thick, so that as a result it looks like a mushroom. Glue a few blades of grass or leaves on the surface of the hat, this will help to achieve greater realism. Put man-made mushrooms on the lid-clearing - and here you have it crafts from chestnuts "Autumn", unusually beautiful and harmonious. Or you can put a cute animal on such a mushroom clearing.
Crafts from chestnuts - photo:

Make others too, because this time of year gives us a sea of natural materials and ideas for turning them into real handmade masterpieces.
Crafts from chestnuts on the theme of autumn - topiary
You can create a stunningly beautiful autumn tree with your own hands, and we will tell you what exactly should be done to achieve the goal. This will be a real highlight of your interior or an excellent gift for friends.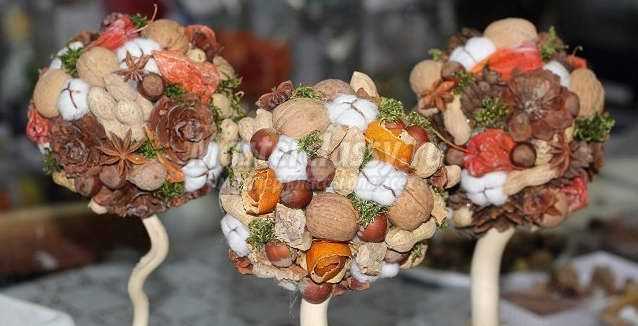
The basis of the craft will be a ball. You can use the most different materials For example, you can purchase a foam base from a craft store. We suggest you use the most common newspapers - they are quite inexpensive and are perfect for the workflow. Crumple them well and tie them with thread so that the newspapers keep their shape. The base ball should be tight, which is why it should be lightly smeared with glue. You can also mask the protruding pieces of newspaper sheets.
Put the base on the trunk. For the barrel, you can take both a wooden and a plastic stick. First, make an incision on the ball, through which you pierce the stick.
Pick up a pot for your topiary in advance - it can be ceramic, glass or plastic. Pour the gypsum solution inside, and when it begins to slowly harden, insert the trunk into the pot. Support the topiary until the plaster has completely set. If the container does not look very attractive, then now is the time to decorate it, for example, by wrapping it with twine or sticking rhinestones.
Sort your natural "treasury" by selecting flat chestnuts that will be more convenient to glue, in addition, they will look more attractive on the crown. Starting from the top, start gluing using glue gun. Try, of course, to glue the fruits as much as possible closer friend to a friend, but if there are gaps, then do not worry, because then they can be masked with sisal or tea. Tea or sisal is also useful for decorating a plaster in a pot.
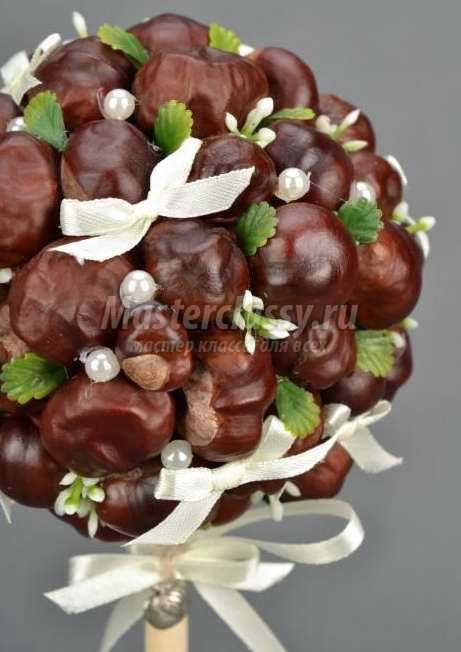
Do you want to make the topiary fragrant? Then, in between, you can put crushed vanilla sticks, aromatic spices or herbs, tea with fruit additives. Fragrant decor can crumble, that's why it needs to be fixed - sprinkle the "master" with odorless hairspray.
You can decorate the crown with whatever you like - bows, butterflies, sparkles, decorative ladybugs.
In order for the "lifetime" of the topiary to be longer, you need to hold the chestnut fruits in a cool place after harvesting, this will allow them to dry naturally without excessive acceleration.

To decorate the interior, especially for Halloween, you can also use a woolen web. The craft is so simple that even a three-year-old under the supervision of an adult can try to do it. To make it, six holes should be made in a large chestnut tree, insert a thick branch 10 cm long into each hole, putting it on glue for greater reliability. Wait for it to dry.
Tie the end of the woolen yarn of your favorite color to the first stick, then stretch the thread and wrap it around the next stick. Continue to do these actions again and again with all the "rays" of the web. If you want to change the color, then just cut the thread and tie a different color to it. When you finish the web, then simply tie the thread to the last stick, leave the tip of the required length for hanging and cut off.

As you can see, there are many ideas that allow you to decorate your home and create a great mood, do it quickly crafts from chestnut cones, various animals and autumn compositions, because the service life of such natural material is not very long.
Looking forward to the end summer holidays, most children are a little upset: their fun adventures will have to be postponed until the end school year. However, autumn is just as beautiful as the warmest time of the year. She presents her amazing gifts to the children - you just need to be able to see them! Go to the forest in September-October, stop for a minute and look around. What beauty surrounds you! A carpet of their multi-colored leaves, under which one can see acorns and cones that have fallen from oak trees, pines and firs, fancy snags, dry branches. All this can be taken home to later make toy animals, Christmas gifts, gifts for friends. However, crafts from chestnuts are the easiest and most interesting. Even children 3-5 years old, not to mention older preschoolers and school students, can easily make them with their own hands. After reviewing the photos and videos, having studied the master classes presented below, they will easily make unusual products from natural materials, take part in competitions of the same works, and maybe even win them, winning an unexpected prize!
DIY crafts from chestnuts on the theme of Autumn - Examples with photos and videos
You can make a lot of children's crafts from chestnuts with your own hands. The most important thing in the manufacture of such works is to give free rein to imagination, well, and our photos and videos with examples of children's work will help with this!
Ready-made crafts from chestnuts - Examples of work on the theme of Autumn
It is impossible to list everything that you can do with your own hands from the most ordinary chestnuts. These are vases with leaves and dried flowers on the theme "Autumn", and cartoon characters, and houses for dolls. The smallest ones can make hedgehogs, caterpillars, Smeshariki. Look at the finished children's work and you will have your own ideas for crafts from these natural materials.
Such a topiary can be made by older children - a thin birch or aspen log will become the trunk of a miracle-dever, and chestnuts, leaves and flowers will become a crown.

How to make do-it-yourself crafts from chestnuts for kindergarten
Ideas for crafts from chestnuts should be suggested to children by adults. They can also help them make hedgehogs, bunnies, squirrels and other cute animals.
Master class for kindergarten on making crafts from chestnuts "Hedgehog" - Video and photo

To make a Hedgehog from chestnuts, you will need other materials. The teacher will help you find them. She must first show the children of the kindergarten a master class, explaining in detail each step.
So take:
- A piece of foam the size of half a notebook sheet;
- multicolored Maple leaves;
- chestnuts;
- Clusters of rowan;
- Plasticine;
- Black sponge;
- Two black beads;
- Cardboard;
- brown corrugated paper;
- Glue "Moment".
Start caring with the basics of the craft.

Crafts for children from chestnuts and acorns on an autumn theme
Most best crafts on autumn theme obtained from acorns and chestnuts. These are universal natural materials - they do not deteriorate over time, it is easy to work with them even for children who have not yet gone to senior group kindergarten, they look great in the home interior.
Photo crafts on the autumn theme - How to work with acorns and chestnuts

In the manufacture of crafts on the autumn theme, chestnuts and acorns are often used. This natural material is easy to handle, stored for a long time and does not deteriorate if properly processed - preliminary cleaning from dirt, earth, dust and drying. In the photo you see how fantasy helped children create from natural materials amazing crafts.
Remembering a ripe fragrant summer berry, autumn acorns can be turned into strawberries! All you need is paint and a brush!

From the "lids" of acorns, you can easily make a tea set for a doll.

Plant mushrooms from chestnuts and acorns on the moss - such crafts look like real butterflies!

And this strange hedgehog has already found fresh mushrooms with acorn stalks somewhere and is in a hurry to hide them in a secluded place.

A photo of this excellent children's collection will tell you what kind of crafts a child can make.

Crafts from chestnuts and cones for a school competition
In autumn, schools constantly organize competitions for children's crafts made from natural materials. The most creative guys create real works of art from chestnuts and cones - large fir trees, new Year decoration, flower baskets, home decor, photo and picture frames, etc.


How to Win the School Craft Competition - Chestnut Bone Work Ideas

It is not easy to win a school competition for crafts made from natural materials - modern children have a well-developed imagination, most of them parents help to make works from cones and chestnuts. And yet it is possible to get the coveted first place! Great idea- big wall panel or a composition on the theme of Russians folk tales. The larger and more original the finished product is, the more chances for its author to win. Pay attention to the photo: when working with natural material, children additionally use beads, rhinestones, paints, varnishes, plasticine.

simple crafts look no worse than the most complex compositions. For example, this pig-like hedgehog looks so cute!

From ordinary fir cones, twine and plastic boxes from chocolate Kinder Surprises, you get a wonderful easter decor!

These crafts have every chance to win the competition of children's works!


Crafts with chestnuts and leaves - Master class with video and photo
Chestnuts and colorful leaves make the most unusual crafts. The ideas of such work on the Internet are often shared by experienced labor teachers and leaders of children's creativity circles. They publish master classes on making works from natural materials on the pages of their websites and blogs, explaining each step with the help of a photo or video.
Craft from chestnuts "Santa Claus and Snow Maiden" - Master class with photo

Summer has flown by, autumn has come, you look - and winter-winter will come soon! For her meeting, you can prepare interesting decorations and make home decor. From chestnuts and cones, for example, Santa Claus and the Snow Maiden can turn out.
For crafts you will need:
- Watercolor paints and brush;
- Glue;
- chestnuts;
- Cotton wool;
- Plasticine;
- Matches;
- Cotton buds;
- Glitter nail polish;
- Cones.

Craft from leaves and cones "Wonder Tree" ― Master class with photo

To make a magic tree, you will need a lot of decor, but the main decoration of the craft will be the leaves.
Tools and materials will serve you:
- Planter or vase;
- tree branch;
- Basis for crafts;
- Newspaper;
- Glue;
- Leaves;
- cones;
- Decor.
- Stick a strong branch or sushi stick into the base for the craft.
- Roll a ball out of the newspaper, wrap it with thread, fix it with glue and put it on the "trunk" of the tree.
- Paste the "crown" of the tree with cones, leaves, beads. Color them the way your imagination tells you.
- Decorate the craft.

Crafts with chestnuts for children 3-5 years old
Chestnuts are the most versatile craft material. Using it, you can make funny animals, fairy-tale characters, original bouquets, magic trees and much more. To fasten chestnuts, children 3-5 years old use plasticine.
What can be done from chestnuts for children 3-5 years old
Making crafts from chestnuts is a creative process that is interesting even for kids 3-5 years old. Working with this material and plasticine details improves fine motor skills hands and develops the imagination.
Even the smallest ones can easily make this cute hedgehog - you just need to prepare plasticine and Christmas or pine needles.

But the "chestnut" caterpillar, quickly sorting through its forty legs - it is in a hurry to feast on the leaves that have not yet turned yellow.

Making crafts from chestnuts, leaves, cones and acorns, kids 3-5 years old who attend kindergarten develop fine motor skills of their hands. Older children, schoolchildren, can already make large panels and home decor on the theme “Autumn” from these natural materials. You will find examples of such works in the photo and video in the article.


