DIY crafts for Mother's Day. Do-it-yourself gift for mom - original surprises for Mother's Day
For each of us, mother is the closest, dearest, native person, ready to tirelessly help, love and care. Certainly, the best gift every mother in holidays it will be the one that the child was able to make himself, as these crafts for mom with their own hands convey all the children's love and gratitude. Let's see how you can make your own beautiful compositions. Perhaps these will be Original gifts made from natural raw materials or do-it-yourself crafts from improvised materials. We have tried to collect different ways, designed for both the smallest craftsmen, and for older people.
Crafts for Mother's Day with your own hands from fabric
Wonderful bouquets, as well as compositions, will be obtained from fabric flowers. Moreover, a little material is required, so there is no need to buy cuts - there will certainly be small flaps at home. With their help, for example, you can sew voluminous crafts for Mother's Day with your own hands. For such work, you will additionally need a synthetic winterizer filler (cotton wool), a bending strong wire that will hold the stem.
There are more simple options suitable for younger children school age- do-it-yourself applique crafts from the material using pieces of felt. Replace this fabric with thick dishwashing napkins. Flowers are cut out of them, then glued onto cardboard. The middle is decorated with a button.


Crafts for mom on Mother's Day with their own hands from napkins
The most diverse different crafts for a mother with your own hands, try making it with simple multi-colored napkins. This malleable material makes it possible to make beautiful carnations, roses and other flowers.
Mom will surely be pleased with an elegant heart card with the palm of her child. To decorate it, you need to cut out a blank-heart from cardboard, glue a loop to it. Then, from white and red napkins we roll up small balls (they should be fluffy). The child’s palm should be circled on cardboard, smeared with glue, tightly (without gaps) glue white lumps to it, and paste over the rest of the postcard in red. On the reverse side, you can leave congratulations-wishes.
Such a do-it-yourself craft for mom on Mother's Day will always remind her of what kind of baby her grown-up child once was.


Children's crafts for Mother's Day from pompoms and cotton pads
Learning how to make pom-poms, according to step by step instructions articles, form from them a variety of lush and soft bouquets. At the same time, it is better to choose woolen threads for making pompoms so that they create more voluminous balls. Crafts from artificial flowers with their own hands are often formed using wire in the form of stems, which are well “disguised” by winding with green thread.
Cotton pads are a simple, convenient, affordable material from which you can also make flowers, as shown in the photographs of our catalog. If necessary, they are painted in different colors.


Mother's Day: DIY crafts for kindergarten
Often, various exhibitions are held in children's institutions, and, sometimes, matinees for the holiday of mothers. Various crafts for Mother's Day with their own hands, children do under the guidance of educators or on their own. For example, a bouquet of children's hands or falling raindrops look very touching, each of which contains a photograph of a child.
When decorating a group or hall for a Mother's Day matinee, do-it-yourself crafts for kindergarten can be quite large, such as garlands of multi-colored paper maple leaves. Separate elements were made by all the children of the kindergarten, and the teachers assembled very beautiful “curtains” from them.


Mother's Day: DIY Paper Crafts
Colored paper, as well as cardboard, are very often used in children's art, since working with them is quite simple. By following the instructions in the photos of our article, you can learn it yourself, and you can also show your child how to make beautiful flowers from paper in the way of origami. On Mother's Day, do-it-yourself paper crafts are made in the form of original greeting cards, and a cute composition of birds will undoubtedly touch any mother.


Crafts-gifts with their own hands from natural material
Using natural resources, it is not difficult to create a wide variety of crafts from autumn materials with your own hands. Walking on the street with a child, pick up twigs, acorns, cones, fallen bright multi-colored foliage for creativity. In addition, sunflower seeds, pumpkin seeds, and other natural raw materials are often used.
We tried to present wonderful crafts-gifts with our own hands in the article. For example, a basket of cones. It is quite easy to make it: you will additionally need a plastic bucket, hot glue, with which the cones will be attached. It is also easy to form a basket using a wire that connects the cones into one ensemble.


Read also: DIY crafts from improvised means - 50 ideas for creating jewelry
Crafts from natural material by the hands of a child
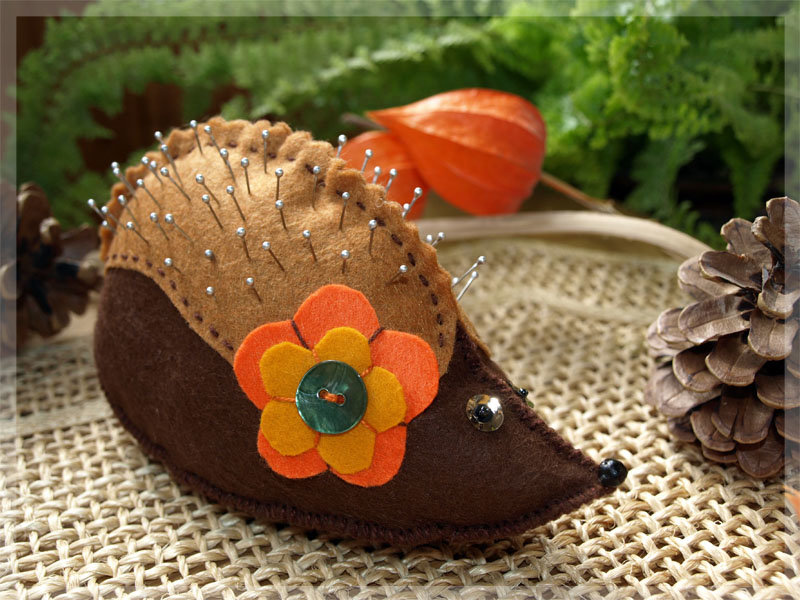
If a child wants to design something on his own, without the help of adults, tell him the option with the application. Pictures can be created using beautiful autumn leaves. craft from natural material the hands of a child will always be distinguished by individuality, since children do not like to do anything according to a pattern. Funny bugs, squirrels, fish, hedgehogs - it's all within the power to make even the smallest.
Older kids will be interested autumn crafts from natural material with their own hands in the form of a bouquet of maple leaves turned into roses with the help of simple manipulations. Original little men, animals can be formed using chestnuts, acorns. Give plasticine to little craftsmen to fasten the parts, and older children can use an awl, making holes for legs and handles.


DIY flower crafts
Wonderful compositions and whole toys are created using fresh flowers. Crafts from flowers with their own hands have different shapes. A simpler option that a child of primary school age can do is stick a photo of his mother on cardboard, and decorate his hair with buds of small flowers.
If you need to decorate a small bouquet beautifully, make a cardboard form for it in the form, for example, of a cheerful bee (see photo below). Such crafts-gifts with their own hands, will certainly please mom.
A more complicated way, but quite affordable, is to form a toy. Then you will need a “floristic sponge” that forms the base, wires or skewers for fastening parts. From the sponge you need to cut out parts of the body, moisten, let the water drain. We fasten the wire together. To keep flower crafts with your own hands as long as possible, cut the flower buds obliquely. Then tightly, without gaps, we insert the flowers. Eyes, nose, mouth are made of cardboard.


DIY crafts for mom for other holidays
In addition to the symbolic mother's holiday, there are a couple more days a year when children do their best to make soulful crafts-gifts for their mothers - this is March 8th, as well as mother's birthday. In addition to various artificial or natural bouquets, it is worth decorating for the International women's day postcard in the form of a figure eight. It should be done in gentle colors, adding paper flowers, congratulations.


DIY crafts for mom for her birthday should be made more symbolic, for example, as shown in the photo, an original cake decorated with fresh flowers. Those who do not have the opportunity to get them can cut flowers from colored paper. In this case, the base should be made from a newspaper: “crumple” the sheets, form a shape, then tie with a thread. Finished construction cover with flowers, planting them tightly to each other. Decorative candles will successfully crown such a composition.

In conclusion, I would like to say that any children's crafts for the mother with their own hands will be the most expensive, beautiful, touching. They will definitely create mom real holiday and good mood.


Hello. You all know that it is always nice to receive gifts for any occasion. And if they are still from our kids, but made with their own hands, then they simply have no price. Any mother, and any father, always enjoy the creativity of their kids, and this is an indisputable fact.
Therefore, on the eve of the upcoming Mother's Day holiday, I decided to prepare a special collection that contains different ideas for making children's crafts for this event.
Jobs can be done by kids different ages starting from junior group kindergarten through elementary school. Of course, adult cooperation will be required. And since this will be a surprise for mom, grandparents and dads, educators and teachers should come to the rescue. So dear adults, let's all surprise our most beloved person on earth together.
For those who have forgotten, let me remind you that this special holiday is celebrated on the last day of autumn. Therefore, do not forget to choose and make a gift with your child in advance, and also learn to express all your love and gratitude to your mother.
Today, first of all, I will focus on step-by-step processes production of works. Also, I will not leave the ready-made photo options without attention, and will provide you with a bunch of interesting and original ideas.
If suddenly, you don’t like anything (although I doubt it), then go to the article on the topic of manufacturing. There is also a cool selection of homemade presents for our mothers.
We will start with products that are within the power of not only older children, but also kids. I dedicate this section to kindergarten. You can create and craft from any material, be it plasticine, paper, etc.
Bouquet of multi-colored palms (for the younger group)

To make such a mental work, you will need plain A4 white paper, paints, water and brushes.
Now make blanks on a white sheet, just draw green stems and “tie” them with a blue ribbon. With a child, paint his palms with any color. Then help him make prints on the twigs. That's all, a chic bouquet is ready!
Also invite the kids to simply mold a gift. Here's what can come out of this idea.

Even with younger preschoolers, you can make greeting cards.
Postcard with balloons
Choose a photo of your son or daughter and cut it out. With a child, inflate small balloons, tie with multi-colored woolen threads. At the same time, leave long ends. On a white sheet of paper, glue colored paper, slightly smaller than white. Next, glue the photo and balloons. Such a present looks very impressive!

Postcard "Colorful buttons"
Well, this is the easiest option. Ask your child to draw stems or print them on paper in advance. Then choose multi-colored buttons, you can have different sizes, and glue them. Behind help write a congratulation.

with the guys in middle group, you can create such charming butterflies.

First, paint the paper with different colors from light to dark. While the base is drying from colored paper, fold the butterflies according to the diagram below.

Well, then glue them on a dried base and complete everything with a twig and leaves, which can also be made of paper or drawn.
An interesting job that requires artistic skills. Ask the children to draw a portrait of their mother. And then all together make frames.

For senior And preparatory group options are a little more complicated.
For example, you can make such ekibanas. The stand will be corks from plastic bottles. The tree itself is a wooden popsicle stick. Leaves cut out of paper in the form of hearts different sizes. Glue them together, and then glue on a stick.

A beautiful bouquet is obtained from ordinary cotton pads. Plus, use the quilling technique to decorate.

In this version, you will have to try and cut out the baskets. Make flowers together in any way known to you. We have already talked about how to make tulips. If you haven't read the article, be sure to check it out here.

Of course, flowers are a frequent gift. Try to create a homemade bouquet.

flower vase
You will need: green paper, napkins or corrugated paper, scissors, glue.

Manufacturing process:
1. Take a sheet of green paper and fold it in half. Step back from the bottom about 3 cm and draw a horizontal line with a pencil. At the top, swipe parallel lines in the range of 1-1.5 cm.

2. The resulting parallel lines must be cut to a horizontal line not reaching 3 cm from the edge.

3. Unfold the slit sheet.

4. Turn the sheet inside out with the other side and fold not exactly edge to edge, but retreating 1 cm.

5. After that, coat with glue and glue.

6. When the paper sticks together well, roll the workpiece into a tube.

7. It turned out a stable vase with petals.

8. Make flowers from a napkin or corrugated paper, as shown in the photo.

9. Glue the finished flowers to the stems.

10. You can decorate the resulting bouquet to your liking, for example, glue sequins or tie with a satin ribbon.

You can also use the idea of decorating pebbles. Paint them with paint, glue felt hearts on top and the souvenir is ready.

Or plasticine, beloved by all children. It will help to create whole pictures.

And I also liked these beads. Mom will definitely be delighted!

DIY crafts for Mother's Day in elementary school
very interesting and creative craft in the form of a fish, made using the technique of appliqué and trimming. Look how lovely.
Rybka

You will need: white cardboard sheet, red cardboard sheet, bright tinted or colored paper, pencil and eraser, glue.
Work process:
1. Take a white sheet of cardboard and draw a fish on it. Cut it out.

2. Make fins and a tail out of red cardboard: draw and cut out.

3. Cut out thin strips from tinted paper. These will be scales.

4. Now fold each strip in half and connect, fixing with glue. Get "droplets".

5. Glue these "flakes" following the drawn line.

6. Fill in the entire body of the fish, while glue each next edge under the previous one.

7. Take the paper from which the muzzle will be made. It can be peach, red or White color. Cut it into small squares. And using the end of a pencil, crush them.

8. Then glue all the details.

9. When filling in the muzzle, make sure that there is no empty space between the paper.

10. After the work done, glue the fins and tail. The gift is ready.

You can also make a vase from a bottle and flowers from any material at hand.

Or, for example, make such a sweet composition. It is done in an elementary way.

And for those who like to work with threads, offer to do some needlework and make a real jewelry box.
If mom is a fashionista, then she will definitely like the next work in the form of a stylish handbag.

Here is another version of a homemade vase. Everything is simple.

Or, for example, girls can sew needle beds. Always a necessary thing in every home.
For lovers of beading, an option with a bracelet. Here is what it looks like with the diagram.

I also found a cool idea with a pattern on a candle. I think it will be very nice to receive such a gift, and then use it.

Take baking paper and draw a pattern on it. Just remember that it will be transferred to the candle in a mirror image.

Then attach the pattern to a thick candle and fix it. Next, treat the candle with hot air, such as a hairdryer. Beautiful candles are ready.

And don't forget about everyone's favorite postcards.

And from a simple jar, try to make a unique vase.


Simple crafts for mom from colored and corrugated paper
And now I want to offer you products that can be made from plain paper or cardboard. For example, you can make a souvenir in the form of a radiant sun.
Sun

You will need: colored paper, glue, scissors, pencil, stick (wooden skewer), felt-tip pens.

Manufacturing process:
1. Cut out two large circle and one small one. Next, take yellow paper, draw lines at a distance of one cm.

2. Start folding the workpiece like a fan.

3. Then cut the end at an angle.

4. Make another second "fan" and connect them together with glue.

5. From another color, do the same as from yellow paper.

6. Connect all the received parts in a circle, firmly gluing them with glue.

7. Hide the stick in one of the cells. Glue it on too.

8. Draw a face on a small circle.

9. Glue it on the big circle. Glue the muzzle on the front side, and the second large circle on the wrong side. Decorate the sun as you wish.
I also want to suggest making a shoe with a sweet surprise inside. For the product, it is better to take thick paper or colored cardboard.

Print and cut out the template.

Bend and glue the parts along the dotted lines.


Decorate the shoe. And inside put a transparent bag of organza with marmalade.

Here is an idea with a beautiful panel of paper plates.

Well, from corrugated paper, for example, you can make a candy-bouquet composition.

Or create these beautiful flowers.

And how do you like such a touching composition in the form of a heart?

Of course, any flowers look very impressive from corrugated paper, so be creative and fantasize. I suggest making a very simple craft that even kids can handle.
flower for mom

You will need: corrugated paper, scissors, glue, disposable spoons and a cup, cotton pad, paints, brush.
Manufacturing process:
1. Fold the crepe paper or tissue paper several times. Attach a spoon to it and draw a petal a little larger than the spoon itself. Cut out the petals.

2. Glue the petals to the spoon.

3. Make a small ball out of a cotton pad or cotton wool. This is the center of the flower. Glue it on. You can also decorate it with glitter.

4. Make a stand out of a plastic cup. You can leave it as it is, or paint over any color with paint. Also paint the remaining white part of the spoon in green color to make a stem. Turn the cup upside down and carefully make a cut. Insert the finished flower into it.
Master class on making cards for Mother's Day + templates
Well, as promised, I throw you a couple of templates for creating postcards on your own. Print them out for the kids and they'll love to color them!


DIY crafts for mom from cotton pads, napkins and pasta
Now I propose another very interesting master Class. In it, I will show how you can make a touching craft from ordinary paper napkins in the form of a heart.
congratulatory heart

You will need: a sheet of red cardboard; stationery glue; pencil; paper napkins (pink and white); narrow satin ribbon or braid; scissors; double sided tape; simple pencil; template in the shape of a child's palm; yellow colored paper; a sheet of white landscape paper.
Manufacturing process:
1. Draw a big heart on red cardboard and cut it out.

2. Now turn the heart over with the white side of the cardboard and circle the child's palm on it with a stencil.

3. Cut the napkins into 4 identical strips. Then cut each strip into squares about 3 by 3.

4. Roll the balls out of these squares, while not crushing the napkins much.

No need to wet wipes!

6. Make a loop out of the ribbon and glue it to the handle with double-sided tape.

7. Lubricate the remaining empty part of the heart with glue and tightly lay out pink lumps from napkins.

8. Make a flower out of plain white and colored paper and glue it on the side.
9. On the front side of the cardboard, that is, red, glue beautiful wish or a rhyme.

And more creative ideas:
- Postcard;

- Bouquets.


Callas from cotton pads

We will need: thick green paper; long green tubes for a cocktail; cotton buds; yellow gouache or watercolor; PVA glue; white cotton pads; beautiful tape.

Manufacturing process:
1. Take cotton swabs, paint one of the ends in yellow.

2. When the sticks are dry, take a cocktail tube and insert the stick into it so that the yellow part is visible. Attach a cotton pad to the tube, while making sure that the yellow stamen is in the middle. Twist the disc as shown in the photo and secure with glue at the base.

3. Make the desired number of colors in this way. Also, cut out petals from green thick paper.

4. Take your flowers and petals and wrap and tie them with ribbon.
See what beautiful bouquets you can still create!


Well, it remains for us to consider gifts that are made from pasta. It's actually not a hard job either. You need to come up with a composition, color the pasta and lay them out on the base. In general, look, choose and do not judge strictly).


In children's institutions, do not forget to make collective congratulations, for example, design a wall newspaper or make a group gift.


This concludes my writing. I think that I gave more than enough ideas for making crafts for my mother's holiday. Now it's up to you. Create with children and delight your beloved mothers.
DIY crafts for Mother's Day for a kindergarten or school are created from the most different materials, but the palm, nevertheless, belongs to colored paper and the most ordinary napkins. They make very simple children's applications, and original bouquets, and beautiful holiday cards. For preschoolers and children from grade 1, simple work options are selected that require a minimum of effort, and high school students are instructed to complete more intricate and unusual products.
We bring to your attention several workshops on making beautiful themed presents. Follow the step-by-step instructions, create small, bright masterpieces with your own hands and delight your loved ones with pleasant holiday gifts.
DIY crafts for Mother's Day from napkins in kindergarten - master class
This interesting master class tell you how to make your own kindergarten for Mother's Day, a beautiful and touching paper napkin craft. Having mastered the lesson, the kids will get an idea of \u200b\u200bnon-traditional ways of working with napkins, develop fine motor skills hands and learn accuracy, perseverance and patience. The finished craft will turn out to be very tender and attractive and will surely please a loved one on a holiday.
Necessary materials for crafts from napkins for Mother's Day
- red cardboard sheet
- stationery glue pencil
- paper napkins (pink and white)
- narrow satin ribbon or braid
- scissors
- double sided tape
- simple pencil
- pattern in the form of a child's palm
- yellow colored paper
- sheet of white landscape paper
Step-by-step instructions for DIY napkin crafts for Mother's Day
- On a sheet of red cardboard, draw a large heart by hand, and then carefully cut it out with scissors.

- Turn the heart over to you with the white side, attach the template of a child's hand to it and circle it with a simple pencil.

- Take a few white and pink napkins, and cut them into four identical strips. Then cut each strip with scissors into 3x3 cm squares.

- Roll balls-lumps out of napkin squares, trying not to press the paper too hard. The final round should be slightly fluffy, not hard. It is not necessary to wet the wipes with water during the manufacturing process.

- Carefully grease the drawn palm along the contour with glue and lay out with snow-white lumps. Then fill them with the same internal space. Lay the balls close to each other.

- When the palm is filled with balls, set the workpiece aside for a while so that everything sticks well. Then cut off a piece satin ribbon or braid of a suitable length and, using double-sided tape, glue the top to the heart. This is a hanging loop.

- Lubricate the empty surface of the heart from the outside with glue and lay out pink lumps from napkins. Move from the edges to the middle and lay out the lumps as much as possible closer friend to each other so that there is no gap between them. The balls adjacent to the white palm should be laid out especially carefully so as not to disturb the shape of the hand and fingers.

- Take a white sheet from a regular drawing album, draw a flower with petals on it with a pencil, cut it out with scissors, and glue a bright yellow eye in place of the middle. Twist the edges of the petals slightly and glue the chamomile to the heart.

- Glue a holiday poem handwritten or printed on a postcard onto the back of the product.

DIY crafts for grade 1 on Mother's Day - postcard "Loving Heart" made of paper in stages

In the 1st grade, for Mother's Day, you can make very beautiful and original greeting cards out of paper with your own hands. Children will cope with such work without any difficulties, and mothers will receive bright, spectacular and memorable presents from the kids on their wonderful holiday.
Necessary materials for making a DIY Mother's Day card
- A5 thick tinted paper
- scissors (stationery and curly)
- simple pencil
- corrugated paper
- stapler
- colored paper set
- set of colored viscose napkins
- PVA glue
Step-by-step instructions on how to make a do-it-yourself paper card for Mother's Day in grade 1

DIY crafts for Mother's Day - simple crafts for school

At school on Mother's Day, together with the children, you can make beautiful, but at the same time very simple crafts. To create a mini-present, you will need the most common materials and a very small amount of time. The finished work will look attractive, spectacular and catchy and will surely please mom on the day of the most tender, inspirational and touching holiday.
Materials needed for a simple Mother's Day craft
- tinted sheets of A5 paper
- set of children's colored paper
- simple pencil
- scissors
- narrow braid
- pearl beads
- glue "Moment"
Step-by-step instructions for making a simple paper craft for Mother's Day at school
- Bend the tinted sheets of A5 format in half, like a traditional folding postcard. Trim each piece around the edge with scissors so that it looks like a tea cup.
- From red and yellow colored paper, cut flowers in the shape of tulips and daisies with scissors.
- Cut long strips from green paper - these will be the stems of the future flower bouquet.
- Glue a piece of white paper of the same shape onto the outer part of the blank for the postcard. From colored paper, cut out the outline of a tea cup 1 centimeter wide and glue it over a white background. From paper of the same color as the outline, cut out a flower and glue it to the outside of the card.
- Form flowers. To do this, glue red and yellow buds to the green stems, and attach a pearl bead to the place of the middle. Collect flowers in bouquets of three, glue together at the bottom of the stems and attach with glue to the inside of the card.
- Cut the braid into small pieces, tie in a bow and glue over the stems of the bouquet.
- On the second inner side of the postcard, write with your own hand or paste a ready-made beautiful congratulations for Mother's Day.
DIY crafts for Mother's Day from colored paper - a master class

The master class describes in detail the process of making spectacular and original children's crafts for Mother's Day with their own hands. step by step lesson explains how to turn sheets of plain colored paper into a bright, eye-catching and eye-catching bouquet. A child in kindergarten, a grade 1 student, and an older student can easily cope with the task. Well, for those who want to create more unusual work, we advise you to pay attention to another master class showing how to make beautiful postcard for Mother's Day from paper napkins familiar to all.
Necessary materials for a bouquet for Mother's Day made of paper
- colored paper set
- scissors
- simple pencil
- clip
Step-by-step instructions for making a DIY bouquet for Mother's Day from colored paper
- Fold a sheet of green A4 paper in half, but do not bend. Cut the sheet with scissors from the side of the fold, not reaching the edge of about 2-3 centimeters.
- Roll the cut sheet into a tube, fasten the edge with a paper clip so that it does not unfold, and fluff the strips on top.
- From paper bright colors cut flowers with petals of different shapes and sizes. Glue middle circles of contrasting tones into the center of each of them.
- Glue the finished flowers to the edges of the green stripes of grass and place the finished bouquet on a suitable stand.
Good afternoon, today we are unloading a large piggy bank of CRAFTS for Mother's Day (Mother's Day, or March 8). In this article, you can choose a beautiful craft and make it yourself as a gift to your mother. A variety of ways to make interesting (simple and original) crafts for mom - both from paper and with the help of paints, threads, and fantasy. We will show you unusual surprises for mom that you can make yourself or with the help of an adult (brother, sister, grandmother, father). Also, these crafts are suitable for a gift to Beloved Grandmother on women's holiday or for a birthday. Choose for yourself what you can and want. Beautiful and simple crafts with detailed explanations, with ready-made templates, assembly diagrams and different options design.
USEFUL crafts for mom.
Phone stand- will a good gift for Mom. This craft is done simply and quickly on the basis of a roll-sleeve from toilet paper. We simply make an incision in the side of the sleeve (the phone will be inserted there), and decorate the sleeve itself - with strips of patterned tape, or strips of colored paper. In order for the roll to stand and not roll, it needs legs. The role of the legs can be push pins (as in the photo below), or a thick copper wire threaded through holes and bent on four sides like ornate legs.

From a high roll you can make a cat stand - also for the phone. To do this, cut off the excess from the sleeve. We draw the cat's muzzle in front with a pencil, leave the vertical part of the sleeve untouched at the back (this is like a tail). We cover everything with yellow gouache. And be sure to sprinkle with hairspray (away from the fire !!!) - the yellow color will shine from the varnish and the craft for mom will become bright and glossy.

If you pre-collect sleeves and rolls from paper towels, then you can make a comfortable one for mom cosmetics organizer. A great craft that will take pride of place on mom's cosmetic table. All rolls needed decorate beautifully(with adhesive tape or strips of paper) and glue the edges too (cool if the edges are glued with thin velvet, leather or other textile material). Pasting is best done with hot glue from a gun - to get the hang of it, practice in advance on a piece of cardboard (to check how the glue lays down and how to smooth out the fabric).
Glue the decorated rolls on single base- a round from a pizza cardboard box (also pasted over with paper or adhesive film).

Can be made by hand board with note holders (photo below). Such a board can be attached to the tile in the kitchen using Velcro holders (thick sticky squares). But you can not spoil the wall with Velcro, but stick stronger magnets on the back of the board. So that the board is not heavy for magnets, it can be made not from wood, but from cardboard, which is pasted over with an adhesive film with a pattern imitating wood (decorative film is sold in the construction and furniture departments of the store).

Can magnetic note holder glue from thick felt (or even cardboard) and decorate it with an appliqué in the form of sweet cupcakes (as in the photo below). Mom will love this elegant and useful craft.

A very convenient material for such crafts is FORMIAM, a modern ornamental material similar to rubber sponge cardboard. It is sold in small leaves - you can buy exactly the color you want and make a craft using a DOUBLE-SIDED TAPE or glue from a hot gun. Very fast and convenient.

You can come up with your own original designs for useful crafts for mom. Scroll through the pictures, get inspired different ways and pull these images up to your idea and final idea.


Crafts for mom.
PHOTO GIFT.
There is nothing more precious for every mother than her beloved children. You can make a photo selection of happy smiles (print your successful family shots in the photo center) and create a warm craft for Mother's Day with your own hands.
Cut out a circle from a pizza carton. We cover it with yellow gouache, sculpt a nose from paper napkins soaked in PVA glue, dry it and also cover it with gouache (or you can draw a nose). Wooden clothespins are also painted yellow. We attach a photo to the clothespins and insert the clothespins with a slit along the edges of the cardboard sun.
MOM - YOU ARE LIKE THE SUN,
YOU WARM US WITH YOUR HEAT.

You can make a frame out of cardboard or wood, pull the ropes on the back wall of the frame. And on the ropes with the help of clothespins, attach a photo and beautiful flower hearts. Also a simple and quick craft for my mother's holiday.

You can cut the frames out of cardboard, wrap them with colored tape or paste over with paper (adhesive film) or ORDER in a framing workshop.
And you can also buy a beautiful foam plinth for ceilings (a penny price in hardware and decorating stores). And cut this plinth into pieces, glue the frame out of them and paint the foam plastic with gouache - as is done in the photo below.

Craft for mom PHOTO-BOX. Let me tell you in detail how to make a clamshell photo album as a gift for mom (see the picture below - put it in a box and glue the bottom edge of the cardboard accordion into the bottom of the box). We pull the upper part of the accordion and a whole series of photo-pictures and crafts rises. That is, somewhere a photo, and somewhere a craft - a flower or a heart or beautiful inscription. Below we will have templates for beautiful pictures , which you can color brightly and put as FRAMES in such a photo fold-out.
It is done simply - we cut the cardboard into identical squares (to fit the size inside the box) - we put the squares on the table one after the other butt-to-butt (leaving a gap of 2-3 mm) and glue the joint-slit with thin tape. We repeat the strip of adhesive tape on the reverse side, at the same joints. If you take patterned or colored tape, it will be more beautiful. Due to the fact that we left gaps between the squares of cardboard - such a strip of squares will be easily BENDED and the squares will fit into the accordion themselves.

You can do it without adhesive tape (as in the photo above). Also cut squares from any cardboard. Put a long strip of colored paper on the table - put squares smeared with glue on it - leaving a gap of 2-3 mm between them. And then cover this entire chain of squares with a second strip of paper on top.
PHOTO-COLLOW BED in the form of a camera- in the photo below, it is also easy to do. We cut a sheet of paper (pink or white does not matter) into strips. The width of the strip is for the size of your future box and for the size of the photos. And the length is VERY LARGE. Therefore, we will glue several strips together to get a long paper carpet. Such long paper carpets will need 2 pieces. And then from these paper strips we fold the Classic Children's Harmonica "Cross-to-Cross". Remember, as a child, they made paper accordion springs by throwing strips of paper cross-to-cross alternately? This is the same thing only on a large scale.

On paper spring blades paste photos and cute pictures. And we glue the spring into the box decorated under the photo apparatus. The decor imitating a camera is very easy to make. Round elements (lens and button) are rolls of colored corrugated cardboard. Any cardboard box paste over with colored paper, glue the lens and button on double-sided tape and here's a camera for you. Beautiful and, if you look, simple crafts for mom on her holiday.
And you can do it in a quick way for mom selfie photo frame with my beloved child. Here you need a sheet of cardboard and your imagination. The design of such a quick craft for mom can be anything - from gouache painting to the application of many hearts and flowers.


crafts for mom
WITH FLOWERS.
With your own hands you can make crafts-flowers for mom. These can be painted bouquets or flat applications cut out of paper and voluminous paper flowers in pots. We have already made many different articles on our website in which we gave detailed photo workshops to create simple paper flowers.
And here in this article we will see simple ideas for children - how to make Craft-Flowers for mom for a women's holiday with your own hands.
Beautiful application of daffodils - consists of a petal part, a calyx-middle and balls of stamens. Let's all do it.
- The petal part is done quickly and simply without a compass and a template. We just fold a square of yellow paper as well as cut it OBLIQUELY - unfold it and get the base of the flower.
- A cup is paper rosettes from sweets (rafaelok or others), you can buy such a set of 100 pieces of paper rosettes in a household magician. Rosettes are dipped in paint with the upper edge - and a bright rim is obtained in a circle.
- Stamens are balls of a yellow napkin, or balls of a white napkin, which were then painted in yellow gouache.

You can make a beautiful application - a DOUBLE-LAYER flower. Glue the bottom layer of the flower completely onto the cardboard base. And the top paper template we plant the flower only in the middle on the glue. And bend the petals up. It turns out a beautiful delicate craft for mom. simple idea for implementation in kindergarten, when you need to do a craft for mom on March 8 in a 15-minute lesson.

When children (in the middle group) learn to fold a fan from a sheet of paper, you can make such a flower craft for mom, as in the photo below. Apply glue to it heartfelt congratulations in verse and heart.

And of course, if you are doing crafts for mom on Spring Festival Eighth of March - then there is no way without yellow mimosas.
They can be made from plasticine, or yellow lumps of napkins. crepe paper for crafts is perfectly crumpled. To make the ball roll easier and not turn around, moisten it with PVA glue. So he will immediately fasten his form.


Beautiful flowers for mom - can be depicted in the form of a bouquet of hearts, clasped in the palm of your hand. Also simple beautiful craft March 8 is Mother's Day.

Bouquet of flowers-palms made of colored paper using glitter sprinkles on PVA glue.

Petals for the Mame flower can be made using the loop technique. Glue the ends of the strips of paper to form a loop. Lay the loops around the drawn circle on cardboard, cover with a round piece of paper or cardboard on top.

If the ends of the paper strips are glued from both ends - in the same direction - THEN YOU WILL GET A HEART. This can also become the basis for a flower craft. We make hearts paper strips and plant them like flowers in a pot.

You can come up with flowers in any technique - the main thing is bright colors and thick paper that will keep its shape well, the flower will stand firmly on the leg and reach for the sun - for mom.
Here below we see how three IDENTICAL DETAILS - folded in half and glued with barrels-blades to each other - we get a folding bed of three flower pages.

If you have hot glue at home, colored fluffy wire and straws for a cocktail, then you can make crafts for mom in the form of BRIGHT fluffy flowers. From can be stuck into cups from yogurt (put plasticine inside or salty dough so that the stick is straight).

And here's another awesome craft for mom. Calla flowers. It is very easy to make them with your own hands. The effect of beauty is created due to the NUMBER of flowers in the bouquet - here the eyes are beating with brightness and luxury. Your mother deserves luxury. Therefore, we will do such a craft for dear mommy.
Here, too, everything is simple and not scary. The middle of each flower is a thin strip of paper (1 cm) twisted around a toothpick or carnation into a tight roll-twist and glued at the tip so that the tail does not unwind.
And the petal halo is made from a large round piece of paper. Round paper disk FOLD IN HALF (received a half disk). And then in the middle of the fold line we put our middle washer AND PULL the half-disk down by the sharp ears, bending around the middle washer so that these ears meet at the bottom and glue them together there. Like dumplings all. Kruglyash in half and the ears met at the bottom.

And here is another simple flower craft for mom. Fold a wide strip of paper in half ALONG. We cut this strip into a fringe - but we chop the fringe from the side where line goes fold. Next, we wrap this fringed strip from one edge with a roll (like a carpet for dry cleaning) around a toothpick or carnation, to make it more convenient. And with our fingers we straighten the fringes in different directions - we get a magnificent panicle of a flower - as in the photo below. Let the kvozdik or wooden skewer on which we twisted the flower be smeared with glue in advance - and it will become the leg of the flower (it must be wrapped with a green ribbon of paper) and inserted into a jar of yogurt or into a piece of plasticine (dough) designed like a green meadow.

And here are flower crafts using the QVILLING technique. Here, all the elements are narrow strips of paper (1 cm thick) that are twisted into round twists, which are then squeezed with fingers until different curly shapes are obtained. From these forms add the elements of applications.


And here are some beautiful orchid flowers you can make for your beloved mother - from paper (thick) or from ornamental materials - such as felt or formiam.

crafts for mom
SWEET TREAT.
All mothers are big sweet tooth. Even those who are on a diet. Even if the diet is very strict. But chocolate is also a dietary product. So let me show you original ways give mom delicious chocolate joys in the form of a beautiful and simple craft for March 8 or Mother's Day.
Sweet idea #1 - ANGEL.
We will need a round candy in foil and preferably already in a paper outlet. From cardboard we cut out a round head and a round rim. Spread the rim with glue and sprinkle with sparkles (a jar of nail powder will do). We make a bow out of paper (there are many training lessons on it on YouTube) or we tie a bow from a ribbon.
Now we put all the details together - glue on a thick piece of cardboard. The length of the strip should be slightly elongated at the bottom - because the lower part of the strip will bend forward and this protruding part will lie inside the outlet, and a candy in foil will sit on top of it.

You can make such a sweet gift for your beloved mother from two strips of paper. We twist the first strip around a square candy, imitating the sides of a pink box.
We bend another long strip in half (the place of the fold is the sharp tip of the heart), and bend the two ends of this strip at the top downwards-inward and fasten it with a bracket or glue (this is the middle-hollow of the heart turned out).
We put a paper heart on the barrel - and inside on the side of the barrel we glue the candy wrapped with the first pink strip. And then add the decor as you like - a ribbon at the top, an appliqué with golden hearts on the side ... or something of your own.

You can put a candy or a mini-chocolate in such a PACKAGING WITH A BUTTERFLY. We cut a strip from ordinary cardboard - the width is the size of the candy, the length is such that it is enough to hug this candy on both sides and there are still ears on the top.
Now we cut the ends of this strip with scissors imitating a BUTTERFLY HALF. On one side we have half a butterfly and on the other too.
And now we cut the left butterfly top down to the middle - and the right butterfly on the contrary down up also to the middle. And this is what we did lock- which will be closed these cuts cling to each other, and the candy turns out to be closed on top, and the wings of the butterfly stick out to the sides.

Original crafts FROM SWEET MODULES - for triangular sweets.
But sweet crafts from triangular modules. A strip of paper folds into a triangle - the size of a pyramid candy. Put the candy inside. Truffles have just such a pyramidal shape. They can be removed from a bulky wrapper and wrapped in ordinary food foil for baking (look for mom in the kitchen drawer). We place each candy inside a triangular paper module - like in a frame.
Of the six such modules- you can collect a HEART. We glue the modules as in the photo below. With scissors we cut out a new long strip of paper (also compacted by bending along the entire length) - and wrap it in a smooth line around the craft - we form the silhouette of a HEART. If desired, add decorative pieces of an arrow - a tip on one side and a tail on the other side.

Important nuances.
- So that the candy does not fall out of its cell- put a piece of double-sided tape on the bottom of the cell and the candy will attach to it.
- And in order for the frame module to be strong, we fold it not from one layer of paper - but we compact our strip by cutting it 2-3 times wider than intended, and then fold it along - also 2 or 3 times. So she will be plump.
From the same modules you can assemble Handbag or shoe. Also an actual crown for a gift to mom with your own hands. All moms love shoes and bags.

It is possible to assemble a Cup from 8 modules. If you stick it on a round piece of cardboard, decorated with an openwork paper napkin, it turns out to be especially elegant. Nice and easy way to do unusual gift for mom with their own hands.

Handbag-box - with a treat for mom. This is also a beautiful craft made of cardboard or very thick paper. It's done very quickly. If you unwrapped a pie box at McDonald's, then you understand how simple it is. Now we ourselves will model such a box-bag and make a craft for mom on Mother's Day with our own hands.

Draw on a piece of cardboard three parallel lines(see drawing below). Further, from all sides between these lines, you need to draw EQUAL and SAME ARCs. There is an easy way to do this(without compass and fear). Place a round cup next to the drawing and circle a piece of the bottom of the cup with a pencil - get an even arc. Repeat this 8 times in the right places of our drawing. Draw an additional line on the side of the drawing - a ledge (the place for the future gluing of the box).
Now cut out the whole figure - and with sharp scissors we scratch the lines of the arcs or lines of the side folds of the box. This is necessary so that all lines bend easily when pressed with a finger. And assemble the box with your hands - the scratched lines will easily bend in the right directions and you will get the result as in the photo below. It remains to add glue at the junction of the sidewalls - but do not rush, we need the box to look like a handbag.

To make the box look like a handbag, we need to insert the patterned flip-over part of the bag into the place of gluing - right into the glue line (it can be cut out of a different color of cardboard and decorated with sparkles or a button). And insert the handle for the handbag there - we make it from a strip of paper bent in half lengthwise for strength. And all the crafts for mom are ready - you made it yourself. You can fold up the sides of the box and put candy, mini donuts, your favorite cookies, or a box of earrings that dad bought at the store.
If your mother loves to bake delicious treats for the whole family, then you can give her a symbol of a good cook hostess - a CAKE IN THE OVEN. Make a box out of white paper, decorate it like a gas stove and place a cupcake inside, real, from the store.

CLOTHING BOX with a sweet treat. Here's a great surprise gift for mom - and it's super easy to make yourself.
Mom gets a box in her hands. As soon as she removes the top cover, the side walls of the box FALL in different directions and we see all the beauty that you have hidden inside. The main gift can be in the center - and the side walls can contain additional gifts or postcards with good wishes for Mom.

The side walls can be equipped with Elastic Bands - and then you can put bags of coffee, tea, flat chocolates behind them.

This is how the assembly of the LID from such a folding box looks like.
And here is how the BOTTOM drawing with SLIDING WALLS looks like.
At once I will tell = YOUR SIZES can be ANY. The main thing to consider one prerequisite- the size of the central square bottom of the box and the size of the central square lid bottom— MUST BE THE SAME. Everything else can be even a meter, even a millimeter size.
In the diagram below, it is clear that the central square of the box is exactly the same as the central square on the lid below. And the sides can be of any height (according to the height of your gift inside) ... maybe you want to put a bottle of champagne there - then the height of the sides will be the height of the bottle.

Fantasize - decorate the sidewalls as you want .... choose the filling of the box according to the interests of your mother. And the size of the box is also customized to the size of the surprise.

By the way Beautiful design such a box OUTSIDE - it is framed like a cute pony.


And here is a master class on how to make a TWISTED HORN for a unicorn pony. Shiny fabric, a piece of puffy synthetic winterizer and a thread in a tight puff. Simple and fast. It remains to paint and sprinkle with sparkles.

Crafts-appliques
Delicious gift for mom.
Here simple application for mom - candy on a stick. If you do such crafts with children in kindergarten, then you will run into a problem. Children cannot lay the circles in a perfect circle - they crawl into an uneven round dance.
There is one trick how to help the child get the really correct arrangement of all the circles in the correct circle. Look at the photo below - you see a hole-dot in the center of the candy.

When the children do this craft, you draw a fat dot on an empty postcard (or rather, place a plasticine button). And give a clear instruction to the children - The circle should lie on the neighbor, so that the neighbor's barrel peeks out a little bit ... and the circle itself must ALWAYS TOUCH THE EDGE TO THE BUTTON POINT. And all the time while the children are pasting this application, walk between the rows of working kids and endlessly tambourine, “the neighbor looks out a little, the edge of the circle is moved to the button.” And let them also comment on their action - "the edge of the neighbor is a little bit visible, move the edge of the circle to the button itself." And then all the circles will fall into the correct common rainbow disk without climbing out of the edges and without violating the harmony of the form. As you understand, this task is for middle group or even senior group day garden.
And here is a craft for mom, which is within the power of KIDS. Simple dressy applique Ice cream.


You can make an application with a cup of tea from which steam comes out (made of white cotton wool). You can stick not the whole cup - but leave a place in the center that is not smeared with glue - then you get a pocket in which you can put a bag of dry tea ... or cookies ... or a note for mom.

And here is a craft for schoolchildren who already know how to write letters and words. Dish with muffin-postcards for mom. Draw an oval tray on a white sheet of paper. We fold the paper rectangles in half and draw cupcakes on them - cut them out - we get a folding cupcake (inside the cupcake we write a wish to mom). Paste cupcakes on a tray. Behind the tray, you need to make a figure of mom (this is not necessary, but possible). From colored paper we cut out the shoulders-mountain, a round head and a hairstyle to match the color of my mother's hair.

You can make a cup-pocket out of cardboard (as in the photo below). You need to take a cup template on the draft (this will be the back wall template - TEMPLATE No. 1).
And then draw the same copy template on the second sheet, and then cut this second copy template vertically in the center ... from top to bottom (but not reaching 1 cm to the bottom) and push the halves of the notch to the sides - so that there is a gap between them in 1- 2 cm. And circle such parted halves on a sheet of paper - we will get PATTERN No. 2 - it will be slightly wider than PATTERN No. 1.
And now if both templates are attached to each other - so that their left and right edges converge ... then the upper template will protrude upwards, and we will get a plump pocket - you can put something for mom in it - a tea bag or a flat chocolate bar.

By a similar principle, you can make more voluminous pockets-bags for delicious gift mom.

And you yourself can do for mom craft-cup, which stands on a saucer and does not fall. Due to the fact that the edges of the halves of the saucer overlap each other - on the glue ... Here is a diagram of the craft below that clearly explains everything.


A plastic cup can serve as an inspiration for creating a POTTY TEAPOT craft for your beloved mom. Look at the photo below - note that the teapot is DOUBLE - that is, it has two planes, front and back (both sides are painted with a felt-tip pen). The teapot stands on a bottom 2 cm wide. Both walls have cuts into which a plastic disposable cup is inserted. The planes of the teapot are glued together in the area of the tip of the spout, in the area of the lid and in the area of the handle.

You can draw any shape of the teapot yourself. Or you can use the template below as a basis for crafts. Do not forget that you need 2 such silhouettes, and that they are glued together by overlapping the BOTTOM PART - a strip of the bottom of one template is glued onto a strip of the bottom of the second template.

crafts for mom
IN THE FORM OF A HEART.
And in this article I will show some original and simple crafts for mom with a big heart. Here is the first one - bright, which everyone likes. Coloring book with 3D effect.
This does not require engineering thinking - everything is ridiculously simple.
STEP 1. Draw a heart on a sheet of paper - a large one almost on the entire sheet. To make it work out evenly, fold a draft sheet of paper in half - draw a half of a heart on it, cut it out with scissors, and unfold the halves - you get a symmetrical heart - the same on the left as on the right. We put this template on a sheet of paper and draw around the edges with a pencil so that the line can then be erased.
STEP 2. Now we take a ruler with a centimeter scale. We apply a ruler to the left edge of the sheet - and through each cm we put a point. We make the same points from the right edge of the sheet, also under the scale of the ruler.
STEP 3. Now we put the ruler horizontally - so that it lies at one end on the point of the left edge of the sheet, and with the other end on the point of the right edge of the sheet. And we draw lines from the left points to the right points - many many lines - BUT THE MAIN THING we draw the lines BYPASSING THE INTERNAL ZONE OF THE HEART, that is, the lines are not visible inside the heart ... and only outside the heart they are. As a result, we should get an empty white heart on a striped background.

STEP 4. Now we will connect the lines to the right of the heart with the lines to the left of the heart - but connect NOT IN A DIRECT ... BUT IN ARC ... We draw an arc at random - as the hand leads.
If you are afraid that you will get uneven arcs- there is an easier way: we take a plate, put it so that its edges touch the left line and a similar right line and draw an arc along the smooth edge of the plate ... and repeat this with all the lines. BUT PAY ATTENTION that in the area of the two tops of the heart, the lines slightly change their bends.
VOLUME PAPER HEART. Here you can make a simple craft for mom in the form of a voluminous beautiful heart at school or kindergarten, where each layer is slightly smaller than the previous one. And due to this, a gentle volume of crafts is created.

You can make a gift for mom in the form PUZZLE PICTURES(template below) paint over the puzzles with a pink felt-tip pen and on each you can write (kindness, tenderness, care, love, beauty, warmth, help, smile, family, pies, sweets, work, husband, son, daughter, cat, dog, grandmother, grandfather ...), and write large on top. MOM, EVERY PIECE OF YOUR HEART IS FILLED WITH WARMTH AND CARE FOR EVERYONE AROUND ... or something like that.

Here are some more simple and child-friendly crafts in the shape of a heart that you can give to mom. Suitable Ideas for school or kindergarten. The diagrams below can be enlarged, printed, or copied by placing a sheet of paper directly on a glowing computer monitor. To enlarge the image on the monitor, press the Ctrl key with one hand, and rotate the mouse wheel with the other hand (increase in one direction, decrease in the other).


Salt dough can also be a source for beautiful crafts for mom. Food coloring is great for coloring salt dough. bright color. We dry it in the room, it hardens and becomes a durable craft that can be stored for a long time and delight, give memories to your mother and the whole family.


In kindergarten, kids can make simple crafts in the form of palms. The palms must be laid so that they do not go beyond the heart drawn on paper. Then the lines are erased, but the bright palms remain. The craft is done for a long time ... but for love there is no need to rush.

For those who are in a hurry - here's a quick craft for mom - a bright patchwork heart made from scraps of paper.

You can take pictures of children ... Collect all the photos on one sheet, print and cut out. And then conduct a lesson on creating a beautiful greeting card for Mom.

Here is another beautiful craft for kids who want to congratulate their mother on Mother's Day - a heart decorated in the form of a berry with eyes and a smile.

DIY for Mom
FROM THREADS.
Here, to the delight of your mother, you can create a craft that will show your handicraft skills. Let dad pierce the holes, and with the help of the NEEDLER (not the needle), and the needle threader, thread the threads into all the holes. So you can not be afraid that you will prick yourself, and even the smallest ones can do this craft.

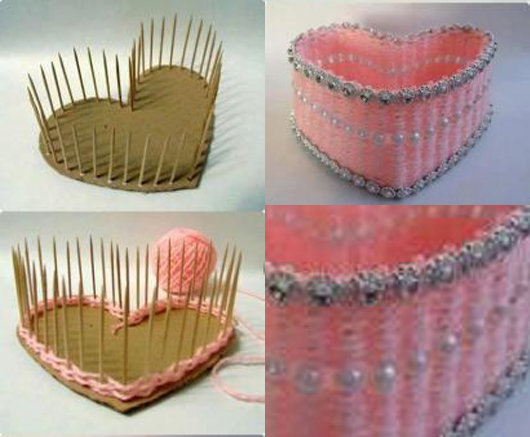
If a plastic cup cut - vertically into wide strips. Punch holes in the top of each with a hole punch. Then you can create a craft with your own hands - a basket of threads for mom.

And for those who have already learned how to knit simple double crochets and simple circles from columns - I give the idea to knit cozy slippers for mom. Everything is very simple here - enough photos to figure out how the whole work of knitting slippers looks like.

TEMPLATES for crafts-coloring
for Mother's Day.
You can just color a beautiful postcard for mom - get a PICTURE-GIFT. Let's choose what your mom loves.


Let's find coloring pages that can convey your love for mom.
The inscription - MOMMY, RELAX MORE. YOU ARE OUR PRINCESS.

Here is a puzzle card - for SON ...
Make an inscription: MOMMY, YOU HELP ME TO BE COMBINED.

Mom, you are the best in the world.

Heart coloring pages bright gift for Mom.


And you can also draw a portrait of mom YOURSELF - for example, inside the mirror ... LIGHT MY MIRROR TELL WHO IS ALL MILER AND BEAUTIFUL - MY MOTHER.

These are the ideas of crafts for mom you found on our website. Now you can do beautiful gift mom with your own hands and hand over your craft for Mother's Day. May this day be kind and warm.
Good ideas to you and beautiful incarnations from life.
Olga Klishevskaya, specially for the site
Mother's Day is gaining more and more popularity in our country. It has been celebrated relatively recently since 1998. And as a rule, exhibitions and competitions of children's crafts are arranged in a kindergarten or school. Of course, the competition is for children, but we adults have to help a little. So what can you think of for Mother's Day?
The first thing that comes to mind is an application card with a floral theme. But instead of flowers, you can make an imprint with a child's palm.


Application in the technique of quilling tode looks decent. Don't be afraid to experiment with paper strips - it's not as scary and difficult as it might seem at first glance.


And you can also make just such a shoe and fill it with flowers or sweets.


And you can also give a bouquet of sweets. Here is a very simple and accessible video tutorial
Do-it-yourself volumetric card for Mother's Day. For crafts, we take a box of sweets.

Girls can weave a bracelet for mom as a gift.

Give a candle with an original pattern on the candle, made by yourself. How to do


Craft Scarlet flower in quilling technique.

Postcard Happy Mother's Day by the hands of a child in kindergarten. Glue a colored sheet of light-colored paper onto a dense base. In the center we paste a white sheet for the congratulatory text. We decorate the opposite corners of the card with flowers cut out of paper, see photo

craft at school elementary grades, DIY card for Mother's Day. According to the template, cut out the vytynanka of the basket and glue it on a sheet of paper. Glue flowers to the basket.

Drawing Heart with flowers according to the template

Mom is the best close person for every person. It is very important to be able to take care of her from childhood and do something nice on Mother's Day.
You can make a variety of crafts, applications, do-it-yourself drawings with your child from paper / cardboard, plasticine, salt dough.
Flowers for mom can be made from paper with a child. To work, you need yellow napkins or corrugated paper, green paper for stems and leaves (in this example, office paper), scissors, glue.
We start work, prepare materials

We fold a sheet of green paper into two parts
Having folded the sheet in half, we retreat about 3 cm from the bottom and draw a horizontal strip with a pencil, draw parallel lines in the upper part in the range of 1 - 1.5 cm.

Where the lines were drawn, we make cuts to a straight line, not reaching 3 cm to the edge.

We unfold the sheet with cuts

Then we turn the sheet with the other side and fold it not exactly edge to edge, but retreating 1 cm.

After that, coat with glue, glue

When the glue grabs, we begin to roll up the tube

It turns out such a blank for the stem. It can be put on the table and it does not fall.


Flowers are glued to the branches in a row, some branches are left without buds.

We decorate the finished bouquet at will with sequins or tie it with a ribbon, you can make a flower arrangement in a pot (you need a jar of sour cream).

We carry out a variety of paper crafts for mom, look at a selection with flowers
A postcard for mom can be made as an application

Crafts from buttons
Postcard with butterflies


